The cast iron tee is one of the main elements of the sewer system.
It is an adapter that connects three pipes; by the way, one of them has a smaller diameter than the others.
This device is installed in places where the pipeline acquires several directions.
Many people wonder whether it is possible to replace a cast iron sewer tee? Practice shows that this can be done, but it is quite difficult with your own hands. Firstly, the technical process itself is quite complicated, and secondly, this type of repair of sewer pipes will require expensive tools. Well, in general, it is quite possible to replace this part of the system, because it is not cast together with the pipe.
This is what a cast iron tee looks like
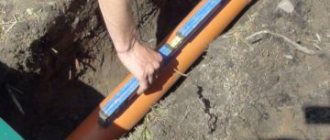
Replacing a tee using an angle grinder
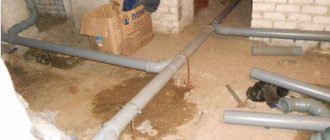
Dismantling cast iron sewer
Replacing an old pipeline is not an easy task, especially when it comes to cast iron. The method of connecting the pipes plays a decisive role in the labor intensity of the process. The set of tools that will be used also depends on this. So, in order to carry out a more or less accurate repair of the sewer system, or more precisely, its complete replacement, you will need:
- grinder with cutting and grinding discs included;
- blowtorch;
- hammer and screwdrivers of various lengths, thicknesses, crosspiece;
- pipe wrench and chisel.
To completely dismantle a cast iron sewer, you will also need a hammer drill, a knife, a steel wedge, a chisel, a pipe cutter, and a crowbar. Do not forget that the first step is to determine how to connect the elements of the sewer system.
Hammer and pipe cutter
Decorative apple tree
This tree can rightfully be called Russian sakura - it is magnificent during the flowering period, as it is dotted with a huge number of pink flowers, and when the time comes for the fruits to ripen and they acquire a red tint, perfectly combining with the color of the foliage, this small tree looks very impressive.
A decorative apple tree will help to place the necessary accents on the garden plot and even highlight a shaded corner.
It should be noted that this species stands out for its unpretentiousness, as well as resistance to adverse weather conditions. This tree is not afraid of severe frosts, so it can be grown even in very harsh climates.
Today, there are many varieties of ornamental apple trees that can rightfully occupy a central place in your garden plot. The color of the petals and leaves can be different, as well as the shape of the crown, therefore, before choosing one or another, you should carefully study all the varieties and characteristics of this tree.
Among the many varieties of ornamental apple trees, the following can be distinguished:
- Riverside, or weeping;
- Royal Beauty;
- Royalty;
- Nedzvetsky;
- Pioneer.
What to do if cast iron pipes are connected with sulfur
You can determine with what substance the pipeline was built using a blowtorch. If, when it is brought to the junction, the substance begins to melt, then it is definitely sulfur. The destruction process itself is divided into several stages:
- The pipe that is located farthest from the riser is the first to break. This is done with a hammer and continues until a crosspiece is found that needs to be loosened.
- At this time, you need to connect a blowtorch or gas heating pad. Under the influence of high temperatures, sulfur melts, and accordingly, it is possible to loosen the pipe. Before carrying out this procedure, you need to wear gloves to avoid burning your hands.
- After the sulfur has been removed, you can try to remove the cross from the riser.
This is what a blowtorch looks like
How does it change on its own?
This is the least desirable option. All responsibility in case of flooding of neighbors will be borne by the owner of the apartment. And perhaps the person who performed the work, if the owner proves that he did not know about the work, or was misled about the qualifications of the contractor.
Attention! If you do not agree on the replacement of the riser, much less notify the management company about this, then administrative liability for interfering with the operation of utility networks is possible.
But there is no direct legislative ban on carrying out work . You have to start the same way, with an application to the Criminal Code. In which it is requested to turn off the riser and it is mandatory, for safety reasons, to carry out pressure testing of the riser by the employees of the management company upon completion of the work.
In this case, there is a chance to share responsibility with the management company. In addition, it is worth pointing out the need to remove the seal from the meter and reseal it. It may be possible without unsealing, but it’s better to warn the Criminal Code.
If you can come to an agreement with the neighbors below and above, then it is better to connect to the old pipe from them.
Description of the procedure for removing a cast iron sewer tee
A shaped piece of piping called a tee is located at the very bottom of the main riser. There are several ways to extract it. And it’s better to involve a professional in this. All cast iron tees for sewerage can be dismantled in three ways:
Breaking apart a cast iron tee with a screwdriver
- using a screwdriver and milk;
- by heating;
- using a grinder.
In the first case, you need to follow a certain order. First, you gently tap the tee. A gap should form between the pipe and the cross, into which a screwdriver can then be inserted and the tee removed.
Screwdriver and hammer
The second method is faster, but is accompanied by the release of an unpleasant odor. Most often, a gas heating pad or blowtorch is used when it is necessary to disassemble a connection with small diameter pipes. You can do this yourself, but if you don’t have experience, it’s better to hire a gas welder.
Gas welder services
The last method is to use an angle grinder. With its help, you need to cut off some parts of the tee and leave a small piece of pipe. After the remains of the product are cut, the socket is closed with a plug. The cut part of the cross is knocked out with a hammer. Finally, the treatment area is cleared of cast iron residues. It is worth noting that it is the last method of disassembling the tee that is the most practical and reliable, and does not require much time.
If after dismantling there is burning sulfur left on the crosspiece, then it must be lowered into a bucket of cold water, preferably made of iron. After the socket has cooled, you can begin installing a new riser made of plastic.
Installation of a plastic tee
Repair through the management company
The most correct option in any case is to contact the Criminal Code in writing, which must conduct an examination and issue a verdict. If she agrees to a replacement, preferably in writing, all that remains is to wait for the actual completion of the work.
Reference! In case of refusal, it can be appealed to the State Housing Inspectorate.
To replace the riser through the management company, but at the expense of the owner, you also need to write to the management company and indicate in the application that you are ready to pay for this work.
In this case, the management company cannot refuse to perform the work, since it is obliged to provide paid services to the owners related to its type of activity. Replacing a riser is just such a service.
Application to the Criminal Code
To replace the riser, you must write an application. The application is written to the manager in free form.
It states:
- Last name, first name, patronymic of the applicant.
- Apartment address and phone number.
- The request itself to replace the riser.
- If it is assumed that the replacement should be made by the management company itself, then it is necessary to indicate the reasons for the malfunction of the water supply riser and the dangerous consequences that may occur due to the malfunction of the riser.
- If the replacement is planned on your own, then the date and time of replacement is indicated to turn off the riser, as well as the possible dismantling of the water meter, and therefore the seals.
Price issue
Replacing a sewer tee that will meet the requirements of GOST is a service that is in demand in the Russian Federation, and accordingly, it has its price. It is difficult to answer the question of price with utmost precision, because it depends on many factors. We are talking about the material used to make the new adapter that is planned to be installed. Just so you know, a propylene tee costs several times less.
The price of the service reflects:
- tee location;
- its diameter;
- current condition of pipes, etc.
The cost of the service is approximately 4000 rubles
Today, the cost of replacing a riser sewer pipe with a tee with a diameter of 110 mm is approximately 4 thousand rubles. Moreover, the price is not fixed and may vary depending on conditions.
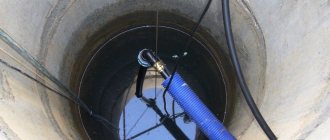
Replacing an old vertical sewer pipe
One of the unpleasant events that can happen in a house is a burst drain. To prevent this from happening, it is necessary to replace the sewer riser with a more reliable material, for example, polyvinyl chloride pipes. You can do the work yourself or use the services of specialists.
Features of connecting to the wiring
In the place where the vertical pipeline will connect to the wiring in the apartment, install a tee measuring 32/20/32. To facilitate installation of the tee, its end is lubricated with liquid soap. The elements are fixed by soldering.
When planning to install a heated towel rail in the bathroom, two additional tees are installed on the pipeline
An important point: when installing tees, it is preferable not to use a coupling, but a soldered connection.
After installing the shut-off valve, check for leaks. If there is none, fix the assembled structure to the wall.
To do this, using a building level, pre-mark points in the wall for making holes for installing clips. Fastening elements are placed every 100-150 cm.
From the moment the last connection is made, the installed section of the network can be filled with water no earlier than an hour later. To ensure a sufficient level of moisture resistance and sound absorption, the places where pipes pass through the ceilings are concreted throughout the entire thickness. These and other finishing activities are carried out only after testing the structure.
Is it possible to refuse to replace risers in an apartment building?
“Is it possible to refuse to replace the riser?” - a pressing question for those residents who have undergone a major renovation of the apartment, because the proposed general house procedure implies some damage to the owner’s property in the bathroom. Is it possible to write a refusal?
Based on the information contained in clause 5 of PP No. 491, risers in apartment buildings are common property. According to the law, none of the residents has the right to prevent representatives of the contractor (MC), as well as emergency services, State control and supervision authorities from inspecting the current condition of communication equipment and carrying out repair work. A control inspection should be carried out no more than once every 90 days, and in case of an emergency - at any time.
Thus, apartment owners do not have the opportunity to refuse to replace common communication systems in an apartment building. In response to the refusal, the management company or HOA has the right to sue.
Possible problems and solutions
Most common mistakes relate to incorrect assembly of the plumbing system:
- errors in calculations. The assembler forgets to add to the length of the pipe blank the length of the section that will be inside the fitting (or adapter), and this is up to 15-20 mm per side;
- low quality of permanent (welded) connections. There are defects in the seams through which water leaks out. Eliminated by forming a new seam on top. In some cases, it is necessary to completely digest the pipe. It is important to understand that even a small leak will eventually turn into a larger one;
- Water drips/oozes from threaded connections. It might need a little tightening. If the defect cannot be eliminated, you will have to disassemble the assembly and carefully examine the condition of the threads - if the damage is severe, the element will have to be replaced completely. If everything is in order. then you need to wind more flax, apply another layer of sealant and try to properly tighten the connection again;
- improper soldering of polypropylene. As a result, the pipe connections are not very strong and can break when pressure is applied. During operation, you should follow the recommendations of the manufacturers of the soldering iron and the plastic products themselves. This applies to both the depth of edge penetration and the temperature of the device;
- choosing unreliable plumbing fixtures. Buying cheap devices on the market can lead to difficulties: constant breakdowns, broken fittings and flooding, and incorrect operation. It is recommended to use products from trusted Russian, Belarusian or European manufacturers;
- ignoring the requirement for the slope of the sewer line. Craftsmen do not maintain the required parameter (3 cm/m for a pipe diameter of 50 mm), this leads to difficulties in moving wastewater. To eliminate it, it is easier to redo the connecting point with the riser, otherwise the apartment owner will constantly encounter blockages;
- the features of the pipe materials used are not taken into account - linear expansion, different behavior under temperature changes, reaction to water hammer;
- Mistakes made when installing the system are often due to the lack of experience of the apartment owner. There must be ball valves on each riser - for shutting off the water, points for connecting meters. It is important to check the system before it is shut down.
Important: care should be taken when assembling pipelines in areas where stationary electrical appliances are located: meters, lighting lamps, junction boxes. It is necessary to exclude the possibility of water leaks and contact with exposed wires.
Pipe burst in an apartment
Providing sound insulation
Additionally, you can take measures to soundproof the sewer riser; they will be useful both in a private house and in an apartment.
Noise in the sewer can occur for a number of reasons, namely:
- When wastewater hits the walls of the pipeline;
- Penetration of foreign air into the system;
- Contact of pipes with walls or ceilings.
Soundproofing work will help eliminate noise-related inconveniences. This can be done in different ways:
- Installation of risers from special pipes. Of course, this measure is mainly used in the process of replacing an existing sewer system or laying a new one. Such products are distinguished by increased wall thickness and high density of the manufacturing material;
- Use of soundproofing materials. Most often, roll insulation or foamed polyethylene is used for this;
- The use of a special insulating “shell”. It is a finished product that is mounted on a laid pipe;
- Installation of the box and lining it from the inside with mineral wool.
Please note that some people use polyurethane foam for sound insulation; this is fundamentally wrong, since this material is not capable of absorbing sound.
Sound insulation work using roll materials includes the following actions:
- It is necessary to check the tightness of the joints, clean and degrease the surface of the riser;
- Apply vibration-damping material and roll it on top with a regular paint roller;
- Wrap the pipe with rolled sound insulation, securing it with flexible clamps (craftsmen often call them ties).
Installation of a soundproofing plasterboard box is carried out as follows:
- The pipes are carefully checked for leaks, because if a leak occurs, the entire structure will have to be disassembled;
- Wrapped with rolled soundproofing material;
- Markings are made for the future box. Please note that its walls should be 50-60 mm away from the surface of the pipe;
- A frame made of a metal profile is installed, with horizontal jumpers attached every 400-500 mm;
- We begin to install drywall, it is better to give preference to moisture-resistant. After one side is assembled, we lay mineral wool and sew up the remaining part.
Caulking
This method has been used for a long time. It is used when installing cast iron pipelines. In this case, rubber seals are not used. The joints of communication sections are sealed using tow (winding made of flax). Cement mortar is used for strengthening. This method is used when the leak between the walls of cast iron and plastic pipes is 3-5 mm. Instructions for installing communications using the caulking method:
- Plumbing paste is applied to the plastic pipe, and tow is wound on top. The caulking depth is 2/3 of the socket length.
- The product is inserted into the cast iron pipeline until it stops.
- Compact the tow using a narrow spatula and a screwdriver.
- The remaining 1/3 of the socket is filled with polymer cement mortar. At home, it is prepared from cement, water and PVA glue.
The advantage of this method is a high degree of reliability. If the rubber adapter is used for 8-10 years, then thanks to the caulking method the pipeline joint will last much longer. It also has disadvantages. So, they note the need to wait 1-2 days until the cement mortar hardens. During this period the pipeline cannot be used. This will lead to deformation of the seam joint, which in the future will cause destruction of the polymer-cement layer and the appearance of a leak.
Completion of work
After installing the central riser, a cross is attached to the outlet tee - an internal branch distributor (for connecting a toilet, bathroom, kitchen and other plumbing devices). The final stage is sealing holes in the ceiling and ceiling, as well as other damage to the wall and ceiling. For this, a cement-sand mortar is used. A sealing layer should be applied to the surface of the pipe in the area where the interfloor ceiling passes. Upon completion of all work, it is necessary to carry out verification tests by draining the water. All leaks must be repaired immediately by additionally applying sealant or applying a sealing compound.
Choosing material
Currently, several pipe options are used for the water supply system. To make the right choice, you need to go to the nearest plumbing store and see what the sellers have to offer. Wandering between the counters, you can see three categories of water pipes:
Steel. You can safely pass by these products, because this is the water supply system you are going to change. Tempted by an attractive price, you will step on the same rake. Galvanized steel pipes look more profitable. This coating is not afraid of corrosion, so the pipes will last for many years. But installing such a water supply system is associated with certain difficulties. Not every person can cut threads on pipes.
Metal-plastic and polypropylene. This is perhaps the best option for home water supply. Such pipes practically do not leak, have a neat appearance and do not cause installation difficulties. Among the disadvantages, it can be noted that metal-plastic pipes begin to leak at the joints over time, so it is recommended to leave the fittings in free access. Polypropylene pipes are welded together with a special soldering iron, this eliminates the possibility of leaks. But the result is a non-demountable structure, which can cause some inconvenience.
Copper. Such products have good thermal conductivity and antibacterial properties. If you give preference to this material, then you can forget about problems with the plumbing forever. Disadvantages include the high cost of copper pipes. In addition, you won’t be able to lay copper water pipes yourself; you need to call in specialists.
Taking into account all the features and disadvantages, it is recommended to give preference to plastic products as the most practical and durable.
Connection using a press fitting
In this case, a special adapter made of metal (steel) is used. On one side there is a thread for connecting to a cast iron pipe, on the other there is a socket for connecting a plastic pipeline. To work you will need an angle grinder and a thread cutter. Installation instructions:
- It is necessary to prepare a cast iron pipe. Make a cut using a grinder. If a coupling is installed in this area, unscrew it. The threaded connection is already ready. Otherwise, you need to do the thread yourself, for which you use a thread cutter.
- A sealing tape is applied to the prepared cut. As an alternative, tow can be used.
- To strengthen the threaded connection, sealant is applied on top.
- Install the press fitting. However, it must be screwed onto the pipe manually. You cannot use an adjustable wrench in this case, because... the fitting may burst.
- On the other side, a plastic pipe with a crimp collar is connected.
In order for this section of the pipeline to operate without interruption, you must remember that a fitting made of polyvinyl chloride cannot be installed on a metal base.