A floating sewer (as opposed to an export sewer) transports wastewater through a pipeline. It is built, if possible, without pressure and according to the terrain.
A properly designed drainage network ensures a self-cleaning flow rate with minimal penetration into the ground:
- the sewer slope, pipe material, and the filling of their cross-section are correctly selected;
- Installation and excavation work was skillfully completed.
It is prohibited to lay a sewer pipeline on or above the surface of the ground within the boundaries of a populated area.
Why is the bias made?
In order for the water flow in the sewer to wash away solid particles, the pipes must be laid at an angle. In this case, the angle of inclination of the sewerage system must comply with the standards established by SNiP. But in pursuit of installation speed or using the labor of unskilled workers, you can end up with a sewer system made with serious errors:
- Ignoring the established standards, they do not make a slope at all or the sewer angle is very small. Thus, the movement of wastewater will be excessively slow and plugs of solid particles will begin to form in the pipes. Very quickly this will lead to the need to clean out the entire sewer system, because if a toilet is installed, but the pipe slope is not adjusted, then there will be practically no flushing and feces will begin to decompose right in the pipes, spreading the smell throughout the house.
- The angle of the sewer pipe is made too large. In this case, the drains through the pipes will move too quickly, washing the solid particles, but not taking them with them. This fact will again lead to clogged pipes, which will have to be cleaned regularly.
If the angle of inclination is incorrect, the water flow does not work Source termo-house.com
Do not neglect the standards established in SNiP, since they were determined based on calculations and observations over many years.
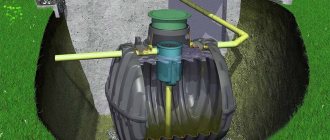
Storage capacity
Container for sewage
The storage tank is a completely sealed container in which the sewage does not go anywhere, and when the container is filled, it is pumped out by a sewer truck.
The sewage that enters the tank is divided into three layers:
- The first layer , the lowest, represents solid organic waste, which, as a result of the activity of anaerobic bacteria (bacteria that multiply in an oxygen-free environment), turns into sludge;
- The second layer is clarified water, which is formed after all solid particles have settled;
- The third layer is fat, which is an accumulation of fatty waste and other particles lighter than water. The fat layer forms an airtight crust, creating a favorable environment for anaerobic bacteria to reproduce.
As in the case of a cesspool, the walls of the storage tank can be made of brick, monolithic reinforced concrete, reinforced concrete rings or a solid plastic container. Particular attention should be paid to sealing the walls and bottom , because the container can be placed below the groundwater level. And for polluting groundwater and poisoning the environment, a person may incur criminal liability.
Sewage well made of bricks (round section) Sewage well (square section)
A brick storage container is sealed as follows: the internal and external surfaces of the brickwork are plastered with cement-sand mortar in a ratio of 1:1 or 1:2. In this case, the grade of cement must be at least M400, and the sand must be sifted. In some cases, to increase waterproofing properties, liquid glass, ferric chloride, sodium aluminate or ceresite solution are added to the cement-sand mortar.
Waterproofing a sewer well made of reinforced concrete rings
Sealing a storage tank made of reinforced concrete rings is carried out as follows: the joints are expanded with a hammer drill and covered with cement-sand mortar with the addition of liquid glass, as described above. The joints need to be processed both outside and inside the rings. Then the outer surface of the rings is waterproofed with roofing felt on bitumen mastic. This will prevent the tank from flooding during heavy rainfall, when the groundwater level reaches its peak level. You should also waterproof the inner surface of the rings with bitumen or waterproofing compounds that penetrate deep into the concrete structure.
Sealing a storage tank made of monolithic reinforced concrete is carried out in the same way as sealing a tank made of reinforced concrete rings: roofing material with bitumen mastic is glued to the outer surface of the monolithic reinforced concrete, and the inside walls and bottom are coated with bitumen or special waterproofing compounds.
Plastic container for collecting sewage
A one-piece plastic container made of fiberglass or polyethylene does not require additional sealing. The walls of such a container are absolutely sealed and are not subject to corrosion or rotting. As a rule, plastic containers are used to collect sewage with subsequent pumping by a sewer truck, or as a treatment facility (septic tank), connecting two containers with an overflow pipe.
Many online resources advise performing external waterproofing of storage tanks using clay ( clay castles ). But this method of sealing will only aggravate the situation, because... In winter, clay saturated with water will expand significantly in volume, which will create excess pressure on the walls of the container, which will lead to the formation of cracks on the walls. In the spring, when the clay melts and decreases in volume, the reverse process occurs, a free space will form between the clay and the walls of the container, into which rainwater will flow, and this will further aggravate the situation in winter.
The bottom of the storage tank , if the walls are made of monolithic reinforced concrete or brick, is made of monolithic reinforced concrete. The ratio of ingredients should be as follows: 1 part cement, 2 parts sand, 1 part crushed stone or gravel. Such a foundation gains the necessary strength in about 7 days. And so that the concrete does not dry out and crack within 7 days after pouring, it is watered with water and covered with plastic film.
If the walls of the storage tank are made of reinforced concrete rings, then it is more expedient to immediately order a reinforced concrete bottom of the appropriate diameter from the factory.
Correct sewer slope
For those who do not know how exactly the data in SNiP documents is deciphered, it should be kept in mind that all standards are indicated in the form of fractions. For example, the inscription 0.03 and 0.008 reads as follows: a pipe one meter long at one end rises by three centimeters, at the other it is raised only eight millimeters. If there is only one number, it means one end of the pipe is at the zero mark, and the other is raised to a given height.
Since the sewer pipeline is much longer than a meter, a formula is used to measure the slope, where the upper end of the pipe is determined as follows: based on the standards, for example, three centimeters of slope is taken per meter, which is multiplied by the entire length of the pipe. As a result, it will be determined how far the upper end of the pipeline needs to be raised.
With a pipe length of 25 meters, the calculation looks like this: 3 * 25 = 75. That is, the slope of the sewer pipe should be 75 centimeters at one end.
SNiP standards for the angles of inclination of sewer pipes depending on their diameter Source pinterest.com
Since sewerage is laid not only in the house, but also outside it, the slope is maintained throughout the entire pipe. At the same time, it is determined depending on the diameter of the pipes - the smaller it is, the greater the slope. There are times when it is impossible to meet the standards, in which case small deviations are allowed. But it should be taken into account that in this case everything must be carefully calculated so that there are no problems with the operation of the sewerage system.
See also: Catalog of companies that specialize in water supply and sewerage.
Septic tank calculation
According to SNiP 2.04.03-85 :
- single-chamber septic tanks must be used with a wastewater volume of less than 1 m3/day;
- two-chamber septic tanks are used when the volume of wastewater does not exceed 10 m3/day;
- three-chamber septic tanks are used when the volume of wastewater is more than 10 m3/day.
The required working volume of a septic tank is calculated by multiplying the number of residents by the daily volume of wastewater (200 l/day). The result obtained is multiplied by 3 if the volume of wastewater is less than 5 m3/day, or multiplied by 2.5 if the volume of wastewater is more than 5 m3/day. In this case, the working volume of a septic tank is the sum of the volumes of all its chambers.
Also according to SNiP 2.04.03-85 :
- for a two-chamber septic tank : the volume of the first chamber should be 75%, the volume of the second chamber - 25% of the calculated volume;
- for a three-chamber septic tank : the volume of the first chamber is 50%, the volume of the second and third chambers is 25% each of the calculated volume.
When using reinforced concrete rings, all chambers are made of equal volume.
What to do if it is impossible to maintain the desired tilt
There are cases when difficulties arise during installation, leading to the fact that the angle of inclination of the sewer differs significantly from the permissible standards. In this case, take the following measures:
If calculations show that deviation from the specified standards is possible, then lay the pipes, but at the same time make additional tees at a certain distance through which the pipes will be cleaned.
When laying the pipe, still adhere to the recommendations, but in difficult areas, establish height differences, which are organized through additional wells. Thanks to this solution, it will be possible to install the pipe at the desired angle. There can be one or several such wells, but correct calculations and installation guarantee proper operation of the sewerage system.
There are several ways to achieve the desired slope of sewer pipes Source vodasovet.ru
As a last resort, if it is impossible to maintain the required slope and calculations show that the operation of the sewage system by gravity is impossible, then you will have to use a fecal pump. This device can be installed both on a local sewer branch and for the entire system.
When laying pipes made of plastic, you can be sure that they will need to be cleaned much less frequently than cast iron, since the smooth inner surface of the walls allows solid substances to slide.
Depth
The depth of laying the external sewerage must be 70-80 cm.
If the length of the sewerage pipeline is about 20 meters, then the entrance of the pipe to the well will be 140 cm deep.
And such indicators can only be obtained in the best case. Then, when the pipeline is lower and the length of the system is slightly longer, the pipe entry can be achieved at a depth of 2 meters.
The question immediately arises: why is this particular length of the sewer pipeline necessary? And the answer is quite simple. The thing is that during the construction of a house, great attention should be paid to the level of soil freezing on the site.
The laying depth must be 10-20 cm below the freezing level. This moment should not be missed under any circumstances, because in the future you may encounter many unpleasant consequences.
Maintaining the angle
Determining the angle of inclination of the sewer pipe is only half the battle. The main difficulty is to maintain it during installation, for which they use a special level with an inclinometer.
Level with electronic goniometer Source tarnaya-doska.ru
If for some reason the protractor does not work, but knowledgeable craftsmen can maintain the desired slope using a regular level. There are several methods for this, and for each of them you need to do a little preparation:
- An oblique line is drawn on the wall corresponding to the selected slope. A level is applied to it and a mark is placed on it in the area of the air bubble. After this, the pipe is aligned in accordance with the location of the bubble. The method is not very reliable, as it allows for a certain error.
- Using a meter level, a special lining is used that will correspond to the angle of inclination.
Preparing for work
Before you begin installing the sewer system, you will need to prepare the following tools and materials:
- plastic pipes that have a cross-section of 5 and 10 centimeters;
- elements that will be used to connect pipes;
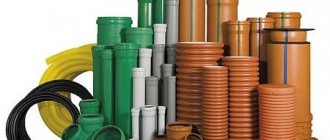
Pipes and connecting elements for sewerage installation Source 911stroy.ru
- cuffs for sealing joints;
- glue intended for gluing plastic;
- marker, tape measure, level and saw;
- cement.
If the sewer system is not being made new, but the existing one is being reconstructed, then before proceeding with installation, you need to study the old structure or photograph it. After this, you need to draw up a plan for installing the new system:
- a drawing is drawn onto graph paper, where all wiring points and bathrooms are displayed, distances are determined and the riser is marked;
- it is checked that the new plan coincides with the existing sewer system;
- then calculations are made and the amount of material required is determined.
Types and uses
The sewer system removes large amounts of liquid, which may contain large particles. Therefore, tubular products with a cross-section from 50 to 110 mm are recommended for use here.
A smaller cross-section pipeline is suitable for creating an internal network. This includes outlets from household appliances and plumbing fixtures.
Pipelines for the general sewerage outlet are assembled from large-sized elements. Most often, installation is carried out through the toilet. This is due to several reasons:
- A large amount of water is drained from the toilet cistern at the same time.
- Large waste passes through the toilet, which can cause blockage in a narrow pipeline.
How to choose pipes
When choosing pipes, you need to pay attention to their color - sewer pipes are painted gray. The different cross-sectional diameters indicate that each type is designed to perform separate functions.
If an existing sewer system is being reconstructed, the operation of which has had no complaints, then the easiest way is to compare the diameter of the old pipes with the new ones - errors in this case are practically eliminated.
Depending on the purpose, sewer pipes and tees come in different diameters Source besplatka.ua
In addition, during installation you need to take into account what household appliances will be connected to the system. To drain water from a dishwasher and washing machine, a diameter of 2.5 centimeters will be enough; for a bathtub and shower you will need 3.5 centimeters. In general, pipes no larger than 5 centimeters in diameter are installed throughout the house, but for the riser you will need to purchase a pipe with a cross-section of 11 centimeters.
In order not to buy unnecessary materials or miscalculate, it is best to measure the old pipes and make a purchase accordingly. In addition, in accordance with the old design, the same number of connecting elements is purchased.
Main settings
When arranging a sewer system, you have to master a lot of information. You need to know the diameter of sewer pipes for a private house, as well as the main parameters of products for this system:
- The symbol “D” indicates the internal diameter; it is taken as a basis when choosing elements for the drainage system of a private house.
- The letters “DU” usually indicate the size of the nominal diameter. This parameter is necessary when determining the nominal value of the internal section of the pipe.
- When designating the nominal cross-section, the letters “DN” are used.
Execution of work
After all the preparatory work has been completed, you can proceed directly to installation. First of all, you need to disassemble the old system. The work is carried out as follows:
- First, problem areas are identified where additional work will have to be carried out. This could be where the pipe goes through the wall.
- Using a chisel, the dismantling of cast iron pipes begins. In this case, cast iron must not be allowed to enter the main line of the sewer system. Otherwise, it may malfunction.
Working with cast iron sewerage is not the most aesthetically pleasing sight. Source domvpavlino.ru
- If replacement of the main riser is not expected, then the pipe from it is sawed off using a grinder.
After dismantling has been carried out, work stops until the connecting units cool completely.
Installation of modern plastic pipes can be done in two ways.
Installation of plastic pipes using glue
- pipes are cut into pieces of the required length;
- the edges are cleaned with sandpaper;
- the edges are degreased;
- pipes are checked for compatibility;
- glue is applied in the right places;
- the processed elements are connected to each other;
- when two pipes are compressed, a roll is formed, reminiscent in color of liquid honey;
- The glue dries within an hour.
Installation of plastic pipes using welding
- installation also begins with cutting pipes to the required length and stripping;
- the soldering device heats up to a temperature of at least 260 degrees;
- connectors and pipe are fixed on the soldering iron;
- the parts are heated to the required temperature;
Welding plastic pipes Source 2gis.ru
- pipes are connected in heated places;
- seams are checked for integrity.
Internal
Pipe slope:
- D 40 mm – 0.035;
- D 50 mm – 0.03;
- D 80 mm – 0.2;
- D 100 mm – 0.015.
In internal sewerage, pipes with a diameter of 40, 50, 80 mm are used, and a diameter of 100 mm is used for the general area at the connection point where the lines converge.
Adapters from one diameter to another are mounted so as to form an even line along the very bottom, creating a continuous channel for drainage. The slopes on different sides of the adapter are set according to their coefficient value.
The required slope is formed by the fasteners on which the pipe rests, or by the inclination of the groove or box in which the sewer will be sewn up.
A section of up to 1.5 meters from the sink drain or connection of household appliances can be laid in any way while maintaining the mandatory slope from the drain to the sewer pipe.
The turn to the sewer pipe line must be formed by an elbow or tee with a slope of 67 degrees. The slope of the elbow or the top of the knee is oriented along the route towards the riser.
The connection to the riser must be formed by a cross or tee with a branch inclination of 67 (87) degrees. It is advisable to replace rectangular tees, which can still be found in apartment buildings when replacing internal sewerage.
Slope diagram of tees and sewer turns
Important points during installation
It is important to start installing the sewer system from the highest points. This will make it much easier to maintain the desired slope. In this case, the sockets must be located against the flow of wastewater. Throughout the entire work, the angle of inclination of the sewer pipes is monitored. This is done either using a level or marks on the wall.
Since the old sewer system is made of cast iron pipes, it is natural that modern plastic pipes will be joined in some places with old cast iron pipes. To do this, special fittings are used, with the help of which a plastic pipe is inserted into a section of cast iron pipe in a vertical position.
When installing a sewer system, the most important thing to pay attention to is the areas where the pipe, lying in a horizontal position, connects to a vertical riser. In this case, you cannot make this connection at an angle of 90 degrees. In order for the system to work perfectly and no turbulence forces arise during water flow, two transitions are made in the form of elbows in an inclined position at an angle of 45 degrees.
Using two adapters with a 45° slope to transition a pipe from vertical to horizontal Source rinnipool.ru
Additional Information
Some more tips on the correct installation of the entire sewerage system, both external and internal:
- When creating an internal system, keep in mind that after some time the slope of the pipes will need to be adjusted, since there is a slight natural shrinkage in the premises.
- All corner joints of pipes, as well as connections and turns, must be at least 120 degrees; if this is not possible, add inspection hatches for inspection and necessary cleaning.
- When creating a hidden water supply and drainage system, do not forget to make completely sealed connections so as not to flood the premises from below.
- Installation of an external sewage system is carried out from the septic tank to the house, and not vice versa.