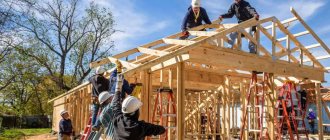
Building a frame house does not take much time. Its design is simple and reliable, which is why it has earned considerable popularity. However, the installation of a floor in a frame house differs from the same procedure, but performed in a conventional building. It is carried out immediately after the foundation is erected, after which the walls and roof are built.
Required Tools
Before starting work on arranging floors in a frame house, it is necessary to draw up a project according to which the structure will be erected. After its completion, the necessary tools and materials are purchased or rented. To arrange the floors you will need:
- Drill with a set of drills;
- Brushes;
- Ladder;
- Screwdriver Set;
- Building level;
- Plumb;
- Pencils;
- Chisel;
- Plane;
- Hammer;
- Circular Saw.
It is necessary to arrange the floors smooth, reliable and durable, because they are the foundation of the house, on which the walls and other important elements are supported. Floors in a frame house on stilts should have a high margin of safety, because their foundation consists of metal pipes that support the entire structure.
Before starting work, it is necessary to find out the depth of groundwater. This will help you decide on the design of the floors.
“Semi-regular” frames
Let me remind you that by “semi-correct” I mean precisely those that have every right to exist, but differ from the typical Scandinavian-American solutions. Therefore, calling them “semi-correct” must be done with caution.
Let me give you a few examples.
An example of how you can “overdo it”
The first example is from our own practice. This house was built by us, but according to a design provided by the customer. We even wanted to redo the project completely, but we were limited by deadlines, since we had to go to the site; In addition, the customer paid a significant amount for the project and formally there are no violations in the design, but he has come to terms with the stated shortcomings of the current solution.
Why then did I classify this frame as “semi-regular”? Please note that there are Scandinavian crossbars, American headers, and double trims not only at the top, but also at the bottom of the walls. In short, there is an American scheme, and a Scandinavian one, and another 30% of the Russian reserve is thrown on top, just in case. Well, the prefabricated stand of 6 (!!!) boards under the glued ridge beam speaks for itself. After all, in this place the only insulation is isoplate on the outside and cross-insulation on the inside. And if there was a purely American scheme, then there would simply be no insulation in this section of the wall, bare wood from the outside in.
I call this frame “semi-correct” because from the point of view of structural reliability there are no complaints about it. There is a multiple margin of safety “in case of nuclear war.” But there are an abundance of cold bridges, a huge waste of material for the frame, and high labor costs, which also affects the price.
This house could have been made with a smaller but sufficient margin of safety, but at the same time reducing the amount of lumber by 30 percent and significantly reducing the number of cold bridges, making the house warmer.
Another example is a frame using the “double volume” frame system, promoted by a Moscow company.
The main difference is that it is actually a double outer wall, with racks spaced apart from each other. So the frame fully satisfies the strength criteria and is very good from the point of view of thermal engineering, due to the minimization of cold bridges, but loses in manufacturability. The problem of eliminating cold bridges, which is primarily solved by such a frame, can be solved by simpler, more reliable and correct methods such as “cross-insulation”.
And, curiously, usually “semi-correct” frames somehow contain Scandinavian-American solutions. And the differences are rather in an attempt to improve the good. But it often happens that “the best is the enemy of the good.”
Such frames can be safely called “semi-correct” precisely because there are no gross violations here. There are differences from typical American-Scandinavian solutions in attempts to improve something or come up with some kind of “trick”. Whether to pay for them or not is the customer’s choice.
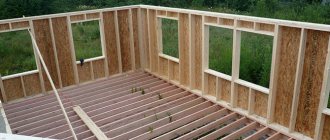
Frame house floor pie
The first step is to install subfloors, which in frame houses are floors. First, floor beams are attached to the foundation frame. At the same time, we must not forget about waterproofing, the installation of which between the foundation and the frame is mandatory. To do this, you can use two layers of roofing material or waterproofing.
Next, the load-bearing frame of the floor is assembled, using only the main beams, or together with secondary ones.
Secondary beams are used when the pitch of the main beams is too large. But this leads to excessive consumption of wood material and complicates the work.
When there are no beams of secondary importance, the main ones can act as joists. Then the flooring pie in a frame house consists of the following elements (from bottom to top):
- A beam with a section of 50 by 50 millimeters, which is attached to the floor beams;
- Hemming boards;
- Wind and waterproofing;
- Thermal insulation between beams;
- Vapor barrier;
- Subfloor made of boards or chipboards.
How to strengthen the structure?
Strengthening may be needed in the following cases:
- construction technology was violated;
- there were errors in engineering calculations at the foundation design stage;
- it is planned to increase loads (adding floors, attics, etc.);
- the service life of the existing foundation has decreased.
Effective methods for strengthening a pile foundation:
- Adding power elements.
- Replacement of failed supports.
- New strapping on old poles.
Before strengthening, it is necessary to reconsider and recalculate the project.
What are subfloors
Subfloors are a flooring formed by boards located in the space between the beams and creating a surface for installing the finishing coating. The subfloor of a frame house assumes the presence of thermal insulation. Only in the attic can subfloors be the main floors, because for a utility room there is no point in installing a flooring made of parquet, laminate or boards.
When choosing materials for making a rough floor in a frame house, the quality of the wood is the last thing to pay attention to, which allows you to save money and buy the simplest types of wood.
Subfloors are not subject to loads. Only insulation and finishing coating are attached to them. After all the work is completed, the subfloor is not visible, so it doesn’t matter what it looks like.
Fasteners
The following elements are used as fasteners for the components of a frame wooden house:
- Fastening plates (angles or flat plates with or without holes). Plates and angles are attached to beams or supports using wood screws.
- Staples (straight and angular) are wire fasteners of a certain diameter. Their edges are bent and inserted into the ends or side surfaces of the beams.
- Bolts - used to tighten adjacent beams and rafters, inserted into through holes and secured in them with nuts.
- Nails.
All connecting, fixing and fastening elements for frame buildings are made of metal. To fasten load-bearing elements, reinforced corners made of hardened steel or increased thickness, 3-4 mm, are used. To fasten the supporting elements, angles made of ordinary steel with a thickness of 2-3 mm are used.
Variety of fastening elements.
In order to protect against corrosion, galvanized steel is used for the manufacture of corners and plates. Rust protection is especially important in outdoor construction, when metal fasteners in walls can become a point of moisture condensation, causing a section of the wall to become wet. Therefore, galvanized fasteners are in great demand in various components of a frame house.
Node connection errors
A drawing of components requires the presence of sketches and descriptions. However, despite this, novice builders often make offensive mistakes. Let's list the main and most frequently repeated erroneous actions that novice individual builders make when assembling a frame:
Not all jibs are installed. This is not true. The jibs ensure the wall's resistance to wind loads. In addition to the jibs, to withstand the wind it is necessary to use rigid slabs in the outer cladding.
- Use solid timber or boards placed tightly next to each other as corner posts. This corner will be cold. Moisture will condense and mold will develop.
- Use “black” screws for fastening. They are not strong enough, especially if the wood purchased for construction is not dry enough. When drying and warping, the “black” screws can be simply “torn off”. A more durable option is golden and silver-colored self-tapping screws, galvanized or coated with a layer of chromating and phosphating.
- They use wood that is not dry enough, which causes severe shrinkage and “breaks” existing nodes and connections.
- And another mistake is not to use nails. These proven fasteners are often stronger than any self-tapping screws.
Frame construction is a new technology in which, despite its apparent simplicity, there are many nuances and features.
Frame house floors
The technology of frame house construction involves the use of wooden floors between floors using beams with a cross-section of 150-250 millimeters. The step between their installation is sixty centimeters. This ensures even load distribution. Insulation of floors is carried out during the installation of subfloors.
The ceiling located between the basement and the 1st floor is done using the same method as the others. The subfloor is mounted on logs mounted on special supports. This allows you to distribute the weight of the structure onto the base of the building, which makes it possible to save materials and use simple and cheap wood, which is why this approach can be found quite often.
Thermal insulation is installed in the same way as in the case of floors between floors. Thus, the technology for arranging subfloors is the same for any level.
Video description
The rigidity of the structure is ensured by additional spacers, the length of which must correspond to the pitch of the joists (minus their thickness). How Larry Hong does this can be seen in the video below:
Racks and joists in one fastening unit Source stroiremdoma.ru
- The logs are attached to the strapping beam, for which special slots are made.
- The logs are attached to the frame beam on the inside using special brackets.
There is no clear opinion regarding the lag layout step.
A more “economical” option is 600 mm. And if we talk about the axial distance, then taking into account the thickness of the lag - 625 mm. But some experts recommend a pitch of 400 mm. And although the mats will have to be cut when insulating with mineral wool, the structure of the subfloor will be much stronger.
Important! In places where heavy equipment is installed (stove, fireplace, floor-standing boiler with boiler), the layout (step) of the log is further reduced.
Subfloors and joists
The base of the building is fraught with danger to the house due to its location near the soil, cold bridges, moisture, etc. In cases where the lower floor is close to the foundation of the house or the ground, it is necessary to isolate wood materials from concrete, bricks and soil. This will minimize the possibility of condensation and protect the wood.
The materials that are supposed to be used for arranging the coating need to be processed in the same way. Waterproofing is a simple job that can be quickly done with your own hands. A layer of waterproofing must be laid before installing the insulation to prevent water from entering it with subsequent destruction of the material.
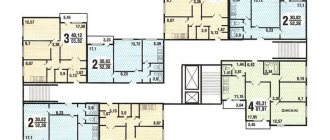
History of drawings
The first drawings appeared along with the advent of primitive writing. People gained experience in construction and tried to teach the younger generation in the competent distribution of materials and construction technologies. Thus, one experienced master could teach only a few people through his personal experience. As the geography of society expanded, the need arose to structure information. This is how the first drawings appeared. Of course, there were no frame houses then, but many things remained very similar. Installed poles at an angle of 30-45 degrees and covered with spruce branches, the idea is not much different from rafters with soft tiles. Both technologies solve the problem of rolling off raindrops and creating a dry and warm room.
Much of this is still happening now; there are specialists in log houses and rounded logs who know how to cut into a bowl and into a paw in such a way that there is no gap between the logs along the entire length of the log and along the entire plane of the wall.
Loose aggregate
Thermal insulation using bulk materials (slag, sawdust, perlite, expanded clay) is the filling of the space between beams in order to insulate and strengthen the structure.
As a rule, the use of bulk aggregates is required when the subfloor in a frame house is arranged along joists. It will be sufficient to install 50*50 mm timber and 15-20 mm OSB to fill in expanded clay or other heat-insulating material.
The advantage of such insulation is that they are evenly distributed over the surface until the required level of thickness is achieved. You can easily do the work yourself and save money.
However, it is better to use this method only for the overlap between the basement and the first floor, so as not to unnecessarily increase the total weight of the structure.
An alternative to expanded clay can be ecowool. The material is of organic origin, is lightweight and will not overload the building frame. Other fillers, such as perlite or sawdust, are either expensive or not used because they are outdated.
You can also use mineral wool or polystyrene foam. Their weight is also minimal. In addition, they are used economically; for high-quality thermal insulation, a layer of ten to fifteen centimeters is enough.
Such insulation does not create a significant load on the floor frames. To install it, it is enough to use thin boards or chipboards; they are mounted on small timber 30 by 30 millimeters.
The resulting floor covering in a frame house can be covered with thermal insulation made of polyurethane foam. But this method is not without its drawbacks. For example, it requires the involvement of workers and special equipment; the materials used are quite expensive. However, it is still considered one of the best options for arranging thermal insulation.
After application, the foam forms a continuous volume that has a certain degree of rigidity and protects structural elements from moisture and other harmful phenomena. The rough construction of the floor in the frame house has been completed.
Calculation of the cost of a pile foundation
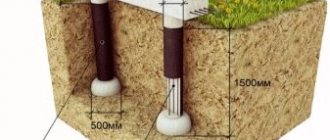
In order to calculate the cost of the foundation, let’s take a building project with an area of 10 by 15 meters. Let's say that the piles will be driven at such a house in increments of 2.5 meters. In this case, we will need 20 piles with a standard diameter of 10.8 cm.
Table for calculating the cost of a pile foundation
Now let's calculate its load-bearing capacity. With a square area of 150 sq. m and a specific gravity of 350 kg/m, it will weigh 52500 kg, that is, 52.5 tons. Considering the number of piles, we will perform an approximate calculation of the load-bearing capacity, since, taking into account reviews, the piles can withstand about 5 tons of load each. Then 20x5=100 tons is the maximum load of the weight of our building on the foundation.
Thus, based on market prices for piles, and today they cost about 1,700 rubles, we will need 34 thousand rubles. In addition, we will purchase heads for 220 rubles. The result is 34,000+(220x20)=38,400 rubles. Also, calculations must be made for additional materials, for example: roofing felt, antiseptic, concrete.
Their calculation is not so complicated, and the decision about which company is better to choose is up to you. If we compare the average cost of strip, column and pile foundations, their prices differ markedly.
Table of load-bearing capacity of screw piles
The calculation for a strip foundation of a house 10 by 15 meters will be approximately 120 thousand rubles, based on the fact that a cubic meter of concrete costs 2,000 rubles. Draw your own conclusions. Be sure to look through reviews, tips and additional recommendations that will help you perform quality work.
Today, reviews are of great importance, especially reviews from friends and relatives who have such housing or a dacha. They have probably already encountered all the advantages and disadvantages of such buildings; they will share their construction experience, perhaps recommend the most sought-after construction specialists and help you independently calculate the foundation for your future home.
Step-by-step instructions for constructing floors
Even if you are not going to make the floors in the frame house you are building with your own hands, we recommend that you study the procedure for carrying out the work in order to control the performers.
Preparation
The first step is to examine the foundation and check how level it is. To do this, you need to measure its height in different parts and check the diagonals. If errors are found, they are corrected. Next, holes are drilled in the foundation and anchors are installed to secure the beds. Afterwards, the foundation is waterproofed using mastic and a special film.
Laying the beds
The beds are boards or beams, secured with anchors throughout the entire area of the building. The installation must be level and secure. The beds must have a thickness of at least 50 millimeters and a width of at least 150.
Installation of the beds is carried out in the following order:
- The boards are laid on concrete slabs, measurements are taken, and excess is removed;
- The location for installing the bolts is determined;
- Holes are made in the concrete;
- Waterproofing is being installed;
- The boards are being installed and secured with anchors. Next, check the level for horizontal evenness. If necessary, correction is made.
Beams and supports
Beams are the main supporting element of the structure; they support the floor structure in the constructed frame house.
Their installation is carried out as follows:
When drawing up a house drawing, the installation locations of the supports and their height are noted. Afterwards, the supports are mounted and the ropes are pulled, thus checking the correct installation.
Next, take a beam with a size of 100 * 100 millimeters and install it according to the plan. A layer of waterproofing is laid under it. The supports are fixed with nails.
The installation of the beams begins with their ends in the pocket. For height mounting, special inserts are used. It happens that the beam turns out to be longer than required. Then you need to cut off the excess. But if it’s the other way around, in short, then you need to make a connection on a support. The beams are attached to the beds with corrugated nails. Wood bevels can also be used.
Strapping and logs
The strapping is done using 50 mm boards. The width is determined by the insulation used and based on the load on the structure. Installation is carried out as follows:
The strapping is installed around the perimeter of the house, the boards are installed parallel to the beams. They are placed end to end, equal to the outer part of the bed, and then fixed with nails driven in every twenty centimeters.
Next, the locations for installing the logs are indicated, for which forty centimeters are removed from the corner board of the trim.
If the board is long enough, markings are made on the opposite side. The logs are trimmed and secured to the beams and strapping, as well as to the beams if they intersect them.
When the length is not enough, overlapping joining can be done. The joint is placed on the floor beams. The floor in the frame house is almost ready.
Thermal insulation of floors
It is best to insulate floors in a frame house using mineral wool. It has only one, but noticeable drawback - the material loses its properties when exposed to moisture. Therefore, work is required to install wind protection and steam and waterproofing.
If thermal insulation with a low density is used, then under the logs you need to install a lining, pre-treated with bioprotection agents.
A vapor barrier film is laid across the joists. During installation, a slight sag is allowed, which is required so that the space between the joists can accommodate thermal insulation material. The joints are glued with tape, and the film is fixed using a stapler.
The insulation is placed between the joists in such a way that there are no gaps. If the thermal insulation is two-layer, it is necessary that the installation be carried out with an overlap. Waterproofing is laid on the insulation.
Warm floor
When planning the installation of a floor in a frame house, you need to immediately decide whether it will have heating, as well as the location of its possible installation. This can be done both in individual rooms (bathroom, living room) and throughout the house. There are many options for implementing the system and you need to choose the one that suits you specifically.
For water-based heated floors, plastic pipes are installed, running along the floors through the entire house to a distribution center that regulates the operation of the entire system. If you use electric heated floors, it is best to give preference to infrared ones. They are more economical, easy to install and maintain.
Knots of the rafter system
The nodes of the rafter system include all connections between its elements, namely:
- Fastening floor beams to the top frame.
- Attaching the rafter beam to the top trim.
- Fastening the racks on the gables to the top trim and to the outer rafters.
- Attaching the internal posts to the rafter beam and to the ridge.
- Fastening struts - inclined beams that support the rafters and rest on the beam.
- Attaching the crossbar to inclined rafters.
- Fastening the sheathing.
Knots of the rafter system.
The fastenings listed above can be done using corners or using nails if the elements of the rafter system are connected overlapping each other.
Ways to save
To reduce the cost of flooring in a frame house, you can use one of the following methods:
- Use used wood;
- Install door panels instead of boards.
Used boards are no worse in use than new ones. In addition, they have gone through a drying process, so sometimes they are even more convenient to use. In addition, the savings are really noticeable: such a board can cost several times less. Door panels are also a good option. They have a flat surface and can be used for arranging a subfloor. Finished floors (for example, parquet) will be installed on top of them, but no one will see what is hidden underneath. Moreover, this approach will significantly save money.
Having studied the material in our article, you now know how to make a floor in your frame house yourself.
Vertical racks
These are the “stands” for the top floor or roof. It is better not to skimp on the number of vertical racks. If there are fewer of them than provided for in the design drawings, then one day they will not hold up and will break. Having lost support, the upper floor and roof will collapse. The consequences are easy to imagine.
First, install the corner posts. If the beams of the lower frame are connected at the corners with nails or an anchor, then the corner posts are fixed with reinforced steel corners.
When fixing the beams with dowels, corner posts are strung onto the vertical outlets of the dowel, having previously drilled recesses of the required diameter in the lower end. The racks are secured with jibs.
Methods of fastening corner posts: reinforced corners, dowels
The side posts are fastened using the cutting method (full or half-beam) or with galvanized corners.
Options for attaching vertical frame posts to the lower and upper frame beams
Why is it better not to use a tile screed?
Reinforced concrete slabs are used to construct such a floor. Such a floor requires additional ventilation in the foundation - it is necessary to form vents.
It is better to make them through for sufficient ventilation under the slabs. The minimum height from the ground to the bottom of the slab should be half a meter. Therefore, the foundation must be high enough.
Using slabs for flooring
For low-lying foundations, which are most often built for frame houses, this type of screed is not suitable.
Moisture emanating from the soil will lead to premature destruction of the slabs, making their operation unsafe.
To lay the unused part of the foundation, it is necessary to lay it with bricks, which leads to additional costs and difficulties in the work.
Foundation with vents
That is why it is better not to use dry tile screed for frame houses.