Published: March 24, 2012 Category: Construction Views: 43414
How to make a floor screed correctly
The design of any floor must have a screed. The screed is located under the floor covering, and the safety and durability of the finish largely depends on it. Therefore, floor screeding should be done efficiently, observing all technological requirements. And so, we’ll tell you how to properly make a floor screed.
In floor construction, the screed performs several functions. The main purpose of a floor screed is to level the surface on which the finishing floor covering is laid. The surface of floor slabs is never perfectly flat, and leveling requires flooring laying technology. The screed is also necessary in order to bring the base of the floor to the required design level. It also provides the required hardness and strength of the base. When installing a heated floor, the screed protects cables or pipelines and distributes heat evenly over the surface. In addition, floors above cold rooms, such as a basement or underground, must be insulated, and floors between floors must be soundproofed, and the screed fixes and protects the heat and sound insulation in the structure.
If the screed is carried out carelessly, cracking and uneven shrinkage with the formation of unevenness are possible, which over time will lead to deformation of the floor covering. Therefore, careful preparation for installation, the correct dosage of components, a reasonable choice of screed thickness, and maintaining the time intervals between stages of work required by the technology are necessary. It is easier to achieve high quality screed using special dry mixtures.
What type of screed is there?
Based on manufacturing technology , a distinction is made between “wet” and “dry” (prefabricated) screeds . For a “wet” screed, the solution is prepared from a mixture of cement and sand or a special dry mixture based on cement or gypsum, poured over the surface and leveled. As a rule, a layer of screed made of sand and cement is reinforced, and when using special dry mixtures, reinforcement is not required.
“Wet” screed is universal , has many options and is widely used in private construction. Its thickness can range from a few millimeters to 10 cm.
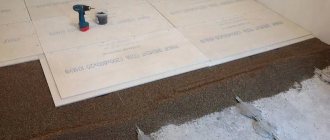
Another way is to use a “dry” screed made from large sheets and slabs 15-30 mm thick, such as fiberboard. However, with their help it is impossible to level the surface if it initially has noticeable differences in levels (and this is typical for floors made of precast reinforced concrete slabs). Therefore, a “dry” screed is often used on top of a “wet” one as a layer located directly under the floor covering.
Depending on the number of layers, the screed can be single-layer or multi-layer , consisting of rough and finishing layers. For example, during construction and installation work on the floor, a rough rough concrete screed is made (which also ensures the rigidity of the connection of the floor slabs), and during finishing work, a perfectly smooth finishing screed is made on it. For the latter, it is more convenient to use a special self-leveling mixture. The rough screed must be at least 20 mm thick, the finishing screed - 3-20 mm.
1. Floor slab 2. Thermal insulation 3. Waterproofing 4. Reinforced screed 5. Wall or partition
According to the method of connection to the base, the screed can be solid , firmly adhered to the underlying layer of the floor, and “floating” , not connected to either the floor or the wall.
A “floating” screed is chosen if the structure requires a waterproofing film, heat and sound insulation. The thickness of the layer of such screed is usually at least 35 mm.
Types of strength characteristics
| Compressive strength | The main characteristic for cement screeds is directly related to the brand of screed |
| Tensile strength | Required when working on wooden substrates or when laying parquet |
| Tensile strength | Required for a given value of adhesion, peel load |
| Flexural strength | Required when working on flexible ones. movable bases |
| Shear strength | Required for high shear loads (forklift braking) |
What is the screed made of?
as a binder in the screed ; sand of various fractions serves as a filler; mineral and polymer additives provide improved properties of the mixture. When diluted with water, these components form a solution of the required consistency.
Cement screeds are not afraid of moisture; they can be used in the construction of the floor of any room. They use a hand-made mixture of cement and sand (traditionally in a ratio of 1:3) or specially prepared sand concrete (ready-made mixtures are commercially available). It should be noted that such mixtures exhibit significant shrinkage. Therefore, when laying an unevenly mixed mixture or with a small layer thickness (less than 30 mm), cracks may appear and the screed may separate from the base. Using reinforcing mesh inside the screed layer or propylene fiber in the solution helps distribute stress more evenly and avoid cracking. In addition, for uniform hardening, it is advisable to wet the fresh cement screed periodically for several days. It takes a long time to dry and remains too wet for at least 20 days for laying moisture-sensitive floor coverings (parquet, laminate).
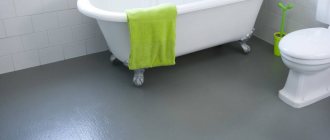
Gypsum (anhydrite) screeds are flexible, easy to use, dry in 24-48 hours, do not shrink at all and can be laid in a thin layer. However, it is not advisable to use such screeds for floors in damp rooms, since gypsum absorbs moisture.
Both cement and gypsum screeds are sold in the form of dry mixtures. They contain modified additives that simplify mixing, increase fluidity and make it easier to lay the mortar, level the surface, reduce shrinkage, accelerate the hardening of the screed, quickly removing moisture from it. When using dry mixtures, layer reinforcement is not required. They can be laid mechanically or manually. Drying time, installation method and time of suitability of the solution for use after dilution are indicated on the packaging.
Screeds made from undiluted dry mortars must be strengthened on top with a layer of cement or gypsum
They also produce dry mixtures for heat-insulating screeds with special fillers made of perlite, ceramics, expanded polystyrene, etc. The use of a “warm” screed will simultaneously provide thermal insulation, sound insulation and surface leveling. But, as a rule, it needs to be reinforced on top with a layer of cement or gypsum screed.
“Dry” screed is the fastest to manufacture; all floor installation work can be completed literally in one day. For it, fiberboard, chipboard, plasterboard sheets or special gypsum fiber boards are used. There are also multilayer boards for dry screed, which include a moisture-proofing film, insulation and a layer of plasterboard, which simultaneously provide hydro-, heat- and sound insulation, strength, and rigidity. Such slabs have only recently appeared on the Ukrainian market and have not yet become widespread.
Mixtures on both gypsum and cement bases are divided into leveling and self-leveling .
Leveling mixtures are designed for rough leveling of bases, eliminating differences and unevenness - rough screed. After dilution with water, they should have a thick consistency; they can be laid in a thick layer (up to 100 mm). The layer is leveled according to the rule, but it is difficult to obtain a perfectly flat surface.
Self-leveling mixtures (leveling compounds) are designed to create a smooth finishing surface on which the most capricious floor coverings can be laid—a finishing screed.
They are diluted with water to a liquid consistency and poured onto the floor. Self-leveling mixtures also come in two types: thin-layer (2-7 mm thick) and thick-layer (5-30 mm thick). In case of significant unevenness of the base and large differences in its heights, it is better to do the screed in two stages: first, roughly level the base to the required height, and then create a thin, ideal surface with a self-leveling mixture.
Stages of work
To make a screed with your own hands, you need to know when and how to do it. During the repair process, the screed is poured before finishing work begins. That is, first they level the ceiling, walls, and install windows. Only then do they pour the screed. Not earlier. Because all leveling mixtures, plasters, putties weigh a lot. Stepladders and other equipment are required for work. All this leaves marks on the floor. And the screed matures for at least 28 days. During this time, it gains design strength (subject to certain conditions). It is unlikely that you will wait that long before leveling the ceiling or walls. So all the hard and dirty work must be completed before pouring the screed.
When the walls are already plastered, pour the screed
Painting the ceiling, gluing wallpaper, applying decorative plaster - these works are no longer so dirty, they do not require heavy materials. They can be started when the concrete reaches 50% strength. At a temperature of +20°C and sufficient humidity, this occurs a week after pouring.
Floor screed laying technology
We are talking about the procedure for pouring concrete mortar. It can be any loaf - from heavy to light. It can also be a semi-dry screed - a solution with a minimum amount of water.
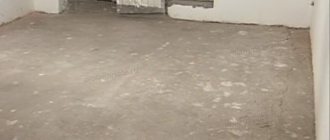
- Preparing the base. Too large irregularities - depressions or protrusions - are removed. This will minimize costs, since the minimum layer thickness is determined by the most protruding point.
- Cleansing. Remove all construction debris and use a construction vacuum cleaner (a household vacuum cleaner will quickly clog) to remove dust.
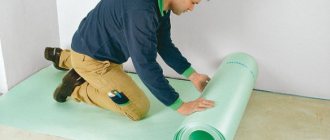
- Primer. When installing a conventional (cohesive) screed, the surface is primed. When floating, put a film or insulation.
Leveling the solution is one of the last operations - The guides (beacons) are installed level (strictly horizontally or at an angle, if necessary).
- Reinforcing mesh is laid out. For household screeds, a welded steel mesh of 100*100 mm, made of 3 mm wire, is recommended.
- The screed is poured.
- The surface is covered with film. We wait until the required level of strength is reached.
This is a step-by-step instruction on how to make a screed with your own hands in general form. There are also points that depend on the specific composition of the screed and the selected materials, but in general, the sequence of work is exactly the same.
Care after pouring
Don't think that once the concrete is poured and leveled, the job is finished. In order for concrete to “mature” and not dry out, it needs certain conditions. Firstly, you need a temperature of at least +17°C. Secondly, a certain humidity is required. And these conditions must be created and maintained.
If you poured the screed in winter in an unheated room, you will need either:
- more time for ripening;
- special additives in the solution, which make it possible for the solution to normally gain strength at lower temperatures;
- heating.
At low temperatures, but not in frost, the easiest way is to add some additives and cover the laid solution. First with film, then with something that retains heat.
The screed is covered with film
If the temperature is above +25°C, you must ensure that the solution does not dry out. To protect against evaporation, you need to curtain the windows - so that there are no areas of local overheating, cover the surface with film. And, every two to three days, moisten the concrete generously. Abundantly - until puddles appear. In this case, care must be taken not to erode the surface. Such hydration is desirable for at least two to three weeks.
How to prepare the base for a screed?
Technologies for creating screed differ in details depending on the type of base, screed material, etc. It is advisable to plan the work in such a way that the screed layer in the room is completely laid in one day.
First of all, you should accurately calculate the thickness of the screed. Determine the height difference between the surface on which the screed is laid and the level of the finished floor without the thickness of the floor covering. The height of the layer is calculated by adding the thickness of the screed to the difference in heights of the base: for a traditional cement screed - at least 30 mm, and when using dry mixes - the thickness permissible for them. A screed surface line should be drawn along the perimeter of the room. Usually for this purpose horizontal marks are made on the walls.
The surface on which the screed is placed (concrete, waterproofing film) should be washed with warm water to remove dust. If you plan to lay the screed on concrete, then for better adhesion it can be coated with a primer or liquid cement paste. If the screed is placed on waterproofing, then the film is wrapped around the perimeter of the room on the walls. The result is a “floating” screed, the thickness of which should be at least 40 mm.
Before applying the solution itself, the base must be primed
If you plan to make the screed using the traditional method (from sand and cement) and with a thickness of less than 40 mm, then it is advisable to reinforce it. To do this, a reinforcing mesh is laid on the surface of the base. So that it does not lie on the base, but is located inside the layer, scraps of ceramic tiles are placed under it.
Next, you need to install beacons to fix the horizontality and level of the screed surface. To do this, beacon slats are installed on self-tapping screws screwed into the base, the level of which must correspond to the calculated level for the floor. The first strip should be installed along the wall (leaving a compensation gap of 10 mm), and the next ones should be installed at a distance of 1 m from each other, since it is convenient to lay the screed in meter-wide strips.
If it is impossible to use self-tapping screws (for example, there is thermal insulation under the screed), then the lighthouse slats are installed differently. Strips of quick-hardening mortar are laid on the base and slats are placed on them. Then, using a hammer, a building level and a ruler, knock the slats into a horizontal position at the level of the screed surface.
To level the screed, as a rule, a squeegee or rule is used
The ratio of components in cement-sand screeds
For the construction of screeds up to 50 mm thick, only cement-sand mortars or materials with granotsiev, in which the grain size does not exceed 7 mm, are used. The proportions of the components depend on the brand of binder and the required brand of the finished solution. If the screed is laid in a room with low traffic, then it is enough to make a cement-sand mortar of grade M100 (strength class B 7.5). If increased loads on the floor are planned, then it is recommended to use a material of a higher grade M150 (B10, B12.5). In addition, high-quality solutions quickly gain strength sufficient for finishing work.
Table of consumption of cement and other components of cement-sand mortars for screeds
Brand of cement-sand mortar, C:P (by weight)
| M100 | M150 | |
| 400 | 1:4,5 | 1:3 |
| 500 | 1:5,5 | 1:4 |
When drying, the cement-sand screed, even if the technological rules for pouring and maintenance are followed, can become covered with cracks. To reduce the likelihood of their occurrence, fiber is added to the solution. In residential areas with low and medium traffic, polypropylene fibers are used. They not only prevent the formation of cracks, but also increase the wear resistance of the surface. Fiber additives are recommended for screeds under soft finishing floor coverings such as linoleum and PVC tiles. Approximately 300 g of fiber fibers are added to 1 m 3 of the mixture intended for floors with low traffic. When making a solution with fiber, the dry components (cement, sand, fiber fibers) are usually first mixed, and then water is added to the mixture.
What's under the screed?
The composition of the layers when preparing the floor depends on the location of the room and the type of interfloor covering:
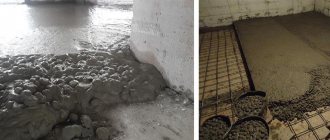
- if the floors in the house are made of monolithic reinforced concrete, then sound insulation is required as part of the floor layers (it is also desirable for floors made of prefabricated reinforced concrete slabs). In this case, a “floating” screed is made, under which mineral wool is placed, protected on top with a waterproofing film, or materials based on foamed polymers;
- Frequently ribbed floors already have sufficient sound insulation capacity. When installing a house, a rough concrete screed is made over them, and during finishing work - a fine cement screed;
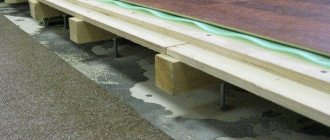
- Sometimes it is necessary to screed a wooden floor, for example in a bathroom. In this case, plank flooring is laid over the joists, layers of sound insulation and waterproofing are successively laid on it, and a finishing screed is made on top;
- if the ceiling of the first floor is made on the ground or there is an unheated basement or underground underneath it, then insulation and waterproofing must be laid under the screed. Mineral wool or expanded polystyrene is protected with a waterproofing film from below and above, and extruded polystyrene foam - only from below;
- and on the floor of an unheated basement, only a layer of waterproofing is laid under the screed.
Screed tools
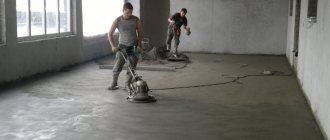
Concrete Grouting Operations
Grouting a concrete screed is divided into several technological operations:
- Rough grouting, during which the cement laitance is squeezed out and the top layer of concrete is pre-compacted;
- Final grouting of the screed;
- Surface treatment with a liquid polymer that seals the smallest pores;
- Cutting expansion joints.
You can try to perform all these operations (see video) with your own hands, but only qualified personnel are able to correctly determine the moment of the beginning and end of each technological operation.
Technology for laying concrete floor screed
What tools will you need?
Building level - to control the horizontality of the screed.
Squeegee - for leveling screed with a liquid consistency. Has devices for adjusting the layer thickness.
The rule is for leveling cement and gypsum screed of dense consistency.
Needle roller - to displace air bubbles from the screed layer.
Special shoes - have soles with nails, used for walking on the uncured surface of a thin self-leveling floor.
conclusions
Modern processing of concrete surfaces using single or double-rotor trowels using strengthening mixtures is the most progressive method, and most importantly the cheapest. After grouting, the concrete surface is strong, smooth and dust-free. It acquires moderate oil and gasoline resistance, as well as various colors.
The great advantage of the concrete grouting technology is that the finished coating is obtained along with laying the concrete. This allows you to significantly reduce the time it takes to put a facility into operation and save on floor coverings. The technology for grouting concrete floors with topping is almost universal and can be used on a wide variety of objects.
How to lay the screed?
Rough screed. A solution made from cement and sand must be plastic, must not crumble, and if a dry mixture is used, it must be prepared in accordance with the instructions on the package. Work begins from one of the walls. Typically, the solution is placed with a shovel on a section of floor approximately 1 x 1 m in size covered with liquid cement paste between two beacon slats at a level just above the beacons. Then, using a rule strip, the top layer is removed to the intended level. Having removed the lath near the wall, the recess is filled with mortar. If necessary (for example, if it is decided to do without a finishing screed), the surface is also smoothed with a trowel or a special steel trowel. The following sections are laid in the same way, sequentially removing the lighthouse slats, filling with mortar and smoothing the joints.
Having laid the cement screed throughout the room, it is left to harden for several days, moistened with water. You can walk on the surface after a day, but lay the floor covering or a layer of finishing screed (including prefabricated screed made from slabs) - no earlier than after a week. For screeds made from a dry mixture, the drying time can be 24-48 hours, you can walk on the floor after just a few hours, and lay the coating in about a week. But these are, of course, general recommendations; in each specific case, the timing may be different. Don't forget to read the instructions on the packaging of the screed mixture.
Clean screed. When creating a perfectly flat screed surface, special self-leveling mixtures are used. When diluted with water, a fluid solution is obtained from them, which is evenly poured over the base. The surface should be leveled using a squeegee or comb, and to displace air bubbles from the layer, it is recommended to walk over it with a needle roller. Beacons are not used; the layer thickness can be from 2 mm.
To select a rough screed, you need to pay attention to indicators such as the compressive strength of the mixture (20 MPa or more) and its working layer (up to 40 mm). Strength is important because the rough screed serves as the basis for the subsequent finishing screed (level) and finishing coat. If the base is weaker than the finishing screed, the integrity of the floor may be broken - the top layer will simply tear away from the bottom. If it is necessary to level the floor with a difference of more than 40 mm, you should use filler - expanded clay or crushed stone (granite or brick) - in an amount not exceeding the initial volume of the mortar mixture. In this case, the strength of the screed is correspondingly reduced. The finishing screed must have a strength of at least 20 MPa and a working layer of 3 to 8 mm. When choosing a composition, you need to pay attention to its ability to self-level in a solution state, that is, to spread over the base, filling all the unevenness.
A high-quality screed should be:
- strictly horizontal . Standards regulating the quality of construction work allow a difference in height of the finished floor of no more than 2.5 mm per 1 m of floor length. Only a screed can provide such a quality surface; with its help, you can level out defects made during the installation of the ceiling. Horizontality will ensure the use of a building level when laying and accurate alignment of beacons;
- flat _ Even small irregularities on the surface of the screed will lead to sagging of the floor covering and its gradual destruction. Only for ceramic and stone tiles, unevenness does not matter. Evenness will be ensured by the use of high-quality leveling compounds and careful leveling. To smooth out a sloppy screed, it can be sanded with an angle grinder;
- strong and solid. Under mechanical loads on the floor and impacts, a screed that does not have strength properties can collapse - cracks appear under the coating, individual sections crumble and the floor sags. Hardness will ensure the use of a high-quality mixture. You can also strengthen the screed by covering it with acrylic, polyurethane or epoxy primer. A durable screed should not crumble if you run a sharp object over it;
- dry. Before laying the flooring, you should wait the necessary time for the screed to dry. This is especially important when laying flooring that is deformed by moisture, such as parquet or laminate. A thick cement screed can take 1-3 months to dry. If there is a danger of the floor being moistened from below, for example from the soil, then waterproofing is placed under the screed.
| The solution must be stirred well until it has a homogeneous consistency. | Work begins from the wall, pouring the mixture onto the floor or spreading it with a special spatula |
| The newly poured layer is leveled and smoothed | The evenness of the next layer is determined by special slats |
Additional processing
For additional protection of the floor surface from moisture, special polymer impregnating compounds are applied to the concrete surface. Impregnation clogs the smallest pores, binds microscopic particles of the top layer, which protects the concrete from dust and accidentally spilled aggressive liquids. Impregnation can be easily done with your own hands using a velor roller or brush, as shown in the video.
After completing all of the above technological operations, all that remains is to cut the expansion joints and seal them with special sealing materials. A high-quality concrete floor that can withstand significant loads is ready for use.
Determining the zero level of the screed
How accurately the zero level of the screed is set determines how level the floor will be in the end. For these purposes, laser or water levels are used. The process begins with the first mark at a height of 1.2-1.5 m from the floor, which is transferred to each wall of the room using the above measuring tools. The result is a set of marks located strictly at the same level relative to the horizon (and not relative to the existing floor), which then must be connected by a horizontal line.
Next, the distance between the zero level and the floor is measured, and the data obtained is recorded. The more such data, the higher the likelihood of an accurate screed device. The smallest value will indicate the highest point of the existing floor. The biggest goes to the lowest. The difference between these values will indicate the level of height difference across the existing floor. Please note that the minimum thickness of a floor screed made of cement-sand mortar when laying it on floor slabs should be 20 mm, on a heat or sound insulating layer - 40 mm, for covering pipelines it should be 10-15 mm larger than the diameter of the pipe (according to SNiP 2.03 .13-88), otherwise cracking is possible. An exception to this rule is when leveling the floor with special compounds. The minimum and maximum layer thickness in this case is determined by the manufacturer for each specific composition.
To calculate the amount of material, you need to calculate the difference between the highest and lowest points of the existing floor. Then, adding the minimum thickness of the screed to this difference and dividing in half, the average value is obtained. When using bagged mixtures, calculations are simplified. The consumption figure indicated on the packaging (for 1 mm layer thickness of 1 m²) must be multiplied by the average height difference. The resulting number should be multiplied by the area of the room. The final result will show the total mass of the dry mixture. The required number of bags can be easily calculated by dividing the total mass of the mixture by the mass of one packaged bag.
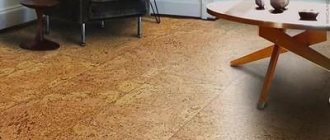
As a rule, cold floor coverings such as tiles, etc. are laid on the “warm floor” system.
Finish line. Smoothing out unevenness with self-leveling floors
The screed was not level enough to lay the parquet. At 2 meters in some places the difference was 0.5-1.0 cm. We decided to top it up with self-leveling floors. Since the difference between the corridor (where the tiles are) and the living room (where the parquet is) should be 4 mm, the self-leveling floors were 1-2 mm thick, which hid some irregularities, but not all. If I were doing it now, I would prioritize a flat floor and do everything level and achieve the required difference between the rooms. But what's done is done.
A couple of days after pouring, cracks began to appear on the surface where the layer was thicker.
I tried to sand down all the unevenness, but it didn’t work out completely. As a result, the parquet creaked in the most trafficked place after 3 months. While I'm sinning with humidity (autumn), we'll see what happens next.
What if there is a heated floor in a screed?
For heated floors, a cement or gypsum screed made from a dry leveling mixture or prepared in the traditional way is suitable. There are also dry mixtures specifically designed for pouring heated floors (they expand less when heated and dry faster). The layer thickness should be at least 30 mm, optimally 40-50 mm.
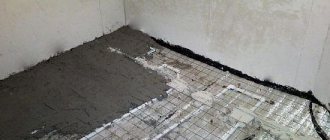
The pipes or cables of the heated floor are laid on the base (which is usually provided with a layer of thermal insulation), secured in accordance with the installation instructions, the performance of the heated floor is checked and then covered with a solution. Make sure that there are no voids left in the layer (they can reduce heat transfer and cause local overheating of the system). It is imperative to leave a compensation gap of 10-15 mm wide between the floor and the wall. During drying, the screed must be periodically heated, including heating the floor at a low temperature and gradually raising it to working temperature over several days.
Warm floor in screed
Final advice
Quite often, a screed (especially a massive one) is used to hide communications: electrical lines, sewerage, water supply, heating networks.
Over time, the location of their installation is forgotten and there is a danger of their damage (for example, when installing plumbing or installing built-in furniture).
To prevent this from happening, carefully lay all communications before pouring the screed and carefully fix them with metal clamps attached to the floor - this will prevent them from moving or even floating up when pouring the solution.
And then the communications layout is carefully sketched or photographed - in order to have a detailed diagram of their location in the future.
Of course, there are methods for finding the location of pipes or wires in a screed array, but they require additional tools. It is much easier to restore the picture according to the scheme made in advance.
How to calculate the volume and costs of a screed?
The volume of the required material (mixture) is obtained by multiplying the area of the room by the height of the screed. When using cement and sand (or sand concrete), about 20% should be added to the obtained value for shrinkage during the hardening process. The packaging of the dry mixture gives an exact calculation of consumption (usually 15-20 kg per 1 m² of floor with a screed thickness of 10 mm). The cost of screed materials varies greatly and depends on the quality and composition of the mixture, purpose, and specific conditions of use. Leveling masses cost 2-4 times more than leveling screeds.
When constructing a screed made of sand and cement, the cost of the reinforcement should also be taken into account. You will also need a primer, beacon slats, and a leveling tool. The cost of installing a floor screed depends, first of all, on the thickness of the screed layer and the area of the floor (the larger the area, the cheaper the work per 1 m²).
These articles may also be of interest to you:
- DIY installation of semi-dry floor screed
- High-quality screed - reliable floor
- Mechanized semi-dry floor screed
- TOP 7 mistakes when leveling the floor
Scope of application
Leveling the concrete screed is necessary when pouring cement mortar into the screed:
in parking lots; in warehouses, hangars, production workshops; in shopping centers; inside social facilities and public places; in industrial buildings; in areas with high vibration exposure; in places where heavy vehicles are stored.
However, it is not recommended to trowel concrete in:
residential and domestic premises; premises where aggressive chemicals are stored; laboratories; premises where sterility is required.