In this article we will look at the error codes of Zanussi and Electrolux washing machines. It is no coincidence that we combined both brands in this article, because they belong to the same production association.
Since both brands belong to the same manufacturer, almost all units and components are the same and interchangeable, and the same control modules (electronic controllers) are used in their production.
In our country, Zanussi and Electrolux equipment have earned the love of customers due to their excellent design, ease of use and high reliability. But even the highest quality equipment can break down and malfunction over time.
If a malfunction occurs, the Zanussi washing machine displays an error that indicates a faulty unit or component. Zanussi errors, like Electrolux errors, are displayed on the device display as a combination of a Latin letter and a number. In the event that the machine is not equipped with a display, the Zanussi error, like the Electrolux error, is read using light indicators located on the control panel, or rather using a combination of them.
In order to read Zanussi errors, you need to enter service mode. Next, we'll look at how to do this on different types of controllers.
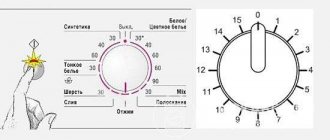
Zanussi washing machine with a knob for selecting washing modes.
Control panels of washing machines with a mode selection knob equipped with EWM2000 controllers can be with a display and light diodes, or with diodes only. Appearance options are shown in Fig. 1 and Fig. 2.
Fig.1.
Front panel of the machine with EWM2000 board.
Fig.2
.
Front panel of the machine with EWM2000 board.
To enter service mode you must do the following:
- set the mode selection knob to the “off” position;
- simultaneously press the “start” button and some other button, as shown in Fig. 1 and Fig. 2 (in Fig. 2 these are buttons 2; in relation to other control panels, the purpose of the buttons may be different), and hold both buttons , turn on the washing machine (in Fig. 2 - with button 1);
- hold both buttons until the LEDs start flashing.
Flashing indicators indicate that the machine has entered service mode.
In the zero position of the mode selection knob, we check the operation of the user interface (buttons and indicators). When you press a button, the corresponding LED lights up.
In service mode, you can check the functionality of individual machine components. To do this, turn the selector knob clockwise and check all modes step by step:
step 1 - check the water supply to the main wash compartment;
step 2 - supply water to the pre-wash compartment;
step 3 - supply water to the air conditioning compartment;
step 4 - supply water to the bleach compartment;
step 5 - heating and recirculation (if any);
step 6 - check for leaks (the water drum is started at high speed);
Step 7 - Check drainage and spin cycle. The consistency of signals from analog and protective level sensors (pressure switches) is also checked;
step 8 - check the operation of the dryer (for SMA with drying).
At all steps, the serviceability of the hatch lock is checked; also, at the moment of filling the water, the time of filling the tank to the overflow level and the operation of the pressure switches are checked.
In service mode, you can view the latest Zanussi errors (Electrolux errors) and also reset them.
In order to reset Zanussi errors (Electrolux errors), turn the program selection knob counterclockwise two steps from the “off” position. The latest Zanussi error will be immediately shown on the display panel. On panels without a display, the corresponding light diodes will light up (for example, in Fig. 2 these are groups 3 and 4), indicating an error in the binary code. You can convert the binary code into the corresponding letter or number using Table 1 (a black circle means that the indicator is lit).
Possible violations to be repaired:
| Symptoms of the error | Possible reason for the appearance | Replacement or repair | Price for work and consumables |
| OE lights up on the display, the water does not drain. | The drain pump burned out due to exposure to foreign factors. | The drain pump needs to be replaced. | Starting from 3200 to 4900 rubles. |
| The machine was washing, but suddenly stopped and gave an OE error. You drained the water, but after that the machine no longer wanted to fill it up. You have LG. | The water level sensor is broken. Your machine cannot detect how much water is in the drum and therefore does not risk taking it in. | The solution depends on the complexity of the breakdown. It may be possible to fix the block, but it may have to be replaced. | Starting from 1900, ending with 3900 rubles. |
| The machine was washing, but suddenly stopped and gave an OE error. You drained the water and tried to start the wash again. The machine took in water and started washing, but when it reached the draining process, it stopped and gave an OE error. | The pump or drain pipe is clogged. | The washing machine should be disassembled and the pump and pipe should be cleaned. | Starting from 1900, ending with 2200 rubles. |
| LG washing machine shows OE error and does not want to drain water. | The problem is in the control unit. The controller responsible for draining has failed. | The solution depends on the complexity of the breakdown. It may be possible to fix the block, but it may have to be replaced. | Repair - starting from 3000 to 4000 rubles. |
**Repair prices are given, and the cost of consumables is also taken into account. The final cost can be determined after diagnosis.
If you cannot resolve the OE error on your LG washing machine yourself, you should seek help
During the conversation, you will be able to choose the most convenient time for a specialist to arrive to repair your washing machine, who will carry out free diagnostics and carry out high-quality and quick repairs.
Table 1. Indication of error codes for washing machines with an EWM 2000 controller.
The four lower LEDs (4) show ones (see Fig. 2), the four upper ones show tens (3).
To reset the error, you must simultaneously press the “start” button and button 6 during the diagnostic cycle (see Fig. 3). The four lower LEDs (4) show ones (see Fig. 2), the four upper ones show tens (3).
Fig.3
.
Resetting the Zanussi washing machine error code (Electrolux washing machine errors).
Preventing the problem from recurring
To prevent OE errors from appearing in the future, you must follow these guidelines:
- use the machine according to the instructions;
- avoid interruptions in the network;
- periodically clean the drain hose and filters;
- check pockets for small items;
- load items with tightly sewn buttons into the machine - they need to be fastened before washing.
Zanussi washing machine without a knob for selecting washing modes.
In this case, the control panel can have both a display and light diodes (Fig. 4) or only light diodes (Fig. 5).
Fig.4
.
Entering diagnostic mode.
Fig.5
.
Entering diagnostic mode.
To enter service mode you must:
- press the “start” and “reset” buttons simultaneously, as shown in Fig. 4 or Fig. 5, holding them down, turn on the machine;
- hold both buttons pressed until the light diodes on the panel begin to blink.
This means that the machine is in service mode. Checking the operation of the front panel buttons is similar to the previous version of the panel with a program selection knob.
By pressing button 1 (Fig. 6) you can sequentially move to the next diagnostic step. Button 2 returns the previous step (Fig. 6). The completion of each step is accompanied by an indication of the corresponding light diode (for example, in Fig. 2 they are located vertically on the left of the panel).
Fig.6
.
Service mode management.
The order and content of the service mode steps are similar to the SMA with a mode selection knob. (see above).
After completing the service mode, the latest error of the Zanussi washing machine will be shown (Fig. 7).
Fig.7
.
Indication of the latest error code.
The order of reading the code is clear from this figure, as well as from the table (see above).
In order to reset the error, you must simultaneously press buttons 2 and 4 while going through the service mode (see Fig. 8).
Fig.8
.
Reset error.
Below, see Table 2, which lists all Zanussi and Electrolux error codes with a description of the reasons for their occurrence and solutions.
Call the master
If you are unable to resolve the OE error yourself, you need to contact a specialist. You can find a specialist through advertisements posted on the Internet or in the newspaper. In addition to individuals, service centers offer their services. Provided that the washing machine is under warranty, it will be repaired free of charge.
The cost of repair depends on its complexity, as well as on the pricing policy of a particular employee. Approximate prices:
- Cleaning the hose and filter – 1400 rubles.
- Drain pump repair – from 2100 rubles.
- Pressostat repair – from 2100 rubles.
- Repair of the control module – from 2600 rubles.
To minimize the risk of encountering scammers, it is better to contact trusted professionals whose services have been used by relatives or friends.
Table 2. Error codes for Zanussi (Electrolux) with EWM 2000 board.
| Error code | Description | Causes |
| E11 | No water filling during the wash cycle (the water level in the tank was not reached within the allotted time) | 1. The most likely cause is a malfunction of one of the water inlet valves or its control circuit (triac) on the electronic controller. 2. If necessary, you can check the valve winding - its resistance should be about 3.75 kOhm. 3. Also, such an error can be caused by a clogged water inlet path and insufficient water pressure in the water supply system. |
| E13 | There is a water leak in the washing machine tray | Check the presence of water in the pan. |
| E21 | Water was not drained from the tank within 10 minutes | 1. The most likely causes: malfunction of the drain pump, clogged filter, pipes and drain hose of the Zanussi washing machine. 2. If necessary, you can check the winding of the drain pump (its resistance should be about 170 Ohms). 3. The appearance of this code can also be caused by a malfunction of the electronic controller. |
| E23 | The control triac of the drain pump is faulty (located on the electronic controller) | Check and, if necessary, replace the specified triac or controller. |
| E24 | Defect in the drain pump triac control circuit (its elements, like the triac, are located on the electronic controller) | Check the serviceability of the elements of the specified circuit. |
| E31 | Pressure sensor malfunction | The frequency of the pressure sensor is outside the permissible limits, there is a break in the electrical wiring. 1. Replace the pressure sensor. 2. Replace the electrical wiring. |
| E32 | Pressure sensor calibration problems | After initial calibration, the water level is outside the range of 0-66 mm and the anti-boil level has not been reached. 1. Open the water tap. 2. Replace the fill valve. 3. Clean the filter. 4. Clean or replace the pressure switch tube. 5. Change the pressure sensor. |
| E33 | Inconsistency in the operation of water level sensors (the sensor protecting the heating element from turning on the latter without water and the first level sensor) | The most likely causes of such a malfunction may be: 1. One of the listed sensors is faulty. 2. The tubes of the level sensors, as well as the pressure sampling chamber for these sensors, are clogged. 3. Increased voltage in the supply network. 4. Leakage on the heating element body. |
| E34 | Mismatch between pressure switch and anti-boil level 2 | The code exists for more than 60 seconds: 1. Replace the pressure sensor. 2. Check the electrical wiring. 3. Replace the pressure switch tube. |
| E35 | The water level in the tank is higher than permissible | During the process of filling the water, the so-called overflow level was reached (the overflow level switch was open for more than 15 seconds): 1. Check and, if necessary, replace the pressure switch. |
| E36 | The heating element protection level sensor (AB S) is faulty | Check the specified sensor. |
| E37 | Malfunction of the first water level sensor (L1 S) | Check the specified sensor. |
| E38 | The pressure switch tube is clogged. The pressure difference is not recorded. | Clean or replace the pressure switch tube. |
| E39 | Malfunction of the overflow level sensor (HV1 S) | Check the specified sensor. |
| E3A | Heating element relay malfunction | Change the electronic unit. |
| E41 | The hatch is open or not closed tightly | Close the hatch tightly. |
| E42 | The hatch lock is faulty | Check the hatch lock (UBL). |
| E43 | The control triac (located on the electronic controller) of the hatch lock is faulty | Check the serviceability of the control triac of the hatch lock. |
| E44 | The sunroof closing sensor is faulty | Check the specified sensor. |
| E45 | The elements of the hatch lock triac control circuit are faulty (its elements, like the triac, are located on the electronic controller) | Check the elements of the hatch lock control circuit. |
| E51 | Short circuit in the control triac of the drive motor (located on the electronic controller) | Check and, if necessary, change the drive motor control triac. |
| E52 | The signal from the tachogenerator of the drive motor does not reach the electronic controller | 1. The most likely reason for the occurrence of such a code is that the fixing washer may come off the tachogenerator body, so the sensor coil comes out of its seat. 1. Correct or change the tacho sensor. |
| E53 | The elements of the drive motor triac control circuit are faulty (its elements, like the triac, are located on the electronic controller) | Check the drive motor triac controls. |
| E54 | “Sticking” of one of the contact groups of the reverse relay (there are two in total) of the drive motor (the relays are located on the electronic controller) | Check and, if necessary, replace the reverse relay. |
| E55 | Open circuit in the engine | 1. Replace the engine. 2. Replace the electrical wiring. |
| E56 | No signal from the tachometer generator No signal after 15 minutes | We change the tachometer generator. |
| E57 | The current exceeds the threshold value >15A | Replace: 1.Engine; 2. Electrical wiring; 3.Electronic unit. |
| E58 | Motor phase current exceeds threshold value >4.5A | Same as for E57. |
| E59 | After setting a new rotation speed other than zero, there is no tachometer signal for 3 seconds | Change: 1.Engine; 2.Tachometer generator; 3.Electronic unit; 4. Electrical wiring. |
| E5A | The temperature of the cooling radiator exceeds the threshold value (88°C) | We change the electronic unit. |
| E5B | The DC bus voltage drops below the threshold ( | We replace: 1.Electronic unit; 2. Electrical wiring. |
| E5C | DC bus voltage rises above threshold (>430V) | Change the electronic unit. |
| E5D | FCV cannot receive and/or send a message within 2 seconds | Same as for E5C. |
| E5E | Communication error between FCV control board and main PCB | Same as for E5C. |
| E5F | FCV control board continuously requests configuration parameters due to repeated resets | We change: 1. Electrical wiring; 2.Electronic unit. |
| E61 | When heating water, its temperature does not reach the set value within a certain time | This code is not available for reading in the normal operating mode of the SM - it is displayed only in diagnostic mode. 1. If necessary, you can check the heating element - its resistance should be about 30 Ohms (at room temperature). |
| E62 | While heating the water, its temperature reached more than 88°C in 5 minutes | 1. As a rule, such an error is caused by a malfunction of the temperature sensor. The sensor can be checked by measuring its resistance - it should be within 5.7...6.3 kOhm (at 20°C). 2. It is also necessary to check the heating element (it may break through to the housing). |
| E66 | The heating element relay is faulty | Check and, if necessary, replace both the heating element relay itself and its control circuits. |
| E68 | The leakage current in the washing machine is too high | Replace the heating element or replace other components. |
| E71 | The resistance of the temperature sensor is outside the specified limits | 1. The most likely cause of such an error is a break or short circuit in the sensor or its connecting circuits. 2. Sometimes the heating element or sensor fails (possible breakdown of one of these elements on the housing). 3. Check the listed elements of the SMA. |
| E74 | NTC (temperature sensor) in wrong position in tank | Check the position of the temperature sensor. |
| E82 | Error selector position selection | The electronic unit is faulty (incorrect configuration data), selector, electrical wiring. |
| E83 | Error reading data from the selector (this code can only be read in diagnostic mode) | Incorrect machine configuration, replace the electronic unit. |
| E84 | Recirculation pump recognition error Input voltage is always 0V or 5V | Replace the electronic unit. |
| E85 | Recirculation pump malfunction Thyristor malfunction | 1. Replace the recirculation pump. 2. Replace the electronic unit. |
| E91 | Communication error between user interface and main unit | Replace the electronic unit. |
| E92 | Mismatch between user interface and main unit | Replace the electronic unit. |
| E93 | SM configuration error | Such a defect can be eliminated by entering the correct configuration code |
| E94 | CM and cycle (program) configuration errors | It is necessary to overwrite the non-volatile memory of the controller or replace this board. |
| E95 | Communication error between the processor and non-volatile memory located on the electronic controller | 1. Check the circuits between the processor and the EEPROM chip. 2. It is also necessary to check the power supply on the non-volatile memory chip. |
| E96 | Mismatch between the configuration of the electronic controller and the external elements that are connected to it (or not) | Check the conformity of the configuration of the electronic controller and its external elements. |
| E97 | Inconsistency in the operation of the program selector and the electronic controller software | 1. Incorrect machine configuration. 2. Replace the main unit. |
| E98 | Mismatch between the engine control unit and the main electronics | Replace: 1.Electronic unit; 2. Electrical wiring. |
| E99 | Abnormal connection between the sound unit and the input/output electronics | 1.Replace the sound unit. 2. Check the electrical wiring. |
| E9A | The hardware/software between the speaker and the input/output electronics is faulty | Replace the electronic unit. |
| EA1 | DSP system malfunction | Replace: 1.DSP; 2.Main unit; 3. Electrical wiring; 4.Drive belt. |
| EA2 | DSP recognition error | Replace the main unit. |
| EA3 | DSP cannot lock motor pulley | Replace: 1.DSP; 2.Main unit; 3. Electrical wiring; 4.Drive belt. |
| EA4 | DSP fault | Replace: 1.DSP; 2.Main unit; 3. Electrical wiring. |
| EA5 | DSP thyristor fault | Replace the main unit. |
| EA6 | There is no signal about drum rotation during the first 30 seconds | 1. Replace the drive belt. 2. Replace DSP. 3. The drum doors are not closed. |
| EB1 | The frequency of the supply network does not correspond to the permissible | Check the power supply parameters. |
| EB2 | The supply voltage is above the permissible limit | Check the power supply parameters. |
| EB3 | The supply voltage is below the permissible limit | Check the power supply parameters. |
| EBE | Safety circuit relay fault | Replace the electronic unit. |
| EBF | Protection circuit recognition error | Replace the electronic unit. |
| EC1 | Fill valve blocked | Replaced: 1. Fill valve; 2.Electronics; 3. Electrical wiring. |
| EC2 | Malfunction of the water transparency sensor (if equipped) | Replace the turbidity sensor. |
| EF1 | Filter clogged Drain hose clogged Drain time too long | 1. Clean the drain hose and filter. 2. Check the drain pump. |
| EF2 | Overdosage of detergent, too much foam during drainage Filter clogged Drain hose clogged | 1. Clean the drain hose and filter. 2. Check the drain pump. 3. Check the dosage of detergent. |
| EF3 | The Aqua Control system is on. The drain pump cable is faulty. There is a break in the drain pump. There is a water leak in the machine. | 1. Replace the cable. 2. Replace the drain pump. |
| EF4 | There is no signal from the flow sensor when the fill valves are turned on | The water tap is closed or there is insufficient pressure in the water supply. |
| EF5 | Spin cycle interrupted, unbalance too large >1200g | 1. Check the amount of laundry loaded. 2. Check the behavior of the machine in a stationary state. |
| EH1 | The supply voltage frequency is outside the permissible limits | 1. Unsuitable power supply or network interference. 2. Replace electronics. |
| EH2 | Supply voltage too high Incorrect power supply | Replace the electronic unit. |
| EH3 | Supply voltage too low. Unsuitable power supply or network interference. | Replace electronics. |
| EHE | Safety circuit relay fault | Replace the electronic unit. |
| EHF | Protection circuit recognition error | Replace the electronic unit. |
Adviсe
Experts recommend a procedure according to which it is worth inspecting a washing machine in order to eliminate the OE error:
- When cleaning the drain pump filter, you need to remove not only large debris, but also small ones; it is advisable to rinse it well under running water;
- The drain hose will need to be disconnected first and then rinsed well under the pressure of hot water;
- the siphon also requires regular cleaning; it is removed and disassembled;
- to check the voltage level of the pressure switch and drain pump, you should use a voltmeter; it will show which element requires replacement if a breakdown occurs;
- sometimes a simple reboot will help solve the problem; first you should disconnect the pressure switch sensor, and then the pump.
It is worth noting that often breakdowns and malfunctions of the washing machine are associated with improper operation.
Not all users are familiar with the instructions from the manufacturer; as a result, they do not know that from time to time it is necessary to carry out preventive cleaning of some elements of the equipment design.
With the right and consistent approach, you can fix the breakdown yourself. It takes up to 30 minutes to clear the blockage, and there is no need to call a specialist, this way you can save your own money.
For information on what to do if an OE error occurs on an LG washing machine, see below.
What to do
First, we correct the error by rebooting - just as it is done with a computer.
You need to turn off the machine for 10-15 minutes and turn it on again.
This is often enough to fix problems and complete the wash.
However, the OE error may not always indicate a malfunction or failure of the washing mechanism in the LG machine itself. Therefore, secondly, you need to make sure that there is no blockage in the sink siphon and sewer pipes. You can fully unscrew the cold and hot water taps to see the rate at which water is draining into the sewer system. If there are no blockages or they were eliminated, but the error remains, the problem is with the car.