The screed is most often a leveling, load-distributing layer, but depending on the type and purpose, it can also serve as additional sound insulation and thermal insulation, as one of the elements of the heated floor system. In some situations it is also a topcoat, for example in a garage or utility room. For a long time, the traditional screed remained the most popular - pouring with liquid concrete mortar followed by hardening with humidity control. Today, dry screed in several versions is becoming increasingly widespread, and FORUMHOUSE users, based on classical technologies, come up with their own and share the results of successful experiments with everyone interested.
Classic dry screed
Dry screed refers to a multi-component system and a method of creating a floor covering without wet processes. The floor pie consists of several layers, each of which performs specific functions.
Waterproofing is most often a thick polyethylene film, but depending on the type of base, it can be specialized membranes, bitumen, or built-up insulation. The last two types are relevant on slab foundations when it comes to first floor floors with an unheated basement or directly on the ground.
Compensation (damper) tape is a gasket between the wall and the base with which the filler layer will be in contact. Commercially available varieties are made of polyethylene foam and may have an adhesive strip for ease of installation and an oilcloth “skirt” that goes down onto the rough coating. Replacement finished insulation is cut out from substrates such as Isolon and other foam materials with a thickness of 5 - 10 mm. The width of the tape should be greater than the expected thickness of the screed layer; the excess will be cut off. When finishing, the tape will be covered with a plinth mounted on the wall.
The filler is an even, compacted layer of dry backfill made of small composite materials: expanded clay and screenings, perlite (coarse expanded sand), slag, slag pumice, etc. Expanded clay of different fractions is most often used.
Rough coating - sheet materials laid on top of the backfill; they become the basis for finishing. This can be DSP, chipboard, OSB and the like, but the most popular are GVL and GVLV, in ready-made dry screed systems the sheets already have a mounting groove.
Types of screeds
Before deciding which floor screed is best, it is worth noting what leveling floor screeds are generally available. There are three types of them:
- Wet.
- Semi-dry.
- Dry.
All these types of screeds pursue the same goals, but are arranged differently. The result is different technical characteristics of the base. The resulting base for laying floor coverings is evaluated according to the following parameters:
- strength;
- resistance to sudden temperature changes and precipitation;
- thermal conductivity;
- a qualitative indicator of surface evenness.
Attention! The functional purpose of screeds is different: when installing warm water floors, the finishing coating should conduct heat well, and the rough coating, on the contrary, should block its loss.
Dry screed laying technology
Installation of dry screed is carried out according to the standard algorithm:
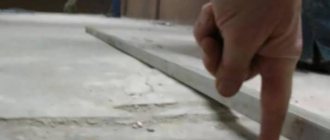
- Preparation of the base - it must be strong and level; if necessary, the old coating is dismantled down to the floor slabs; this may also be required to lower the starting level. There should be no irregularities left on the base, either bulges or depressions. The bumps are knocked down, and the holes are sealed with any quickly hardening mixture and leveled, construction debris and dust are removed. Large cracks on the wooden base are sealed, loose areas are replaced or strengthened, and they are also cleaned of dirt, ideally with a vacuum cleaner in both cases.
- Waterproofing – the concrete is covered with a polyethylene film of at least 200 microns or a special substrate. If it is necessary to connect the pieces, they are laid with an overlap (10 - 15 cm), the joints are sealed with tape, the insulation should extend onto the wall (10 - 15 cm). If the base is wooden, construction bitumen paper is laid using the same principle.
- Damper tape - purchased or cut from insulation, glued to the wall (on liquid nails).
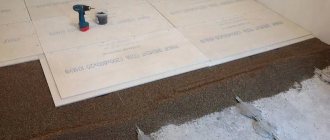
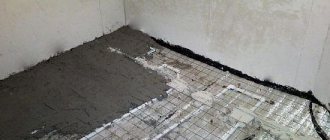
- Backfilling - depending on the available equipment, you can maintain the level using a laser level or a water level. The beacons are set according to the level (galvanized profiles for drywall are considered convenient) in the usual way. Unlike conventional screed, they are removed from dry screed as the areas are filled. Remaining in the mass, they will worsen the parameters of the floor. The filler is poured in excess, the layer is leveled as usual, and, if necessary, compacted with a plaster float.
- Rough coating - it is most convenient to use a special gypsum fiber board with mounting grooves; the sheets are laid, glued with PVA (tiled and similar) and additionally fixed with self-tapping screws (the caps are recessed). The second row is laid with a bandage (250 mm indentation), it is not recommended to make a joint in the doorway, this will be a weak point of the coating.
- Trimming - remove the protruding parts of the film and compensation tape.
The average thickness of the dry screed layer varies from 30 to 40 mm; if it is necessary to increase the thickness to 60 mm, the rough coating is reinforced with a second layer of slabs. Dry screed provides a reliable, durable coating that can withstand dispersed loads of up to a ton per 1 m², and a point load of 360 - 400 kg. The popularity of this method is explained by the characteristics of the resulting base.
- Reduced load - the dry option is much lighter, when the weight of the screed is critical, for example, on wooden joists, or when there are doubts about the quality of slab floors, a dry screed is preferable.
- Reduced thermal conductivity - a screed with expanded clay filler 30 mm thick has a thermal conductivity of about 0.12 W/(m*C).
- Sound insulation - with a thickness of 30 mm, dry screed dampens up to 40 dB of noise.
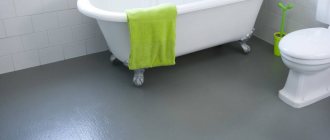
In addition, dry screed is attractive due to its ease of installation, speed and the absence of wet and dirty processes; concrete mixers, mixers, heavy containers with mortar and other “delights” of pouring are eliminated. The limitation for dry backfill is the slope of the surface; it is also not designed for heavy partitions, only light frame ones. Although a dry screed is “afraid” of moisture, and if the coating is poured, it will have to be dismantled, when using moisture-resistant gypsum plasterboard, this danger can be avoided. In rooms with high humidity (bathroom, kitchen), ceramic tiles are used as the finishing layer. If the technology for preparing the base and masonry is followed, the coating becomes airtight.
In order to reduce the cost of dry screed as much as possible, forum member dusha82 decided to turn the rough coating into a finishing coating, saving on finishing.
dusha82 Member FORUMHOUSE
As I decided, I will make the floor using dry screed technology - loose screed, but with some finishing touches. I chose this floor for several reasons:
- I don’t want lags - they will creak.
- Filling is difficult.
- Self-leveling flooring is expensive.
Loose flooring is simple, quick and relatively inexpensive. Now about the finishing touches: the dry screed itself is leveling and the subfloor, but I need (to save money) to have a finishing coating right away, so instead of gypsum fiber sheets, I decided to take plywood, then coated with varnish, which will work for the first time. I chose two sheets of 8 mm each - I think it’s more difficult to mill a thicker one for a rebate. But one problem arose in the process - when I poured expanded clay and put one piece of plywood on it for testing, it turned out that all the “rustle” of the expanded clay could be heard. Fortunately, I had polyethylene foam at hand, the sound stopped after I laid it under the plywood.
Floor on joists
The floor on logs is a frame made of wooden blocks, which are installed in increments of 400-500 mm on wooden pads or brick posts on a concrete or soil base. The timber for the logs is pre-treated with fire-bioprotective compounds. A “rough” floor made of wooden boards, chipboard sheets, OSB, plywood or MDF is laid on the logs, which serves as the basis for the final floor covering - plank, parquet, linoleum, carpet, laminate. If necessary, insulation can be laid in the space formed under the floor covering.
"Floating" dry screed
It differs from the classic dry screed in that it has a base - an additional layer of thermal insulation materials is placed under the backfill: EPS boards or mineral wool (hard). The screed is called a floating screed because the backfill is isolated from the base by a layer of insulation, and from the walls by a damper tape, and due to the absence of a rigid ligament, it is not subject to deformation. This cake allows you to maximally soundproof the room, which is especially important in high-rise buildings or private houses for children's rooms and bedrooms.
The installation of a floating dry screed is no different from the installation of a classic one, only the installation of insulation is added, it is laid closely, the seams are taped. Forum member Alexcrab used a floating screed specifically to drown out extraneous sounds.
Alexcrab FORUMHOUSE Member
There is a reinforced concrete floor, the main purpose of the screed is sound insulation. There will be a dry screed throughout the apartment (except for the kitchen), I will make a “floating” screed on extruded polystyrene foam, 30 mm thick. There is also wiring running along the floor, high-power - in corrugated pipes, low-power - without, all wiring is laid with a reserve cross-section.
Considering that the main purpose of the slabs is insulation, such a screed is indispensable in cold regions or when the slab is laid directly on the ground, or dampness and cold are drawn from the basement.
Noise insulation
I recommend that when pouring the screed, be sure to lay a layer of sound insulation. I suggest you compare several of the most available technologies.
Styrofoam
- Easy installation.
- Easy to cut.
- Elastic and strong material.
- Service life up to 25 years.
- Not afraid of moisture.
· The presence of joints, which reduces sound insulation properties.
The cost of polystyrene foam per m 3 with a thickness of 10 mm is 280 rubles. (I couldn’t find a price for the work)
Mineral wool
In my opinion, mineral wool is one of the best building materials, providing excellent sound insulation of the floor. However, mineral wool cannot be poured into concrete. It is only suitable for wooden floors. For example, laying between floor beams.
- The ability to absorb sound waves.
- Does not burn.
- Does not emit harmful and dangerous toxic gases.
- The ability to cope with temperatures up to +1000°C.
- Possibility of installation without a cold bridge.
- Service life up to 25 years.
- Mineral wool is resistant to various aggressive environments.
Semi-dry screed
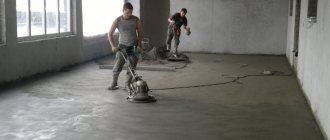
With a semi-dry screed, instead of expanded clay or other dry filler, a cement-sand mixture with plasticizers, fiber and similar additives is used. Expanded clay or perlite may also be present in the mixture or replace part of the sand. The main difference between a semi-dry screed and a dry one is the use of liquid when preparing the backfill and the absence of a rough layer. The finishing coating is laid directly on the hardened screed in accordance with the technology of the selected type of floor.
Semi-dry differs from ordinary cement screed in the minimal amount of liquid used - it is enough to start the hydration process, but the batch turns out to be almost dry and is laid out on the base rather than poured. The molding process produces a smooth, streak-free floor that does not require finishing. Among our forum members, many use semi-dry screed as something between dry and regular. It can withstand dynamic and vibration loads, which are contraindicated in the dry method, but it is done faster and with less labor than pouring with a liquid solution.
TurbosolFORUMHOUSE Member
I myself am engaged in the construction of such couplers; in Moscow we were one of the first to offer this technology, although we were looked at wildly because of the cost at that time. As practice shows, the semi-dry method quickly replaces the classic liquid styling method. Semi-dry screed usually does not require additional leveling with self-leveling floors or levelers, and they cost quite a lot of money, although a lot depends on the master layers.
CupcakeFORUMHOUSE Member
I think that at the moment this is the optimal screed option: no dirt, no need to worry about flooding someone, no problems with delivery, no problems with lifting the mixture to a height, no need to worry about where to get a concrete mixer, you can start the next day for further finishing work. The screed is made on the basis of sand and cement, even if there are water leaks somewhere in the future, it will survive it without problems, and the price, in my opinion, is reasonable.
Unlike dry screed, semi-dry screed needs to be moistened during the hardening process.
Turbosol
Moisturize, at least once, but it is necessary! In order for cement to fully gain strength, it requires moisture; the reaction occurs only in the presence of liquid (hydration). The first time moistening is carried out five days to a week after installation; before this period, the screed contains its own moisture, and it gains a primary compressive strength of up to 15 MPa. This, in principle, is enough for a household floor, but it is advisable to increase it to 20 MPa by humidifying it.
A semi-dry screed is often made to float due to the high thermal conductivity of concrete - a layer of insulation can significantly improve the heat-saving parameters of a room if there is an insulating layer under the screed. In addition, a floating semi-dry screed is less susceptible to deformation, cracking and shrinkage. And due to the absence of direct contact between the ceiling, the wall and the screed, sound insulation is also effective.
Which floor is best for an apartment: screeds in all their glory
Yes, yes - you heard right. Screeds in the plural – today we can count at least three different technologies for their manufacture. Moreover, all these technologies are by no means similar to each other and do not necessarily involve the use of cement-sand or any other mortar - these are both classic options and, so to speak, adapted specifically for apartments in high-rise buildings.
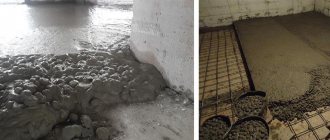
- Standard floor screed. Its main disadvantage is the larger amount of water contained in the solution - it is this that makes this flooring option unsuitable for apartments. The fact is that all this water does not evaporate into the air during the hardening of the screed - in every possible way it looks for loopholes that allow it to penetrate the ceiling of the neighbors below. Believe me, in almost 100% of cases these loopholes are found. A screed of this type in apartments is acceptable only if you are eager to definitely ruin relations with your neighbors, and at the same time make repairs for them. It is this drawback, from which even a waterproofing film cannot save, that negates the advantages of this option, such as low cost and comparative ease of self-production. In general, these are not the best floors for an apartment.
Which floor is cheaper to install in an apartment photo
What kind of floors can be made in an apartment photo
This concerns the floor screed, one of the disadvantages of which is the cold - such a base gives off the cold. There is no way you can walk on it barefoot without heating, even if you insulate it in every possible way. The only base made from sand and cement that can really be called a screed is a mortar screed with foam introduced into it - the so-called warm screed, which will cost you no less than a dry screed, although their insulation effect is approximately the same . In general, if you want to get a truly insulated floor base, then it is better to look for the answer to the question of what kind of floor to make in the apartment among the boardwalks, which we will talk about later. Here you should look for the answer to the question, which floor is cheaper to install in an apartment?
Conclusion
In some situations, the only correct solution was and remains a conventional screed using the wet method as it best meets the conditions of use. And nothing can be done about the phlegm, dirt and other associated inconveniences. In places where increased loads and dancing for days on end are not envisaged, dry screed and its variations can be a worthy alternative.
Dry screed is one of the suitable types of base for an infrared film floor, which is described in the article “Infrared heated floor - from theory to practice.” To prevent the heat retained by the floor from escaping through the windows, read the article about do-it-yourself wooden Euro-windows. In a video about working with floors and walls, a specialist will demonstrate a light screed device.
Subscribe to our Telegram channel Exclusive posts every week
Main differences between materials
The main differences between dry and wet screed are as follows:
- made from completely different materials;
- dry screed has several varieties, wet screed - only in one form;
- wet screed has much higher strength and durability compared to any type of dry screed;
- A wet screed requires a long drying time, which delays construction.
Insulation
As for insulating the floor in the apartment, I advise all my customers not to miss this opportunity. Especially when the apartment is on the ground floor and there is an unheated basement below you. Insulating the floor will eliminate heat loss.
If a heated floor system is installed on the floor, then insulation of the floor is simply necessary. The insulation must have a reflective film on it. Due to this, all the heat generated will rise to the top of the apartment.
Various materials are used for insulation.
Expanded polystyrene
Expanded polystyrene is sold in packages. Depending on the manufacturer, the price ranges from 1.1 to 4 thousand rubles. Work per m2 will cost you 150 rubles.
- Easy installation.
- Light weight.
- Environmentally friendly.
- Various microorganisms do not live in it.
- Does not allow moisture and heat to pass through.
- Service life 50 years and above.
- Flammable
- When the temperature reaches 90° it deforms.
Cork
A roll of cork 2 mm thick costs 1,200 rubles. The thickness of the cork is 6 mm and the price per roll is 3800 rubles. In my opinion, the use of this insulation is unjustified. There are much cheaper insulation materials. But in some cases this is the only optimal solution. The price for installation is 320 rubles. m 2.
- Long service life.
- Environmentally friendly.
- Does not rot, does not spread mold.
- After time it does not lose its characteristics.
- Lets air through.
· Afraid of moisture. I do not recommend using in rooms with high humidity.
- Difficult installation process.
· High price. But in my opinion, the quality is completely worth the price.
Ecowool
One of the modern solutions. In my opinion, the most effective way to insulate a wooden floor in an apartment. Cost 1 kg – 28 rubles. Work for 1m2 costs from 1600 rubles. (wet method). In my opinion, the ideal combination of quality and low cost.
- Lets air through.
- Low cost.
· Does not grow mold, does not rot. It does not harbor insects and mice.
- Easy installation.
- Seamless insulation.
Cons: the main disadvantage is that after a while, dry laying of ecowool cakes. Therefore, when insulating the floor, I recommend compacting it thoroughly; on average, per 1 m 3 the consumption will be 50 kg.