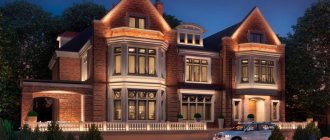
Increasingly, in private construction, customers are choosing new materials and technologies, refusing to build a cottage “the old fashioned way”: from brick or wood. In response to requests, our company develops standard (ready-made) and individual designs of houses made of aerated concrete (aerated blocks). For car owners we have options with a garage. In general, the cottage turns out to be more economical and provides more scope for imagination in terms of architecture and designer decoration. It’s nice when a building pleases the eye, surprises neighbors, and delights guests.
The best known of modern materials is cellular concrete. They are widely used in Finland and can withstand severe frosts. Our catalog of architectural designs for houses made of aerated concrete presents interesting solutions for the construction of cottages with both one and two floors. Among them there are complex ones - using a monolithic frame and brick.
Modern one-story house with a flat roof on USHP
The majority of portal participants who open topics describe their personal experience in building a residential building. At the same time, some have already “practised on cats” (cabins, bathhouses), while others have picked up instruments or hired performers for the first time. But there are no less informative stories from those who get involved in construction already having their own experience of building a house for permanent residence.
WhiteyakovForumHouse Member
Having some experience in building houses and further living in them, we decided to combine comfort, modern design and energy efficiency. Optimize the costs of construction and further operation of the house.
Introductory:
- House area – 150 m²;
- Number of floors – one;
- Foundation – insulated Swedish plate (USP);
- Wall material – aerated concrete blocks, 400 mm thick;
- Partitions – aerated concrete blocks, 200 mm thick;
- Roof – load-bearing corrugated sheet, flat roof;
- The facade is a combination of wooden cladding (planken, larch) and plaster (wet facade).
Video visualization.
Site layout.
Visualization.
The house was built during the 2021 season, work on the facade was completed in 2018, and it was successfully completed in two winters. This is what the house looks like this summer.
Fence.
The choice of this architecture is determined by the experience of previous construction and operation of the house.
Whiteyakov
Why such an architectural decision - when we build our first house, we rely on the opinions of other people, read forums, look at neighbors, pictures on the Internet, etc. We try to come up with something in between, something that has already been tested by someone. This applies to the appearance of the house, construction technology, and materials.
This is how I built my first house (photo below). But having experience in living and operating a house, we have determined for ourselves certain points that should make up our house for a comfortable life in it, its construction and operation. And without looking around, we implemented this project.
Previous house.
Dmitry names several factors that determined the construction concept.
- One floor - in addition to the convenience associated with the absence of stairs, a more even climate in the house, especially taking into account underfloor heating.
- Panoramic glazing is worth it, and with the right approach to energy saving, heat loss through large windows is reduced due to solar heating on clear winter days. Plus, for the convection of warm air, the contours of the heated floor are connected to the windows.
- Natural finishing – wood, plaster, paint; no plastic or metal imitations.
- Individual ergonomics - convenience of layouts, arrangement of electrical, plumbing and furniture based on the preferences of household members, and not generally accepted standards.
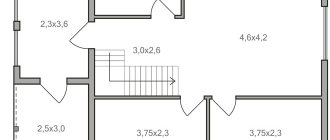
The house project was developed jointly with his wife, and it all began in an original way - with a kitchen project, around which the house “grew.”
Layouts.
Construction began with the construction of the access road.
This was not the first slab, so there were no problems during preparation.
But during concreting, problems arose with the vibratory rammer and the weather - while we went to pick up the helicopter, due to the heat, the concrete had already set and it was too late to smooth the surface, all that remained was to wet it. Nothing particularly critical, but I had to work hard when laying the tiles.
As already mentioned, the walls were laid out of aerated concrete with glue; 75 mm blocks were purchased for the reinforced belt, from which U-shaped trays were made. We reinforced the first row, then every fourth row and under the window openings - we cut out a groove with wall chasers and laid d8 reinforcement in two rods. The armored belt was reinforced with d12 reinforcement and insulated with extrusion: 75 mm block, 50 mm insulation, reinforced concrete, 75 mm block. At the same time as the reinforced belt, the lintels above the windows were poured, and above the panoramic windows reinforced reinforcement was poured (a bundle of six d18 rods). Ready-mix concrete was poured from a mixer through a special nozzle.
The armored belt above the partitions has a double function - both load redistribution and a tilting device for the roof. Therefore, Dmitry immediately placed the board formwork at the required angle. This made it possible to do without special, expensive wedges. The parapet was formed by three rows of partition blocks, the height was 750 mm, and in the “clean” height of the parapet it was 400 mm above the roof level. Sheets of corrugated sheets were riveted together and attached to the armored belt with dowels.
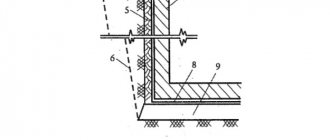
The flat roof pie is typical, except for the wedge-shaped thermal insulation.
Bitumen-polymer waterproofing was preferred to a membrane: there was no experience and no tools for soldering. The inside parapet and flat slate were treated with bitumen primer. Ventilation – turbo deflectors.
Since the roof was completed on September 1 and the autumn weather left much to be desired, the facade was postponed until the next season, and interior work began. All processes are greatly simplified thanks to the selected technologies. They also allowed us to do all the interior work in one hand.
- Heated floor circuit in USHP - to start the heating system it was enough to mount and connect a wall-mounted electric boiler.
- Engineering communications in USHP - connecting plumbing to ready-made inputs.
- Smooth walls made of aerated concrete - instead of a thick layer of fiberglass, thin-layer plaster without beacons and putty on the walls for further painting.
- Electrics - the main cables are also in the slab, electrical wiring along the ceiling is in grooves, which are cut into aerated concrete without any problems.
The facade was initially planned to be completely insulated - 150 mm of stone wool for plaster and 50 mm of mineral wool for plank. However, winter and a thermal imager test showed that with a 400 mm aerated concrete wall, even with panoramic glazing, insulation is not required. Therefore, 100 mm of stone wool is only under the plaster, and there is a ventilation gap under the plank.
Whiteyakov
If you choose the right technologies and optimize labor costs, you can build a full-fledged house of 200 meters in one hand, in one and a half to two years with full finishing. But, this is if you have time and, of course, a great desire and a little adventurism (I checked this on my previous project). In this project, I hired workers at some stages (foundation pad, masonry, roof) to speed up the process, we started in June, moved into renovation on December 10th.
Read more in the author's thread in real time.
What to pay attention to when reinforcing window openings?
When the window opening exceeds 1.8 m, the penultimate row of masonry is reinforced. Make 2 grooves 50 cm longer than the openings. Subsequently, the grooves are filled with adhesive or cement mortar.
Is it possible to spend the winter without heating? Sometimes it is not possible to complete construction work completely within a season. The box is left for the winter without connecting the heating system. The following measures will help prevent the appearance of cracks on the walls in the spring:
- If groundwater is close, drainage is needed.
- It is necessary to carry out waterproofing and insulate the foundation and plinth.
- Insulate the blind area around the structure.
- Insulate floors in the basement.
Thanks to the above measures, freezing of the soil under the foundation can be avoided. It is recommended to additionally maintain the temperature in the basement above zero.
Small house made of aerated concrete
Andrey_72 joined the construction at the reconstruction stage.
Andrey_72FORUMHOUSE participant
Everyone builds something, and each in their own way. I will also share my experience. So, where it all began, a very long time ago, more than twenty years ago. Then I acquired a plot of land with a house after a fire and, out of youth and stupidity, set about restoring it. Of course, it would have been much easier to clear the place and rebuild, but I didn’t think so at the time. He lifted the frame with jacks, poured the foundation, installed the crowns, replaced the burnt floors and roof. I gained invaluable experience, the main meaning of which is that it is not the gods who burn the pots; anything can be done.
The next approach, in 2005, was to “sew a coat to a button”, expanding the wooden frame, with an area of only 48 m², with a foam concrete extension up to 160 m². Almost another decade later, they set their sights on a detached small house made of aerated concrete, the construction of which will be discussed.
Introductory: we need a small house for an elderly mother, so that they can be close by and not disturb each other, which “follows” a number of wishes.
- The area of an average one-room apartment is 7x5 meters, enough for a comfortable stay for one older woman.
- A large kitchen is a habit from a past life.
- Comfortable bathroom - with shower.
- Small windows - so that the house harmonizes with the surrounding buildings.
- The foundation is MZFL for a light house.
- Wall material – aerated concrete, D500, 300 mm wide.
- The facade is ventilated with insulation (mineral wool, 50 mm, siding).
- Plinth – EPS insulation, plinth panels.
- The roof is hip; due to its small size and complex shape, we had to abandon metal tiles (almost 50% waste) in favor of onduvilla, which imitates aged tiles.
- Ceiling insulation – backfill ecowool, layer 20 cm.
- Heating – electric convectors with programmers (two-tariff meter, no need to install piping with pipes and radiators).
- Water supply is a well under the house for technical needs, drinking water is still brought from the large house.
Layout.
Visualization.
Implementation.
The preparation of the trench for the foundation was simplified by the presence of sand fill under the building site - it was marked out, the fertile layer was removed, the preparation was made with sand, compacted, and formwork was installed. We had to use self-mixing concrete, for which we purchased a concrete mixer and components - the mixer simply did not go into the yard, and it was irrational to order a concrete pump for such a volume. It took three days (a weekend) to pour alone, after which “I went to work with arms outstretched like a gorilla and a sense of accomplishment.”
For waterproofing, the tape was treated with bitumen mastic, wooden logs were laid on top (the timber was pre-coated with an antiseptic) and a base made of expanded clay concrete (with reinforcement) was added. The logs are not enclosed, there is air space around, there are two vents in the underground along the long sides, 15x30 cm. To cut off moisture, the soil over the entire area was covered with used advertising banners.
Laying the box using the rolled-in technology - the first row is on mortar with the horizon drawn out, the subsequent rows are on an adhesive mixture, with reinforcement in the grooves.
Life hack from Andrey - in order to draw the first row as smoothly as possible without “fussing with the hydraulic level”, the laser level needs to be placed on the “Health” disk. Such a turntable on bearings helped to assemble the formwork evenly and cut off the corners in a few minutes.
The glue was applied to the ends with a special ladle with a serrated edge, using a trowel in two strips. The blocks were of sufficient quality, so I didn’t bother finishing them with a grater, which I still regretted later. In some places it was necessary to “gnaw” to make it fit and the seam was thicker in places, and this was an overrun.
It took 360 blocks to make the box, since buying U-blocks was “choked by a toad”, the lintels were poured into the formwork using expanded clay concrete, having previously laid the reinforcement.
To fill the armored belt, I used wall blocks, but sawn into four parts - the thin plates turned into permanent formwork.
By the summer, Andrei had finished the box, and with four hands, together with his son who came for the holidays, they continued to turn it into a house - they assembled a rafter system (mortgages for beams in an armored belt), and covered the roof. The formwork was first used for scaffolding, and then it was used for rafters, which is why it was assembled from forties at one time. We bought additional lumber for sheathing and sheathing.
The house went into autumn with doors, windows, a veranda and even a tiled path.
Internal work was carried out on winter evenings - frame partitions made of OSB and gypsum plasterboard, electric heated floors in the bathroom, electrics, plumbing.
Decoration and furnishings.
Andrey_72
It all took a year of time and about 600,000 money. Hired workers were not involved as a matter of principle. The result turned out something like this. Mom is happy.
The following year, the façade was finished, also independently, with vinyl siding, since inside the yard there is no danger of damage to the fragile material. I saved on extras by bending the corner parts from a flat painted sheet.
In this example, we are not talking about chic - this is budget construction with your own hands, when you need a house and there is no extra money, tailored purely to individual needs.
Andrey_72
Regarding construction only on your own. First of all, I'm just interested, and that's the most important thing. I love working with my hands and using my head. Secondly, there are no complex jobs available only to professionals (and also think about why you don’t need to study for five years at an institute to become a bricklayer/plumber/electrician and other blue-collar jobs). I don’t compare myself with experienced professionals, but basic accuracy and adherence to technology allow me to achieve better quality than many hacks.
A year later we got around to the veranda.
At the moment, the house is already four years old - no complaints or problems, only the gables, put aside “for later”, are just waiting in the wings. Andrey advises not to leave little things and imperfections, it’s not a fact that you will get around to it. The pediment is never finished.
Due to this, it was possible to save a lot of money and other details are in the topic.
Interior decoration
Decorating the inside of a house can be done with any materials that match the properties and characteristics of an aerated concrete block. Plaster mixtures and screeds must be selected from highly specialized raw materials, and finishing materials must meet all the requirements stipulated by GOST and SNiP.
First, you need to decide what you want to see in the end. Let's consider the possible options.
Search for design solutions and a brief description of the progress of work
For clarity, we will use the method of stage-by-stage planning of the design of individual parts of the premises.
Table 3. Alternative designs for interior decoration of the house:
| The ceiling in a house can be finished in several ways: by plastering and subsequently painting, or by installing plasterboard boards. In the second case, the choice of design options is extremely large. With the help of gypsum plasterboards it is possible to create complex multi-level ceilings with specialized lighting of any desired shape. Drywall is attached to a pre-assembled frame. Plastering will not be necessary, but insulation will be quite important. |
| Walls | First, before applying the finishing layer, the walls should be plastered and leveled at the same time. Priming and laying the reinforcing mesh is mandatory, since the adhesion of aerated concrete does not allow the materials to be reliably fastened together without additional impact. Next, the finished surface should be painted, covered with wallpaper or covered with textured plaster. Individual areas can be decorated with artificial stone or any other material. The emphasis can be placed on the corners, window openings of the room, as well as highlighting certain areas of the room. |
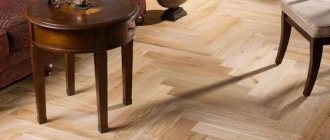
| One of the most common options is laying laminate, parquet and linoleum. Ceramic tiles and porcelain tiles are used more often than usual in bathrooms, kitchens and hallways. The device begins with the installation of wooden logs. Next, the floors are insulated and, as an option, covered with floorboards. |
| With the help of gypsum boards you can diversify the interior with arches. Since drywall is easy to process, you can create even the most incredible designs and shapes. |
House made of aerated concrete with a pitched roof and economical finishing
Unfortunately, there is no separate topic on the forum, and messages about the house from a member of our portal with the nickname AIVD appeared in a thread about economical finishing of aerated concrete. But he has a rather unusual approach to the visual component both outside and inside, and even from the photographs the main thing is quite clear.
Introductory:
- Area – about 72 m² (12×6 along the axes);
- One floor;
- Wall material – aerated concrete, D400, 300 mm wide;
- The roof is pitched, covered with slate;
- Ceiling insulation – 10 cm of polystyrene foam according to OSB;
- Combined heating - electric (warm floors and radiators in the bedrooms) and a stove-fireplace in the studio-type kitchen.
I developed the project myself. Layout.
And this is not the first experience - AIVD simply painted the previous house made of gas blocks with façade paint, after first passing a repair solution over the walls (grated scrap of a gas block and an adhesive mixture). But he didn’t repeat it, and put the appearance of the facade into the masonry - he immediately chamfered the block.
Then I painted it with silicone paint without prior puttying or plaster, on top of the primer.
AIVDFORUMHOUSE Member
Paint with silicone, same primer. I painted with a wide short bristled brush, essentially rubbing the paint into the GB to fill the pores. One layer, two would be nice, but money is tight. The paint holds up well and does not peel off.
The interior is decorated in a similar way.
The partitions are made of shell rock - the yellow one is covered with stone varnish, the white one is painted with the same silicone paint as the facade.
And details, if necessary, can be clarified in a personal message.
Calculation of the cost of mortar for bricks
| Name | Values and cost UAH. | Cost rubles |
| Composition of the solution | 1 part cement and 3 parts sand. | |
| Cubic meter of solution | 250 kg of cement + 750 kg of sand. | |
| Price of cement for a cube of mortar | 10 bags of cement, 25 kg each = 550 UAH. | |
| Price of sand for a cube of mortar | 750 kg = 100 UAH. | 250 rub. |
| Total cost of a cube of solution | 650 UAH | 1700 rub. |
| Volume of mortar for laying a brick cube | 0.25m3. | |
| Cost of mortar per cubic meter of masonry | 650*0.25=140 UAH. | 400 rub. |
Conclusion
From the same material you can build both a small standard house and an original house in a modern style - it all depends on capabilities and personal preferences. It is from them that you need to start when choosing a particular technology. And aerated concrete attracts with its versatility, low thermal conductivity and good geometry. Under certain conditions, it is possible to do without additional insulation or a minimal layer of insulation. And this is not marketing, but personal experience - Andrey_72 in Tobolsk, after four winters, does not plan to add anything to the existing 50 mm, and Dmitry, in Tula, actually used stone wool as a base for a wet facade, and not as thermal insulation.
If insulation is necessary, read how to do it correctly in order to comply with the principle of vapor permeability of layers. When building from GB in residential premises, you can make not only thick-layer plaster on the beacons, but also a thin layer of putty. And if there are no plans to improve the façade in the foreseeable future, it’s worth thinking about protection from external influences. The video is about a multi-level aerated concrete house with a complex structure.
Subscribe to our Telegram channel Exclusive posts every week
How to winter without heating
If the house has already been built, but the connection to the central heating or gas line is not expected until next year, you need to prepare for the winter.
Measures to help you survive the winter without losses:
- drain water from all systems;
- close windows and doors tightly or secure two layers of thick film in the openings;
- insulate the foundation, plinth and blind area with polystyrene foam slabs.
For one or two winters the building can be left without exterior decoration. Frost resistance of aerated concrete is 50-100 cycles. The material can withstand this amount of freezing and thawing without changing its properties.
It is not recommended to throw aerated concrete for a long time without protection from precipitation. It has a water absorption of 20-25% by weight, and is prone to waterlogging and destruction at subzero temperatures.
Capillary moisture
A country house made of aerated concrete must be cut off from capillary moisture. The first row of gas blocks (bottom) is not placed on glue, like all other rows, but on a regular sand-cement mortar. It is thicker and can compensate for unevenness and differences in height of the base, which glue cannot cope with due to the small thickness of the layer. However, sand-cement mortar absorbs moisture well and can transfer it to the lower rows of gas blocks. Because of this, the walls may become wet, loss of heat-saving qualities and destruction of structures.
If the foundation is not waterproofed and a cutoff is not laid between the plinth and the concrete strip, capillary wetting of the walls cannot be avoided. Many builders neglect such subtleties, trying to complete construction as quickly as possible. Such frivolity is costly, since the lower rows of gas blocks bear the maximum load, and too difficult conditions should not be created for them.
Production technology
The technological process consists of several stages:
- grinding components to dust and mixing using electronic dispensers. Dosage accuracy is a crucial moment that ensures the quality of the material;
- adding water and aluminum powder (usually in paste form). The mixture is placed in special molds to undergo a chemical reaction. At this time, the mixture rises and swells, like yeast dough;
- at the end of the reaction, aerated concrete receives its porous shape thanks to many small (2-4 mm) gas bubbles. The massif is removed from the mold and sent for cutting using special knives and strings;
- The finished aerated blocks are sent to an autoclave for final crystallization. The process lasts 12 hours, during which time the blocks are treated with hot steam under high pressure;
- After crystallization is complete, the material gains grade strength. It is packaged and sent to trade organizations.
An autoclave method for producing aerated concrete is described. There is another, non-autoclave material. It undergoes crystallization under treatment with hot steam, but without pressure. It is generally accepted that non-autoclaved aerated concrete has less strength and durability. However, studies have shown that the lack of heat treatment leaves non-autoclaved aerated concrete with the possibility of slowly gaining strength during almost its entire service life. Samples of the material taken for research from buildings approximately 80 years old showed hardness and strength 2-4 times higher than the brand name. This feature makes you look at non-autoclaved aerated concrete with different eyes.