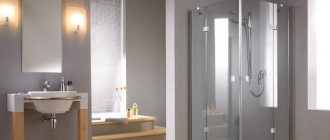
Shower cabins are becoming increasingly popular among bathroom products. Convenience and functionality come first for the consumer, so large, uncomfortable cast-iron bathtubs of standard sizes are becoming a thing of the past; also, in many new buildings, bathroom space is very limited. This is where a shower stall will come in very handy, whether you have a large or small bathroom.
Purchasing and installing a shower cabin will allow you to increase the usable space in your bathroom, especially if your bathroom is not large. You can easily place a washing machine, bath furniture and much more there.
Choosing and purchasing a shower cabin is only half the battle; you still need to assemble and install it.
I would like to say that a shower cabin is a product in which 70 percent service life and reliability
This is a kind of construction set that you must assemble correctly, with high quality, and then it will serve you for many years.
Please note that the shower cabin is assembled in a finished, clean room; all finishing work must already be completed.
Using these instructions, you can assemble most shower cabins with a glass back wall, either 90 by 90 centimeters, 80 by 80 centimeters, or 100 by 100 centimeters.
We also note that assembling a shower cabin with a high tray is no different from assembling a shower cabin with a low tray . The only difference will be in preparing the space for the shower stall.
Assembling the shower cabin is best done with two people; the approximate assembly time is about 3 hours.
To assemble the shower cabin you will need the following tools
The shower cabin is not included in the package!
- Sealant (with application gun)
- Screwdriver
- Drill Ø1-3mm
- Phillips screwdriver
- Pencil
- Pliers or wrenches
- Level
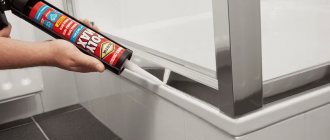
According to the manufacturer, some shower cabins are assembled without sealant. But even for these types of showers, you will still need a sealant . They need to process the shower drain hole, install water traps and magnetic seals, and other small options if available, such as processing the hole for the radio and nozzles.
In all other shower stalls, sealant is required.
With its help, all fixed elements are processed. The joints of the rear wall between the central panel and the pan, the joints of the front frame and the pan, fastening the drain and nozzles, installing seals and water shut-offs.
Glass shower cabins are supplied unassembled, in cardboard boxes. The number of boxes per shower cabin is from 3 to 5 (depending on the manufacturer)
Arrangement of a cabin with a homemade pallet
If we do not take into account all the nuances of constructing home-made pallets, depending on the chosen cabin design option, then using the example of a pallet made of concrete or brick, as the most popular materials, we will consider step-by-step instructions.
Stage #1 – preparatory work
The very first step is preparation. It will look like this:
- Thoroughly clean the shower floor and adjacent wall areas.
- Waterproof the base of the pallet.
- Install a primary cement screed if there is none.
- Prime and treat the base of the future cabin with a highly adhesive waterproofing compound, for example, bitumen mastic.
- Install the shower drain in the chosen location, strictly according to the level, and, in accordance with the instructions, connect it to the sewer.
- Install the formwork.
- Fill the inside of the shower tray and the sides with concrete or brick.
After all the preparatory work has been completed, calculations have been made, all the necessary components have been selected and purchased, you can begin the main work on its construction.
It is important to initially correctly plan the placement of the shower, taking into account the outlet of the sewer pipe. It is desirable that the path of wastewater to it be the shortest without sharp turns
Stage #2 – water supply
With the correct selection of all materials and the availability of the necessary tools, connecting the shower stall to the water supply and sewerage networks will not be difficult. As a rule, in a private house, hot water is supplied to the shower from a gas or electric boiler. For this, tees or fittings with a threaded connection are used.
Main nuances of water supply:
- The distance between hot and cold water pipes, to eliminate their temperature influence on each other, should be at least 10-15 cm.
- The diameter of the pipes is selected depending on the water pressure, the optimal is 27-30 mm.
Flexible hoses are used to supply water directly to the shower panel or faucet. All connections must be made using sealing gaskets and FUM tape.
Water shut-off valves are installed on water supply pipes using 8-10 turns of FUM tape wound onto the thread, twisting it only clockwise
Step-by-step instructions for connecting to water supply:
- shut off the water supply to the main pipelines;
- insert the sealing gaskets into the nuts of the flexible connection on the side connecting to the hot and cold water pipes;
- Connect the hoses to the pipelines without much effort.
Shut-off valves must be installed on all connections to plumbing fixtures.
Stage #3 – ensuring waterproofing
A very important point in the construction of a pallet is primary waterproofing. It is carried out before installing the screed, by covering with a special film or roofing felt the joints between the floor and the walls, and placing waterproofing material on them.
When purchasing a waterproofing compound, you need to pay attention to its area of application. It must be marked as being used for showers
To plan further work, it is necessary to take into account that the complete drying of the concrete layer from which the base of the pallet is constructed, especially if this layer is thick enough, takes at least a week.
After the cement has dried, final waterproofing is carried out before starting facing work. The surfaces and joints of the pallet are coated with water-repellent mastic, and a special waterproofing tape is laid around the entire perimeter.
The finished structure of the future pallet must be carefully isolated from the possible influence of water. For this, various materials are used, for example, water-repellent mastic. It is applied, trying not to miss a single area.
Stage #4 – construction of the pallet
As an alternative to the classic version of a stall with a ready-made tray, you can build a shower entirely with your own hands, starting with the construction of its base.
For this purpose, you can use brickwork, concrete blocks or cement screed. Water drainage in such trays is carried out using shower drains, the installation features of which will be discussed below.
Cement-lime compositions are not suitable for use. Concrete is prepared from a mixture of cement and pure sand, or ready-made mixtures are used, but always marked as waterproof.
The owner of a private house does not always choose the option with a brick frame for the tray of a homemade shower stall. Often it is replaced by a completely concrete screed. This option for constructing a homemade shower stall will ultimately turn out no worse than a cabin with a tray
When installing a pallet, a drain is constructed entirely from concrete, and then, with the help of formwork, the self-leveling floor is raised to the level of the ladder.
Not only must the slope be maintained to the ladder, but also a margin must be provided for the thickness of the facing tiles. The ladder grate should be a few millimeters below the floor.
In order to maintain the required slope angle of the screed, beacons are installed in the inner part of the pallet during its construction.
Stage #5 – frame construction and finishing
The most common and optimal choice of location for constructing a shower stall is in the corner of the room. With this placement, not only space is saved, but there is also no need to install two walls that replace the walls of the room itself.
The structure of the homemade pallet in the corner of the room is completely assembled. It is dry and ready for tiling work. Which are easy to do with your own hands by choosing the most suitable material
The structure of the pallet and the walls are lined. The choice of finishing method for a shower stall should be approached with special responsibility, since this is a room with a high degree of humidity and is subject to constant exposure to water and steam.
Features of tile finishing
As a rule, ceramic tiles are used for cladding walls and other elements of the shower enclosure, which harmoniously fit into the overall design of the shower stall and the room itself.
When choosing a shower tile finish, you must take into account the fragility of this material under strong mechanical stress. If it is necessary to fasten shelves and other objects to the walls of the bathroom using dowels, holes in the tiles or at their joints should be drilled very carefully.
To make a hole without damaging the tile, you must use a special drill with a soldered end, and the drill must operate in drilling mode
At the same time, tiles have many undeniable advantages over other materials and are the leader in use in rooms of this type.
The advantages of tiles include:
- tightness;
- significant service life, which with the correct installation technology is 20 - 25 years;
- ease of care;
- relatively affordable price;
- temperature resistance;
- the possibility of covering not only the walls, but also the tray, sides and floor in the shower room.
We should not forget that wet tiles are quite slippery, therefore, in order to avoid injury, it is advisable to use a rubber mat on the floor in the shower stall, which can be easily selected both in size and color.
A comb spatula is used to apply tile adhesive. It is recommended to start laying tiles from the floor. Depending on the pattern of the tiles laid on the floor, the walls are covered. It is necessary to start laying tiles on the walls from the central corner, towards the edges.
Since the size of the shower stall is not too large, you can pre-plan the option of laying tiles on the surface of the floor or wall and make markings. The purpose of marking is to ensure that at the corners you do not have to cut tiles, part of which will be less than half of the whole plate.
If possible, it is better to tidy the cabin using mosaics. This type of tile has a rich color palette, decorates plumbing fixtures well and visually smooths out the slopes of the pallet
Panel cladding rules
Using plastic or siding is a more budget-friendly option for finishing the cabin walls. If you have the necessary skills in installing panels from these materials, high-quality tightness in the room will be achieved and the attractive appearance of the shower will be preserved for a long time.
Plastic panels are an inexpensive and practical solution. Moreover, this material is easy to install yourself. And the result will delight you for the next decade
To install the panels, a vertical or horizontal sheathing is attached to the surface to be finished in increments of 50-60 cm. You can also cover the ceiling with plastic panels and siding. The material does not require much effort to maintain.
Applying latex paint
The presence of modern finishing materials does not push into the background the old proven method - painting the walls. This is the simplest and least expensive, both time- and financially, option for finishing showers.
The use of latex paint does not at all imply that the waterproofing qualities and aesthetics of the room will be sacrificed to the detriment of the price advantage.
Paint does not mean a boring and monochromatic interior in the bathroom. If you wish, you can diversify the design with your own hands using prepared stencils. To do this, you don’t need to have experience in painting, but the result will please you
The main guarantee that there is no need for a quick re-repair of the shower room after painting it is thorough preparation of the surface.
Shower walls must be perfectly level before painting. After which they are subject to coating with starting and finishing putty and primer
In addition to the above materials used for finishing showers, there are a number of others that are relatively expensive and technically difficult to work with. For example, marble, granite or decorative stone. The choice remains with the owner of the house.
Stage #6 - installation of cabin fencing
The cabin enclosure is usually installed after connecting the pan to the sewer.
The design of a homemade shower cabin can have several options:
- corner square or rectangular;
- in the form of edges;
- with a semicircular connection of 2 walls.
The methods that are used when installing cabin walls with a ready-made pallet and a pallet built with your own hands are almost the same.
The shape of the shower cabin can be very different - here the owner has the right to show his imagination. The main thing is that the invented design fits harmoniously into the interior of the bathroom
Regardless of the chosen type of cabin, the doors are installed on it as hinged or sliding type.
The front part of the cabin can be equipped with additional side walls, usually made of the same material as the doors. These walls are mounted using a vertical profile. Special seals are attached to the sashes, which are recommended to be treated with silicone.
Installation of swing doors
The process of hanging hinged doors in a DIY shower stall is not very difficult. For this purpose, commercially available furniture hinges are used. Sealing elements are installed at the joints.
Installing the swing structure is easy. It is important to buy high-quality furniture hinges - after all, they will serve in conditions of high humidity
Installation of sliding sashes
For sliding sliding doors, frames or niches are mounted at the base and top of the cabin, along which they will move on rollers. This door is hung on a profile and installed on rollers.
The doors are adjusted using eccentrics on the rollers. The glass sliding door can be equipped with a magnetic gasket for end-to-end closure, similar to refrigerator doors
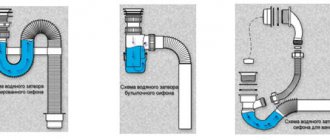
Stage #7 - connecting a homemade pallet
At the first stage of installing a homemade tray, a drain system is installed, which uses not the usual hydroboxes, but shower drains. There are two types of drains: slotted and square grating.
The square drain must be installed in the center of the shower stall, sloping towards the drain grate in the form of an envelope, otherwise the water will stagnate
When selecting a drain, in order to eliminate the effect of a “pool of dirty water” in the pan, it is necessary to compare its throughput with the performance of shower heads. The throughput of the ladder is considered good within the range of 30 - 48 l/min.
The location for installing the slotted ladder is chosen near the cabin wall. The throughput of such a design will be higher. To a ladder of any type it is necessary to create a slope according to the norm, at least 3 mm/m.p. All pipes draining water are installed in the floor.
When installing and connecting the drain, you must adhere to the manufacturer’s recommendations set out in the user manual. Following which, you can do all the work on connecting to the drain system yourself
Another method of drainage for a homemade tray is through a drainage channel, which can be placed across the entire width of the shower stall, which will ensure uniform discharge of water into the sewer. Installation and connection of drains and drainage systems to the sewerage system is carried out using the equipment included in their kit.
The following article will introduce you to the technology of constructing a shower stall without a tray, which provides step-by-step installation instructions.
Universal scheme for preparing communications
This assembly scheme is suitable for almost all shower cabins, for example, using this scheme you can assemble a shower cabin measuring 80 by 80 centimeters, 90 by 90 centimeters, 100 by 100 centimeters.
General diagram of the shower cabin assembly
Stage one
First of all, before assembling the shower cabin, unpack all the boxes and take out all the components and components.
Lay them out and check that all components are in place.
A standard shower enclosure with a glass back wall consists of the following assembly units
Pallet (some manufacturers supply the pallet assembled; if your pallet is not assembled, then you will have the following spare parts in the box with the pallet)
- Pallet
- Roof
- Front decorative screen
- Horizontal profiles - 2 pieces (upper and lower)
- Frame
- Components for assembling the frame and attaching the decorative panel (studs, bolts, legs)
Very often, all of the above components are contained in one box. This is the biggest box. Also, inside there may be a box with all the components, where you can find everything to assemble the shower cabin.
If you can't find the threaded rods for the legs and frame, shake the frame itself; some manufacturers put the studs inside the frame.
Back wall
- Two glasses of the same size
They can be immediately framed with aluminum profiles, or just two glasses if the back wall is assembled at the corners.
These two walls differ from each other in the presence of holes already drilled in them for components. Such as a shelf, mirror, foot massage, hand shower and others.
To understand which glass is right or left, look at the product image on the instructions or on the Internet. There you will see the configuration of your shower cabin, and on which side the options are located
Front windows
- Fixed glass - 2 pcs.
- Doors - 2 pieces (curved glass with holes for rollers and handles)
- Horizontal profiles - 2 pcs.
- U-shaped seals (2 or more pieces)
- Magnetic seals on the door - 2 pcs (may already be attached to the doors)
- L-shaped cutters (2 or 4 pcs)
Central pillar
It may come with options already screwed on, such as a faucet or lighting. Also, very often, inside, on the back side, various seals and other small spare parts are placed directly into the panel .
- Video instructions for assembling shower cabins
Accessories
Mandatory components that all shower cabins have
- Rollers for doors
- Pens
- Mixer
- Hand shower
- Hand shower holder
- Siphon drain
- Side window holder corners
- Fastening elements (Screws, bolts, washers, clamps)
Components that depend on the configuration of the shower cabin
- Injectors
- Rain shower
- Options control panel
- Radio speaker
- Backlight bulbs
- power unit
- Foot massager
- Steam generator
- Seat
- And so on
That is, at this stage, knowing the complete set of your shower cabin, you can visually inspect before assembly and understand what is screwed where, or suddenly something is missing.
Frame option No. 2:
- We assemble it as in the photo. The only rule is to first fold it without twisting it
(try it on) so that the mounting plates with holes are on one side. Tighten without applying any force. The profile bends and loses rigidity. Also, a nut that is welded rotten may fall off.
- All operations are basically similar to the first version of the pallet. Only “hemorrhages” in the additional assembly of the shower cabin frame with your own hands. In order to quickly and evenly screw in all the studs to an equal depth in one plane, I used to use a tape measure, measuring the distance from the floor to the end of the stud, and then the legs.
- It is better not to measure from the body of the tray; it is rare to come across even shower trays, and especially even ones at the bottom. Now I have improved the method using a laser level. Everything is done much faster.
Important:
- Be sure to adjust the fit of the bottom of the apron to the brackets (the main thing is perpendicularity and normal curvature of the circle). Then it will be very difficult to do...
Stage two.
Before assembling, place the remaining cardboard boxes on the floor . This way, you will assemble the pallet and, most importantly, the glass without damage.
Never place glass on a bare floor, especially tile or concrete.
In general, handle shower glass very carefully during assembly. Although tempered safety glass used in shower enclosures is very strong, it does have weak points, especially at the corners. Never place glass on a corner. Do not drill holes in the glass, it will simply crumble into small fragments.
All the necessary holes are already there and were made at the factory. If, in your opinion, a hole is missing, it means this is a manufacturing defect, or the manufacturer has replaced the equipment.
How to check the quality of parts?
Before installing the cabin in the bathroom, you need to make sure the quality of the components. To do this, the product is pre-assembled in a spacious room and without the use of sealant . Cabins with a ceramic tray are installed using a jigsaw.
Pallet: ceramic, steel or cast iron, acrylic (the latter is at the peak of popularity).
- Thin sanitary ware has a high chance of cracking or breaking - look at the thickness .
- Steel trays are supplied on adjustable legs, with a bottom treated with polyurethane foam and rubber gaskets underneath (so that the water jets do not create a rumble when they meet the surface). If there is no such protection, using the shower will be inconvenient.
- Acrylic needs additional support in the form of a support system , a metal frame or fiberglass bottom reinforcement. Check for the presence of parts that provide rigidity to the structure.
Scratches and chips on the frame, and even more so broken parts, are unacceptable . Test small parts for geometric consistency.
The glass is in packaging, but in the box it is not visible whether it remained intact after transportation. , tempered glass with a thickness of at least 6 mm is used for booths , which is enough to withstand many mechanical impacts. But to check, shake the box - if there is no characteristic noise of broken glass, then everything is fine. It is better to order sliding glass doors from Almetagroup.
Stage three
Assembling the pallet
If your shower cabin comes with a tray already assembled, then you can skip this step, except for the level adjustment item.
1. Turn the pallet upside down and place it on the floor, previously covered with cardboard from the packaging, or lay down a cloth.
2. We screw the legs and studs onto the frame and try the frame on the pallet.
We try on the frame, taking into account that all its holes for fastening, both at the bottom of the pallet and at the corners of the pallet, fall on the embedded parts (these are those parts on the back side of the pallet that stick out and are intended specifically for attaching the frame there)
Attention! Some manufacturers may have a frame without holes, then after trying on the frame on an inverted pallet, you must make such holes yourself. Also, for some manufacturers the holes may not match or be in a completely different place, in which case you need to make new holes based on the correct installation of the frame.
After you have tried on the frame, secure it to the pallet with self-tapping screws.
Attention! Be sure to check the length of the screws so that you do not accidentally screw in longer screws. Otherwise, they will come out inside the pallet and damage the pallet!
3. Screw on the drain siphon
Be sure to coat the places where the drain is attached to the pan with silicone sealant.
4.Install the front decorative panel
Most often, such a panel is attached using self-tapping screws and closed with decorative plugs.
5.Remove the protective film from the tray and front decorative panel
6.Move the tray into place and use the feet and level to adjust it to the correct position. Tighten all nuts with a wrench and check the level again.
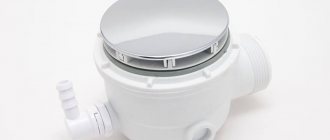
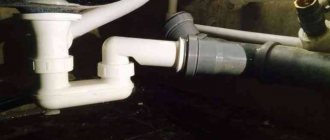
Install a siphon
Shot: @Alexander Kvasha / YouTube
Find the parts of the drainage system and assemble it according to the included instructions. Turn the pan on its side and install the siphon. To do this, remove part of the protective film around the drain hole, insert the siphon socket into it, after installing the gaskets. Screw the union nut onto the reverse side and tighten it by hand.
If you are not sure about the quality of the seals, coat all joints with sealant, but keep in mind that disassembling the joint will be problematic later. Typically no additional sealing is required.
Try the drain onto the sewer socket, but do not connect it yet. It’s more convenient to do this at the very end, after assembling the booth (when you slide it into place).
Stage five
Rear wall assembly
This stage is best done together with an assistant.
We carefully look at where our right and left walls are.
Option for assembling rear walls framed with profiles
We place the glass and the central panel on a pallet, and using self-tapping screws or bolts (depending on the manufacturer) we fasten the side walls with the central panel together.
Seal the joint between the central panel and the side walls with silicone sealant.
Option for assembling rear walls at corners
1. Place the right and left glass on the pallet and secure it with self-tapping screws, installing the side corners at the top and bottom
2.Install the center post between the rear walls
3.According to the guide holes on the sides of the rear walls, connect the central post to the walls with self-tapping screws, securing the side corners at the top and bottom.
Stage six
Front frame assembly
- Connect transverse (arched) and longitudinal (straight) aluminum profiles using self-tapping screws
- Install the front side fixed windows into the groove of the longitudinal profile, having first placed a silicone U-shaped rubber seal on the glass.
If the glass is difficult to insert, do not try to knock on it, do not hammer it in. Try to spread a little silicone sealant on the U-shaped seal and carefully, with pressure, without bending or deforming the glass, try to insert it into the groove.
3.Press the free edge of the glass with the corners of the front walls using self-tapping screws.
Stage seven
1.Place the front frame on the pallet
2. Connect the front frame and the back wall together using self-tapping screws or bolts (depending on the manufacturer). First check that they stand level and do not protrude anywhere.
3.Secure the back wall to the pallet using self-tapping screws or bolts. (depending on the manufacturer).
Attention! If you do not have holes for bolts, you will need to make them yourself using a drill, which may not be included in the kit.
Basic nuances when installing a shower stall
The main thing when installing a shower stall is to choose the right place for installation. It should be next to the hood and, if the model has many additional functions, connected to the electrical network with mandatory grounding. When assembling the pallet, you need to use a building level, since the pallet must be installed strictly horizontally. When installing a pipeline, be sure to use sealants, otherwise water leakage will force you to redo the entire job. When connecting the cabin to the water supply, you must install at least one filter. All pipes are run along the baseboards or hidden in a box or wall.
Let's look at a detailed example of installing a shower stall using Massimo as an example. This is a corner booth made in China with a high tray. Size - 100x100 cm. Bought for 30 thousand rubles. For other models and manufacturers, assembly may vary.
Stage eight
Door assembly
1.Attach the upper and lower rollers to the doors, with the wheels facing outward
2.Attach the door handles to the holes on the sides of the doors.
3.Using sealant, install the shutters and magnetic seals on the door
4.Install the door stops on the upper and lower cross sections
5.Hang the doors on the upper rollers, placing the wheels in the groove of the cross profile.
6.Snap the lower rollers into the lower roller slot by lowering the wheel.
7.Adjust the rollers so that the shower doors close tightly and move effortlessly along the guides.
Shower in the room's recess
A shower of this type does not need a tray , because...
water flows into the drain due to the slope of the floor. An alternative option is a drainage system. Convenient in cases where even the smallest pallet is too high for some family members (for example, for the disabled and the elderly). A special feature of the installation is the installation of a water collection system (stairway or channel). The pipe and siphon are placed inside the screed. According to the rules, the sewerage system is located with a slope towards the riser.
Waterproofing of walls and floors near the shower stall in this case should be of particularly high quality and use antifungal agents . A special cuff is laid on the floor, which surrounds the drainage ladder. The cuff covers the main waterproofing layer to eliminate the possibility of leaks.
The sound of water transmitted to the rooms on the lower floor can be muffled by soundproofing . Some drainage drains are initially designed to absorb unnecessary sounds.
Stage nine
Roof assembly
Remove the protective film from the roof and attach a speaker, hood light, and rain shower (if included) to the roof.
Secure the roof to the shower stall using self-tapping screws or bolts (depending on the manufacturer)
The roof is usually attached only to the rear wall
Video description
How to install a shower tray in the video:
Connecting communications
Without a sewer connection, not a single shower cabin will function. The procedure takes place in five stages:
- Removing the protective film from the drain hole.
- Replacing the rubber gasket with silicone sealant. Carried out at the request of the customer.
- Siphon installation.
Siphon structure Source wodolei.ru
- Secure the lower fastening with sealant.
- Connection to sewerage. The connection is also treated with sealant.
It is necessary to take care of waterproofing. Water should not come into contact with the electrical network even during flooding. In addition, it is necessary to take into account the installation of accessories, washing machines, sinks, etc.
Doors, walls, roof
Due to differences, there are some differences in the installation process of doors, walls and roofs. For this reason, installation is carried out exclusively according to the instructions included with the model. Bolts are used to secure the walls.
Wall installation is carried out in accordance with the following algorithm:
- The protective film is removed only from the top of the pallet. The reason is that the bottom may be damaged by the following operations.
- The pallet moves away from the wall.
- The pallet is connected to the walls using corners. Self-tapping screws are tightened without applying any serious effort.
- Some of the corners will have special holes. These elements are marked with a marker.
- The partition is removed to apply silicone.
Glass cabin without partitions Source omerkoch.co
Stage eleven
Connection to communications
1. Connect the hoses coming from the mixer to the hand shower, rain shower and to the nozzles (if any)
2.If you have an electrician, connect the wires going to the lighting, hood, and radio.