If renovations begin, the question arises of how to make an apartment with a modern interior while saving the family budget. Many repairs can be done independently, if only you have the desire and patience.
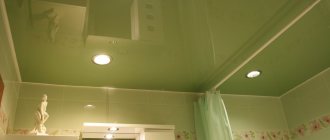
Ceilings made of decorative slats are popular today. Many apartment owners believe that it can only be installed in the bathroom. It's not like that at all.
There are slats of various colors on the market, so any room in the apartment will sparkle in a new way and amaze with its uniqueness. The slatted ceiling has many advantages:
- Fungus and harmful microflora do not damage the coating.
- Mold and rust will never appear.
- It is light weight and fastens securely.
- Easy to care for: wipe from time to time with a damp cloth and any detergent.
- The material is not too expensive.
- The ceiling in the apartment does not need to be pre-leveled or specially prepared. Only the existing coating is removed.
- You can mount the suspended structure yourself.
A slatted ceiling is a structure consisting of aluminum, metal or plastic panels, which are also called slats.
For connections, special profiles and corners are used.
Calculate the required quantity before purchasing slats
If you decide to make a slatted ceiling, decide what type and color it will have, you need to make material calculations. You can't make a mistake.
- The room is measured around the perimeter to find out the number of U-shaped profiles. It is needed for fixing on the walls so that the panels fit tightly against them.
- To count the number of combs (stringers), start marking the ceiling. The stringers will be positioned perpendicular to the slats themselves. We take a step of 1 meter.
- Finding the total area of the room or bathroom will allow you to determine the amount of decorative covering for the future suspended ceiling.
After that, go get the material and necessary supplies. Take panels with a small margin.
Nuances of choice
When purchasing a set of rack system for decorating the ceiling in the bathroom, you need to pay attention to the following details:
- equipment – availability and width of the “layout”;
Complete set without narrow strips. - rail size – width 5 – 15 cm;
- color – white, plain, multi-colored;
- texture – imitation of wood, stone;
Covering the planks with imitation wood. - coating – gloss, matte, photo printing.
Panels, layout and stringers must be from the same manufacturer. The end profile is interchangeable and only affects the complexity of assembly and the decorative value of the coating.
Since the installation is carried out by a home craftsman with his own hands without the involvement of specialists, it is necessary to purchase the required number of hangers, lighting fixtures and “combs” (stringers). To do this, you need to read the step-by-step instructions below.
Marking the ceiling
Ceiling installation is done last, when all repair work has already been completed.
To get a beautiful ceiling covering, first mark the ceiling by drawing lines on it at the selected height. First, a line is drawn along the perimeter of the room at the attachment points of the U-shaped profile.
Here you should take into account the features of the ceiling. With a horizontal surface, installation will go faster and will not present any particular difficulties.
But with a multi-level ceiling you will have to work hard when marking. If nothing will be placed under the interceiling space, then the ceiling is raised to the maximum, with a gap of 5 cm. If lamps and various communications are to be installed, then the false ceiling and the real one should be located at a greater distance from each other.
When marking for stringers, the lines must be strictly parallel not only between these extensions, but also with the side walls. In relation to the ceiling slats - perpendicular, as well as to the end walls.
The influence of lighting fixtures on the height of the structure
The choice of lighting fixtures, as well as their location, also influences how much a suspended ceiling consumes. Proper lighting allows you to zonally divide a room into functional zones and visually increase the space.
The following lighting devices are used:
- spots (spotlights). Their use allows you to lower the ceiling by 1-1.5 cm, it all depends on the specific type and shape of the spot. The use of these devices allows you to save on electricity and create an original interior. It is better to choose lamps with a metal casing.
- Chandeliers are a classic option for interior design; this solution, at first glance, is simple, but there are nuances in choosing a device. You can purchase a chandelier that will be mounted on a special strip, or a version with a hook and loop. The choice depends on the distance - how many centimeters from the ceiling to the base base. On average, for a hooked product this figure is about 3 cm.
- Halogen lamps are practical and economical, while allowing for brighter lighting. The shapes of the devices are varied, which makes it possible to design the design in an original and stylish way. When choosing lighting devices, you should take into account that lamps with high heat emission are not suitable.
- LED lighting allows you to visually enlarge the space. Their use will help create a zonal division of space thanks to a large selection of options for placing them on the surface. In this case, the ceiling drops by at least 2 cm;
- LED strips look impressive; they allow you to smooth out surface unevenness that was allowed when installing the sheathing under the tension structure. It is worth noting that the ceiling drops by at least 2 cm, and depending on the specifics of the room and the lighting method, the descent can reach 10 cm.
Video description of lamps
Fixing supporting profiles
Fixing load-bearing profiles requires accuracy and consistency of actions.
- Using dowels, secure the profile. Holes are drilled at a distance of at least 50 cm. These are places for fastening. Moreover, 5 cm should remain undrilled on each edge. Work with a drill from the outside of the profile so that burrs do not interfere with attaching it tightly to the wall.
- We fix the hangers. They can be plate or wire. It is advisable to use adjustable hangers. This facilitates the process of leveling the ceiling surface. Along the edges of the ends, an indentation is made within 40 cm, in intervals the step is from 120 to 150 cm.
- Lastly, stringers with grooves are attached. The slats are fixed on them. Select the correct length of these supporting elements. Keep an eye on the gap: from the stringer to the U-shaped profile there should be at least 1 cm. If it is made smaller, the panels will deform due to the temperature difference.
Influence on the height of the sheathing material and structural elements
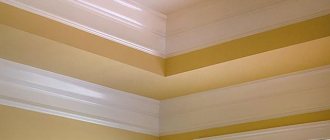
The answer to the question of how many centimeters a suspended ceiling eats up also depends on the material of the supporting structures of the house and its features. In some cases, the ceiling finishing option requires securing the corners of the room and joints.
The lathing material affects the distance between the suspended ceiling and the base surface. At the same time, the wooden sheathing conceals up to 3 cm, the metal-plastic structure requires less space, it is quite durable, and is small in size. Used to create complex structures with several levels.
As far as we know, material stretched over a metal frame lasts a long time; aluminum sheathing is most often used.
Assembling the slatted ceiling
When completing the final installation of a suspended slatted ceiling, a certain sequence is followed.
- We prepare slats of appropriate sizes in advance. Their length should be 5 mm less than the distance from one profile to another, so that the ends of the ceiling slats can be inserted without problems.
- When assembling the ceiling, the rail must be inserted into the groove of the stringer. A correctly inserted element will make a click. This is a signal that the fixation was successful.
- The last rail does not always correspond to the size of the remaining space. To cut it, you will need to make a deep furrow with a knife. The cuts must be perpendicular. The excess piece is then broken off by bending and unbending several times.
- The ceiling will look neater if you leave the cut strip for last, inserting the outermost one into the stringers until it clicks.
- All panels are installed diagonally. To install the last rail, the tactics are changed. The panel is moved to the side and the opposite edge is inserted into the groove. It snaps into place and is positioned correctly along the wall. After this, the panel is fixed until it clicks in the stringer.
Details of the installation of the slatted ceiling can be seen in the video.
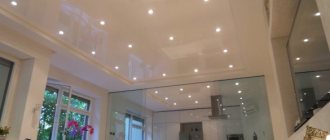
Disadvantages of systems
The price of suspended ceilings is not as high as it might seem at first glance. The cost is significantly lower than natural materials, but higher than other budget options, for example, polypropylene tiles. But this is far from the biggest disadvantage of PVC products. They are seriously criticized for being sensitive to temperatures. Due to this quality, it is prohibited to install systems in unheated rooms. In addition, the ceiling cannot be equipped with incandescent lamps with a power exceeding 60 W, as well as halogen devices with a capacity higher than 35 W.
Pressure changes have a detrimental effect on PVC sheets. Opening windows or doors suddenly increases the pressure difference in the room, so the ceiling structure may collapse. In the best case, a sail effect appears, due to which the product is pulled up or down. Often such phenomena occur in new buildings.
Under tension, the panel is afraid of some sharp objects. At the same time, we are not talking about strength - the structure can easily withstand 2-3 adults, but if it is punctured by a sharp object, the canvas will spread around the entire perimeter.
Another important disadvantage is the difficulty in cleaning. This disadvantage is due to the specificity of the materials. Thus, heavy contamination cannot be quickly removed, because abrasive substances can corrode the product, and pressing it against a hard surface to speed up the cleaning process simply will not work.
A few important installation points
When planning the installation of a suspended ceiling made of slats, many important points are taken into account:
- Where will the joints be directed? In a narrow room, the usual arrangement will not work. It is better to place the panels across. For a room shaped like a square, the stripes are applied diagonally. Small rooms benefit from lighting because the surface of the panels is able to reflect light.
- In a large room the panel length is not enough. You will have to splice with intermediate liners that hide the joints.
- If you place slats in the same room in different directions, zoning is ensured.
- You can install spotlights on the ceiling made of decorative slats. You will need to cut holes. A circle is drawn and the center is found. You need to make cuts from it as thin as possible, bending the resulting strips inward.
How to make a plasterboard ceiling with your own hands - detailed instruction article
- guide profiles;
- ceiling profiles;
- direct ceiling suspensions;
- “crabs”;
- metal scissors;
- adhesive sealing tape;
- anchor wedges;
- dowels;
- painting cord;
- laser level (can be replaced with a hydraulic level);
- perforator;
- screwdriver;
- metal screws with frequent pitches of 25-35 mm;
- self-tapping screws with a press washer;
- roulette;
- hammer;
- knife;
- spatulas wide and narrow.
In all other rooms where there is a stable temperature regime and there are no prerequisites for an increase in humidity, you can use ordinary yellow-gray plasterboard. If you are still in doubt about the choice, here are the main advantages of the material, allowing it to be among the market leaders in finishing materials for walls and ceilings: Perhaps it’s worth starting with the most important thing - with an inspection of your room and accurate measurements. In fact, it is very important not to make mistakes with the numbers, so that later you don’t rush to look for profiles or hangers that have suddenly ended: Perhaps these are the only noteworthy disadvantages of using plasterboard on the ceiling - and they are unlikely to be able to prevent you from arranging beautiful suspended ceilings at home.
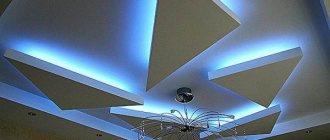
High rooms
Tension rooms are mainly installed in high rooms, such as a living room, hall or hall. Translucent canvases are mainly used here, which allow you to visually expand the room.
Experts note that the optimal inter-ceiling distance is 25-30 centimeters.
This distance allows you to equip a rough layer where lighting fixtures will be installed in the future. Diffused light indoors is created by moving the tension covering away from the base ceiling and using decorative lighting.
A system called “starry sky” is often used. It looks most attractive in hallways and halls. This is a ceiling canvas, complemented by LED or fiber optic lighting. The star effect is created by the luminescent coating. If a different coating is used using light generators, the ceiling will drop by 20 centimeters.
When it comes to volumetric or multi-level ceilings, here you can limit yourself to a minimum lowering of 10 centimeters. Such designs are usually used in medium-height rooms, which are no higher than 260 centimeters.
Multi-level designs will look great in large rooms. In this case, the designer is able to bring any of his ideas into reality, without limiting himself to anything.
Varieties by material
Stretch ceilings come in fabric and film. To decide which type is best suited in a particular situation, you need to study the characteristics of each of them.
Fabric ceilings
Such designs began to be used not so long ago: as soon as manufacturing companies learned to process the material so that it had the necessary strength indicators. After the fabric is impregnated with a special composition, it acquires the required strength and resistance to physical influences, maintaining the appearance of the textile. The products have a whole list of advantages:
- Impregnations that improve the strength of the material do not harm human health.
- The maximum width of the panel is about 6 m, which makes it possible to create a one-piece seamless structure even in spacious rooms.
- The fabric is resistant to temperature changes, so it is often used for finishing rooms that are used during the spring-summer season.
- Fabric coverings will look organically in the interior, creating coziness and comfort.
- Due to their porous structure, fabric structures allow air to pass through, so the surface can breathe.
- Easy to install. During the installation process, you do not need to use a heat gun, as for film structures, so you just need to make a lathing, moisten the fabric with water, and then stretch it onto the frame.
When choosing a fabric, you should take into account the functional purpose of the room. Like any material, fabric products have a number of disadvantages:
- The material quickly becomes clogged with dust due to its porous structure. Despite the treatment with a special dust-repellent composition, such a ceiling will need to be cleaned much more often than a film ceiling.
- Coatings absorb odors well, so they are not advisable to use in the kitchen.
- Fabric products are much more expensive than their analogues.
Film structures
This type of product is made from polyvinyl chloride. Coatings have different textures and color shades. Despite its small thickness (average value 0.22-0.25 mm), the film can withstand water pressure - at least 100 liters per 1 m2. After eliminating the consequences of flooding, the ceiling quickly returns to its original shape.
The film is produced in rolls, the width of which varies from 1.5 to 2 m. Today, film coating is made not only by foreign companies, but also by domestic companies. The latter successfully compete with products from China.
Before installation, the material is stitched with high-frequency current. The resulting seams are almost invisible, but quite durable. In this way, canvases are made according to the size of the room. To install the coating, the use of a heat gun is required because the tension of the material is carried out due to heating and then cooling of the PVC sheet. The latter have many advantages:
- moisture resistance - products can withstand flooding;
- speed of installation;
- ease of care;
- absence of reactions to shrinkage of the building, so installation can be carried out in new buildings;
- a variety of types, which allows you to satisfy the whim of any client;
- a rich palette of colors and shades (in addition, photo printing or some kind of image can be applied to the surface);
- low cost of paintings;
- the products do not absorb odor and are resistant to mold and mildew;
- hide any defects in the base floor;
- as needed, the products can be easily dismantled and hung again.
Bottom line
Before installing a suspended ceiling system in your home, you need to determine the potential loss of space. The exact parameters of how much the suspended ceiling is lowered depend on a number of factors. By taking each of them into account, you can avoid unpleasant surprises after installing the system.
Sources
- https://dommdom.ru/na-skolko-opuskaetsya-natyazhnoj-potolok-ot-bazovogo.html
- https://pod-potol.com/vidy-potolkov/natyazhnye/kakaya-minimalnaya-vysota-natyazhnogo-potolka-vozmozhnye-varianty-raschetov.html
- https://antkachev.ru/natyazhnoj-potolok/na-skolko-opuskaetsya-natyazhnoj.html
- https://HoroshijPotolok.ru/natyazhnye/natyazhnoj-potolok-minimalnoe-rasstoyanie-ot-potolka.html
- https://katalogpotolok.ru/natyazhnye-potolki/vysota-natyazhnogo-potolka-minimalnaya-vysota-natyazhnogo-potolka-ot-potolka.html
- https://dekoriko.ru/potolki/natyazhnye/na-skolko-opuskaetsya/
- https://msk-potolki.ru/montazh/minimalnaya-vysota-natyazhnogo-potolka
- https://NatyazhPotolki.ru/4325-vyisotyi-natyazhnogo-potolka.html
- https://StroyGuru.com/remont-kvartiry/potolok/na-skolko-opuskaetsya-natyazhnoj-potolok-pri-ustanovke/
- https://vodatyt.ru/natyazhnye-potolki/minimalny-otstup-ot-potolka.html
- https://PotolokvDoma.ru/natyazhnye/minimalnaya-vysota-natyazhnogo-potolka/
- https://fotopoto.ru/vysota-potolka/
3 546
Why is it not advisable to mount a wall profile close to the ceiling?
Electrical wiring under a suspended ceiling
There are several reasons for this:
- Usually, when constructing buildings, low-quality concrete is laid in the space between walls and floor slabs in order to save on building materials. Because of this, the base is not able to withstand the loads established by the standards ( per 1 m² - 100 kg of weight );
- When installing the profile, difficulties may arise during drilling holes. They will have to be drilled at an angle to enhance the reliability of the fixation;
- sometimes an electric cable is placed in such gaps (ceiling wiring), and drilling holes can cause damage to the integrity of the wires;
- Some companies, depending on the complexity of the work, increase the cost of installing a decorative structure. For example, in such a situation it will be necessary to install special spacers to ensure reliable fixation of the baguette.
Details about the reasons and options for stretch ceiling indentation in cm .