Click to share
There are at least several proven ways to change the color of grout . As you can imagine, completely replacing grout by removing the old one and applying a completely new layer is a time-consuming and tedious job that cannot be done when working with a large area of tile. Therefore, it is worth learning about other ways to make the grout perfect. So how can you change the color of your grout and freshen it up?
What it is?
Epoxy grout is a universal mixture for filling tile joints. Unlike various mixtures based on cement, which need to be diluted with water, it has a complex composition of 2 main components: epoxy resin with various additives, and a hardener. Plasticizers that increase the elasticity of the mixture, dyes, and silicon filler are used as additives.
A mixture based on epoxy resins has excellent protective qualities, protecting seams from mold, rust, and moisture penetration. In addition, epoxy grout is actively used by designers: a wide range of colors and additional special effects allows you to implement any solutions.
Epoxy grout is indispensable for finishing any premises: bathrooms, corridors, hallways. It is used when laying kitchen aprons, tiled countertops, window sills, and is suitable for loggias, balconies, verandas. After laying and drying, the coating becomes almost eternal: it does not absorb water and coloring compounds, and does not suffer from cracks and chips.
Simple coloring
Painting the spaces between the tiles is the most affordable and easiest option for updating the seams. What is suitable as a base product:
- special paint for tile joints;
- water-based composition;
- marker;
- whitewash.
Painting seams is considered not the most durable option; the effect of the result lasts for a maximum of six months. However, when using special formulations, this effect may be longer. And, even more so, when using paints that contain a sealing additive. In addition, antifungal substances can be added to special formulations to protect seams from mold. Which is another argument in favor of specialized tools.
When choosing water-based paint, you should take into account the fragility of the option, since the seams will quickly darken again. It is recommended to apply the composition to areas that have been previously cleared of dirt and mold and have been well sanded.
Options with markers and whitewashing are also not durable, although they are simple in technique. The maximum period for maintaining the effect after their use is no more than six months. In addition, the use of whitewash is allowed only in rooms with a dry climate.
Main advantages
Among the main advantages of epoxy grout for tiles:
. After drying, the mass forms a water-impermeable film, protecting the coating from bacteria and fungi. Thanks to this quality, epoxy grout is indispensable for finishing the walls and floors of bathrooms, kitchens, swimming pools, and showers. Grouts are also used in public spaces: hammams, baths, food production.
Moisture resistance- Safety . Epoxy resin-based grout does not have a strong odor and does not require additional protection during operation. It is chemically neutral, does not emit harmful substances during operation, does not crumble, and does not form cracks. The peculiarity of the composition prevents the spread of bacteria, black mold, and rust. The composition is safe for children, allergy sufferers, and pets.
- Durability . According to the manufacturers' promises, the grout lasts up to 50 years without changing its appearance and continuing to perform protective functions. For comparison: traditional cement grout needs updating after only 4-6 years.
- Attractive appearance . Seams treated with epoxy grout look perfect: they are smooth, neat, and do not require additional painting. They do not change color even when exposed to hard water, direct sunlight and chemical cleaning compounds. There are grouts with special effects on sale: shimmering, pearlescent, duochrome, metallized.
- Versatility . Epoxy grout is suitable for filling tile joints of any width, from 1 to 15 mm. It is used when working with stone, wood, earthenware, ceramic, clinker, glass or porcelain tiles of various sizes and shapes. The grout is suitable for interior and exterior work and premises of any purpose.
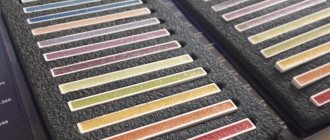
- Wide possibilities for design . Some manufacturers have more than a hundred color options for epoxy. Using grout, you can visually expand the room, highlight areas of tiles, and experiment with contrasting combinations. To create interesting effects, grouts containing shimmering or luminous particles are suitable.
Painting grout
This is a task that requires a certain amount of precision and patience. In order for the effect to be as expected, you need to choose the right type of paint - first of all, it should be abrasion-resistant and moisture-resistant paint. Therefore, the best solution would be to choose a product designed for this purpose. This type of paint:
- Suitable for painting almost any grout, even the dirtiest, with plaque and discoloration. The appropriate level of coverage allows you to mask any imperfections.
- It adheres well to the base and does not crack or peel.
- Thanks to its unique composition, it will be extremely durable. In such a product one can find, among other things, a polymer binder.
It's worth knowing that grout repair products are sold in several different forms: as markers, paint in a bottle applied with a dispenser, and paint complete with a brush and sponge.
It is best to choose your paint application method based on your preferences and painting skills. By trial and error, you can quickly move on to practice so that the effect of the repair is completely satisfactory.
How does a restorer and a marker work for filling in tile joints? How to use them?
These products are designed to quickly and effectively update the appearance of tile joints. The purpose of this substance is to penetrate the top layer so that it can absorb a new layer of paint applied, for example, using a suitable marker.
Leading manufacturers of construction chemicals offer a product for repairing grout, but there is practically no difference between products of different brands - they all work exactly the same. The big advantage of using a restorer and marker is that it gives really long-lasting results. In this case, the product also acts as an additional impregnation layer.
How to start renewing seams step by step?
- First prepare the grout by washing and degreasing it. The grout will be ready for the restorer to be applied when it is dry.
- The next step depends on what form the paint is in. If mixing is required, you need to try to do it as accurately as possible in order to get the desired color in all places. The paint must be applied accurately, but the work must be divided into squares of about 1 m2. After applying the paint, you need to wait 30 minutes for it to take effect. This time cannot be exceeded.
- After half an hour, wash off excess paint and clean areas where dirt is visible.
What if you want to not only freshen up your grout, but also change its color?
A radical change in the color of the grout requires a more careful approach. First of all, when purchasing a restorer or marker, you must follow the manufacturer's recommendations for lightening and darkening the grout.
If you are not sure whether the resulting effect will be satisfactory, it is advisable to conduct a test on a small fragment before applying the restorer to a large surface. If the color is correct, you can start updating the entire surface.
Flaws
Despite many advantages, epoxy grout has disadvantages that should be considered before starting repairs:
. The grout sets within 45-60 minutes after application, during which time you need to have time to apply it, level the seams and remove residues from the tiles. Cement grout takes much longer to dry; minor imperfections can be easily corrected after application.
Maximum curing speed- High price . Mixing components are more expensive than cement mixture. If you need to restore a small area, you will have to buy a new set. In addition to the epoxy mixture and hardener, you will need chemical cleaners, special sponges, precision dosing devices and much more.
- Difficult to apply . In order for the seams to look perfect, it is necessary to carefully distribute the composition and quickly remove excess. Incorrectly applied grout looks rough and leaves unsightly streaks or a cloudy coating on the tiles.
Choosing grout: what to buy
Experts recommend choosing grout from leading manufacturers offering a wide range of shades and textures. When choosing, you should focus not only on the price, but also on the hardening speed, packaging volume, consumption per 1 sq. m. m, recommended joint sizes. All necessary information is contained in the instructions included with the package.
Masters give preference to the following manufacturers:
Litokol
An Italian brand that produces grouts for interior and exterior use. The range includes more than 100 shades with various effects. It is easier to dilute and apply than some other compounds, but the mixture is grainy. White grout may turn yellow over time.
Mapei Kerapoxy
Option for swimming pools, hammams, industrial premises and car washes. The composition of 3 components is resistant to alkalis and acids, but requires very careful application. It has minimal grain size and is available in 10 liter packs. The color palette is more modest, with only 26 shades.
Diamond
Domestic grout, available in 46 colors. Recommended for finishing bathrooms, but can also be used in kitchens. Not suitable for outdoor use. Odorless, highly resistant to moisture.
Founds
Available in 29 colors, packaged in 2 liter packages. Ideal for outdoor use, suitable for finishing balconies, verandas, outdoor pools. It is resistant to sudden temperature changes, does not fade in the sun, is moisture resistant, and protects the coating from all types of fungus and rust.
Which color to choose: designer tips
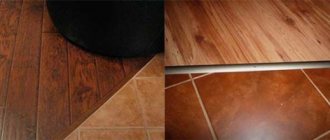
Epoxy grout not only protects joints from moisture and bacteria, but also has an important aesthetic impact. For small spaces, designers recommend grouting to match the color of the tiles, creating the effect of a single canvas. This is especially important when working with light-colored tiles: beige, sand, white or cream.
If it is necessary to create a contrast effect or highlight a separate section of the wall, dark grout is used. For tiles with a pattern, you can choose grout to match the color of the main element. Sometimes the composition is selected to match the decor of the bathroom: taps, metal trim. For this purpose, grouts with the effect of bronze, silver, and aged gold are ideal.
In swimming pools and bathrooms, you can use grout with a luminous effect or pearlescent tints. If small tiles and mosaics are used, calm neutral shades are suitable: cream or beige.
It is better not to use white grout for the floor: over time it may acquire a grayish tint. It is better to choose an option in pastel colors that harmonizes with the interior.
Important: Designers do not recommend using more than 2-3 colors in the bathroom. This is worth considering when choosing grout.
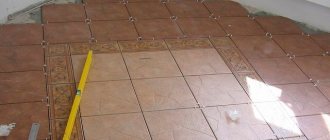
Purpose of grout for tile joints
Grouting tile joints is designed to perform two main functions:
- protective , which allows you to prevent moisture from seeping into the adhesive layer and the ends of the tiles, which significantly increases the service life of the cladding;
- decorative - tinted grout can visually emphasize the color, texture or pattern of the tile, and can also hide laying defects and unevenness of the tile itself.
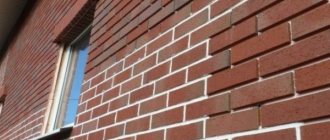
One of the functions of tile grout is decoration, so special attention is paid to the choice of color PHOTO: stroy-podskazka.ru
Questions and answers
We laid the tiles ourselves and they look great. But there is a problem - apparently, the grout was not completely washed off and unevenness remained on the surface. Is it possible to get rid of them?
A hair dryer will help remove traces of frozen grout on the tiles. Warm up the hardened areas and scrape off the epoxy with a putty knife. The procedure may need to be repeated several times.
I used white grout for white tiles, but after a year it began to turn yellow. What is the problem?
This happens with white Litokol grout. Remove the top layer with a heat gun and putty knife, and then apply a fresh coat of a different brand of grout. You can use a cream shade rather than pure white.
Can epoxy grout be used as an adhesive?
Yes, it is convenient to glue small tiles and mosaics to epoxy and then apply it to the seams. This technique will not work for large tiles.
Why can't you dilute the grout with water?
In order for the epoxy grout to lay down evenly, it is important to strictly follow the proportions specified in the instructions. Water will make the mixture too liquid and will not allow you to accurately fill the gaps between the tiles.
After 4 years, the cement grout lost its appearance and partially crumbled. I want to replace it with epoxy, is this possible?
Yes, but you will have to very carefully clean the seams from cement residues.
A tile worker advises against using epoxy, why?
Most likely, he simply does not know how to work with this material. You should not insist: an inept installer simply cannot cope with epoxy grout, and streaks, unevenness and an unaesthetic coating on the tile are guaranteed.
Is it possible to learn how to work with epoxy grout on your own?
Of course, but to achieve the desired result you will have to practice styling for more than one month. For large jobs like tiling a swimming pool, it is better to invite a specialist who knows how to work with epoxy and has the appropriate recommendations.
Epoxy grout is a multifunctional material that improves the quality of repairs and guarantees its durability. In order not to be disappointed in it and not to waste time and money on remodeling, you need to responsibly choose a specialist, do not skimp on the material and strictly follow the mixing and application technology recommended by the manufacturer.
Instructions for grouting tile joints yourself
The grouting process itself is not particularly difficult; if you follow simple rules, you can completely do it yourself. To do this, you need to purchase a minimum set of tools:
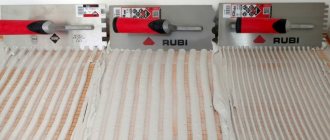
- rubber spatulas;
- knife for cleaning seams;
- paint brush or long-haired brush;
- foam sponge;
- container for mixing the fugue - if necessary.
Rubber spatulas are usually sold in sets PHOTO: stroyday.ru
You can purchase a special knife for cleaning seams - with replaceable blades, or you can use a regular kitchen knife.
A special tool for removing tile adhesive residues inside the seams PHOTO: stroyday.ru
After finishing the tile laying process, the technological pause, depending on the type of adhesive used, can range from several hours to a day. After this, you can begin grouting the tile joints.
Table 8. Instructions for self-grouting tile joints
| Illustration | Description of action |
PHOTO: stroyday.ru | The seams are thoroughly cleaned of the glue that has filled them using a scraper or knife. It is better to use a special tool, as it eliminates the possibility of damage to the front surface of the tile. The crushed adhesive mixture is swept out using a narrow paint brush |
PHOTO: stroyday.ru | If necessary, the grout mixture is diluted with water. In this case, the dry construction mixture is added to a container with pre-measured water, and not vice versa. The amount of liquid must comply with the manufacturer's requirements specified on the packaging. The fugue is thoroughly mixed until a homogeneous mass is obtained. |
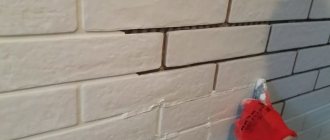
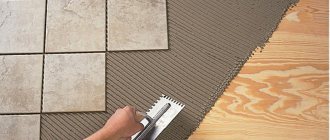
PHOTO: stroyday.ru | Using a regular household sprayer or brush, the tile joint is moistened with water. The grout is applied with sharp short strokes across the seam. At the same time, you must try to squeeze it as deep as possible into the space between the tiles. |
PHOTO: stroyday.ru | After the seam is completely filled, the spatula is cleaned and passed along the seam, collecting excess fugue |
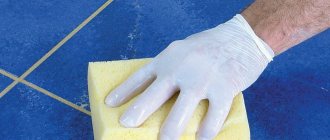
PHOTO: stroyday.ru | Until the grout on the surface of the tile has completely dried, it is removed with a sponge or damp cloth. |