Experts call the seam processing process “jointing”. Grouting/grouting is the application of an additional layer between bricks after installation. Performed on walls that are not planned to be plastered or covered with other materials.
Gaps are left during laying
What does grout do?
| Photo | Description |
| Decorative purpose: |
- emphasizes the correctness of the lines,
- gives clarity to the drawing,
- combines horizontal and vertical lines,
- makes the masonry neat and expressive,
- a new color scheme is introduced into the design,
- the appearance of the building is improved.
Grouting is not able to eliminate errors: excess cement, mistakes on bricks, curvature of walls and seams.
When can you grout:
Jointing is possible only with careful laying. When planning to decorate the seams, use only intact bricks without flaws.
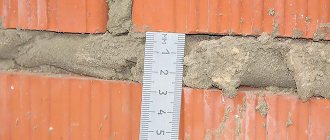
All seams must be the same thickness. According to SNiP standards, the width of the seam between bricks is maintained at 10–15 mm horizontally and 8–15 mm vertically.
Masonry under grout
Grouting is possible for construction and decorative bricks, for gypsum tiles under brick. It is also used for facade panels and natural stone.
Grout: 5 ways
Scheme of types of joints
Joining is performed in several ways:
| Photo | Description |
| Method 1. Trimming (flush) |
Simple and fast way.
The mortar that has gone beyond the plane of the masonry is removed with a trowel.
The mixture located between the bricks is compacted with a sharp spatula.
Then they are cut and smoothed with a jointing spatula.
It turns out to be concave in the middle, and the edges are covered with cement.
The joints need to be filled with a jointing spatula, which is also used to compact the cement mass.
You need an arc-shaped spatula.
They are passed along the seam, filling the space with the building mixture.
The most difficult, requires skill.
Most often used inside the house on decorative brick.
Cement is removed from the seam by 5–6 mm.
Doesn't require any special skills and is done quickly.
A trowel is passed along the seam at an acute angle and excess mortar is removed.
Tool for grouting - jointing spatula
Some craftsmen use a certain type of masonry - horizontal seams are thicker than vertical ones. This is an interesting modern design.
Mixtures for jointing
For grouting, ready-made compounds are sold (30 kg/700–900 rubles), they come in two types:
Cement mixtures are popular: they are cheaper, easy to use, and easy to clean off the surface.
The packaging contains clear instructions with dilution proportions.
Usually this is water, but there are solutions that are mixed with latex.
- high-quality types of cement;
- dyes;
- quartz sand;
- plasticizers;
- additives to speed up drying.
Epoxy grouts are effective in places with mechanical stress and in aggressive conditions.
Grouting brickwork joints
Grouting is the application of a special additional layer to the surface between the bricks after they are laid.
This material is used for vertical or horizontal wall laying, after the excess mixture has been removed from the joints of each brick, but small irregularities remain. Grouting, or as it is also called jointing, is used precisely for such purposes. The brick laying turns out beautiful and even. The layer that will protect from moisture has increased tightness and strength. As a result, the service life of the structure increases. They try to carry out the jointing immediately after the construction has been completed. Of course, there are also cases when this work is done several years later. In this case, the wall has already absorbed a large amount of moisture and is gradually collapsing.
Grouting is done only on those walls on which plaster or cladding will not be applied in the future.
Sealing stove walls with mortar
If the seams of brick stoves become leaky and begin to gradually collapse, carbon monoxide will begin to leak into the room, which is considered hazardous to health. To determine exactly where the seams have weakened, the furnace is flooded, and the place from which smoke will leak is marked. To solve this problem, the old voids are first thoroughly cleaned to a depth of 20-30 mm. Next, the masonry is washed with soapy water, all rough areas are scrubbed with a wire brush.
To seal furnace seam voids, you will need a refractory mixture, which is prepared from red clay. To make the solution as durable and heat-resistant as possible, it is recommended to add 350-400 g of salt to a bucket of the finished mortar mixture. If the gaps are very large, they are additionally sealed with a fire-resistant cord before sealing. When the solution dries, the walls are grouted; if necessary, the surface is whitened, painted or covered with greaseproof varnish.
Why do they do it?
Experts call the procedure for processing the seams of brickwork jointing. The grouting process is the application of an additional layer to cement joints. Performed if the walls are not planned to be subjected to additional cladding work. The jointing has a decorative function and also has practical characteristics.
Decorative properties are as follows:
- highlighting the texture of lines and brick patterns;
- combining vertical and horizontal lines;
- strict and clear appearance of the facade.
Practical properties include:
- increasing the level of sound insulation;
- protection from excessive moisture;
- improved heat retention;
- increased service life of the building;
- tightness.
Brick joint grout seals all cracks and covers the cement layer.
This procedure is not able to eliminate errors in the form of uneven masonry, excess cement, curvature, or stains on the wall.
Some buildings are operated without jointing, so it is necessary to note the main purpose of this procedure. As mentioned above, in this way it will be possible to increase the aesthetic perception at the first glance at the building. By resorting to this method of decoration, you can mask differences in color that may arise if the solution was mixed gradually.
Grouting for external use helps prevent the destruction of the cement mixture, thus extending the life of the building and postponing the need for major repairs for a long time. This result can be achieved by protecting the joints from excess moisture, which has a destructive effect on the cement mortar.
Repairing minor damage
Home coating and grouting
Old walls are often built with lime mortar, so this is what is used when restoring brick walls.
Other reasons to use lime mortar:
- high ductility.
- good adhesion to old masonry elements.
- slow hardening.
- no cracks during operation.
To restore seams and seal cracks in brickwork, restorers recommend MM-01 masonry lime mortar.
It is necessary to re-process all external joints to avoid differences in the color and structure of the old and new mortar.
Benefits of grouting
- Improving the appearance of the building facade. The grout has a rich color palette. Using contrasting colors, you can emphasize the harmony of the masonry.
- Protection from moisture not only the seams, but also the walls of the house, which increases their service life.
- The sound and heat insulation properties of floors are significantly increased.
It is not always possible to see buildings with similar decoration. If the masonry is subsequently to be plastered or faced, grouting is not required. Advice. When subsequently decorating the seams for masonry, you must use only intact and flawless material, and the seams must be the same in thickness. There are craftsmen who make horizontal seams somewhat thicker than vertical ones. This is a design decision.
Applying paint
If you want to make a room in Provence style, a spray gun will help you with your work. Using a compressor, filling the walls in white or any other pastel color will be much easier than rolling up the masonry with a roller, and then manually filling in the gaps with a brush.
It's another matter if you need to decorate the room in an antique style. In order for everything to turn out beautifully, you will have to decorate entirely by hand.
The idea is to decorate each brick, draw all the seams, and do it unevenly, creating a worn effect. It’s difficult to give any standard advice here, since this process has more in common with creating a picture than with banal painting.
But creativity is creativity, and even the most daring design decisions are subject to their own rules.
It should be understood that when creating a loft, you do not need to emphasize the severity and neatness of the brickwork by painting; this design is more suitable for a street urban, but not for the interior of industrial buildings converted into housing.
Also, it would not be the best idea to use graffiti to freshen up gloomy “Gothic” masonry. The idea is certainly interesting, but it does not fit with the spirit of the Middle Ages.
And most importantly, you must clearly understand that painting a brick wall is a one-way trip; you won’t be able to redo anything and return the masonry to its original appearance.
With these words, we in no way seek to scare the reader or dissuade him from looking for paint to match his brick, but only warn against rash decisions. Before you take up the brush, you need to clearly understand what you want to get as a result and how it will look in the overall interior picture.
Here is a classic option for properly painting an old brick wall, which is more reminiscent of restoration rather than repair:
If you haven’t decided on a design yet, take a look at our photographs, perhaps they will help you create your own interior.
In the meantime, we say goodbye to you. Goodbye and see you soon on the pages of the Site about the dacha.
The feasibility of using jointing
In construction, grout has decorative and practical significance. The first option has the following properties:
- Emphasize the correctness of the lines.
- A new color is added to the created design.
- The drawing turns out clear and bright.
- The appearance of the structure is improved.
- The masonry is more neat and expressive.
- Grout combines horizontal and vertical lines.
Important! Beginning craftsmen need to remember that processing seams does not eliminate surface defects: excess cement, curvature of walls, fragments of hardened composition on bricks.
High-quality jointing of brickwork
Practical value:
- Protection of cement composition from the destructive effects of moisture.
- Increased sound insulation characteristics.
- Significant extension of the protective properties of the cement base.
- Strengthening the thermal insulation of the building.
- Increasing the strength of brick masonry.
- Strengthening the density of joints.
- Additional tightness.
- Hiding small cracks and crevices.
You can seal the holes if the masonry is done carefully. If there are decorative seams, use whole bricks, without flaws. It is necessary to ensure that the solution has the same thickness on all parts of the surface.
According to accepted SNiP standards, the width of the horizontal and vertical space left should not exceed 15 mm. Grout is used for decorative, building material, gypsum tiles. A special composition is also used for facade panels and natural stone.
Final processing of a brick wall
Why is it needed?
Grouting the seams of brickwork is the alignment of the seams formed during the laying of bricks, their decorative design, possibly applying an additional layer of mortar of a different color, which will effectively emphasize the correctness of the lines and the neatness of the masonry itself. This is a unique way of finishing walls, thanks to which they will become more expressive and neat. The grout combines the horizontal and vertical seams formed during the bricklaying process into a single whole.
Where is seam stitching used?
Grouting the joints of brickwork is necessary not only for decorating the facade of the house. It makes the masonry more resistant to weather conditions, increases its tightness, and increases the service life of the entire structure. That is, it increases the density and strength of the masonry seam and makes it possible to give clarity to its pattern.
On a note! Grouting joints is not always able to improve the appearance of masonry. If the work on building a brick wall was carried out carelessly and carelessly, then even the best and carefully applied grouting mixture will not correct the curvature of the seams and walls, unremoved pieces of excess cement and other defects.
Grouting decorative brick joints
The main purposes of using grouting or grouting.
- Improving the appearance of the facade of the house. The use of grout mixtures that have different shades (and their color range is quite rich) can emphasize the neatness of brick laying. Contrasting shades are often used, for example, light-colored grout looks good in combination with dark brick and vice versa.
- Grouting will protect the cement mortar seams from moisture, which will significantly improve its service life, as well as the house and walls as a whole.
- The thermal and sound insulation values of walls made of bricks are significantly increased by grouting the joints.
Brickwork for jointing
Where can jointing be used? After all, it’s not always possible to see houses with such finishing, which means, theoretically, you can do without it? Grouting is necessary if the walls of a brick house will not be tiled or plastered in the future.
Convex jointing of masonry joints
Advice! If the walls of the house will be decorated using grouting, then during masonry it is necessary to use only intact and neat bricks without flaws. And the seams between individual bricks should be of the same thickness, although some craftsmen make the horizontal ones slightly thicker than the vertical ones - this is a kind of design move. In general, according to the requirements of SNIP, the thickness of the joint layer of brickwork should be as follows: vertical joints from 8 to 15 mm, horizontal joints from 10 to 15 mm.
Grouting joints
Grouting joints is suitable for any type of brick - construction, facing. The main thing is that the bricks themselves are beautiful if grouting work is planned specifically for aesthetic purposes. It looks very good both on the facade walls of the house and inside the room. Grouting the joints of natural stone masonry can also be an excellent option.
Demonstration of the grouting process
Possible options
There are several options for how to do the jointing. The visual effect that the wall will receive depends on the chosen method.
When working on the filling, you need to follow the sequence, starting first with the vertical seams, and then with the horizontal ones.
Special attention is not paid to the thickness of the seams. The indicator can vary from ten to fifteen millimeters for horizontal seams, and from eight to twelve for vertical ones. But most often you can find thin seams, four millimeters thick. This decision was driven by the desire to save on cement mixture. Also, the thickness of the seams depends on the worker’s approach to performing the procedure and climatic influence.
The process of finishing the seams is important regardless of the thickness, because a clear pattern will not only decorate the walls, but also increase the performance characteristics of the building. What methods exist to highlight brick seams?
Flush
This option is the easiest to implement. You can do jointing in this way even without a special tool. Filling mortar that protrudes beyond the brick or gets on it is removed with a trowel. After the main process, the seam is processed using a stiff brush.
We recommend: How and with what to tap walls for wiring: instructions for work
Concave
This method requires a special narrow spatula. This small tool will fill the seams. For ease of working on all lines, the spatula should not be long. The cement mortar is removed from the masonry, as in the previous version, after which they go along the seam with a jointing tool. The grout solution is applied inside in the same way.
Convex
To work on jointing with a convex effect, you need an arched spatula. The tool is applied to the seam with the arc part facing outwards, the resulting space must be filled with mortar. Afterwards, the spatula is moved further to the untreated area and the construction mixture continues to be applied.
Undercut or flush
This method is considered the most accessible and is most often used for making masonry joints.
The main idea is that the mortar protruding from the masonry is trimmed with a trowel, after which the seam areas are additionally treated with a hard-bristled brush. Using this method, the joining areas are given ideal smoothness and aesthetics.
Rectangular
This option is more difficult to work with than the previous ones. First, you need to remove five millimeters of cement from the seam, even if it has already dried. After this, the gaps are filled with grout mixture. This design looks interesting, but experts do not recommend using this method for facade decoration due to poor drainage.
Beveled
This method is suitable for buildings that are being built in harsh climates. In this option, the mortar between the seams is not cut straight, but at an angle. The cutting angle should be sharp, 3-5 millimeters.
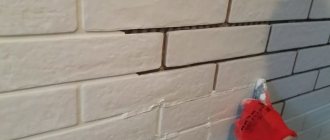
What defects may occur?
In brickwork, defects can occur not only in the condition of the brick itself, but also in the seams between it. For example, if the technology is violated, cracks may appear on the jointing.
A few more major defects that require immediate repair:
- bulging of mortar on jointing;
- corrosion of seams, surface coating with fungus or mold;
- solution detachment;
- lack of waterproofing and vapor barrier;
- freezing of seams;
- destruction of joints.
A layer of mortar between the facing bricks is also too thick or too thin. Poor filling of joints in vertical masonry also has its disadvantages: the wall loses its protective properties, and over time the masonry may collapse and repair work will have to be carried out.
To identify defects, a thorough visual inspection of the wall is carried out . As an auxiliary tool, you can use a chisel or spatula. If you carefully pry the mortar seam with the corner of a spatula, you will notice how it moves away from the jointing on its own. This means it's time for renovation.
Advantages and disadvantages
Jointing masonry joints has the following advantages:
- this finishing option requires almost no additional building materials;
- the service life of brick walls increases;
- the need for cosmetic repairs is reduced;
- protection of the surface from natural factors is created;
- the work is carried out independently, the involvement of professional specialists is not required;
- the aesthetic appeal of the walls improves;
- masonry mixture is saved.
Unfortunately, there are also certain negative aspects:
- with some jointing methods there is a slight decrease in the thermal insulation properties of the walls;
- walls made of silicate stone require special attention when jointing - it is difficult to remove cement stains from the surface of the facing material;
- the work is painstaking. The slightest mistake spoils the entire appearance of the surface.
Calculation of the amount of primer
Quantitative calculation of the primer composition is a material indicator as part of the costs of finishing work. There are no uniform reference standards, since when determining consumption it is necessary to take into account the condition of the surface, the number of layers of application of the composition, and the type of finishing material.
The average figures per 1 square meter in one layer are indicated by the manufacturer and they are approximately as follows:
- acrylic primer – 130 -150 g/m2;
- water-dispersed soil – 100 g/m2;
- deep penetration soils – 180 g/m2.
When calculating, it would be correct to increase the total amount of composition by 10%. This is explained by the fact that there may be corners and protrusions on the surface that have to be primed with a slight excess of material.
So, when calculating the amount of soil, you need to: measure the surface area, multiply this figure by the average consumption, then multiply by the number of layers and add 10% of the resulting value. This will determine the total amount of primer.
Types of jointing and their main characteristics
In fact, there are several types of seam stitching. Previously, only two options were considered: concave and convex. In practice, you can find many more of them. These are:
- To the pruning.
- Pustoshovka.
- Simply connected and doubly connected concave.
- Doubly connected convex.
The most popular options are worth considering:
1. Flush - the most common type of jointing. The procedure consists of the following steps: the remaining mortar is cut off from the surface of the wall using a construction trowel, then the gaps between the bricks are processed with a brush, resulting in smooth and clear white seams.
2. Recessed rectangular - this type is used when creating decorative finishes. This variety requires significant labor costs and is more suitable for treating walls indoors, since such jointing cannot withstand constant exposure to precipitation and atmospheric phenomena. The processing technology is as follows: in the seams at a depth of 5 mm, you need to remove the mortar, then compact the new mixture, smooth it using construction tool.
3. Concave – another common option, which involves the use of a special “jointing” tool. Excess mortar is cut off, the seams are processed with semicircular jointing.
4. Beveled - grout is able to withstand harsh climatic conditions, therefore it is common in the relevant regions. To process joints you need to use a carefully sharpened trowel. Grouting is carried out using the following technology: excess mortar is cut off with this tool, located at an acute angle, with a recess of 3-4 mm.
Approximate costs depending on type
The cost of materials and services of processing specialists is shown in the tables.
Cost of materials
Prices for different types of materials depending on brand and volume:
| Type of waterproofing | Material name | Price from |
| Injection | Foamjet 260 LV | 1069 RUR/kg |
| Restfoam 1 KM | RUR 26,340/ 10 kg bucket | |
| MasterFlex 801 | 1545 RUR/kg | |
| MasterSeal 901 | 1537 r/kg | |
| Pasting | Ruberoid | RUR 300/roll |
| Stekloizol | RUR 387/roll | |
| Izol | RUR 466/roll | |
| Smearing | Kiilto Fiberpool | 3730 RUR/7 kg |
| Ceresit CR 166 | 5926 RUR/24 kg+10 l | |
| Weber. TEC 822 ser. | 1927 RUR / 8 kg |
Cost of processing work
Prices for the services of specialized specialists in applying waterproofing by regions of Russia:
| Type of waterproofing | Moscow and Moscow region, r/sq m, from | St. Petersburg and Leningrad Region, r/ sq m | Krasnodar, r/sq m | Rostov-on-Don, r/sq m | Kazan, r/ sq m |
| Injection | 3500 | 3000 | 2800 | 2800 | 3000 |
| Pasting | 300 | 300 | 280 | 300 | 300 |
| Coating | 600 | 560 | 550 | 550 | 580 |
Required tools and materials
Before you start jointing the brickwork, you should prepare the following tools and materials:
- brushes - with hard bristles and wire;
- hammer;
- a stitching tool, which can be used as a finished factory product or home-made devices;
- a flat wooden strip with a length of at least 1 m;
- roller or soft brush to wet the surface.
If you plan to restore an old wall, you will additionally need:
- a hammer drill, a wooden wedge or a narrow chisel with the width of the working part slightly less than the thickness of the seam;
- a special mixer designed for mixing the solution;
- container for preparing cement-sand mixture;
- trowel or trowel.
In addition, you will need cement, sand, lime and water in the required quantities.
Causes of destruction
After examining the brick walls, it is necessary to determine the factors that caused such destruction. If you immediately identify the prerequisites for the appearance of defects, then in the future you can avoid a repetition of the situation.
The main reasons for repairing jointing are:
- Incorrectly prepared solution.
- The use of low-quality components to create jointing.
- Violation of the sequence of work.
- Additional load on the wall that was not previously provided for.
- No ligation of seams.
- Damage by erosion.
- Natural aging of stones.
If low-quality materials were used to prepare the joint grout or mortar, then over time such grout will become unusable. For example, the master added more water to the solution than required according to the recipe. The solution turned out to be too liquid.
After it hardens on the seams, it will begin to crumble. The exterior of a building is also affected by ultraviolet radiation, rain, wind and snow. All these factors will become a catalyst for the destruction of the jointing.
Another reason is a violation of the sequence of work . For example, it is recommended to grout only when the mortar used for the brickwork has already completely hardened.
If you do this when the solution is still wet, then you will have to redo all your work. It is important to carry out grouting in good weather: if it is too humid outside, it will play a negative role during grouting.
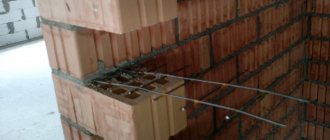
If the brick was not tied during laying , this will also cause defects. For example, in walls where the masonry consists of 2 bricks, which has an attractive appearance, often there may be no dressing at all. Poor-quality dressing provokes early destruction 25% faster.
Preparatory activities
Joining can be carried out immediately after laying the brick or after erecting the walls. In the first case, the mason brings the masonry into proper shape after several rows have been completed and the mortar begins to set.
In the second case, when laying, the master leaves the outer part of the seam empty for subsequent filling with jointing mixture, and they begin refining the wall after a certain time has passed, necessary for complete shrinkage of the masonry.
Before restoring old masonry, it is necessary to remove the mortar from the joints to a depth of 15 mm and clean the wall from dust and dirt
Preparing the masonry is carried out in the following sequence:
- If it is necessary to update the cladding of an old wall, parts of the old jointing are removed from the seams to a depth of 10 - 15 mm. To avoid damaging the bricks, it is better to use a narrow wooden wedge and a hammer. If it is not possible to knock off parts of the frozen solution, use a chisel;
- Use improvised means to remove dust and dirt from the walls of the building;
- The seams are cleaned using a stiff brush or a high-pressure apparatus. This work should be carried out very carefully, since dirt and dust particles interfere with the adhesion of the jointing solution;
- After cleaning, the seams are moistened using a roller or soft brush and a bucket of water.
The preparation of the cement-sand mixture begins only after the surface has been completely prepared for the next stage, at which the jointing solution is prepared.
You can make the jointing mixture yourself or use a ready-made factory-made composition, which is sold dry. and in wet form. Since the solution is used for decorative purposes, concrete dyes can be added to it. A concrete mixer will speed up the process of preparing the jointing mixture
We recommend: Ventilation and climate control equipment
If you prefer to do everything yourself, then to prepare the optimal mixture, take lime, sand and cement in a ratio of 1:10:1 and mix with water until the consistency of very thick sour cream is obtained. Remember that the composition remains mobile for up to 1.5–2 hours, so mix only the amount that you can use during this time.
If the mixture you receive is too liquid, you can remove excess moisture from it by placing dry red brick in a container with the solution for 1 - 2 minutes.
For large volumes of work and the presence of assistants, a concrete mixer will help speed up the process.
Method 3. Cords and tapes for seams and crack repairs
To solve the problem in more critical areas - in the bowl of a pool or reservoir, in the walls of the underground part of the foundation or the external walls of a house - serious measures and special means will be needed. Such repairs, although expensive compared to the “good old” methods described above, are many times superior to them in terms of functions, reliability and scope of application.
- Variety of products - there is a special material for each task.
- Tightness, durability, wide range of applications.
- For outdoor use and harsh conditions. Installation in winter is possible.
Disadvantage: high cost of material.
- The first 3 list items of the previous method.
- Tape or cord for “stone” cracks (selected depending on requirements).
- Polyurethane sealant for concrete, gun.
- Chisel, brushes, brushes, foam rubber.
Operating procedure
See points 1, 2, 3 described above.
4. At this stage, you should measure the depth and width of the space to be filled in order to correctly select the self-expanding cord.
5. Install the cord (tape) into the cut. With a depth of 60 mm, 18x23 mm tape is ideal. It should stay in the gap without tension, naturally. There should be 20–30 mm left for expansion to the bottom and top of the crack.
Attention! No type of self-expanding cord is subject to caulking or any other type of reinforced installation. It will fill all the space itself during the expansion process.
6. Fill the outer part with polyurethane sealant and smooth the surface with a spatula. We remove the remaining damp sealant with foam rubber. As a rule, the names of preferred brands are placed on the packaging of materials that require careful selection. Follow the manufacturer's recommendations.
In case of application in relatively dry rooms (basement, basement), where waterproofing measures are of an insurance nature, finishing sealing with cement mortar or cement repair mixture is allowed.
| Sealant | Release form | Unit price, rub. | Price kg, rub. |
| ELASTOSIL PU 20, Russia | Tube 600 ml, 500 g | 250 | 500 |
| 3M PU 575, Russia | Tube 600 ml, 500 g | 275 | 550 |
| Rubberflex Pro PU-15, France | Tube 600 ml, 500 g | 300 | 600 |
Crack repair cords are of particular interest, and we will talk about them in more detail.
Materials for concrete repair work include a huge range of products, different in price and purpose, that have appeared over the past 15 years. These are the results of scientific progress in the service of the national economy. These materials are mainly binders and are available in the form of cord, tape or continuous mat. The main components are modified clay, polymer resins and bentonite material (or an analogue). The purpose of their use is to connect two surfaces or seal them.
According to the form of release they are:
- Cord. For filling developed cracks of small depth (30–50 mm).
- Ribbon. For cracks, cracks and technological joints with a width of 20–50 mm and a depth of 50–150 mm.
- Mats. For connecting layers of cement (concrete) screed together when laying a new one on an old one.
- Water-reactive sealant paste. For filling small cracks.
Cords and tapes are called hydrophilic and have the special property of filling the space in which they are installed without creating excessive force (without crushing the seam). This happens in contact with water. That is, a dry cord laid in a crack remains dry until water appears. In contact with it, it swells and delays it, becoming a “cork”. When the water is removed, it returns to its original state. Such cords and tapes can increase in volume up to 8 times within 48 hours.
Binding mats are bentonite sheets impregnated with resins. Resins are activated in contact with liquid concrete (mortar).
The paste has properties similar to the cord, but is available in tubes. Especially for hard to reach places.
Hydrophilic crack fillers:
| Name, manufacturer | Release form | Withstands pressure, atm | Expansion coefficient, times | Price 1 linear m |
| "PLOUG", Russia | Tape, cord | 5,5 | 2,5 | 190 |
| G-Flex GX-7615, Alchimica, Ukraine | Tape 18x23 mm | 6 | 2,5 | 200 |
| Waterstop 1520, Greece | Cord Tape 18x23 mm, | 7 | 3,5 | 245 |
| FUMAX, China | Tape 18x23 mm | 6 | 2,5 | 320 |
| Hydrotite CJ-0720-2K, Japan | Tape 18x23 mm | 8 | 4 | 360 |
Safety precautions
You should not grout in hot weather, because the mortar mixture dries out much faster. Craftsmen recommend waiting out rainy weather so that the solution does not absorb a lot of moisture.
Carrying out such work requires the use of protective equipment - helmet, goggles, gloves, overalls and a respirator. Before working on scaffolding, you should study the safety requirements for high-rise repairs.
It is prohibited to hang yourself on a wall or lean on freshly laid brickwork, work on random supports, or leave tools unattended.
Decorative plaster on a brick wall
For decoration, first select the desired effect, then select a suitable mixture. For example, textured mixtures are not suitable for bark beetle, but “bark beetle” and “pebble” mixtures are not suitable for Venetian.
Popular finishing finishes include:
- for the facade - travertine, bark beetle, lamb, rain, fur coat, mosaic, sgraffito or pebble, or rusticate;
- for indoors - wet silk, Venetian, craquelure, imitation brickwork, wood, etc.
You can get acquainted with the types of effects and implementation technology in the “Decorative plaster” section.
Jointing technology during construction
In this case, the seams are processed immediately after laying several brick lines. The starting point for work is the beginning of hardening of the composition. The composition itself must retain its plasticity.
It is important to follow the following sequence:
- When laying this material, the entire composition that protrudes outwards is cut off flush with the laid masonry. Such pruning significantly increases the rate of jointing. An example of this is shown in the figure below:
Pruning
- The wall surface is thoroughly cleaned. The working tool is a stiff fleecy brush.
- Sewing vertical seams. The tool moves from top to bottom and is pressed into the masonry. Air is removed from the composition by pressure. The density and strength of the composition develops. First of all, short seams are unstitched vertically.
- To make the seams horizontally even, a wooden strip is attached to their underside. You should lean on it and guide it along the masonry line. Uniform pressure here will create a pleasant aesthetic finish.
- Filling seams vertically. Then - horizontally. Movement on the working surface: from top to bottom.
- When the composition has completely set, the elements of the jointing mixture are removed from the wall. A broom or brush is used here.
Before you begin restoration, assess the situation
What you will need: tape measure, small ruler, level, plumb line, feeler gauge.
Before starting work on the restoration of brickwork, it is necessary to assess its technical condition. The research can be divided into three stages.
Superficial inspection
Visual assessment allows you to detect:
- cracks on the surface of the brickwork,
- destruction (looseness, spalling, chips, potholes) and/or lack of individual bricks,
- weathering of seams,
- separation of masonry rows,
- rust spots and efflorescence on the surface,
- fungus, mold, moss.
Rust on the surface of the masonry is a sign of loss of structural integrity due to corrosion of steel embedded parts or reinforcement.
Measurements
To clarify the data obtained during a visual inspection and assess the extent of damage, it is necessary to measure:
- thickness and depth of cracks,
- seam thickness,
- angles of deviation of the masonry from the vertical and horizontal in the plane of the wall (at the seams),
- angles of deviation of the masonry from the plane of the wall.
Before restoring the brickwork, it is necessary to eliminate the root causes of deformation, otherwise repeated destruction cannot be avoided.
>Control of deformation development
If cracks appear in the masonry, it is necessary to monitor the dynamics of destruction. To do this you need:
measure the initial width and depth of the crack, mark the measurement location by installing beacons (made of paper or plaster); monitor dynamics at regular intervals; eliminate the root cause of deformation, which most often consists of subsidence of the soil, foundation or part of the building; make sure that the condition of the cracks has stabilized.
Composition analysis
If there is efflorescence on the masonry, it is also recommended to conduct a laboratory study of its chemical composition. It allows you to find out the amount of sulfates, nitrates, salts and moisture contained in the masonry.
Material for analysis is taken from four points distant from each other.
Cases when masonry is considered emergency
Bricks or masonry blocks overhang and threaten to fall. The masonry is deviated from the vertical by more than 1/200 of the wall height or 1/3 of the masonry thickness. The masonry bulges (sticks out from the plane of the wall) by more than 1/200 of the height of the deformed area or 1/3 of the thickness of the masonry. Cracks cross four or more courses of masonry. Damage to the masonry is more than 2 cm deep. Disorder or delamination of the masonry rows is observed.
Methods of carrying out work
Grouting can be done in two ways, in which the seams will have either a convex or sunken appearance. When performing a processing method called sunken, you will need a small spatula, with which both vertical and horizontal seams are simultaneously filled with the mixture. When the grout is applied, the tool with the arc is turned inward and the excess mortar is removed.
In order to perform convex grouting, an arc-shaped tool is applied to the gap between the bricks with an arc outward and the space is filled with mortar. When one of the seams is filled, the tool is pulled further. Thus, all horizontal seams are filled. When the mixture dries, you can do convex grouting of the vertical joints. All excess mixture is wiped off the surface of the bricks with a damp cloth.
As can be seen from the information presented, grouting the joints of brickwork can be successfully done with your own hands. A properly prepared solution will last a long time and reliably, giving brick walls an aesthetically attractive appearance and preventing moisture from entering the masonry.
Step-by-step repair technology
The first thing to do is to carefully remove all delaminated, cracked, crumbled seams . If the affected area is large, then all the grout is removed - then repairs will make sense. To do this, use an entrenching hammer with a long handle and a chisel or chisel.
It is set at an angle of 45 degrees or more, shockingly, and struck several times with a hammer on the handle of the chisel, thereby removing the old coating from the cracks. The work is long and requires patience.
Once it is completed, you can proceed to the main repair:
- Cleaning. Take a hard, large brush with synthetic bristles and carefully clean the joints of any debris that has formed, while simultaneously completing the previous work. If the brush does not fit into the cracks everywhere, you can use a small brush.
- Flushing. To prevent the brick from subsequently drawing water from the mortar or grout, the surface must be treated. To do this, connect a hose with clean water and carefully, under low pressure, pass through all the cracks where dirt was removed.
Preparation of the solution .
The mixture is prepared according to the instructions on the package. Often, this requires sifting sand through a fine metal sieve, clearing it of large impurities. Add cement in a 2:1 ratio. Then add water, achieving the consistency of thick sour cream. The solution should not be liquid.If you purchased a ready-made grout mixture, then pour 6 liters of water into a bucket and gradually pour out the grout, mixing with a drill with a “mixer” attachment. The consistency should be slightly thicker than sour cream. The grout or mortar is left to swell for a while - after which the repair can begin.
- Joining. The prepared solution is placed on a wide spatula. The tool is applied tightly to the gap. Using an additional spatula, the mixture is quickly pressed into the seams and closes all cavities. There should be no air remaining in the cracks, otherwise holes will appear, and over time the jointing will again become unusable.
- Vertical seams . They are filled most easily from the palm of your hand. The master holds a little mortar in his palm and quickly fills the vertical cracks with jointing. First, it is better to unstitch the vertical joints, then proceed to the horizontal ones.
When the grout has dried slightly, use a large brush again. They actively clean out excess mortar, making the brick beautiful and well-groomed. If during the application of the solution there is too much of it in the holes, it is important to immediately remove the excess material before it hardens.
Repair of brickwork seams - in the video:
Grouting old masonry joints
Grouting of joints can be done not only on fresh masonry. Using this method, you can improve the appearance of an old brick building. This is especially true if the mortar in the gaps has already begun to deteriorate, causing the thermal insulation of the entire structure to deteriorate.
Old brickwork
If grouting is done on old brickwork, then you must first remove part of the old mortar (about 1-2 cm). This is done using a chisel and a hammer. You can also wash off the remains of the old mortar using a special device that blasts the masonry with a powerful stream of water (for example, a mini high-pressure washer).
What walls are suitable
Walls made of white and red brick are suitable for a loft; there is not much difference here. The only thing you need to pay attention to is the condition of the masonry.
Important ! If, when cleaning the surface, shedding and destruction of bricks were revealed, the best option would be to plaster the surface and seal all defects. This work also includes the replacement of individual masonry elements with the help of restorers.
Naturally, in this case we cannot talk about any “natural” loft. Therefore, imitation masonry, decorative stone and other methods of wall decoration are used here.
Imitation of masonry using photo wallpaper Source design-homes.ru
Main stages of grouting
The seams are processed after finishing the bricklaying. The process is monotonous and it takes a lot of time to solve the problem. A novice master will be able to do the grouting himself. For inexperienced masons, experts have created step-by-step instructions:
- Prepare the surface. You need to clean the masonry and seams with a regular stiff brush.
- Rinse the wall with clean water. The most convenient way to do this is with a pressure hose. Wet the wall surface. This is necessary so that the brick does not draw moisture out of the mortar, and cracks do not form during natural drying.
- After preparation, prepare the solution according to the instructions.
- Use a large spatula to scoop up the working mixture, gradually applying it to the seam. It is better to use narrow jointing. To do this, craftsmen carefully embroider the joints located horizontally.
- To remove accumulated air and achieve maximum density, the tool is pressed into the gap.
- Vertical joints are filled with cement-sand mortar according to the standard pattern. The prepared composition is held in the palm of your hand.
- The entire area is cleaned with a brush.
- At the final stage, the type of jointing is formed. This procedure begins immediately after the solution has set.
Important! Experts recommend determining the amount of solution in advance in order to have time to use it before it hardens.
Surface preparation
Shaping the finish
Coating features
The principle of working with varnishes is similar to painting. First of all, you need to prepare the surface to be treated. The walls must be cleaned of dirt and dust, cracks filled with putty, growths cut down, and recesses filled with plaster or putty. If the facade was previously painted, the paint should be completely removed.
Leveled walls must be sanded with coarse sandpaper and then washed. A household detergent will work for this. After drying, a re-inspection is carried out. Identified deficiencies are eliminated. A dry, clean surface is primed. It is advisable to use primer and varnish from the same manufacturer.
Application is carried out in several ways: brush, roller or spray. In the latter case, the mixture (if it is not in an aerosol can) must be mixed with a solvent to reduce the density. If this is not done, the spray gun will not cope with heavy varnish.
Varnishing begins from one of the upper corners, gradually moving down. On large areas it is convenient to work with a 20 mm long pile roller. Small elements are treated with a brush with natural hard bristles. Adjacent strokes should be applied with an overlap of several millimeters. The varnish is applied in two layers or more. Each subsequent layer is applied after the previous one has completely dried (absorbed).
Caring for the varnish coating consists of treating it with a mild detergent twice a year.
See below for more details.
Joint jointing of brickwork
We recommend: Roller blinds for plastic windows: how to measure, attach, instructions and photos
Grouting the joints of brickwork is considered the finishing action of wall finishing, giving it a finished look. This action is aimed at creating an aesthetically pleasing surface.
It is necessary in most cases, since during masonry it is impossible to avoid the appearance of errors that negatively affect visual perception.
Currently, there are many different materials used for these purposes, which differ significantly from each other not only in their final appearance, but also in the chemical composition of the components.
Main goals
The grout will protect the masonry from wind and sun
If everyone knows the reason why it is necessary to grout the seams between the tiles, to give a finished appearance, then for brickwork you can give several understandable motives.
Some professionals call this action jointing, and the meaning does not change. Compulsory implementation is required for the following reasons:
- The grout composition protects the walls from the harmful effects of the environment (wind, ultraviolet rays, temperature changes, precipitation). The cement mortar deteriorates over time and the integrity of the surface is compromised. It plays the role of waterproofing; the use of high-quality material guarantees that in a few years the walls will not crack under their influence.
- There is a specific property for the seams of brickwork that protects it from blowing by strong winds. The use of grout mixtures allows them to be protected from the penetration of cold air through the micropores of the cement mortar.
Varieties of material and methods
Epoxy-based compounds are used for interior finishing.
Masonry joints must be treated with special compounds. Several different types of grout can be used for these purposes. However, in Russia, with frosty winters, only 2 types are widely used:
- cement-based mixture;
- composition made from epoxy resin.
The first is mainly used for treating external walls, the second - internal, as it is much easier to wash and clean. The color of the composition is determined depending on the wishes of the owner and is achieved by mixing with the color scheme.
In addition, you can use chemical components that will prevent the formation of fungus and mold, as well as increasing resistance to sudden changes in temperature conditions.
The appearance of the wall will depend on the grouting method chosen. The final result will depend on what tool will be used to complete the work. While some of the grout joints can be applied using a spatula, more complex compositions will require a special device.
To a greater extent, seaming is done in the following ways:
- Flush, in this case the composition is placed inside the seam, and the excess is removed with a spatula. After this, the brick is cleaned with a brush.
- A convex seam is applied using a similar method, however, the excess is not removed with a spatula, but, on the contrary, a special arc-shaped device is passed along it, after which a neat mark is formed. Thus, horizontal masonry is processed; vertical seams must be made after the first ones have partially hardened.
Why grout joints in brickwork?
When laying the external brick walls of a house, an unsealed seam may remain. The main reason for the defect is the poor quality work of the masonry team, because when forming the order, it is necessary to treat the entire surface of the masonry with mortar.
However, sometimes this technology is not followed, resulting in an empty seam, which not only spoils the appearance of the facade, but also causes the formation of cracks and breaks in the wall.
Filling the joints of brickwork is carried out in order to prevent such problems and prevent further destruction of the structure.
Mashing compounds
In hardware stores and markets you can purchase the most suitable grout for gypsum brick tiles, which vary in composition. Depending on the main component, they are:
- cement mixtures;
- based on epoxy resin.
The most popular mixtures for grouting decorative brick joints are cement-based mixtures. The main advantages of grout for decorative gypsum bricks are high resistance to temperature changes and other aggressive environmental influences and ease of application and preparation of the mixture.
Compositions based on epoxy resin have a higher level of viscosity. This property of the material allows for quick and high-quality application of the solution, so it is recommended that only professional craftsmen work with it.
As for specific brands of grouting compounds, the most popular are the following.
Ceresit
The most popular materials from Ceresit for work on surfaces lined with decorative bricks are:
- ce 40 aquastatic. Used for sealing seams whose width does not exceed 1 cm. Suitable for use on surfaces lined with stone, ceramics, glass, and decorative bricks. They are characterized by a high level of water repellency and resistance to stains. The surface of the seams is “velvet”. The material acquires maximum hydrophobicity 5 days after completion of work;
- se-33 Super. Brickwork grout is used for joints whose width does not exceed 5 mm. It is characterized by moisture resistance, frost resistance, and is available in 50 different colors. Grouting for bricks is carried out at a temperature of plus 5 degrees and above;
- ce 43 Super Strong. Brick grout is intended for external use and is used for joints up to 2 cm wide. It is characterized by a high level of moisture resistance, frost resistance, and has increased strength. It has a disinfecting effect and is not deformed.
Kiilto
They use Kiilto brand materials for work both indoors and outdoors. White grout for bricks is made from cement with the inclusion of a certain amount of lime and various polymers. Characterized by high elasticity and easy to apply. After completion of the work, it is easily removed from the surface of decorative bricks or tiles.
It has good moisture-resistant properties, is resistant to temperature changes, and frost-resistant. Used for filling joints whose width does not exceed 6 mm. The composition can be applied to a surface with a humidity of 90%, drying time is 15 minutes.
Mapei
Mapei materials are characterized as follows:
- the composition of the mixture is represented by a hydraulic binder, fractionated aggregate and modified additives, due to which increased resistance to the formation of efflorescence and fading is ensured;
- The material line is available in 5 colors;
- preparing the solution for use is as simple as applying it;
- after the material has completely hardened, no shrinkage is observed;
- characterized by a high level of adhesion and a long service life;
- due to its high density, the material does not form stains either on the surface of the seam itself or on the facing material;
- characterized by sufficient vapor permeability, a high level of frost resistance, resistant to precipitation and adverse environmental conditions;
- grout for facing bricks can be used at temperatures of plus 5 degrees and above;
- work should only be carried out in dry weather.
Tips and secrets
And finally, a few tips and secrets that will help improve the quality of the work performed.
- The sand must be sifted through a sieve so that no large inclusions remain in it. Otherwise, they may ruin the appearance of the grout.
- There is no need to rush to work with the newly mixed solution. You need to let it brew a little.
- During the work, the brick is protected from the mixture getting on it. By the way, when laying bricks, it is better if the mortar does not completely fill the gap on the front side of the wall.
Decorative seams
- If concave grout is done, then you can fill both horizontal and vertical joints at the same time. If it is convex, then first vertical, then horizontal.
- After completion of work, the remaining solution is removed immediately.
- You need to work with the mixture as quickly and carefully as possible, because it dries in a short time. But at the same time, it is important to seal the seams carefully and without mistakes, because after drying it will be difficult to simply fix them.
- To obtain a specific color, tints are purchased.
- It is important to carry out work in cloudy but dry weather.
- You can make the jointing yourself from any dense metal product, for example, from a knife.
Grouting errors
Grouting brickwork joints is one of the most durable ways to decorate the appearance of a brick facade wall. It looks very impressive, and all the work is easy to do yourself, without the help of specialists. And this is undoubtedly a huge plus.
What needs to be prepared?
What is needed to start working on sealing joints in brickwork with your own hands? You won't need many materials. The first thing you need is a grouting solution, the creation of which is described a little below.
The second thing you need to get started is the tools that will be used to perform jointing and additional actions. You may need:
- spatula/trowel;
- construction mixer or attachment for a hammer drill;
- a sieve to sift sand;
- utensils for mixing materials;
- metal device - jointing.
The jointing must correspond to the size of the seam. If the horizontal and vertical lines are different sizes, you need to purchase two tools that match each. The list contains only the basic tools that are expected to be used. All devices may not be useful in all cases. For example, if you do not plan to create a figured seam, then the excess mortar can be immediately removed with a trowel.
Next you need to prepare how to seal the seams between the brickwork. To do this you need to mix a special mixture. The color is selected after the brick laying is completed. But you can first decide on the colors when selecting materials for construction. It is better to purchase materials that are in maximum harmony with each other and match the color scheme. It happens that an experiment with colors can look quite interesting; in the case of a designer approach, a contrasting grout is obtained. But this option needs to be selected more carefully. In the event that a suitable color could not be found, jointing of the joints can be done with a regular mixture of cement and sand. This is a win-win option, since the color of such a solution is in harmony with any others.
To prepare the solution that will be used for the work, the following materials are needed:
- high-quality cement - 4 parts;
- fine sand, purified – 2 parts;
- grout mixture;
- water.
The quantities of materials indicated are approximate. Based on these proportions, costs can be calculated. To prepare the mixture, you first need to sift the sand using fine force. This is done in order to remove debris or large pieces that will spoil the finished mixture and, accordingly, the appearance of the dried grout. One part of sand needs to be combined with two parts of dry cement, after which you can add a little water. Using a special mixer for construction, you need to mix the resulting mixture until a homogeneous mass is formed. After this, the grout mixture and the remaining water are added. All components must be mixed well together and allowed to stand. After the solution has infused and the liquid has been absorbed a little, the mixture must be stirred again.