- home
- We are building a house
In this article, we tried to highlight the main points that you need to know for the construction of brickwork.
Article outline:
Standard brick sizes Designation of brick edges Designation of brickwork elements Thickness of brickwork Height of brickwork Banding systems Main types of joint bandaging Methods of masonry Joining joints Selection of videos on bricklaying Masonry reinforcement Comments
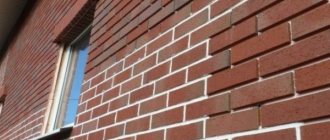
Standard brick sizes
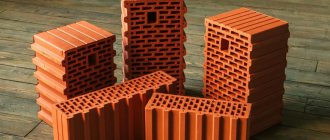
The brick is made in the shape of a rectangular parallelepiped with the following dimensions:
| Type of brick | Dimensions, mm | ||
| length | width | thickness | |
| Single brick | 250 | 120 | 65 |
| Thickened brick | 250 | 120 | 88 |
| Single brick of modular sizes | 288 | 138 | 63 |
| Thickened brick of modular sizes | 288 | 138 | 88 |
| Thickened brick with horizontal voids | 250 | 120 | 88 |
|
|
Designation of brickwork elements
To make this article more informative for you, you need to understand the simple terms inherent in brickwork, the definition of which is presented below.
Brick laying is done in horizontal rows. The bricks are laid on the mortar with a wide edge - a bed (there are methods of laying on a spoon).
Horizontal seam - a seam between adjacent horizontal rows.
Vertical seam - a seam separating the side edges of adjacent bricks. There are transverse and longitudinal.
The inner mile is a row of brickwork that faces the inner surface.
The front or outer verst is a row of masonry that faces the outer (facade) side.
Zabutka - rows located between the inner and outer versts.
Spoon row - a row of bricks that are laid with spoons to the surface of the wall, i.e. long edges.
A butted row is a row of bricks that are laid with butts to the surface of the wall, i.e. short edges.
The suture dressing system is a certain order of alternating spoon and butt rows.
Spoon masonry is a masonry in which the brick is laid with a spoon outward in relation to the front surface of the wall.
Buttered masonry is a masonry in which the brick is laid with the butt facing outwards in relation to the front side of the wall.
The width of the brickwork must be a multiple of an odd or even number of halves (1/2) of bricks.
Video description
You can learn how to lay bricks correctly and create the perfect seam from the video:
Lightweight dressing
Usually performed if insulation of the house is required. Two separate walls are formed with a void inside, which is filled with thermal insulation material. There are several design options:
Three-row dressing - every five empty rows are tied with three full ones;
Anchor ligation - bonded rows protrude into the structure, playing the role of anchors. The gaps between the walls are filled with foam concrete;
Well vertical ligation - brick laying is carried out according to the pattern of wells located at equal intervals.
Brick thickness
Depending on climatic conditions, purpose of the building and design loads, brickwork can be of the following thickness:
| Name of the masonry | Piece of brick | Thickness, mm |
| a quarter brick | 0,25 | 65 |
| half a brick | 0,5 | 120 |
| in one brick (in a brick) | 1 | 250 |
| one and a half bricks | 1,5 | 380 |
| two bricks | 2 | 510 |
| two and a half bricks | 2,5 | 640 |
| three bricks | 3 or more | 770 or more |
The thickness of the masonry = the total thickness of the bricks in the masonry + the thickness of the mortar between the bricks. Example of laying 2 bricks: 250 mm+10mm+250mm=510mm
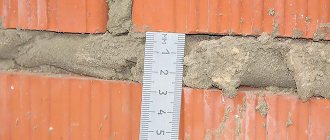
When planning dimensions, the width of a vertical joint in brickwork is usually considered to be 10 mm, but in practice this number varies from 8 to 12 mm.
Quarter brick masonry (1/4) – 65 mm
Half-brick masonry (1/2) – 120 mm
Single brick laying – 250mm
Laying one and a half bricks (1.5) – 380mm (250+10+120mm)
Laying two bricks – 510 mm (250+10+250mm)
Laying two and a half bricks (2.5) – 640 mm (250+10+250+10+120mm)
Seamless brick texture for 3d BR008 English light brick masonry
The basis for creating the texture was a photograph of English masonry made of light brick measuring 250 x 120 x 65 mm with a smooth surface. This seamless brick texture for 3D includes diffuse, displacement, normal and roughness maps. Using these cards will allow you to obtain realistic 3D material that imitates English masonry.
Texture characteristics:
- Type: seamless for 3d;
- Material: brickwork;
- Sample size: 1060 x 960 mm;
- Laying method: English;
- Shape of bricks: 250 x 120 x 65 mm (corresponds to size 1 NF according to GOST 530-2012 “Ceramic brick and stone. General technical conditions”);
- Horizontal seams: 15 mm;
- Vertical seams: spoon rows - 15 mm, butt rows - 12.5 mm;
- Seam pattern: semicircular concave;
- Brick surface: smooth;
- Brick color: light (similar to gray brick produced by brick);
- Solution color: gray.
Cards
The archive contains the following maps:
- Diffuse (diffuse color);
- Displacement;
- Normal (normals);
- Roughness (roughness).
Image properties:
:
- Format: JPEG pictures (.jpg);
- Width: 5300 pixels;
- Height: 4800px;
- Resolution: 96 dpi;
- Color mode: diffuse and normal - RGB, displacement and roughness - Grayscale;
- Color depth: 8 bits per channel;
- File weight: diffuse - 8.79 MB, displacement - 5.58 MB, normal - 30.56 MB, roughness - 9.89 MB.
Brick height
Most often used in construction:
- single (ordinary, standard) brick, which has a height of 65 mm;
- thickened brick with a height of 88 mm.
When planning the size of a building, the height of a horizontal joint in brickwork is generally considered to be 12 mm, but in practice this number varies from 10 to 15 mm.
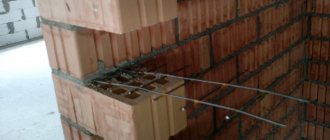
When electrically heating brickwork or reinforcing it, electrodes or a metal mesh are placed in the horizontal seams, respectively. In this case, the seam size should not be less than 12 mm.
Knowing what kind of brick (single or thickened) the structure is planned to be built from, you can easily calculate the height of the future structure:
| Number of masonry rows | Structure height, mm | |
| single brick | made of thickened brick | |
| 1 row (height of 1 brick + height of 1 horizontal seam) | 77 (65+12) | 100 (88+12) |
| 2 rows (height of 2 bricks + height of 2 horizontal seams) | 154 (65+12+65+12) | 200 (88+12+88+12) |
| 3 rows (height of 3 bricks + height of 3 horizontal seams) | 231 (65+12+65+12+65+12) | 300 (88+12+88+12+88+12) |
| 4 rows (height of 4 bricks + height of 4 horizontal seams) | 308 | 400 |
| 5 rows (height 5 bricks + height 5 horizontal seams) | 385 | 500 |
| 6 rows (height 6 bricks + height 6 horizontal seams) | 462 and further through 77 mm | 600 and then every 100 mm |
Height of 10 rows of thickened brick = Height of 13 rows of single brick = 1000 mm
In order not to calculate and reduce the sketch dimensions to the constructive ones each time, the designer uses a table of brickwork dimensions. © www.gvozdem.ru
Briefly about the main thing
You can lay brick on brick only after studying the rules for building walls. Failure to comply with the principles of masonry leads to cracking or destruction of the finished structure.
For laying chimneys, you should choose refractory bricks with high temperature resistance.
Without a plumb line and level, it is impossible to level vertical and horizontal surfaces and perform high-quality masonry.
Adobe and recycled bricks have the right to be called building materials.
Ratings 0
Dressing systems
In order to combine rows of brickwork into a single strong monolithic structure, seam dressing systems are used. For theory, we suggest that you familiarize yourself with the basic rules of bricklaying.
The following vertical seams are ligated:
- transverse,
- longitudinal.
The strength and reliability of brickwork largely depends on the quality of the ligation of vertical longitudinal and transverse seams.
The ligation of vertical longitudinal seams is carried out by laying bonded rows and helps to avoid longitudinal destruction of the masonry.
Ligament of vertical transverse seams is performed by alternating spoon and butt rows, and in adjacent rows it is necessary to move the bricks by a quarter or half. This dressing ensures: uniform distribution of the load on the nearest sections of the masonry and the longitudinal relationship of adjacent bricks, which in turn gives the brickwork solidity and strength under uneven temperature deformations and precipitation.
Suture dressing systems
The following suture dressing systems are most often used in construction:
- single-row or chain;
- multi-row;
- three-row.
Single row system (chain)
Single-row ligation of sutures is performed by sequential alternation of stitch and spoon rows in compliance with the following rules:
- The first (lower) and last (upper) rows are laid with pokes.
- Longitudinal seams in adjacent rows are shifted by 1/2 (half a brick) relative to each other, transverse seams by 1/4 (a quarter of a brick).
- The bricks of the overlying row must overlap the vertical joints of the underlying row.
With a single-row ligation during the laying process, a large number of incomplete bricks will be needed (most often 3/4), the cutting of which will entail not only labor costs, but also serious losses of bricks, which will ultimately lead to significant financial investments.
It must be remembered that the chain ligation system is the most labor-intensive, but despite this, it is also more durable and reliable.
Multi-row system
Multi-row dressing of seams is a brickwork laid out in spoon rows, which are tied in height every 5-6 rows with one butted row. With this dressing system, the following rules must be observed:
- The first, also known as the bottom row, is placed with pokes.
- Second row - spoons.
- The third, fourth, fifth and sixth - with spoons with ligation of the seams in 1/2 (half a brick). This is done regardless of the thickness of the wall.
- Along the width of the wall, the vertical longitudinal seams of the masonry of five rows do not need to be bandaged.
- The pokes of the seventh row overlap the seams of the sixth row of spoons by 1/4 (a quarter of a brick).
Advantages of a multi-row dressing system:
- there is no need for a large number of incomplete bricks;
- most productive;
- allows the use of brick halves for laying backfills;
- improves the thermal characteristics of the masonry (this occurs due to increased thermal resistance, located along the path of the heat flow, untied longitudinal seams of five rows).
Flaws:
- the third rule for cutting brickwork is not fully observed;
- strength is less than with single-row dressing;
- cannot be used when laying brick pillars due to incomplete bandaging of the longitudinal seams.
Three-row system
The three-row seam dressing system is used for bricklaying narrow walls and pillars, the width of which does not exceed 1 m.
Safety precautions when performing work
In construction, masonry can be done at different heights. Therefore, the work of a mason at the top level is considered dangerous. Various documents regulate the performance of work at height. It is necessary to observe not only the work technique, but also personal safety.
The work is performed in special clothing (work suit). The costume includes special shoes (boots) and mittens.
When working on lower floors, for example, building a private house using a ladder, the structure must be securely fastened.
Do you remember to follow safety precautions?
Main types of suture dressing
Brickwork in 1/2 brick (spoon)
Laying 1 brick (cross) - option 1
| View from the facade | Dressing sutures |
| View from the facade. Bandaging 2nd and 3rd rows of masonry | Inside view. Bandaging 2nd and 3rd rows of masonry |
Laying 1 brick (cross) – option 2
| View from the facade | Dressing sutures |
| View from the facade. Bandaging 2nd and 3rd rows of masonry | Inside view. Bandaging 2nd and 3rd rows of masonry |
1-brick multi-row masonry
| View from the facade | Dressing sutures |
Laying 1.5 bricks option 1
| View from the facade | Dressing sutures |
| View from the facade. Bandaging 2nd and 3rd rows of masonry | Inside view. Bandaging 2nd and 3rd rows of masonry |
Masonry of 1.5 bricks. Option 2
| View from the facade | Dressing sutures |
| View from the facade. Bandaging 2nd and 3rd rows of masonry | Inside view. Bandaging 2nd and 3rd rows of masonry |
Laying 2 bricks
| View from the facade | Dressing sutures |
| View from the facade. Bandaging 2nd and 3rd rows of masonry | Inside view. Bandaging 2nd and 3rd rows of masonry |
Laying 2.5 bricks
| View from the facade | Dressing sutures |
| View from the facade. Bandaging 2nd and 3rd rows of masonry | Inside view. Bandaging 2nd and 3rd rows of masonry |
Masonry technology
Before starting brickwork on the plinth, it is necessary to insulate it. To do this, a layer of roofing felt or other insulating material is laid around the perimeter of the masonry under the brick.
Using a level, several rows of bricks are laid in the corners of the plinth. The orders are attached to the corners using staples. The distance between the divisions in the order is 77 mm (65 mm height of a single brick + 12 mm height of the mortar). According to established procedures, mooring cords are pulled, which help maintain the straightness and horizontality of the erected rows of brickwork. It is advisable to place the cord every 5 m to prevent it from sagging (if the mooring is stretched by 10 m, then after 5 m a beacon is made in the form of bricks to tension the cord). The mooring cord for external walls is fastened in order, and for internal walls using staples.
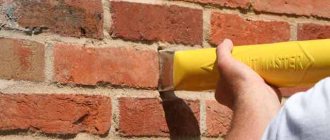
Using a trowel, a mortar is placed on the brick, the thickness is 30 mm and the distance from the outer part of the wall is 20 mm. The first row of brickwork is bonded. The brick is laid using the “press” or “butt” method.
Butt method
Using the “end-to-end” method, the brick is laid on a plastic mortar (cone draft 12-13 cm).
The sequence of actions when laying bricks “back to back”:
- At first:
- take the brick in your hands and tilt it a little,
- rake a little of the spread mortar onto the brick with the edge (with a spoon - for the butt row, with a poke - for the spoon row),
- move the brick with the raked mortar towards the brick that was laid earlier.
- Then the brick is laid on the mortar.
Press method
Using the “press” method, the brick is laid on a hard mortar (cone draft 7...9 cm) with mandatory jointing and full filling of the seams.
The sequence of actions when laying bricks “pressed”:
- A portion of the mortar is raked and pressed against the vertical edge of the previously laid brick with a trowel.
- Then they lay a new brick, making sure to press it against the trowel.
- With a sharp upward movement, remove the trowel.
- They lay down the brick.
Detailed instructions for laying bricks from marking the foundation to laying the wall are on our website www.gvozdem.ru in the article “Do-it-yourself bricklaying”.
Preparatory activities
Before giving step-by-step masonry instructions, let's consider several features of Bavarian masonry.
- Selecting a picture. There are many shades of Bavarian brick, but we do not recommend using more than four on one wall. The more shades, the more difficult it is to lay bricks, the more time it will take to find the right colors. Practice shows that 3-4 shades are quite enough to give façade walls an original look. On the Internet you can find recommendations to develop color alternations using special programs. You shouldn't go this way, don't waste your time. None of the professional masons adheres to the exact location of each brick.
An example of a Bavarian masonry scheme
Bavarian masonry, by the way, is different in that there is no exact pattern in the alternation of different bricks; it is not a strict geometric pattern. Decide on a main tone and two or three additional ones. The main tone must be at least 50%, the rest can be selected in arbitrary proportions. If it’s difficult to choose the main tone and additional ones that go with it, contact the designers or look for options on the Internet. When purchasing bricks, the number of shades must correspond to the percentage of each tone. With this in mind, calculate the materials needed before visiting the store.
Brick “Bavarian masonry Vanilla”
- To speed up the laying, roughly arrange bricks of different colors on the scaffolding. There is no need to count accurately; each color can be added if necessary.
- Bavarian masonry is done only for jointing; prepare all the tools and equipment. We will tell you what you need to have in the article below.
Laying is done under jointing
- If you wish, buy a colored solution. It costs a little more, but the money spent is justified by a significant improvement in appearance.
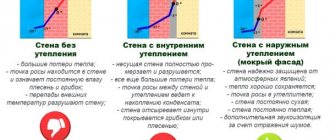
Bavarian masonry can be used as separate cladding or as the outer row of a brick wall. During separate cladding, you can use foam boards to insulate the wall. But we do not recommend using this method of insulation; its actual effectiveness is far from expected. The fact is that foam slabs lying freely in the space between the load-bearing wall and the cladding do not interfere with the thermal convention of air, which is what leads to the main heat losses.
Insulation of walls outside
Prices for thermal insulation materials
Thermal insulation materials
To eliminate convection, you need to additionally tightly fill the space between the foam and the walls with liquid foam. This significantly increases the cost of construction work.
Foam insulation
There is another method of insulating facade walls for cladding with slabs - plaster the wall, glue or fix the slabs with dowels, seal the gaps between them and only then begin cladding with Bavarian bricks. But this method also increases financial losses significantly. From an economic point of view, it is better to insulate such walls from the inside of the premises.
Joining seams
To obtain sufficient compaction of the mortar in the seams, as well as to give the brickwork a clear pattern on the outside, jointing is used. In this case, brick laying is carried out with cutting the mortar. When stitching, the seams are given the following shapes:
- triangular,
- concave,
- convex,
- rectangular,
- rounded.
For example, to obtain convex seams, concave joints are used.
To obtain better quality seams and reduce labor costs, the seams of the brickwork are unstitched until the mortar sets, following the following sequence:
- use a brush or rag to wipe the surface of the brickwork from mortar splashes adhering to it;
- embroider vertical seams (3-4 spoons or 6-8 stitches);
- unstitch the horizontal seams.
If in the future you plan to plaster the walls, then the bricklaying must be done empty, i.e. Do not bring the solution 10-15 mm to the wall surface. This method will allow the plaster to firmly adhere to the wall surface. © www.gvozdem.ru
| Undercut | Vpushoshovku |
| Convex seam | Concave seam |
| Single cut seam | Double cut seam |
Development of walls with channels
If there are channels in the wall for ventilation or chimneys, then special drawings of the layout of walls with channels are made.
The figure shows a layout for walls with channels, as well as a plan of the wall. To make the drawing easier to read, the channels are highlighted with a solid main line. The holes in the ventilation ducts are shown diagonally, and in the chimney ducts they are half darkened. Where exactly these channels are located is indicated by reference to the floor of the floor and to the outer wall.
For each channel, a digital value is separately indicated, indicating on which floor the channel begins. As can be seen in the above figure, on each floor of the building there are two ventilation ducts located in the bathroom and toilet rooms and one for the chimney, starting in the kitchen.
Detail of a wall with ventilation ducts and chimneys