Before carrying out wiring installation work in an aerated concrete house, you need to calculate the power consumption of the entire house and each room separately. The sum of the powers of all premises will give the total power consumption of the housing. This is necessary in order to determine the characteristics of the input cable, electric meter, general circuit breaker and circuit breakers located in areas or rooms. Next, we will tell you how electrical wiring should be done in a house made of aerated concrete. For readers who are electricians themselves, we have provided instructions with photo and video examples.
Calculation of power consumption and cable selection
To determine the characteristics of the required electrical cable, it is necessary to calculate the power consumption of all possible electrical appliances in the house. Let us immediately note that it is necessary to use copper wires.
For a socket group, the cable cross-section should be from 2.5 mm. Sq., for lighting – from 1.5 mm. sq. To connect powerful electrical appliances, such as a boiler, electric stove, fireplaces, etc., the cable cross-section should be from 4 mm. Sq.
Single-phase input or three-phase - which is better?
Currently, electricity consumption in private homes is constantly increasing. Back in the mid-twentieth century, the number of electrical appliances was limited to an electric stove, a couple of household appliances, and a few incandescent lamps.
Today, in any room there is a huge abundance of household electrical appliances, therefore, in private properties they often began to resort to three-phase cable inputs, abandoning single-phase ones.
Three-phase or single-phase current - the choice is yours
Many believe that a three-phase network will allow the use of power more than usual, in fact, turning on many devices at the same time. But this is not at all true, because the maximum permitted power is indicated in the technical conditions for connection.
For a three-phase connection, this is usually 15 kW for household needs, for a single-phase network - 10-15 kW. As you can see, the benefit is insignificant or completely absent. In addition, the meter for the three-phase input has bulky dimensions - and this is a minus.
However, the fact that it becomes possible to directly connect three-phase electrical receivers to the network:
- electric boilers;
- asynchronous electric drives, etc.
This is definitely an advantage. The fact is that for the operation of the same asynchronous motors connected to a three-phase network, the energy and mechanical parameters are improved. And when operating powerful electrical consumers, such as boilers and stoves, “phase imbalance” is not observed.
The operating voltage in a three-phase network is close to 380 volts, which will require you to take a more careful approach to electrical safety issues! especially if the electrical wiring is in a wooden house.
Disadvantages of three-phase input
- It is necessary to obtain permission to connect from local authorities.
- Increased risk of electric shock, as well as the risk of fire and fire, due to high voltage.
- Cumbersome dimensions of distribution input panels.
- The need to install a modular surge suppressor in the switchboard.
Advantages of three-phase input
- The ability to avoid “phase imbalance” by redistributing workload between phases.
- Direct connection to the network of powerful three-phase electrical consumers.
- Reduction of current ratings in input protection equipment and cable cross-section.
- Sometimes, the possibility of increasing the maximum permitted power consumption of electricity.
As you can see, the use of three-phase input is most appropriate for houses with a usable area of 100 sq.m. and more. When there are many single-phase current consumers, it is easy to distribute the load more symmetrically. Moreover, three-phase input is ideal for heavy-duty three-phase electrical appliances.
In other cases, the transition to “three-phase” is not particularly necessary.
Single-wire or multi-wire conductor
The single-wire cable core is more rigid and breaks if it is bent frequently. It is used specifically for stationary electrical wiring, since it is cheaper than multi-wire and easier to install.
The stranded core is very flexible, used for hard-to-reach places and for connecting portable equipment.
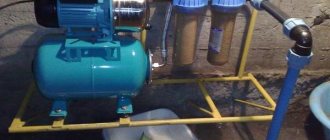
Use of transformers and stabilizers
Unstable voltage in the network is a common problem in homes, and this can cause not only breakdown of electrical appliances, but even damage to electrical wiring.
Such problems can be solved by using a voltage transformer, which is a statistical electrical device that converts voltage. You can order such a device on the website newet.ru. The principle of a transformer is that it levels out and smoothes out power surges, protecting the entire electrical system of the home.
Wiring diagrams
The reliability of electrical wiring, ease of use, and the consumption of wires and components depend on the connection diagram.
The following types (schemes) of connection are distinguished:
- All sockets and light bulbs are connected through one machine.
- All sockets are connected through one circuit breaker, all light bulbs through another.
- In each separate room there is a machine with sockets, and all the lighting is connected to another machine.
House wiring and wiring plan
The electrical wiring plan is a very important and responsible step, which you need to understand very well yourself, or resort to the services of specialists.
At the planning stage, you need to schematically indicate the following elements:
- Shield.
- Wires.
- Sockets.
- Lamps (light bulbs).
- Switches.
- Automatic machines.
- Distribution boxes.
Marking the room
In order to mark the room you will need:
- ordinary building level;
- water or laser level;
- construction pencil;
- beating thread;
- roulette.
Initially, using a laser level (water level) and a tape measure, we mark the installation locations of sockets and switches. Next, using a building level or a laser level and a pencil (mark), we mark the descents from the ceiling to the sockets and switches using strictly horizontal lines for subsequent cutting.
Using a laser level, we mark on the ceiling the places where cable and conductor products will be laid for the subsequent installation of fasteners for corrugations and cable laying.
We mark the installation location of the distribution box, which should be selected in such a way that the costs of cable and wire products are minimal.
Tags: automatic, boiler, sconce, car, view, choice, switch, house, , cable, how, design, circuit, , installation, lighting, heating, connection, wire, project, laying, cable laying, start-up, repair , socket, light, lamp, term, ten, type, current, , shield, electrical panel
Hidden and exposed wiring
Hidden wiring is an option when wires are hidden in the walls, ceiling and floor. Grooves are made in the walls, cables are laid in them and covered with plaster. Corrugated wiring in floors is filled with concrete screed. On ceilings, corrugated cables are covered with suspended ceilings, plastic panels and other hanging materials.
The main purpose of hidden wiring is visual perception and additional decorative options.
Open wiring is an option when corrugated cables are laid outside the walls in special cable channels. Cables along the floor and ceiling are laid in plinths. In appearance, such wiring does not look very nice, my subjective opinion.
And it is more susceptible to mechanical damage, for example, if it is accidentally hit by moving furniture. The advantage of open wiring is quick replacement and simple repairs.
Using corrugation
Corrugation is an additional cable protection and is used in electrical wiring quite often. But is its use always justified? Let's figure it out. Many electricians insist on the widespread use of corrugation in order to increase the amount of work and the overall cost. But let's approach this issue logically.
Think about it, if you use a good VVGng-Ls cable, which is hidden in an aerated concrete groove and plastered, does it need corrugation? From a fire safety point of view, corrugation is not needed in this case, but it can be justified if the cable is replaced when it is pulled out of the groove with wire. But it is far from certain that this will work out.
Corrugation must be used if part of the cable is laid in a concrete screed.
The use of corrugation is mandatory for open wiring, and especially when using flammable facing materials such as plastic and wood.
Installation of distribution boxes and sockets
Distribution boxes, like sockets, can be recessed into the thickness of aerated concrete, or they can completely protrude on the surface. The recessed version in aerated concrete is more preferable, as it is both more fireproof and more practical.
A large hole in aerated concrete for a socket or distribution box can be made using a screwdriver with a crown. The circles are drilled out and the inside is chopped off with a hammer.
Electrical wiring in a house made of aerated concrete
Electrical wiring is all the cables through which electricity is supplied to energy consumers. Wiring also includes various electrical equipment, fastenings, and protective devices. Not only the comfort of energy users, but also fire safety depends on the quality of electrical wiring. In order to make electrical wiring in a house made of aerated concrete once and for all and in the future to avoid gating of walls, the choice of electrical wiring diagram and its installation must be approached thoughtfully and responsibly.
Electrical wiring device
The power supply system in Russia is three-phase (380 V). Single-phase voltage (220 V) in a regular outlet is the phase voltage of one of the three phases. Electricity with a huge voltage of 10,000 V is supplied to the aerated block house via power lines. The electricity enters a step-down transformer, from which 4 wires (3 phase + 1 neutral) diverge. There are 2 wires running into the house: phase and neutral. Both wires go into the input panel, in which a circuit breaker and a voltage limiter are installed to protect the electrical network from sudden changes, for example in the event of a lightning strike. Grounding also occurs in the shield. Moreover, grounding is carried out before the machine. A three-core cable goes directly into the aerated concrete house, from which all wiring is carried out.
Electrics in a private home: features of high-quality installation
The main task that craftsmen have to face when installing new wiring is the choice of materials, wire cross-section, and characteristics of the machines. The reliability and safety of electrical appliances depends on this.
We calculate the total power of electrical appliances
An important rule: the power of the machine must correspond to the cross-section of the wiring. This will ensure that it operates before the insulation begins to melt or a fire starts.
For lighting, the total power is usually 10 or 16 A. For a group of sockets, it is taken from 16 to 40 A. Taking this into account, electrical installation of a house begins with calculating the power of consumers connected to one line. The resulting value is divided by the network power, which is 220 W. For example, if a total of consumers require 4 kW, then the required network power is 4000/220 = 18.2 A.
When making calculations, it should be taken into account that it is practically impossible to turn on all electrical appliances at the same time. Therefore, a correction factor is introduced, which depends on the total power:
- less than 14 kW it is taken 0.8;
- up to 20 kW – 0.65;
- below 50 kW – 0.5.
Using the coefficient will help you avoid unnecessary expenses on purchasing expensive equipment. At the same time, network security remains at the proper level. It is better to dispel any doubts about installation in a panel house or any other house by consulting with specialists.
For many craftsmen, electrical installation in a private building becomes a difficult task. A program for developing an electrical part project allows you to simplify it and avoid many mistakes. She will handle the following questions:
- calculation of power supply capacity;
- voltage loss calculation;
- determining the length and cross-section of the cable;
- selection of materials.
Another important bonus: using the program for installing any type of wiring will ensure an accurate calculation of the required number of lighting devices and selection of their optimal installation location. It will become a reliable assistant to a person who has minimal knowledge of electrical engineering. In addition, the program makes it possible to consider options without financial investments, study the features, advantages, and disadvantages of connections. This minimizes the likelihood of error.
Table of cable cross-section by power and current
Wiring in a house made of aerated concrete
Work begins with calculating the power of electrical appliances. It is done separately for each room, and then for the entire building. Installation of electrical wiring in a house made of aerated concrete is carried out in a hidden and open way. The disadvantage of the open option is that the power grid remains visible. If high demands are placed on the aesthetics of the room, then it is better to refuse it.
Grilling
The advantage of aerated concrete is its ease of processing. It can be easily cut with a grinder or wall chaser. Moreover, it is quite possible to do this in the house with your own hands. First, markings are made by drawing two parallel lines on the surface, then the walls are tapped. The process is noisy, dusty, and labor-intensive. To protect the body you will need gloves, goggles, and a respirator. Grilling requires care: aerated concrete is quite fragile and can crack under strong force.
Wiring in a house made of aerated concrete
* By clicking the “Get file” button you agree to subscribe to news from
8
Product Catalog
News
Company's news:
Before laying electrical wiring in an aerated concrete house or cottage, you must first calculate the total power consumption of all electrical appliances and equipment, and separately for each room. It is assumed that each room will have its own line. Next, we will be able to obtain the characteristics of the cable, metering device and protection devices that will be installed in the house. We have also added video tutorials that clearly explain how exactly it is necessary to install electrical wiring in a house made of aerated concrete.
How to winter without heating
Often, when a country house made of aerated concrete has already been built, but the heating has not been connected and winter looms ahead, you have to think about protecting the structure. You can’t leave it as is – gas blocks don’t like water and frost and can collapse.
Basic measures to protect your home:
- Draining water from all systems.
- Insulation of the base, plinth, blind area with polystyrene foam boards.
- Close doors and windows tightly or secure in all openings a thick film taken in 2 layers.
- Without exterior decoration, the building can be left for a maximum of 1-2 winter seasons.
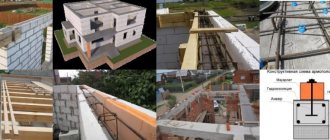
A house made of aerated concrete is an excellent solution, which is already being implemented in Moscow and the regions. Construction companies present standard and create individual designs for houses of various shapes, sizes, layouts, etc. If the technology is followed and all requirements and standards are correctly met, the structure turns out to be strong, comfortable and durable.
Connection diagram
First you need to determine the connection diagram. After this, it will become clear how much cable is needed, how many components are needed, as well as how reliable and safe the future wiring will be. You can consider three main electrical wiring diagrams in aerated concrete:
- all lines (sockets + lighting) are connected to one protection device;
- all socket lines are connected through one circuit breaker, and lighting lines through another;
- all outlet lines in each room are connected to a separate circuit breaker, all lighting lines are connected to another (but powerful electrical appliances, such as an electric stove or boiler, are still connected separately).
As a rule, the third option is optimal. The figure below clearly shows the electrical wiring diagram in a house made of aerated concrete:
Now you need to decide which way the wiring will be laid - open or hidden.
Hidden laying method
Aerated concrete is a fairly easy-to-process building material, so there shouldn’t be any problems with chiselling the grooves. This can be done either with a special wall chaser or with the familiar “grinder”. No additional training is required for this job.
Next, you should mark the routes along which the wires will be laid, and also mark the installation locations of sockets and light switches. One important rule should be observed here: laying can be carried out either horizontally or vertically. No sloping areas.
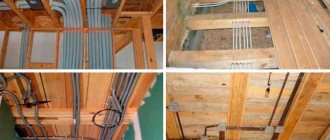
Based on the markings, the electrician hollows out the grooves and cuts out areas in the right places for installing switches, sockets, etc. The cables and wires laid in the grooves are secured using clamps, as can be seen in the photo below. After the installation is completed, the voids are filled with mortar and leveled.
Separately, you should consider laying cables in grooves using corrugated pipes and cable channels. This is a more expensive and time-consuming method; it is only necessary when you constantly have to change the electrical wiring. An additional disadvantage when using corrugation is the need for deeper grooves. At the same time, if there is a problem, there is no certainty that using the same corrugation it will be possible to restore the electrical wiring.
In addition to walls, wiring can also be carried out along the ceiling. Depending on the type of ceiling (monolithic, reinforced concrete, wooden floors), the method of connecting wires to chandeliers, lamps and ceiling lamps is selected. So, if the ceiling is monolithic, then even at the construction stage, channels for electrical wiring should be laid there. If the ceiling is made of factory reinforced concrete floors, then you can try laying it through technological holes. In the case where the ceiling is wooden, you should prefer an open laying in compliance with all the rules of the PUE.
And finally, the last possible option for electrical wiring in a house made of aerated concrete is on the floor.
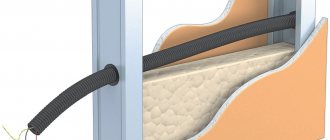
When laying this way, the cable must be protected with the same corrugation, as is done in the photo below:
Corrugation in the walls
As they say, the rules of the PUE, clause 7.1.37, embedding a bare cable in a groove is allowed. But in the same rules there is an explanation of what the word allowed means:
It turns out that theoretically you can use the cable in walls without protection, and the rules leave you a loophole for this. The main thing is to legally justify why you did it this way and not otherwise.
Moreover, in the updated set of rules SP 256.1325800.2016 “Electrical installations of residential and public buildings. Design and Installation Rules” plainly states:
That is, it is possible to plaster not only the cable, but also separately the wires in the protective sheath.
What about laying on the ceiling, without plaster? Here we look at paragraph 15.15 from the same code:
And here, too, it is clearly stated that it is allowed to lay individual cables along the ceiling on brackets, i.e. without any corrugation.
In fact, both the PUE and the joint venture say the same thing in two ways - without corrugation it is possible, but with corrugation it is necessary.
At the same time, there are several practical considerations that clearly show that laying a cable without corrugation cannot be considered a durable installation.
Open laying method
Open laying is simpler, faster and allows you to do without chiseling grooves. Wires or cables laid openly must have double insulation. Sockets and light switches are mounted on the walls. Small wooden planks are installed under them, with a lining made of non-combustible material (asbestos, etc.)
In most cases, the optimal cable for open installation in the house is VVG ng. It has a shell and insulation made of PVC, which is flame retardant when laid in groups.
Installation of branch boxes, sockets, switches in aerated concrete
Branch boxes should be located on cable routes in places where cables branch and connect. When installing hidden wiring, they are buried in the structural material and firmly fixed. Due to the high porosity of aerated concrete, not every fastener can reliably fix the body of the junction box, so it is better to use building mixtures. They can be used to attach the box to aerated concrete.
You can quickly prepare such a solution by mixing alabaster and glue for gluing ceramic tiles.
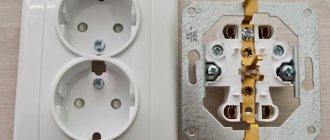
When installing open wiring, the installation fittings of sockets or switches are attached to aerated concrete using special fasteners. It consists of self-tapping screws, polypropylene dowels for aerated concrete or chemical anchors that prevent sockets from being pulled out of the walls. This sometimes happens when there are large mechanical forces on the spring-loaded contacts of the sockets, if the fasteners are applied incorrectly.
Compliance with the rules for laying electrical wiring is the key to the safety and reliable operation of electrical appliances and equipment used in the house.
Scheme selection
So, let's start by choosing a consumer connection scheme. The wire consumption for electrical wiring, the number of components, as well as the reliability and ease of use of the installed wiring depend on it. You can consider three main wiring diagrams in aerated concrete:
- all sockets and lighting fixtures are included through one circuit breaker;
- all sockets are turned on through one circuit breaker, and lighting through another;
- all sockets in one room are turned on through a separate circuit breaker, all lighting through another (do not forget that the boiler, washing machine, electric heating, electric stove are turned on separately from other consumers).
The most suitable third option. The electrical wiring diagram in an aerated concrete house may look like this:
Next, you need to decide on the type of wiring: hidden or open. Each case has its own specifics of performing the work and a set of components for electrical installation.
The main stages of installing electrical wiring in a private or country house
According to many years of experience in performing electrical installation work, all work can be divided into the following stages:
- Drawing up a power supply diagram (number and location of sockets, switches, lamps, etc.).
- Determining the installation location of the distribution panel.
- Marking ceilings, walls and floors for laying cables and wiring products and installing socket boxes and distribution boxes.
- Chasing walls for hidden electrical wiring.
- Grooving walls for installing a distribution panel (when installing an internal panel).
- Drilling holes for installing socket boxes and distribution boxes.
- Installation of routes for fastening the corrugation (if the laying of cable and wire products will be carried out in the corrugation).
- Laying of cable and wire products.
- Installation of socket boxes and rough sealing of grooves.
- Disconnection of distribution boxes.
- Installation of the ground loop.
- Checking the grounding resistance of the mounted circuit.
- Assembly and installation of the shield.
- Checking the functionality of all sockets and switches.
- Installation and connection of sockets, switches and lighting fixtures.
Let us consider in more detail the main stages so that the installation of electrical wiring in the house is carried out with high quality and will last at least 20–25 years (this is exactly the minimum service life of copper wiring).
Hidden electrical installation
Aerated concrete is an easy-to-process material and, unlike concrete walls, does not cause any particular problems for laying internal wiring. It can be easily cut with both a wall chaser and an ordinary grinder, but there is more dust. You can do this step yourself.
After this, you need to mark out the electrical wiring, as well as the installation of sockets and switches for the entire area. One rule must be observed: any laying is carried out only horizontally or vertically, connecting at an angle of 90 degrees. There should be no diagonal laying patterns in the house.
According to the drawn up diagram, the electrician creates grooves, cuts out seats for switches, sockets, sconces, and wall lamps. In the prepared aerated concrete, he walls up electrical components, lays wires, and secures them in the grooves using clamps, as shown in the photo below. After this, the voids are filled with mortar and leveled.
Some owners have a question about how to lay a cable in the wall using internal cable ducts or electrical corrugation. This method is only suitable for conditions where regular changes occur in the wiring diagram. As a rule, a well-thought-out and calculated scheme does not require regular changes and installation along previously prepared channels is not carried out. A huge disadvantage is that to lay the corrugation you will need to cut the groove in the aerated concrete 1.5-2 cm deeper. If a section of cable fails, there is also no guarantee that it will be possible to restore the electrical network using built-in cable ducts or walled-up corrugation. This is true for installing wiring in aerated concrete walls and in walls made of brick or concrete.
How to conduct electricity through the ceiling? If the walls of the house are made of aerated concrete, then the ceiling can be made:
- monolithic;
- reinforced concrete floors were installed;
- wooden floors have been installed.
Depending on the type of interior flooring, you need to choose a method for connecting wires to chandeliers and ceiling lighting. If the ceiling is monolithic, then during its manufacture channels should have been provided for laying electrical wiring. In this case, it is enough to use a ready-made solution. In the case of installed prefabricated reinforced concrete floors, you can use technological holes that are provided in advance. If these are wooden floors, then it is necessary to carry out an open installation in compliance with all the requirements of the PUE. We talked about how to install electrical wiring in a wooden house in a separate article.
The photo below shows another popular option for electrical wiring in an aerated concrete house - along the floor:
In this case, the cable must be additionally protected with black corrugation (it is more durable). We also talked separately about how to lay wiring on the floor.
Types of electrical wiring
There are two types of wiring used in a private home:
- open. The wires pass along the surface of the wall, the supporting points for them are ceramic insulators-weights;
- closed. The cable is laid in a groove - a recess made in the wall for hidden placement of elements of the house's energy supply system.
Open wiring was used in the early to mid-20th century, and at some time was practically forgotten. However, it was remembered when wooden houses made of rounded logs, not sheathed or finished with anything on the inside (not counting transparent paint and varnish coatings) came into fashion. In such conditions, it is impossible to use hidden wiring, since there is simply nowhere to hide it.
Closed wiring is familiar to everyone - this is a common type of placement of elements of a home power supply system. All wires are laid in special cable channels or in wall recesses (grooves), sockets and switches are internal. Cables or wires are not visible, finishing work can be done in a given style, without unwanted technological additions.
Today, both types of electrical wiring are used, and the open type is found not only in wooden, but also in brick houses. The fashion for open placement of wires creates many problems - today there are many more of them than in the last century, therefore, you have to be cunning - stylize one wire for open installation, placing the rest in hidden channels.
The main problem with hidden wiring is the need for labor-intensive gating, a dusty and very noisy procedure. However, aerated concrete differs favorably from dense building materials - it is soft and allows you to make a hole with hand tools. For this purpose, a special wall chaser is often used, designed to make grooves for reinforcing rods in the masonry of gas blocks.