By visual inspection, the quality of building construction is determined by how accurately the thickness of the brickwork joint is maintained.
It does not matter what kind of object is being built, be it a residential building or an outbuilding, fencing or decorative landscaping items. Beauty should be in everything, and for technical structures it is very important to comply with the given proportions. Failure to maintain horizontal and vertical distances between bricks not only reduces the attractiveness of the house, but also leads to a decrease in its reliability. That is why constant monitoring of seams during construction is carried out. Control is carried out both visually and through measurements.
Brick laying technique
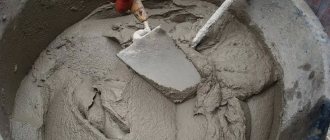
Before use, the solution is stirred, since heavy particles can sink down and water can rise to the top.
The mixed solution is placed in buckets and transported to the masonry site, where it is distributed. Immediately lay a strip of mortar - a bed - for one row. For a bond row the bed width is 200-220 mm, for a spoon row - 80-100 mm. If the seam is filled completely, about 10-15 mm are removed from the edge, the height of the mortar is 20-25 mm, which, when laying, provides a seam of 10-12 mm. Before installing the brick, the mortar is leveled with a trowel. There are three techniques for bricklaying. On hard, low-plasticity mortar, the “squeeze” technique is used. In this case, the seams are completely filled. If the solution is plastic, use the “butt” technique.
Back-to-back bricklaying technique
As already mentioned, this method of laying bricks is used with plastic mortar. It should be mobile, easy to apply and move. This is achieved by adding additives. You can spread the solution over the entire surface of the wall at once: additives allow you to extend the time before setting begins.
The bed is laid with a thickness of about 20 mm, with a gap of about 15-20 mm left from the edge. This indentation allows you to avoid squeezing out the mortar onto the front surface, but at the same time the edges of the seams often remain unfilled. This significantly reduces the strength of the wall, therefore, in regions with seismic activity, laying milestone courses (external and internal) using this method is prohibited.
When laying a spoon row, take a brick, holding it with a slight slope. Approaching what has already been laid, at a distance of 8-10 cm they begin to rake up the solution with the edge (poke). When joining, it turns out that the seam is already partially filled. The brick is pressed down a little (settled), pressing it to the bed. The excess is removed with a trowel and sent either to a bucket or to the wall.
Technique for laying bricks “back to back”
With this technique, it often turns out that the vertical seams are only partially filled. That’s why this method is also called “wasteland”. They are filled in when laying the bed for the next row. If the technique is not yet well developed, it is better to fill the seams before laying the next row: voids reduce the strength and thermal insulation characteristics.
When laying a bonded row, everything is exactly the same, only the mortar is raked with a spoon edge. The zabutka is laid, like the bonded rows, and then pressed with the palm of your hand. It is necessary to ensure that all the stones are at the same level. This is done using a building level, and the verticality of the wall is checked with a plumb line every 3-4 rows.
"Press" technique
When working with hollow bricks, hard mortars are usually used. In this case, bricks are laid using the “squeeze” technique. In this case, you also have to work with a trowel.
The bed is laid at a distance of 10 mm from the edge, the thickness is still about 20 mm. Since such a composition does not stretch well, it is raked to the edge of the laid brick with the edge of the tool. With your left hand, take the brick and press it against the trowel, while simultaneously pulling it up. At the same time, they continue to press with bricks, achieving the required seam thickness (10-12 mm).
“Butt-to-end” technique
Excess mortar is picked up with a trowel. Having laid several fragments, take a level, checking the horizontality of the row, tapping the trowel handle to straighten the position. The solution that has been squeezed out is picked up. The result is a dense masonry, but the process takes longer: more movements are required.
Butt-together with trimming
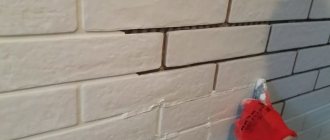
The average method in terms of productivity is butt jointing with cutting of seams. With this method, the bed is laid out close to the edge (10 mm), as when laying pressed, and the laying technique is flush: the mortar was raked with brick, placed, pressed down, and the excess was removed. If the wall is not subsequently planned to be finished with anything, after several rows it is necessary to take a jointer - a special tool and give the seams the required shape (convex, concave, flat).
As you can see, this is a kind of symbiosis. To make it more convenient to work, the solution is also made with “intermediate” plasticity. If it is too liquid, it will flow down the wall, leaving streaks, so it needs to be kneaded a little more tightly than when laying end-to-end.
Laying one and a half and two bricks
The basic principle of high-quality construction is the precise ligation of the vertical seam that connects the entire structure.
Brickwork is carried out according to certain rules. The basic principle of high-quality construction is the precise ligation of the vertical seam that connects the entire structure. The essence of dressing is to properly distribute the load and increase the strength of the structure. Bandaging can be done in three ways:
- a transverse seam that prevents the displacement of bricks from joining throughout the entire structure;
- vertical suture dressing;
- a longitudinal seam that prevents delamination and displacement of the building material distributes the load evenly.
Brick walls are laid out in two ways: multi-row or single-row. For the single-row type, it is typical to lay out the row with the spoon side out, and the second row is laid out with the butting surface. As a result, it turns out that each transverse seam moves by ¼ of the building material, and the longitudinal seam by 0.5.
The multi-row type is characterized by alternation through several spoons.
Construction in one and a half pieces. The thickness of the walls of a brick house can be 380 mm. This masonry method is quite common and is called one and a half bricks. The product begins to be laid out from the corners, the first bricks are placed perpendicularly. The first row is laid out using a construction cord, which is fixed at the height of the first and second bricks. We place the bonding surface on the outer side, and the inner side with the spoon part. The next row is laid out opposite the first, thus creating a mirror image. The thickness of the wall, built at one and a half bricks, can withstand the load of the roof and the ceiling between floors. The peculiarity of this method is that the vertical seam does not coincide; it is completely covered by the surface of other bricks.
Construction in two parts. The method of laying 2 bricks or 500 mm is performed in places with strong temperature changes. This thickness of brick walls does not require the use of insulation materials. The quality of the design directly depends on the durability of the structure and its thermal insulation.
Joining options
Joining gives the structure a finished look and is carried out upon completion of the masonry. The work is painstaking and requires careful execution from a specialist.
The jointing serves to protect the mortar and brick from moisture penetration through existing cracks and irregularities. For better adhesion, special components are added to the solution. The seam between the bricks, the size of which corresponds to the standards, is embroidered with a special tool. Its use allows you to carry out work more clearly and accurately.
There are several types of jointing:
- Convex and concave
- To trim
- Pustoshovka
- Single-cut
- Double-cut concave and double-cut convex.
The paneling of the front side of the wall has its own differences. Depending on the design, the seam is made full or incomplete, with a recess of up to 15 mm. An incomplete seam promotes better plastering of the surface.
The convex shape of the seam protects the masonry from the effects of precipitation. If the climate is drier, the seam is made more concave.
The original design is considered to be a panel made in black or white. Its contrast with brick makes the appearance of the building more attractive.
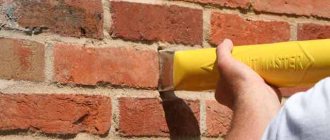
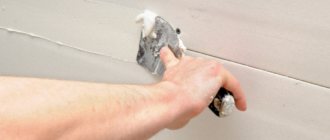
With the help of jointing, masonry is updated to renovate the facades of old houses with unplastered brick walls. To do this, you must first deepen the existing seams by 2-3 mm and apply new mastic. If the work is done carefully, the masonry will have the appearance of being freshly laid. A recess is made in the old mortar using a chisel.
How to grout masonry joints
Brick jointing is required when restoring old walls. The technology may be associated with the execution of jointing in one color. Very often the mixture differs in color in different areas.
First, the surface of the dry mortar is cut to a depth of 1-1.5 cm using a hammer and chisel. After this, all its remains are removed. Cleaning should be done not only at the seams, but throughout the entire masonry. In order for the treated surface to look beautiful, the wall should be cleaned of dirt before grouting.
You can simplify the task if you blow out the cracks using a compressor unit. This will remove even the smallest crumbs and particles so that the fresh joint has the best adhesion. To prepare for the procedure, you will need a sharp, reliable instrument. This is the only way to remove excess mortar from the surface so as not to destroy the brickwork.
Next, all seams should be moistened with water and the jointing procedure should begin. There is no need to moisten the entire surface at once, since you can limit yourself to a small area that will need to be addressed in the next 1.5-2 hours.
In the store you can buy ready-made grout or dry grout, to which pigments or plasticizing additives have been added. When choosing a solution for jointing, you need to pay attention to its base. The seam can be processed using the following types of materials:
- cement;
- epoxy resin.
If you prepare the mixture yourself, then such a composition will be inexpensive. The simplest material used for grouting joints is a solution prepared from 2 parts of lime and cement, taken equally. You will also need fine sand in the amount of 10 parts. You should not mix too much of the composition, since its pot life is about 90-120 minutes.
For another recipe, recommended by experts, you will need to prepare ground volcanic traces and 5 parts of sand, which will serve as a filler. This composition is suitable for treating walls that have efflorescence and whitish stains from the seams. The prepared solution must be stirred until it has the consistency of liquid sour cream. It is important that it does not spread, but stays in a lump on the inverted trowel.
Features of brick walls
Brick, especially solid brick, has only one drawback. These are its low thermal performance indicators, which are worse only than the similar characteristics of reinforced concrete.
If the wall is one and a half bricks (38 cm) and can withstand heavy loads, then severe frosts become a problem for it. However, winter temperatures of -30 degrees are the norm for most regions of our country. How to make it warm in a brick house?
To keep the walls warm
Considering the rather low coefficient of thermal insulation of solid brick, to achieve heat, walls from it would have to be laid with a thickness of 64 cm. Of course, this is an extra expense - and not only on the walls, but also on the foundation, therefore the construction of solid masonry with a thickness exceeding 38 cm is considered economically unfeasible.
Hollow wall brick
So:
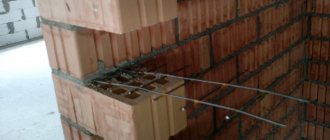
- There are many ways to get out of the situation. This is why hollow (slotted) bricks were invented, so that the weight of the masonry could be reduced, and, accordingly, the load on the foundation part of the building could be reduced. Technologies are also used that make masonry easier using solid bricks.
- This is the construction of masonry with widened seams, with the formation of longitudinal voids and wells filled with effective insulation materials. In addition, masonry and plaster mortars, which are commonly called warm mortars, are used to construct brick walls. Due to the content of perlite sand, their thermal insulation coefficient is several times lower than that of a conventional solution.
Warm masonry mortar
- The undoubted advantage of brick houses is the fact that the air temperature in their premises fluctuates very slightly. The thing is that the masonry not only warms up slowly, but also cools down slowly, and the thicker the wall, the longer the heat will remain.
- However, in country houses and country houses where no one lives permanently, heating brick walls requires much more fuel consumption than just maintaining a comfortable microclimate. Temperature changes contribute to the formation of condensation on the external and internal surfaces of walls, which can lead to the appearance of mold and efflorescence, leading to the gradual destruction of the masonry.
Cladding brick walls in an inconsistently heated house
It is best in such cases when the inside walls are lined with wood. Depending on the status of the house, it can be lining, plank, sheets of plywood or OSB, wood panels or MDF.
Drywall is also excellent, as it also has good thermal insulation qualities. Well, it is advisable to clad them outside using a system of insulated ventilated facades - approximately as shown in the photo above.
Some useful information
Low-rise buildings can be erected from any type of brick. In addition to ordinary clay bricks, these are also silicate and hyperpressed bricks, which, however, have some limitations.
Despite their strength, which in principle is not inferior to the strength of ceramic bricks, these products are not used for the construction of basement walls and strip foundations. In rooms with high humidity, the surface of such masonry must be protected.
Walls built from sand-lime brick
If the internal brick wall is load-bearing, then it cannot have a thickness of less than one brick. It can be built from either solid or hollow bricks. There are also standards for laying walls and pillars. The size of the pier cannot be smaller in cross-section than 250*610 mm. The cross-section of a pillar laid out of brick must be at least 380*380 mm.
Living room with brick wall
- When starting construction, it would be nice to know in advance what options for interior decoration and room design will be used. And partitions can help with this. For their construction, you can use not working brick, but face brick, which will allow you to use such an interior design option as a brick wall in the living room, dining room, or bedroom without extra costs.
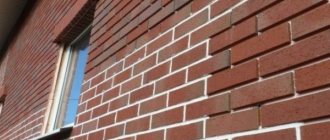
- A decorative wall made from the side of the facade for insulation, or simply as a cladding, also looks incredibly beautiful. Here, of course, nothing can compare with clinker bricks. It looks good in itself, and if you also take into account the various variations of its front finish, then with a competent approach to choosing color and texture, the facade of the house will look just like a picture.
Clinker cladding on the facade
Brickwork dimensions
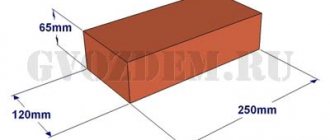
Standardization of masonry bonding systems and brick sizes promotes standardization of brickwork sizes. In the case of masonry walls without insulation or air gaps, the dimensions of the walls correspond to the modular dimensions of the brick edges and the standardized thicknesses of the masonry joints. When designing the dimensions of brick columns, piers and wall thicknesses, it is generally accepted that the width of the vertical masonry joint is 10 mm (in practice 8-12 mm). In this case, two bricks laid with a butt make up a section of masonry equal to the length of the brick laid with a spoon (120 mm + 10 mm + 120 mm = 250 mm).
Consequently, the dimensions of the brickwork in plan can be 120, 250, 380, 510, 640, 770, 900, 1030 mm and more. There are exceptions. Sometimes, brick partitions are made by laying bricks on edge. In this case, the thickness of the partition is not 120, but 65 mm. Another exception is the previously mentioned wall construction with an air gap or insulation. In this case, the dimensions of the brick wall depend on the thickness of the insulation or void. The section thickness consists of the modular size of the structural part of the wall, a cladding layer 120 mm thick and the calculated thickness of the insulation.
We figured out the dimensions of the brickwork in the plan. The vertical dimensions of the masonry are subject to the same laws, but with one caveat. There are two accepted brick standards in construction. An ordinary brick has a height of 65 mm. There is also a thicker one with a height of 88 mm. When designing the height of structures, the size of the brickwork joint between horizontal rows is taken to be 12 mm. In practice, 10-15 mm is allowed. When making reinforced brickwork and when electrically heating the masonry, meshes or electrodes are placed in the horizontal seams. Therefore, the size of the seams in winter brickwork is at least 12 mm. We get the height of walls, piers and columns made of ordinary brick - 77, 154, 231, 308, 385, 462 and then after 77 mm. For thickened (one and a half) bricks - 100, 200, 300, 400, 500 and then every 100 mm. At the same time, 13 rows of standard brick correspond to 10 rows of one and a half bricks (1000 mm).
The dimensions of the brickwork openings are set depending on the window or door frames being installed. Today, mass construction is focused on individual planning. Therefore, partitions and openings in them are erected after the sale of the apartment (house), taking into account the wishes of the owner. If the size of the box is known in advance, the opening is made 20 mm larger. This guarantees high-quality installation of the frame (box) in the opening with subsequent sealing.
When making masonry plans based on architectural drawings, it is necessary to reduce the sketch dimensions to constructive ones, taking into account the dimensions of the brick. In order not to calculate each time, the designer uses a table of brickwork sizes.
Rows (for vertical dimensions)
Vertical dimensions for standard brick, mm
Vertical dimensions for thickened bricks, mm
Recommendations for laying different types of bricks
Load-bearing walls and basement areas exposed to frequent moisture are built from solid ceramic bricks, most often in a single format. The optimal scheme in this case is considered to be a two-row one; it ensures uniform distribution of weight loads, the final thickness is 25 cm. It is recommended to install the products after carefully checking the evenness and waterproofing of the base and visual inspection for damage. To eliminate errors, the first row is first placed without mortar, in a dry form, all unformatted blocks are removed.
The thickness of the lowest layer can reach 20 mm; all subsequent layers are laid taking into account the design data. To make vertical seams, a little compound is applied to the butt side of the brick, after which it is lightly pressed against the previously installed blocks. Excess mixture in the longitudinal direction is immediately removed with a trowel, using a smooth movement from bottom to top.
When making horizontal rows, this is not recommended due to the risk of smearing the DSP over the surface, which is especially important when working with facing bricks. A special template helps to achieve uniform thickness without overspending; in the absence of experience, it is used not only in the longitudinal, but also in the transverse direction
The construction of any structures begins from the corner, followed by securing the order - a special bar for level control. Walls to be plastered or insulated are erected with a void - by recessing the mortar 10-15 mm deep from the front side of the brickwork.
Multi-row heat-insulating systems are constructed from porous ceramics with a fairly good strength grade. The general requirements for seam thickness and evenness remain unchanged, but due to the presence of voids, you should be prepared for an increase in mortar consumption. Changes also concern its composition; to eliminate cold bridges, additives that reduce thermal conductivity are introduced into standard DSP mixed in a 1:3 ratio: expanded clay chips, foam glass and their analogues. The scheme in multi-row structures becomes more complicated; if they doubt their abilities, they entrust the work to specialists.
Ceramic and pressed sand-lime bricks, by analogy with the others, begin to be laid from the corner, carefully checking the level and placing each row dry. But due to high requirements for decorativeness, the type of seam changes, it becomes concave or convex, and grouting is carried out immediately. The second type is more often chosen when cladding facades; such jointing enhances the moisture resistance of the walls.
The nuances include the placement of small ventilation holes in the vertical seams, usually on every 4th row. During the work, the front surface is protected from splashes of the solution; any drops that accidentally fall are removed with a dry cloth before they begin to set. The requirements for masonry and grout mixtures depend on the degree of water saturation: ordinary ceramic varieties are wetted before installation, clinker types are installed dry, but only with special compositions with a minimum content of salt-extracting substances.
Rules for preparing the grout mixture
Grouting of decorative brick joints is prepared according to the following scheme:
- Through a fine metal sieve, you need to sift two buckets of sand into the prepared container to clean it of excess impurities and large fractions.
- Mix dry cement with sand, ratio 1:2.
- After thoroughly mixing the two compositions, you need to add water to them. The amount of water must be selected so that the mixture resembles a thick, homogeneous mass. It is convenient to carry out the mixing procedure using a hammer drill with a spinner attachment.
If you need to treat the seams with grout of a certain shade, which is purchased in the store, then preparing the grout mixture includes the following steps:
- Approximately 6 liters of water should be poured into the container for diluting the solution.
- Pour the prepared mixture from the package into the liquid.
- Mixing of the solution is also carried out with a hammer drill with the specified nozzle.
- It is necessary to leave it to sit for a while so that the liquid can be absorbed.
- Wait until the mixture begins to swell.
- After this, mix the solution thoroughly again. The mixture is ready to use.
The importance of dressing during construction of a structure
The safety of a building structure depends on its correct construction. Conventional masonry is carried out using the long side of the material, this method is called spoons, the short side and across the wall are called pokes. Construction begins with raising the corners several bricks higher than the usual structure. The layer formed between the masonry is adjusted, and the excess is removed before the solution hardens. Afterwards the jointing is carried out.
Main rules:
- When erecting a building, it is necessary to check the laying of corners with a square at least twice throughout 1 m of masonry.
- Check the horizontality of the rows (with a rule and a level), and the verticality of the surface of the corners (with a rule with a plumb line).
- It is better to align the ones that arise with the next row.
- The thickness of the solution between the material should be measured every 5-6 rows.
Materials, tools
The following equipment is used for jointing masonry:
- hard brushes;
- hammer, trowel or trowel;
- device for forming seams;
- flat wooden strip 1 m long;
- sprayer for humidification.
To prepare the mixture, use:
- sand;
- cement;
- white lime;
- water.
Why do you need jointing?
Now let's take a closer look at why this grouting and trimming of seams is needed in a brick house, because many buildings have stood for years and no one does anything with them.
- As we have already said, this has a beneficial effect on the aesthetic side of the house. For example, you can easily hide the difference in shades when the solution is mixed gradually over several days.
- Grouting the joints of the brickwork reduces the amount of moisture that gets into the joints, destroying the cement base. This allows you to extend the life of the entire house, postponing repair work into the distant future. If you don’t know, then the cost of restoring a brick wall when cracks and collapses appear is very, very “unpleasant.”
- Proper jointing also allows you to increase the insulating properties of brick walls, because the seams are the main source of heat loss.
The wall after jointing is a monochromatic seam, the bricks stand out clearly
Where is jointing used?
Interestingly, both building bricks and double sand-lime brick M 150 are suitable for grouting joints (also suitable for facing decorative bricks).
The main thing is that the wall should not be plastered, because jointing is an analogue of a finishing material, but is only applied to a certain part of the surface.
- It can be used for outdoor walls, which is the most common option.
- It is also useful for interior work, when you need to add color to a decorative surface.
- Joining can also be used for walls that are built from natural stone.
- You can embroider the masonry at any stage: directly when erecting the walls, or after the house is built and shrinks. There is one fundamental difference - when jointing and laying together, it is easier to remove excess mortar that has not yet had time to dry. Once the house is ready, this must be done with effort, because the cement mortar is quite strong.
Let's sum it up
Summing up the material, at the end I would like to note a few more important nuances that you need to know when sewing seams:
- Joint jointing should be done in cloudy times without rain. Jointing should begin with vertical joints. Jointing allows you to increase the heat and sound insulation qualities of a brick wall, and also protects the joints from moisture penetration into them. A brick wall under jointing is inferior to a plastered wall in terms of thermal insulation, however, it wins in terms of durability and ease of use. A jointing tool can be made from improvised means - even from an ordinary old knife, thoroughly heated with a burner and then bent into the required shape.
Sources:
- www.stroitelstvo-new.ru
- econet.ru
- vseprostroiku.ru
- orcmaster.com
There are no similar posts, but there are more interesting ones.
Factors affecting seam size
When erecting walls, adhere to the established average thickness of horizontal joints of 10 mm. This value varies by 1-2 millimeters in one direction or the other. More specific indicators of the thickness of the joints between bricks are determined in the approved building design and are strictly controlled.
Most masons make a horizontal joint 12 mm thick and a transverse joint 10 mm thick.
Acceptable values are:
- in longitudinal rows 10-15 mm;
- in vertical rows 8-12 mm.
The reason for the decrease in strength is the uneven removal of water from the solution.
The uniformity and thickness of brickwork joints depend on:
- Professionalism of builders. It is better to entrust the work to specialized teams of masons.
- The hardness of the solution. If a cement-sand composition with a thick consistency is used, a solution thickness of up to 12 mm is allowed. When using plastic adhesive compositions, this parameter can be 8-10 mm.
- Conditions of work. In winter, bricklaying is carried out using anti-frost additives or the structures are heated. It is better to keep the seam size to a minimum, since at low temperatures the masonry is made more monolithic.
- Shapes and sizes of the material. Brick, as the most common building material, is characterized by uneven surfaces and unequal sizes, especially when using cheap types. When building walls, experienced masons adjust the width of the seam between bricks to 2 mm, depending on the design data.
The accuracy of brickwork also depends on the proportion of voids in the products, the frost resistance of the mortar and the brand of cement used.
The thickness of the mortar between the bricks is influenced by the consistency of the masonry composition. A properly prepared mixture fills all the unevenness and voids, but only to a thickness of a certain size. If it is exceeded, the layer simply spreads to the sides without filling the roughness, which leads to a deterioration in the quality of the masonry.
Monitoring the results of work
Masonry work requires constant monitoring of the thickness of vertical joints between rows of brickwork and the filling of voids. When laying in winter, the width of the seam can be the minimum allowable in order for the mortar to set quickly.
The check is carried out according to the following method. After every ten rows of masonry, a control measurement of the height is carried out. The number of bricks used is determined by multiplying the height of the material used (65 or 88 mm) by 10. Then the second is subtracted from the first amount. The result obtained is divided by the number of seams.
The final figure must meet the standard indicators established in the project. If a discrepancy is detected, the thickness of the seams is immediately adjusted.
SNiP requirements
All building stones that are used in the construction of structures must be selected in accordance with the standards for various types of building materials, which is also determined by SNiP. The brick used for external masonry must have a rectangular shape and clear edges. Each building stone is visually inspected by a master before laying.
It is also important to properly prepare the solution, which should have a mobility of no more than 7 cm. To ensure such parameters, it may be necessary to add various components to the cement mixture, including plasticizers, lime and chemical additives
These components are added depending on the manufacturer's requirements.
In winter, it is recommended to keep the solution temperature at least +25 degrees. If conditions do not allow maintaining this temperature, then it is necessary to add plasticizers to the solution.
SNiP also determines that the use of building stones that do not have the appropriate certificates is prohibited, especially in the construction of residential buildings.
Creation of joint compound
After these stages, it is necessary to create a joint compound. It can also be ordered ready-made. You can cook it yourself. It is worth considering that the composition is created for decorative purposes, so special dyes should be introduced into it.
The option of creating this solution yourself involves:
- lime – 1 share.
- sand – 10 shares,
- cement – 1 share.
They are mixed with water. The result should be the consistency of thick sour cream. The time interval for solution mobility is one and a half to two hours. For this reason, create as much mixture at once as you will use during this time.
If the created solution is very liquid, then place a red brick in the container with the composition for a couple of minutes. It will absorb excess moisture.
If you need to prepare a lot of mortar, it is better to use a concrete mixer and also get assistants.
Brick joint thickness
Needless to say, ceramic brick is one of the most popular building materials. The technology of brick production, as well as the various types of its masonry, have been known since time immemorial. How long a building built of brick will last depends not only on its quality, but also on the quality of the mortar, laying technology, skill of the mason and the thickness of the joints in the brickwork.
Although one of the parameters of the durability of a structure is the frost resistance of the brick (the ability to withstand a certain number of complete freezing and thawing cycles), adjusted for the climate coefficient, an incorrect seam thickness can completely destroy the entire calculation system.
For brickwork, the thickness of horizontal joints should be 12 mm. In some cases, a minimum seam thickness of 10 mm and a maximum seam width of 15 mm are allowed.
The vertical seam should be 10 mm. The minimum possible vertical seam is 8 mm. The maximum width of a vertical seam is 15 mm. In any construction project, the thickness of the joints must be indicated. Without this indicator, it is very difficult to make a correct estimate for the construction of a facility, since it is difficult to calculate the amount of cement, sand and even the amount of brick. If a mason reduces the thickness of the joints by a couple of millimeters, the total number of bricks may increase. As soon as the mason increases the size of the seam, the strength of the building decreases.
The thicker the brickwork joint, the more difficult it is to achieve uniform joint density between the bricks. Due to uneven density, brick may experience additional bending and shear loads. Thick joints in the masonry contribute to greater deformation. Therefore, for a certain type of masonry, designers set a certain thickness of the seam. In addition to the types of masonry, the thickness of the joints is influenced by the climatic conditions in which the building will be operated.
In addition, the thickness of the seams may vary depending on the weather conditions in which the brick laying work is carried out. The thickness of the seam is especially important when the brick is laid in frosty conditions. As the thickness of the seam increases, until the solution sets, the moisture inside the solution may crystallize.
Simply put, the water in the solution will simply freeze. And as soon as the temperature rises, the ice will again turn into water, but instead of a strong seam, it will become a kind of loose substance. Therefore, the thickness of the brickwork joint when working in frosty weather should be as minimal as possible. In addition, various fillers are added to the solution, which act as antifreeze.
The thickness of the seams, with the right approach to technology, must be checked. To do this, measure the width of several rows of masonry (usually 5–6 rows). The resulting size is divided by the number of rows, the size of the bricks is subtracted, and the remaining figure is divided by the number of seams. The resulting average figure should not go beyond the limits specified in the building design.
In some cases, the thickness of the seams can be only 5 millimeters. Usually this is a critical masonry made of refractory bricks, which is used in furnaces with high temperatures.
Gas silicate, gas silicate blocks, cellular concrete, aerated concrete, autoclaved aerated concrete. All these names refer to the same building material - autoclaved aerated concrete.
Brick laying under jointing is used when finishing materials will not be applied to the surface of the brickwork, but at the same time the surface should look visually finished.
The characteristics of the building directly depend on the quality of the brickwork. In particular, the strength, thermal insulation and durability of the building as a whole depend on the quality of the masonry.
Vladimir Messages: 1
Average seam size Answer #1 date:
10/24/2013 at 05:53:48
With the calculation of the average seam thickness you indicated, even non-standard seams can pass. Example: between six rows of bricks, the thickness of the seams, measured at each seam, is 8,19,23,7 - not a single seam complies with SNiP. We calculate according to your scheme: we measure 6 rows from brick to brick - 465, subtract the size of the brick - for example 65. 465 - 65 * 6 = 75 divided by the number of seams - 5, 75/5 = 15, which is fully consistent with SNiP. Those. Non-standard seams with this calculation are within the framework of SNiP.
Fields marked *
required. HTML tags are disabled.
Basic set
Bricklaying tools have two purposes: to make the builder’s work easier and to improve the quality of the future wall. Over the centuries-long history of using this material, craftsmen have come up with many devices that we can no longer do without. The proven technique is based on the traditional arsenal of a mason:
- Master OK. A small metal spatula with a comfortable handle is the main tool. Used for laying mortar, leveling it and grouting joints. Another name is trowel.
- Level. Helps to maintain even brick laying; there are several types. A rectangular instrument made of metal or plastic with a flask of liquid and an air bubble. If the masonry is smooth, it is installed in the middle.
- Joining. Used at the final stage, it gives a beautiful look to the seams. The shape of the device depends on the construction technology.
- Rule. Aluminum wide plate, usually used for leveling the plaster layer. It can be useful for a mason to check the smoothness of the masonry.
- Cord. The tension of the cord determines the neatness of the rows; it is also used to plan the breakdown of the masonry by height. There is another name - mooring.
- Bucket-shovel. Convenient device for mixing and supplying the solution.
- Order. Attached to the lowest row, it is used to determine the correct position of the brick relative to neighboring elements.
- Hammer-pick. A good device that allows you to straighten the masonry - it is used to break off interfering pieces of brick and give it the desired shape.
In addition to the items listed, there are other tools used by masons. However, they are not necessary; their choice is more a matter of taste and the chosen technology. If you need to lay a wall made of facing bricks, you need to be especially responsible when choosing tools. Clinker bricks as a material are more expensive, and their damage can cause serious damage to the budget.
You need to choose quality tools and not skimp on purchases. The appearance of the masonry and its service life depend on the correctness of their readings - the level, for example. You can only make simple devices yourself.
Thickness of the outer wall of the house
In terms of the load-bearing part, the thickness of the outer wall of an individual house of 25 cm will cope with its task completely, but solid brick, in addition to its excellent qualities, also has its drawbacks. One of the disadvantages is good thermal conductivity. In short, if you build a house with insufficient thickness of external bricks and without additional insulation, then at subzero temperatures in winter the walls in the house will begin to get wet.
What to do in this case?
Increasing the wall thickness of an individual building
If you try to increase the thickness of the wall, it turns out that it should be 0.64 m, i.e. 2.5 bricks based on the maximum temperature in winter -30°C. Considering that the specific gravity of brickwork is very large, such a wall requires a massive foundation for a house that would withstand such a load, and this is a huge expense, and the brick itself is not the cheapest building material.
Using Hollow Brick for Brick Wall
In masonry, you can use so-called hollow bricks, which will reduce the thickness of the wall of an individual building due to voids, which will reduce its thermal conductivity.
Using insulation inside the wall of an individual house
Using additional material for insulation inside a brick wall is an ideal option in this case, which is very popular and has a lot of advantages. Today, building the walls of a house from bricks without insulation is not advisable, and is practically not used in modern construction.
The pie of such a wall looks like this:
The outer part of the wall is 0.5 brick thick, i.e. 12 cm - insulation, the thickness and type of which is selected taking into account climatic conditions. - the inner part of the wall, to ensure load-bearing capacity, is made of 25 cm thick bricks or blocks.
Choosing this method of constructing brick walls of an individual house will solve several problems at once:
Reducing foundation costs - reducing brick costs - increasing the area of the house by reducing wall thickness
And in general, living in an individual brick house is a pleasure. Such a house will never lose its popularity, because, with a properly laid foundation, such a house will last “eternity.”
Greetings to all readers! What should be the thickness of brick exterior walls is the topic of today’s article. The most commonly used walls made of small stones are brick walls. This is due to the fact that the use of brick solves the problems of creating buildings and structures of almost any architectural form.
When starting to carry out a project, the design firm calculates all structural elements - including the thickness of the brick exterior walls.
The walls in a building perform various functions:
- If the walls are only an enclosing structure
, in this case they must meet thermal insulation requirements in order to ensure a constant temperature and humidity microclimate, and also have soundproofing qualities. - Load-bearing walls
must have the necessary strength and stability, but also, like enclosing walls, must have heat-shielding properties. In addition, based on the purpose of the building and its class, the thickness of the load-bearing walls must correspond to the technical indicators of its durability and fire resistance.
Seam size between bricks
The correct choice of bricklaying method determines the strength and quality of the object being constructed, its consumption, as well as the cost and duration of construction work.
The brick bond itself plays an important role in ensuring the properties of the structure being constructed.
The fact is that such masonry implies the presence of vertical and horizontal joints, which are filled with cement. It acts as a connecting component that connects individual blocks together into a single structure.