Is mesh needed when plastering?
The reason for using reinforcing mesh is simple: it strengthens the plaster layer, prevents cracks from appearing, and also prevents the heavy layer of dried mortar from peeling off the wall.
Good to know: article about the requirements for the quality of wall alignment and coating thickness according to SNiP.
When plaster reinforcement is necessary:
- Cracks on the base . If, when examining the wall before plastering, cracks are visible, then reinforcement is definitely needed.
- Reinforcement will prevent the appearance of shrinkage cracks and peeling of the plaster
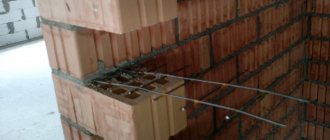
Joints of different materials, corners . In these places, cracks are also likely to appear; it is better to plaster over a mesh. For internal and external corners, there are painting corners with mesh on sale; with them, the junction of two planes will be excellent.
- Large layer of plaster . When leveling, gypsum and cement coatings should not exceed a certain thickness recommended by the material manufacturer. For example, “Rotband” can be laid up to 5 cm at a time without reinforcement, provided there is a strong base.
- Plastering over insulation . Fiberglass is attached to polystyrene foam and mineral wool, pressing it into the adhesive layer. Without such reinforcement, it is impossible to create a hard surface for further decorative finishing.
- There is no confidence in the quality of the material (different batches ). It happens that mixtures from different batches, and even more so from different manufacturers, have different characteristics in terms of strength, adhesion, drying time, etc. If you use such mixtures on one surface, then you should protect yourself from cracks and reinforce the plaster with a mesh.
- Uneven walls - brickwork, wood. Bricks are usually plastered with cement-sand mortar, which has a high density. Without a mesh, not only cracks are possible, but also peeling. With wood, everything is clear - its adhesion is weak, the plaster itself will not hold (more about this here).
As you can see, there are quite a lot of cases using mesh. Below we will look at what type of reinforcement to choose for a particular job.
What is a mounting grid
Reinforcing mesh is a cellular material necessary to strengthen the plaster layer. It is thanks to the use of such a product that cracks, chips, shifts and other defects do not appear on the surface being finished. The mesh also allows you to create a durable layer on complex substrates, for example, on a metal structure.
The installation network can be used for the following types of work:
- pouring the floor - the reinforcing layer allows you to increase the strength of the screed, prevent cracking, and also increase the service life;
- plastering walls - the product allows you to apply a thicker layer of plaster without the risk of defects; it is also necessary to use a mesh if the base is made of metal, wood or foam;
- finishing measures - reinforcement is required when the base has a low level of adhesion;
- finishing the surface of the foam plastic - if plaster or putty is applied to the foam plastic without using a net, the solution will crack after hardening.
There are several types of wiring network depending on the material of production:
- metal (steel, galvanized);
- plastic;
- fiberglass;
- polyurethane;
- polypropylene.
Also, the product can be universal or intended for specific types of work, for example, masonry mesh. The material is also divided by cell size; the thinner the mounting layer, the smaller the cell size can be used.
It is recommended to choose a product for work that is resistant to aggressive environments, only in this case it will not dissolve in the solution, and will not be subject to rusting or rotting.
Types of reinforcing materials
There are not many construction (installation) meshes used for plastering walls and ceilings. Let's start with the most common option.
Fiberglass mesh for plaster
The fiberglass plaster mesh consists of small square cells. The mesh is sold in rolls with a length of 10 to 50 m, a width of 0.5-1 m. This material is resistant to sub-zero temperatures and is treated with impregnation from the aggressive alkaline environment of the applied solutions. Widely used for indoor and outdoor applications.
Expert opinion
Sergei Shablovsky
Plasterer
Important! The material on sale varies greatly in tensile strength, regardless of density! For example, a recycled mesh with a density of 160 g/m2 can easily break after bending, while a less dense but high-quality fiberglass fabric will not break. Always test the material if you have not worked with it before. Simply fold the canvas in half and everything will become clear. Excellent tensile strength = 1700-1800 N.
Another important quality indicator is resistance to tearing after 28 days in NaON alkali. According to GOST, the tensile load should not decrease by 50%. Focus on a value of 35-40%. You need to look at this data on the packaging or ask the seller for a test certificate.
You can choose the same plaster fiberglass mesh for interior and facade work.
Current price:
fiberglass mesh for plaster reinforcement
"Spiderweb" painting
This material with a density of 45-50 g/m2 is also made from fiberglass, but without cells. Cobweb is used during puttying or as an independent coating for painting. In the second case, it is attached with glue, hides small irregularities without puttying and makes the walls perfectly smooth.
Serpyanka ribbon
Serpyanka is a skein of cellular fiberglass 45-230 mm wide on a self-adhesive base. It is used for reinforcing the joints of ceilings, floors with walls, junctions of window and door frames, as well as for gluing joints of sheet materials: plasterboard, chipboard, fiberboard, fiberboard, etc. before plastering.
Polypropylene
Polypropylene reinforcement is rarely used for plastering; PVC mesh is mainly used for pouring floor screeds, for garden fencing and other household needs. It is a very durable frame, combines low weight and flexibility, which allows you to give it any shape. In addition, plastic is durable, does not rot and does not give corrosion stains.
Metal
Let us now consider what metal mesh is used for plastering. According to the production method, they are of the following types:
Expanded metal
Woven
Rabitz
Welded
To reinforce walls under heavy (cement) plaster, we recommend choosing galvanized welded mesh, for example, 0.8 mm rod diameter; cell 12.7 x 12.7 mm. Or expanded metal with similar dimensions. This will be quite enough.
Benefits of subsequent work
One of the main advantages is the application of the solution. And if the gypsum mixture fits well on the base, then it is difficult to work with cement material. It is the mesh with its cells that holds it on the surface until it hardens and does not shrink too much.
After the material has hardened, the plastered wall can be puttyed without fear. It can be painted and covered with decorative plaster. There is no threat that a crack will appear in the middle of the wall due to shrinkage of the house.
Laying tiles is also possible on a reinforced wall. The use of mesh provides surface rigidity for a long time.
Reinforced mesh should be used for plastering work. Each material – metal cells, polymer – has a specific application. By properly fixing the mesh and plastering the wall or ceiling, the surface will remain in its original form for up to 20 years.
Which ones to use
The choice of mesh will depend on where the plastering is carried out - indoors or outdoors, on the type of base, and the thickness of the applied layer of mortar.
| Grid view | Type of work |
| Fiberglass mesh plaster 5x5mm (the most universal) | On flat bases (concrete, aerated concrete, plastered walls) when plastered with gypsum, cement mixtures; work on insulation using glue; under tiles |
| Fiberglass painting sheet 2x2mm | When puttying over plaster |
| Fiberglass "Gossamer" | For puttying or on walls for painting |
| Serpyanka ribbon | Drywall joints, wall corners and window/door openings |
| Metal chain-link, welded, expanded metal | On uneven bases, wooden walls, with a large layer of cement mortar |
Necessity
Previously, shingles were used to ensure surface strength and long-lasting plaster. It was made from wooden slats nailed to the base. Now on the construction market there is mesh for plastering. They vary in color and material. They serve for better adhesion to the surface, there is no peeling of the applied layer from the rough base for a long time, there are no cracks after the solution dries. After applying the material under the plaster and drying the solution, decorative finishing is applied without fear that defects will appear underneath.
How to mount on the wall
The mesh is usually attached after priming for plaster. But you can first install the reinforcement, and then prime the entire wall with a sprayer. Let's consider all the methods.
Mechanically
Metal or plastic reinforcing mesh with large cells is mechanically fixed to the wall. This is necessary to support the large weight of the reinforcing material and plaster mortar.
Dowel nails with a plate - a reliable method of fastening
- On a dowel-nail . Use a hammer drill to drill a hole in the wall and insert a dowel. For better fixation, place a washer or a square piece of perforated metal tape under the head of the nail.
- On self-tapping screws . This installation method is more suitable for mounting on wooden walls or cellular concrete blocks (aerated concrete, etc.).
- In clusters , which are driven in half and folded over. Can be used on wood and other non-solid substrates.
- Construction stapler staples . This mount is suitable for wooden walls.
When installing the mesh, make sure that it is slightly tight, without sagging. If a wave has formed, additionally fix the mesh in this place.
For solution
This is how any fiberglass mesh and fine-mesh metal sheets are attached to flat surfaces.
- A layer of plaster or tile adhesive 2-3 mm thick is applied to the wall.
- A pre-cut mesh from the ceiling to the floor in one strip is applied to fresh plaster mortar or insulation adhesive.
- Press and smooth with a spatula/trowel until the mesh is completely hidden in the solution. The result is a strong, reinforced layer, which can then be plastered, puttied or glued to tiles.
- If the bottom edge extends to the floor, it is trimmed with a regular construction knife.
This installation method has one drawback: if the solution quickly sets on the wall, then by the end of the canvas it will be more difficult to push the plaster through the cells. In this case, you can attach the mesh in stages:
- Apply the solution not to the entire height of the wall, but 1-1.5 meters from the ceiling. Then press in the fiberglass mesh.
- Roll the dry part into a roll so that it does not interfere (you can screw it to the ceiling with a self-tapping screw).
- Apply a layer of plaster again to 1-1.5 m, roll out the mesh. And so on until the floor.
This method is shown in the video below:
Gluing
Consumption - 0.15 kg/m2, complete drying time - 24 hours.
The fiberglass “cobweb” is attached to the glue for painting or putty. The work is exactly the same as wallpapering.
- Fiberglass is cut into strips.
- Mix dry glue or use ready-made glue.
- Apply glue to the walls with a roller and apply a “cobweb”. You can overlap by 2-3 cm, the joints will not be visible.
- Smooth out with a spatula and leave to dry.
The second case when reinforcement is glued to the surface is using sickle tape. As a rule, they are self-adhesive, which is very convenient. Simply unwind the tape to the desired length and cover drywall joints or wall corners with it.
Fastening the mesh using technology
Reinforced material used for plastering walls and ceilings must be correctly attached to the base. Each type of cellular fabric is attached using the specified technology.
Some types of mesh cannot be stretched too much or allowed to sag. This can lead to serious consequences.
How to attach reinforced
Technique for fastening metal cellular fabric:
- First of all, measure the required size of the canvas from bottom to top.
- First, the material is fixed at the top. To do this, dowel-nails are fixed at the top corners. The corners of the mesh are placed on them and pressed with self-tapping screws.
- After which the same work is carried out below.
- On the ceiling, the operation is performed in the same way - first the corners are attached, then in the middle.
- The material must be fixed in the middle so that it is adjacent to the rough base in all places. If there is sagging, then the work will be in vain.
How to attach a decorative plaster base
Decorative reinforcing fabric is attached using ordinary self-tapping screws.
They are not completely screwed into the rough base at equal intervals. A mesh is put on them and completely twisted into the base. Attention. The mesh should not be too tight, but there should not be any sagging.
There is an option for mounting on a mounting tape. However, there is a risk of the canvas tearing off the surface during plastering work.
The best mesh for plastering walls
The choice of material is made taking into account some rules and recommendations:
- if the plaster layer is up to 3 cm, use fiberglass, from 3 cm - only metal;
- For exterior work, mainly galvanized or polymer-coated metal sheets are used;
- Plastic reinforcement is ideal for gypsum mortars; plastic or fiberglass is ideal for gypsum board joints and sealing small cracks;
- To strengthen the stove and fireplace masonry, chain-link is suitable, and in the presence of thin plaster finishing - fiberglass.
If the choice is made in favor of a metal sheet, it is worth checking the brand of metal or alloy, its quality, as well as the method of connecting the wire. The welding method is considered more reliable than conventional twisting. The material will cost less if it is produced by a large enterprise, since mass production is more profitable.
For interior work
Typically, the following types of canvases are used for interior decoration:
- Plastic - for gypsum and other fine plasters. It is best to choose a material with a cell size of 1 x 1 mm or 2 x 2 mm, which will withstand the layer of mortar and will not allow cracks to form.
- Fiberglass - for plastering rough foundations made of brick and concrete. They reinforce cement plasters and reduce the risk of shrinkage of the mortar.
Using plastic mesh to strengthen gypsum plaster
For outdoor use
For outdoor use, you need to select the mesh with special care. The choice depends on the following factors:
- type of plaster and thickness of its layer;
- features of climate, humidity, temperature changes;
- size of the surface to be plastered.
For small bases, fiberglass is usually used, which ideally strengthens facade surfaces and plinths. Metal mesh is most often purchased in the following cases:
- significant surface area;
- wooden, aerated concrete or brick walls;
- high air humidity, regular temperature changes;
- applying cement plaster;
- the need for increased building strength.
Metal mesh for plastering the base
Grinding
The concept of “reinforced network” is defined, but among building materials there is also a grating for grouting the putty layer. The product is based on woven glass fiber in a large checkered pattern. An abrasive is attached to the mesh itself with glue (a common type is silicon carbide), which is why the type of mesh is called abrasive.
Advantages of the product over sandpaper:
- Efficiency . After the puttying is completed, it makes sense to sand the surface - an abrasive mesh will cover a larger area three times faster than sandpaper.
- Easy cleaning process. The emery quickly becomes clogged, and attempts to clean it are futile. Just hit the mesh a few times and the clog will fall out on its own.
As you can see, painting and fiberglass meshes for reinforcing the putty layer are useful building materials for finishing. Thanks to such products, you can securely fix the putty on the surface and get smooth walls.
Technology of plastering walls with reinforcing mesh (indoors and outdoors)
Before applying the finish, the base must be prepared for further work. First of all, damaged areas (for example, eaten away by mold, corrosion or fungus) are eliminated. They are cleaned and treated with special protective solutions. Then apply primer and level the surface. If necessary, glue the insulation, apply a reinforcing mesh for plastering the walls and a finishing layer.
Installation features
Installation of the canvas and plastering is carried out in several stages:
- Surface preparation. The work algorithm depends on the façade finishing technology. If a thermal insulation layer made of polystyrene foam or other insulation is being plastered, then there is no need for preparation. The main task is to eliminate all defects that prevent the laying of the reinforcing fabric.
- Mesh fastening. Getting the job done is simple. The product is cut into the required lengths and attached to the structure. For this, dowels or mortar are used. Galvanized wire is welded onto the wall surface. It is important to install it securely.
- Plastering. After attaching the reinforcing device, the plaster mortar is adjusted. Smoothly smoothed over the entire area of the structure.
When the plaster is completely dry, painting and finishing are applied.
How to use
The reinforcing capabilities of painting grids are maximized when they are placed inside the processing layer intended for leveling. The probability of crack formation decreases in proportion to the approach of the mesh to the outer layer of the surface. Technological process for reinforcing the putty layer:
- Prime the plastered wall.
- After the primer has hardened, apply the putty base.
- While the putty is wet, place a fiberglass mesh on the wall and press it into the solution with a tool (trowel).
- Cover the network with an additional layer of putty, leveling it with a wide spatula.
When the reinforced layer has hardened, it is time to process it with a sanding mesh or sandpaper. In order to achieve an ideal aesthetic effect, a finishing compound is applied to the second layer of putty, which, after hardening, is sanded with fine-grain emery cloth. A completely flat plastered wall is coated with a finishing primer, after which it has hardened, painting can begin.
The technology for using mesh with an adhesive layer on drywall is somewhat different:
- The joining boundaries are expanded, cleaned and primed.
- Serpyanka is glued to the frozen joint.
- Putty strokes are applied with force so that the mass squeezes through the mesh and fills the space between the sheets of drywall.
- Without interruption, apply the second layer of putty, gradually leveling it with a spatula.
After sanding the surface and making sure that the primer has completely polymerized, you can begin painting and wallpapering.
The web is also initially glued to the primed surface: the glue is spread with a roller, the strips of fiberglass are leveled and pressed with the same adhesive roller. The putty mixture is applied after the glue has completely hardened. The following steps are identical to previous finishing technologies: sanding and priming.
Note! The next mesh for puttying fiberglass walls should overlap the previous one by at least 5 cm.
In order to reinforce the putty layer at the outer corners of the openings, you can use a specially designed corner with attached fiberglass. The corner forms an auxiliary barrier against careless chipping as a result of severe mechanical damage by a person carelessly leaning on these areas. Internal corners are often reinforced with a standard grille or fiberglass.
Types of plaster mesh
Reinforced mesh for plaster differs in the materials used for its production, the structure and size of the cells, and the methods of creation. According to the first criterion, the following varieties are distinguished:
- plastic;
- fiberglass;
- metal.
Products have all the advantages and disadvantages of the materials used to produce them.
A more detailed classification is presented in the table below.
| View | Cell size, mm | Characteristic |
| masonry (painting) | 5*5 | plastic sheet used when working outside and inside buildings using gypsum mixtures |
| universal: small, medium, large | 6*6, 14*15, 22*35 | the fine-mesh version is a suitable mesh for plastering internal walls, and the coarse-mesh version can withstand temperature changes and external loads well |
| fiberglass mesh | 5*5 | durable, resistant to moisture, cold and heat, chemical compounds |
| Plurima | 5*6 | made from polypropylene, chemically inert, used for external and internal work |
The existing assortment allows you to select high-quality products taking into account all requirements. The use of a material that meets existing conditions determines the durability of the finish.