Whatever the design of the chicken coop, there should be two exits from it: a door for humans and a small window for chickens.
The hole for chickens in the chicken coop is designed for them to go outside. Its design and dimensions should be optimal:
- as small as possible to retain heat inside
- with a closing door so that the chickens cannot go out when not needed and so that no one can come in for no reason
- insulated so that heat does not escape through it in winter
- at such a height from the floor that in winter it is possible to pour a thick layer of sawdust and that there is still a “threshold” that prevents heat from escaping if the door is open. Like in a steam room bath.
Wood is considered the traditional material for building a chicken coop:
- walls made of timber in the form of a cobblestone house
- from boards like sheds
- frame structure with wall insulation
Depending on what the chicken coop is built from, the design and type of hatch are selected:
- If chickens are kept in a polycarbonate greenhouse, then they go out through a window cut directly into the polycarbonate. I don’t know how they make it open and close in the winter, but I saw a simple uncovered hole in the summer
- in a wooden chicken coop, naturally, it’s easier to make a hole with a mini door
However, people are so inventive that there are many variations on the theme of chicken coop doors:
- toilet lid
- washing machine hatch
They adapt everything they can. Everything is correct: why throw away something that is used, but still good.
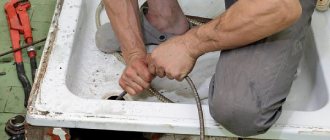
It happened exactly the same way for us: the washing machine broke down and it was such a pity to throw it away that we took it apart piece by piece. It turned out to have a lot of useful parts that can be used in the future for various crafts at the dacha. For example, four small pumps can be used to create fountains. And of course, the body of the washing machine “asked for itself” to be built into the frame of the chicken coop.
The body of the washing machine in the chicken coop can be used “to its fullest extent”!
Engineering communications of an automated chicken coop
Having completed the construction of the chicken coop, the user began to manufacture its engineering filling.
I set the task - to make lighting with smooth ignition and decay over time, opening and closing the paddock door according to time, taking into account the ambient temperature, turning on heating + ventilation depending on the temperature inside the house.
Installation of lighting and forced ventilation in the chicken coop.
Block for smooth ignition and dimming of lighting.
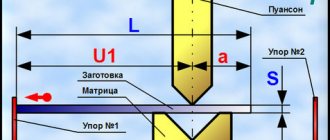
To automatically open the walkway door, an actuator (electric drive) with a working stroke length of 35 cm and a speed of 10 mm per second is used.
Electrical diagram of the system.
Electric control box of an automatic chicken coop control system close-up.
Installed system.
On the left is the outside air temperature sensor for door operation, on the right is the temperature reading inside the house.
There are three timers on the bottom, the one on the far left opens and closes the door, it is connected to a temperature relay; at sub-zero temperatures the door will not open. In the middle is a light on/off timer. The temperature relay is connected to heating the house + turning on forced ventilation.
The heating system for the chicken coop is made from a meter long infrared film laid on both sides of the internal roof slope.
The IR film is stapled to the OSB, on the back side of the rail, so that when heated, due to the air gap, convection appears.
The chicken coop lighting is made on the basis of a 12-volt LED strip on an aluminum strip with an aluminum profile.
The chicken coop's automatic waterer is made from a 10-liter tank.
The chicken coop has 3 drinking bowls inside and 5 outside.
The perch is made of a block with a cross section of 4x5 cm.
Stairs to the chicken coop.
The ladder leading to the roost is hinged for easy cleaning of the coop.
Ordinary stairs lead to the nests, made from leftover materials left over from the construction of the chicken coop.
There are shavings scattered on the floor of the chicken coop.
- The overall dimensions of the chicken coop are 2000x4000 mm.
- The dimensions of the chicken house are 2000x2000 mm.
- The elevation height of the chicken house is 600 mm.
- The height of the house from floor to ceiling is 2200 mm.
The walkway door works like a clock. In summer the door is always open. In cold weather it works using a sensor. Currently the chicken coop is home to one rooster and seven hens. There are enough eggs, we store them in the refrigerator.
Ventilation
Chickens feel fine in normal humidity. When they fall or rise, they begin to hurt (high humidity is more dangerous), so ventilation in the chicken coop should creep in during the planning period. A hole is made in one of the walls for air flow. To do this, you can insert a piece of plastic pipe into the wall and select a cover for it.
Ventilation is very important
The air outflow from the chicken coop (exhaust) is a pipe passed through the roof or the top of the wall. On the street, the pipe rises some distance above the roof and ends with a fungus or a canopy - for protection from precipitation and foliage. The supply and exhaust are located in opposite corners so that the air travels the greatest distance. This type of ventilation is called natural, but it does not always work stably.
For stable operation, a fan with a cover is embedded in the upper part of the wall. It's better if it has several speeds. The operation of this type of ventilation does not depend on the weather, but depends on the availability of electricity and requires human intervention. In principle, you can do both methods and use them as needed.
The final stage of constructing a chicken coop for laying hens
After completion of construction of the structure, finishing work is necessary. They concern little things, but are extremely important for the comfortable use of the house by the owners and the well-being of the birds. Thanks to them, a do-it-yourself chicken coop for laying hens (photos demonstrate this) will become functional and will not spoil the appearance of the local area.
Recommendations for finishing work:
- After completing the construction of the house, cover the enclosure with mesh for walking. Do not cover the roof: if it rains, the chickens will easily hide in the poultry house or under it;
- A convenient solution would be to combine the front door with a bird hole. For it you need to make a hole at the bottom of the door; if you wish, you can cut it separately. The main thing is that the hole dimensions are at least 35x35 cm;
Convenient bird hole leading to an aviary for walking
- to form an approach to the hole, nail a board with horizontal sticks to it;
- the approach must also be mounted to the perch, which will help young birds climb onto the perch;
- In order for the egg production of chickens to increase, it is necessary to extend their daylight hours. To do this, in the spring and autumn, when the days are much shorter than in the summer, turn on a small 90 W light bulb in the morning and evening. To do this, you will need to install lighting in the chicken coop. This is easy to do with the help of a cable, and in order not to drill an additional hole, the wire can be easily passed through the pipe for ventilation;
- To prevent wood from rotting, apply a special impregnation to the surface, paint the building from the outside, and treat the inside with slaked lime to avoid the spread of parasites.
The main features of an ideal do-it-yourself chicken coop for laying hens: photos and descriptions
In summary, it is important to emphasize that various nuances may arise during construction. The situation is influenced by many factors: the availability of space on the site, the need for subsequent expansion of the poultry house, and even the climatic conditions of the area
However, a number of patterns can be identified, following which you can build a poultry house no worse than in the video of chicken coops for laying hens with your own hands, given at the end of the article. You will also be confident in the comfort of your pets.
Beautiful and functional chicken coop for 10 laying hens
A number of nuances if you decide to build a chicken coop (both at the dacha and at your place of permanent residence):
- The more spacious the birds’ home, the better. Therefore, if space on the site and building materials allow, do not make a drawing based on minimum calculations, but build with a reserve;
- make sure there is easy access to all feeders and drinkers in the room;
- all perches for chickens should be located at different heights;
- carefully choose a place for the nests of laying hens: they should be located in a dark, quiet and warm corner where the chickens will feel safe;
- there should be enough light in the room, so make sure there are windows, as well as the presence of artificial lighting sources.
After the completion of the main construction, finishing work is necessary, thanks to which the chicken coop can become a decoration of your yard
Care
Caring for nests is extremely simple. Let's look at some mandatory activities.
- Regular cleaning. The filler is changed as it gets wet, and the eggs are collected in a timely manner.
- Disinfection. It would be good to accompany the change of filler with treatment with a disinfectant solution. This procedure should be done weekly.
- Fumigation with smoke bombs. This is necessary because harmful pathogens multiply quickly in poultry houses. To prevent infection, the nests and all parts are wiped with a bleach solution. After treatment, the room must be well ventilated.
- Timely maintenance. To avoid injury to birds, check nest attachments at least once every three months.
Please note that if chickens ignore the constructed structure, it means they have special reasons for this. Errors must be corrected in a timely manner. If there are no errors, perhaps the young hen just needs to be trained to the nest. For these purposes, it needs to be closed in the nest for one or two nights. You can also place an egg laid by another individual inside. You can also find an item that will fit the shape
It is recommended to place feathers and down in new nests, which will attract the attention of birds. Birds may refuse nests because they are bothered by parasites, mold and dampness inside.
How to build a wintering chicken coop for 10 chickens
You can build a winter chicken coop for laying hens for 10 chickens with your own hands in a few days or weeks. The main stages of construction are laying the foundation, constructing the frame, walls, roof and interior equipment of the room.
Laying the foundation
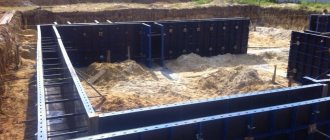
Since a chicken coop for 10 chickens occupies a small area (2*2 = 4 m2), the simplest columnar foundation can be laid for its construction. The use of a strip or, especially, a monolithic foundation is impractical - such methods take more time and effort.
To build a columnar foundation you need:
- Level the site, remove the top layer of soil 20–30 cm.
- Mix clay with glass fragments and spread around the perimeter (this is done to protect against rats and other rodents).
- Mark the contours using tape or a laser level.
- Mark locations for installing supports and dig holes 50 to 70 cm deep (150–200 cm interval).
- Fill the bottom with a sand cushion with crushed stone (height 20–30 cm).
- Place a concrete block in each hole (you can use clay bricks instead). Instead, you can install formwork and pour concrete.
- A pin is attached to the base of the posts for further fastening of the strapping beam.
- Coat the surface with liquid waterproofing (put 2 layers): for example, “Ceresit” or “Blokada”.
A columnar foundation can be built from concrete blocks
Installation of frame and walls
The next stage in the construction of a winter chicken coop for 10 chickens is the construction of the frame and walls:
- The bottom trim is constructed from 10*10 cm square beams.
- Fixed in the corners with metal pads.
- Install racks from boards with a cross section of 10*5 cm at intervals of 100–120 cm.
- Make the top trim.
- Strengthen the frame.
- Next, walls are erected from wooden beams, making cuts on them for fixing in a “tenon and groove” manner.
- Holes are cut, window frames are installed, and glazing is installed.
- Metal jambs are installed and doors are hung.
- The tow passes through all the cracks.
- To insulate a winter chicken coop for 10 chickens, the walls on both sides are lined with particle board (OSB) or wooden lining.
- The walls are sheathed with artificial material - polystyrene foam or polystyrene foam (thickness 10 cm).
- If possible, you can cover the outside of the chicken coop with a fine-mesh metal mesh - this is additional protection against rodents.
Attention! Before laying, all wooden beams are treated with special antiseptics to prevent rotting.
Floor insulation
Significant heat loss in winter is associated with cold coming from the ground
Therefore, special attention should be paid to floor insulation. To do this you need:
- Place boards under the joists.
- Lay a layer of insulation over them.
- Go through the voids with mineral wool.
- Fasten the boards perpendicular to the joists (section 15*5 cm) every 10 cm.
- Lay the last layer of moisture-resistant plywood.
This option is suitable for Siberia and northern regions. In the middle zone and especially in the south, you can get by with a layer of insulation. The temperature is also quite easy to regulate with the help of lamps and a layer of sawdust, straw, and hay.
Construction of ceiling and roof
One of the last stages of building a winter chicken coop for 10 chickens is the construction of the ceiling and roof. It can be made in either a single-pitch or a traditional gable format. To do this you need:
- Fix the ceilings to the top frame (using metal plates).
- Cut in the rafters.
- Reinforce the connections in the ridge with metal plates.
- Install sheathing along the rafters.
- Lay roofing material, such as slate or asbestos cement sheets.
- Sew the ceiling with a board.
- Place insulation on top: sawdust treated with lime, mineral wool or expanded clay.
- Lay slabs of polystyrene foam or other material for waterproofing.
The roof of a barn is often made gable
Interior arrangement
A winter chicken coop for 10 chickens is a small room
Therefore, it is especially important to install a natural supply and exhaust ventilation system here. To do this, make 2 air ducts (plastic pipes with a diameter of 15–20 cm)
They are installed as far apart from each other as possible in pre-drilled holes in the roof and ceiling. A head is made above each pipe.
During installation, take into account that the pipes rise 40 cm above the roof, and above the floor:
- inlet – 20 cm;
- exhaust - 170 cm (under the ceiling).
The winter chicken coop must have supply and exhaust ventilation.
At the final stage, it is necessary to build a wooden perch (3 m long is enough) at a height of 50–60 cm from the floor. They put up feeders and drinkers, and make 3-4 nests from wooden boxes. Install wiring and two lamps for lighting and heating. They spread sawdust, hay, straw and let the birds fly.
Drawings and projects
A summer chicken coop for 10-20 chickens is a small building, usually made of wood. A mini poultry house with a walk, which will house less than a dozen birds, has dimensions of 3 * 1.5 m. Moreover, this is with a walk - a fenced off area. The very room where the chickens will spend the night and lay eggs is 80-100 cm deep, 140-160 cm wide, and its height is about 1 meter.
Summer chicken coop for 5-9 chickens with walking - a very small building
For maintenance - changing bedding, cleaning - there is a door in the back wall. There is a small window covered with shutters to let in light. In general, an ideal option for a summer house for seasonally keeping a small number of chickens.
A chicken coop for 10-15 chickens is a more serious building. Dimensions double: 1*2. The height can still be kept low - all servicing can be done through a door in the back wall. There is no need to go inside. Only as a last resort.
Drawing with dimensions of a chicken coop for 10-15 chickens
For an even larger number of birds, you need to make an even larger barn for chickens. This is really a barn or a shed. You can already enter such a room.
If the winters are snowy, you will have to make high slopes and a hip roof
Please note that even the smallest poultry house should have windows. No one will install metal-plastic, but glass must be present. In a seasonal chicken coop, one glass is enough; in a winter one, it is better to install two. Moreover, the second can only be installed in cold weather. And one more thing: it is advisable to have shutters on the window. This will give you the opportunity to change the length of daylight hours.
There are designs for chicken coops of unusual shapes - in the form of a triangle or a wigwam. This type of construction is optimal. By spending a minimum of funds on construction, we get a substantial area.
Unusual shape. It turns out that the floor area is large, and the costs are very small.
This chicken coop for 10-20 chickens is built using frame technology. There are no walls as such; they are covered with soft roofing material. A very rational construction. It is also suitable for snowy regions: with such an inclination, little will be delayed.
When you can not heat
To organize heating of a chicken coop, two methods are used - artificial and natural. Each of them has its own strengths and weaknesses, differing from others in energy consumption, efficiency and the amount of money spent. So, for regions located in southern or temperate latitudes, the natural method is quite suitable. The main condition for using this method is the absence of a significant decrease in night temperatures and strong winds. If the temperature in an unheated room can be kept within 7 degrees, then the natural method is more rational and, when carrying out a number of heat-saving measures, can be safely used.
The first object to insulate a chicken coop is the floor. This is due to the fact that, thanks to the plumage, the bird’s body is not particularly sensitive to cold, and the only vulnerable point is the legs. That is why floor insulation must be done first. Before you begin laying the insulation, the floor surface must be sprinkled with powdered slaked lime at the rate of 1 kg/m2. The presence of lime will rid the chicken coop of fleas and ticks. Then the lime layer is covered with any heat-insulating material, which can be sawdust, fallen leaves or straw. The total layer thickness should be 25-30 cm.
The most effective means of natural heating of a room is manure. During the process of overheating, mullein releases a significant amount of heat, which is quite enough to “heat” the chicken coop during the winter. The only condition for using manure is the prohibition on removing old, already trampled mullein. In such cases, a layer of new fertilizer is placed on top, while preserving the previously laid manure.
After insulating the floor, it is necessary to begin thermal insulation of the walls and ceiling. To do this, you need to plug all the cracks, not forgetting to form a small ventilation window. When building a chicken coop that is not equipped with artificial heating, double walls and a ceiling should be made. The cavities between the two surfaces are filled with foam plastic or mineral wool, and the thickness of the insulating layer must be at least 15 cm. A room constructed and insulated in this way will “work” on the principle of a thermos: the heat generated by chickens and manure will be retained for a long time, which will allow chickens can tolerate frosts down to 12 degrees. The final stage of insulating the chicken coop will be the insulation of windows and doors, which is carried out using polyethylene or thick fabric.
Drawing up a drawing
Before making a chicken coop with your own hands for chickens, make a drawing, even if we are talking about a small room. This will help you correct all mistakes at the preliminary stage and think through every little detail. Accordingly, you need to clearly imagine the structure of the building. The drawing shows the walls and windows, the internal equipment of the room (nests, feeders, compartments for storing equipment and feed). When creating a chicken coop project, all objects are depicted, taking into account their sizes. Naturally, the drawing is a reduced copy of a natural building, but all proportions must be respected.
When creating a drawing, you do not need to copy a ready-made diagram found somewhere. You must first take into account your desires and goals. In addition, it is important not to forget that the size of the poultry house and its configuration depend on how much free territory there is on the site.
With a correctly made drawing, building a chicken coop will turn into an elementary task that even a person who does not have construction skills can cope with.
If the drawing for the chicken coop is ready, proceed to the next stage: preparing building materials and tools.
How to heat a chicken coop in winter without electricity
If there is no electricity in the chicken house, or you want to save energy, you can find ways to heat the chicken coop in winter without electricity.
Scheme of construction of a winter chicken coop from insulated SIP panels
One of them is a potbelly stove and a heating boiler. A convenient, but complex and cumbersome option is to install batteries and operate a heating boiler. The options are simpler - a potbelly stove, a wood-burning boiler or a small brick stove, which is easy to install yourself.
The main thing is to route the pipe through the chicken coop so that it provides the maximum amount of heat. An iron stove or pipe can be lined with bricks for greater efficiency. Heated brick retains heat for a long time, and if the chicken coop is well insulated, this heating is enough for 2 days of a comfortable temperature in the poultry house.
Do-it-yourself heating of a chicken coop in winter using sawdust
You can achieve a comfortable above-zero temperature without additional heating in the chicken coop using the heat released by sawdust during decomposition. However, keep in mind that this option only works if the building is well insulated:
- pour sawdust on the floor;
- the first layer should be filled in the fall, on the eve of the onset of the first cold weather;
- the layer thickness should be 10-15 cm;
- leave the layer for 1-1.5 months.
Filling with sawdust will help maintain optimal temperature in the poultry house.
This bedding option is superior to hay in its performance characteristics, since due to the good regulation of humidity by sawdust, chickens do not get sick. Moreover, birds love to rummage in the litter, and thanks to constant movement, even with infrequent walking and good nutrition, laying hens will not become excessively fat.
After 30-50 days, add a new portion of sawdust: the need to add a new layer is noticeable by the appearance of old sawdust and its smell. The thickness of the new layer should be about 10 cm. After a while, repeat the procedure. As a result, by the end of the winter season, a layer of sawdust about 50 cm thick forms in the chicken coop.
Thanks to the layer of sawdust, even in cold weather, the temperature in the poultry house does not fall below 0°C, and when burrowing into the litter, the chickens are in a comfortable temperature of about 20°C. The birds dig holes and perch in them, the sawdust is crushed, and as a result of the reaction a large amount of heat is released.
Helpful advice! In the spring, the entire sawdust mixture should be taken to the compost bin. After a short time you will receive excellent fertilizer.
The interior decoration of the chicken coop is made of sheets of moisture-resistant plywood
In advance, in the fall, it is worth filling the board in front of the door - then the litter, reaching its final thickness, will not spill out through the door. This will make it somewhat difficult to walk through the door, but it will eliminate the resulting draft.
Keeping young animals
If we talk about complete instructions on how to build a chicken coop, then it includes the construction of a compartment for chicks. Farmers who do not plan to breed birds can do without a permanent place to keep young animals.
The compartment for the chicks is an ordinary cage, for which you need to allocate space during the process of creating the drawing. It must be positioned so that it is not in a draft when the doors are open. You can make a chicken cage yourself.
Breeding chickens
It is advisable to place a container under the chicken cage to simplify the cleaning process. Sawdust or straw is placed at the bottom of the pallets, which will prevent the appearance of an unpleasant odor in the poultry house. The floor of the cage should be made of a medium-sized mesh. It is also necessary to take into account the fact that the temperature regime for chickens should be slightly different than for adult chickens, so an additional heating lamp should be placed above the cage.
Safety for chickens
In the poultry house and on the run, poultry faces many dangers:
- infectious diseases;
- external enemies - foxes, stray dogs, ferrets, hawks and other predators;
- small rodents.
Only feeling protected, the bird is calm, eats food well, gains weight and rushes.
To create a safe environment for the bird, you must:
- comply with capacity standards;
- regularly disinfect the premises;
- do not let in strangers who could become a source of infection;
- protect yourself from rodents and predators.
If everything is clear with the first three points, then how to get rid of mice and rats? They can cause a lot of harm, since the risk of infection with various diseases is extremely high. In addition, pests eat food intended for chickens, steal eggs and choke small chickens.
Rodents love to settle in insulation on the roof or in the walls, so polystyrene foam, polystyrene foam or mineral wool should be wrapped in a metal mesh with a mesh size of no more than 5-8 mm. To prevent rats from chewing their way through the floors, place a layer of broken glass mixed with crushed stone or gravel in the trench around the perimeter of the house.
An effective folk remedy for mice and rats is wood ash. It needs to be mixed with bedding in the proportion of 1 bucket per 4 sq.m. area and distribute evenly over the surface with a rake.
Traps work well in places where rodents move, but they need to be placed outside the boundaries of the chicken’s habitat. Pests can only be poisoned outside the chicken coop, so that the birds do not peck at the poisonous bait. Carrying out a set of these measures will ensure peace of mind for you and the entire bird flock.
Trap for rodents
A special device called an “electric shepherd” will help protect you from foxes, ferrets and other misfortunes. This mesh structure is fixed to poles around the paddock. The equipment can operate from the mains or independently from batteries, a built-in battery with a solar energy generator.
In operating mode, when you touch the fence, a small voltage discharge occurs, which is safe for birds or animals, but effectively scares away anyone who wants to profit from fresh chicken. An electric shepherd is not cheap, but no other additional fencing is required, and the bird will be safe.
Arrangement of a pen for walking chickens
Another important aspect of arranging a comfortable chicken coop is an aviary for walking birds. As noted above, chickens need physical activity and fresh air. For laying hens this is a guarantee of good egg production, and for broilers it is an increase in the meat layer. Walking birds in an unfenced area is dangerous; they will peck and trample plantings, and there is also a risk of being attacked by other animals and birds of prey. As a rule, the size of the enclosure is calculated at 3 square meters. m per bird, and its height must be at least 2 m so that the chicken cannot fly over it. Poles are driven in around the perimeter, and the space is fenced off with a fine metal mesh. If there are birds of prey in your area, you should definitely put a net over the top of the aviary.
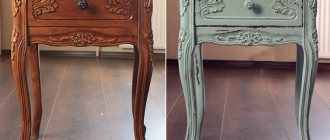
Chicken coop in the style of a mini-chalet
At the end of the article, we will show you an unusual chicken coop that can decorate any suburban area and fit perfectly into the landscape design.
The chicken coop was made from timber and turned out very comfortable and beautiful. The outside is lined with a block house, which was then painted.
Close-up of chicken coop components.
A beautiful chicken coop and its inhabitants.
Another option for a beautiful chicken coop from Taras_Pidlisny covered with flexible tiles.
We advise everyone who is involved in breeding rabbits and chickens to familiarize themselves with the topic, which describes in detail how to build an excellent chicken coop and comfortable cages for breeding rabbits with your own hands.
We recommend articles:
In the article:
- What is more profitable - growing vegetables on the plot or buying them in a store?
- What are the best vegetables to grow in the garden?
- How to make money from your garden.
- How to grow excellent harvests of vegetables on a country plot.
- How to make a greenhouse with your own hands.
- What is a greenhouse according to Mittleider?
- Advantages of a greenhouse according to Mittleider.
Also watch the video - Chicken coop in the garage with homemade cages.
The video shows:
- How to create a good microclimate and provide chickens with food and water.
- How to make cages for broiler chickens with your own hands.
Purpose
Tasks of the nest and perch for chickens:
- rest and sleep (conditions are close to natural);
- reducing the risk of infection by pathogenic microorganisms that can reside and multiply in dirty litter;
- ensuring safety (small predators will not reach them on roosts);
- preventing frostbite;
- ensuring cleanliness (their own feces do not stick to the chickens).
Expert opinion
Firsov Sergey Arkadevich
Poultry farmer
Attention! Perches and nests for chickens are an indispensable attribute of a poultry house; it is impossible to do without them. However, you don’t have to spend money on buying them; you can do everything on your own.
Useful tips
It is advisable to equip the chicken coop with a gable roof, but a single-pitch design is also acceptable. It must be made in such a way that its slope is not directed towards the area for poultry walking. When designing a poultry house, you should keep in mind that over time the population may increase and the chickens will need more free space. As a rule, mini-chicken coops are built on a columnar foundation. It will be an ideal solution for lightweight construction. In addition, after its preparation you will not have to wait until the poured concrete has set 100%.
As mentioned earlier, the coop should have window openings. The building can be equipped with several small or one large window. You cannot leave the poultry house without these elements. When designing a chicken shed, you need to remember that it will need frequent cleaning.
That is why it is so important to think over the height parameter of this building - you should be able to clean it as conveniently as possible. If, before starting construction work, you have already stocked up on ready-made drawings, then you need to check how they fit specifically to your site
Do not forget about the height of the future construction.
Electric lighting should be installed in the chicken coop. It is advisable to fix them above the feeders, but not above the perches. Such devices will come in handy when it’s winter outside the window, and with it short daylight hours. When designing an aviary for walking birds, take care of its high-quality fencing. This way you can protect the bird from visits from predators.
Place feeders and waterers opposite perches. Make sure that the constructed structure does not have cracks or holes, since animals dangerous to chickens can enter the house through them. It is advisable to build a fencing for the house from metal sheets or slate. These parts need to be dug well into the ground. Bird nests must be installed in areas of the chicken coop where there is darkness. Most often we are talking about areas opposite perches. Nests can be made from baskets, plastic boxes or made of wood. There should be drinking bowls and feeders not only in the barn itself, but also in the area reserved for chicken walking.
When building a summer chicken coop, do not use material such as metal profiles, since it gets very hot at high outside temperatures. As a result, the barn may not create the most comfortable environment. Place chicken coops in places on the site where there is no excess noise and there is no roadway nearby. This is explained by the fact that chickens are more comfortable in peace and quiet. Excessive noise frightens these animals, which can affect their health and egg production.
You should not build a barn that is too large and spacious for 10 chickens, because in such an environment a small number of birds will simply be cold. It is best to build chicken coops on a site with a slight elevation. If your site has a perfectly flat surface, then a high point on it can be built artificially using crushed brick or stone. You should not keep chickens in an enclosure all the time - these birds do not really like to be constantly in a cramped environment. The bird must be released from the enclosure at least once a day, otherwise it will get sick and lay poorly.
When building a chicken coop yourself, you need to remember that the surface of the walls in the inner part must be perfectly smooth. They are often covered with plaster or trimmed with plywood - each farmer uses his own techniques. Be sure to monitor the cleanliness of the poultry house you built yourself. A dirty building will be susceptible to all sorts of epidemics. Often the walls in poultry houses are covered with a layer of lime in order to protect the room from parasites.
The entrance door leading to the poultry house should be equipped with an additional access hole. To organize it, a special hole is made at the bottom of the door leaf, the dimensions of which should not be less than 35x35 cm. To equip a safe approach to the hole, it is worth nailing a board to it, supplemented with small horizontal sticks. If you have built a poultry house from wood, then you need to remember that such material is susceptible to rotting. To protect the wood from such damage, you need to coat it with a special impregnation and treat the inside with slaked lime. In such conditions, not only does rot not spread, but parasites also do not appear.
Layout features
As when planning any structure, first of all it is necessary to calculate the space and draw up a detailed plan. This will save time and labor costs, and will also help prevent mistakes that are usually discovered already at the stage of settling animals. A chicken coop can be built from any available materials, be it wooden beams, bricks or cinder blocks. Wooden structures are the simplest and do not require additional costs. The frame is sheathed with sheets of chipboard, fiberboard or any boards that are available. If there are already outbuildings on the site, you can allocate one of them for a poultry house.
Whatever option is chosen, when planning, you should calculate the required area and space for walking. The volumes will depend on the expected number of birds, because the larger the number, the more space will be required for comfortable living. The optimal size is 3 square meters. m for 2-3 chickens. With strict space saving, these indicators can be reduced to 1 sq. m, but it should be borne in mind that crowded conditions negatively affect the fertility of laying hens. The size of the enclosure for walking, accordingly, should be many times larger. And this is justified, since chickens need activity in the fresh air:
- Laying hens should not gain weight while sitting indoors, otherwise they will stop laying eggs;
- meat chickens only gain muscle mass when moving and exercising, that is, what they are intended for.
How to do without electricity
The artificial heating method requires the use of heating equipment, the choice of which depends on the external temperatures, the size of the room and the financial capabilities of the farmer. Electric, gas and solid fuel appliances are used to heat flocks and chicken coops. The simplest is the electric heating method, however, with frequent power outages or constant power surges in the network, it is better to abandon this heating method and use others.
Heat with gas
Gas heating comes in two types: convector and water. The water system works on the following principle: the heat generated during the combustion of gas heats the water in the heat exchanger to the desired temperature, after which the coolant, moving through the pipes and entering the radiators, heats the room. The essence of convector heating is that the device is devoid of pipes and has no connection with radiators; it heats up exclusively on its own, and outwardly resembles a large electric heater. Among the advantages of gas heating are the ability to quickly heat the chicken coop and high energy efficiency.
Disadvantages include the high cost of equipment and the need for constant human presence. In addition, when installing a gas boiler, permission from gas services and strict compliance of the building with fire safety standards will be required. It is advisable to use this type of boiler equipment in large poultry farming complexes, where constant monitoring of the device and its maintenance will be carried out.
Potbelly stove
Heating using metal stoves is the simplest and most affordable way to heat chicken coops. The potbelly stove has a simple design and does not require expensive maintenance or regular maintenance. The essence of how a potbelly stove works is quite simple: when solid fuel is burned, the metal walls of the stove become hot and begin to give off their heat to the room. The advantages of this method are low fuel cost, quick installation and ease of use.
The disadvantages include the need to comply with fire safety rules, which obliges a set of measures aimed at preventing fire. Such measures include the construction of a fireproof pallet and the protection of nearby wooden walls from exposure to high temperatures. In addition, the use of a potbelly stove requires the constant presence of a person, which is due to the need to constantly add fuel. But the most significant disadvantage of heating with a potbelly stove is that it will not be possible to maintain a constant temperature in the room.
Diesel stove
Heating with diesel appliances is also used to heat chicken coops. Such installations are able to quickly warm up the air in the room and, unlike potbelly stoves, have a temperature regulator. This allows you to change the intensity of the flame and create the required temperature in the room. Diesel units are completely fireproof and environmentally friendly. The disadvantage of such systems is the high cost of diesel fuel, which most likely will not cover the profit received from the sale of chickens.
Buleryan
This type of oven is air-convection and is a good solution to the problem of heating chicken coops. The devices are characterized by high energy efficiency and can operate on any fuel. In addition, Buleryans, like all convection models, are quite economical and have high power. This allows them to be used for heating large-area chicken coops on farms and farms.
Water heating
The water heating method is considered the most efficient and fireproof. If the home is heated using a water heating boiler, then the ideal option would be to connect the chicken coop to the heating circuit of the residential building. To avoid heat loss when transporting coolant from the house to the chicken coop, it is better to build a room for keeping chickens close to the house. If buildings are located remotely, pipes running along the street should be insulated.
Cages in poultry farming
Serial single-tier cages are designed for keeping laying hens, young poultry, and turkeys in home poultry farming. The KKhN-20 cage is designed to accommodate 20 laying hens, overall dimensions 1850X500X650 mm, weight 19.5 kg. The same number of laying hens can be accommodated in a KNI cage (overall dimensions 1825X630X600 mm, weight 14.6 kg.
The KBI cage is intended for raising broilers and replacement young stock, holds 40-50 birds, overall dimensions 1820X900X590 mm, weight 22.5 kg. The cage shown in the figure below is intended for keeping young meat poultry: 40 ducklings (cage brand OVU-1) or 25 goslings (brand OVG-1) and is assembled from standardized elements (weight 60 kg). Cage KSI-T-1 (point b in the figure) is designed to house three to four turkeys. To keep a larger population, several cages are placed in a row.
Homemade multi-tiered
In a four-tier cage for broilers (in the figure below, point a), the width of the gaps between the vertical slats in the wall near the feeders should be 3-4 cm, in the remaining walls - 3 cm. The feeders are placed on shelves 2, the height of the side of the feeder from the side of the broilers approach: 4-5 cm for chickens under 30 days of age, 6-8 - up to 60 days, for young chickens over 60 days - 9-10 cm. The floor in the cage is made of wire mesh with a diameter of 1.5-2 mm. The mesh size for chickens up to 30 days old is 12X12 mm, up to 60 days - 20X20 mm and over 60 days - 25X25 mm.
Homemade tiered cages for poultry: a - four-tier cage for keeping broilers: 1 - door; 2 — shelf for the feeder; . 3 - feeder; 4 — cross-section of the feeder; 5 - baking tray for collecting litter; 6 — mesh floor; b - two-tier cage for keeping hens: 1 - cross-section of the feeder; 2 - egg; 3 — mesh floor; 4 - baking tray for collecting litter
Chicks of different ages are kept on different tiers and are transplanted as they grow from tier to tier from top to bottom. On each tier, a feeder 2 is placed on a shelf with the appropriate height of the side on the side of the chickens approach and a mesh floor 6 is inserted with a mesh attached to the frame, which corresponds to the age of the broilers and the cell size.
In a two-tier cage for laying hens (in the figure above, point b), the mesh floor is made with sides on the sides and in front. It is installed with an inclination of 10-12° towards the front wall of the cage, leaving a gap of 5-6 cm between the bottom of the feeder and the floor. Through the gap, the laid eggs roll freely to the front side, from where they are easy to collect. The height from the bottom of the tray for collecting litter to the frame of the mesh floor near the rear wall of the cage is 10 cm, near the front - 6 cm. One laying hen should have 550-600 cm2 of cage floor area.
Calculation of chicken coop parameters
You can very easily calculate the size of the chicken coop using a simple formula: one square meter for four chickens. In addition, you need to think about the foundation for the bird’s future home.
The most important thing for the foundation of a chicken coop is strength. As a rule, the foundation is made of ordinary concrete. There are several reasons for this:
- Preventing boards from rotting. If they are isolated from the destructive effects of wet soil, then the building itself will be much stronger and more durable.
- Preventing Undermining. It's no secret that foxes and other wild animals, and often domestic dogs, are not averse to eating chicken. Once they hit the concrete base, they won't be able to dig a hole into the coop and cause you any damage.
If you don't want to make a concrete foundation, then just carefully line the entire bottom of the coop with iron sheets.
Location
With your own hands - How to do it yourself How to make a two-flight staircase to the second floor with your own hands photo drawings Do-it-yourself two-flight staircase to the second floor
The location of the resting place for hens should be selected after analysis. Chickens should be comfortable sleeping on it. It is necessary to provide for the thickness of the poles. They should fit inside a chicken foot. Thick ones contribute to the deformation of the hens' fingers. Thin ones can cause hens to fall from their roosts
You need to pay attention to the quality of wood processing. Ideal slats are smooth, have no sharp parts or irregularities
The height of the perch is selected based on the breed characteristics of the chickens. There are individuals that cannot fly. There are chickens with developed, wide wings. This way you can place the seating area higher. The length of the perch should be suitable for the number of chickens. Too long will not give them comfort (chickens crowd together). Lack of space provokes fights and aggressive behavior of birds.
Which to choose
There are two main types of toilets: floor-mounted and wall-hung. From the name you can understand that these types of toilets differ in the installation method. The floor-mounted toilet has a relatively low cost and is very easy to install. In addition, it is easy to maintain, because all the necessary components are always available for sale
The advantages of a wall-hung toilet include accessibility of the entire area, which is very important when cleaning the bathroom. Also, when installing such a toilet, all communications are hidden in the wall and do not spoil the appearance of the room, as is the case with floor-standing toilets
The last point at the same time complicates the maintenance of such a toilet, because getting to the structure becomes much more difficult if it is walled up in the wall.
If we talk about the installation height, then with a floor-standing toilet, of course, no questions arise, since it already has a fixed height and all that can be done is to place it on a pedestal. But when installing a wall-hung toilet, you need to comply with some standards prescribed by the specific features of use. In order to understand the principle of correct installation, you need to study the communications structure of a wall-hung toilet.
Installation
Lighting
Sunlight is also of great importance here. When making a drawing of the building, keep in mind that the total area of the window openings in it must be at least 1/10 of the floor area.
Unfortunately, winter days are short (7-9 hours). Therefore, the duration of the photoperiod has to be increased to summer values (14-16 hours) due to artificial lighting. Its total power and mounting points are selected so as to achieve the optimal brightness level.
Despite the cost-effectiveness of LED and fluorescent lighting, many owners of winter poultry houses still use incandescent lamps. They produce soft radiation, the spectrum of which is close to that of the sun.
Poultry does not like too bright light. She becomes irritable and restless. Therefore, do not overdo it in this matter. For a room designed for 10 chickens, a 60-watt incandescent light bulb is sufficient. It needs to be installed in a sealed lampshade and hung above the feeders. In this case, the roost area will have dim lighting, ideal for resting birds.
In winter, the lights are turned on at 6 a.m. and turned off at 8 p.m. This process can be automated using a timer (electronic or mechanical).