Leveling the floor
200 rub. m²
Order
- Prices
Leveling the floor is the first step in preparation for installing plywood, laminate flooring or other finishing flooring work. The procedure is mandatory for both old floors and floors in new buildings. There are several basic methods used by both professionals and amateurs who independently carry out repairs at home. Popular alignment methods include:
- by lighthouses;
- using self-leveling floor;
- using extensions.
Each of these methods has its pros and cons, making it more suitable for a given situation. Therefore, the specific method is selected depending on the type of floor that will be installed in the future. Let's look at all the options in more detail to find out in which cases which one is more relevant.
Alignment by beacons
One of the oldest and most popular methods. Used for large rooms. The method got its name thanks to the beacon slats that are laid on the floor to achieve the required floor level. The advantages of the method include:
- the ability to level the floor with any height differences;
- obtaining a high-quality, perfectly flat floor surface;
- the best method for leveling floors under laminate, parquet boards and linoleum flooring.
The only disadvantages include the long period of drying of the screed - from 10 to 30 days (depending on the temperature and layer of material). Therefore, the method is suitable for those who are satisfied with such deadlines and for whom the quality of the floor is more important than the speed of completion of the work.
How to prepare a wood base
High-quality preparation of the rough base for pouring affects further work and the service life of the self-leveling floor. Therefore, the wooden base is prepared carefully. The following tools may be required to carry out the work:
- hammer;
- nails, screws;
- grinding machine or machine with a grinding attachment;
- nail puller;
- vacuum cleaner;
- sandpaper;
- sealant or putty.
- putty knife;
- dense polyethylene;
- damper tape;
- construction knife.
Before starting work, remove the baseboards and assess the condition of the flooring. If its surface is uneven, covered with paint, varnish, or grease stains, it is cleaned with a grinding machine. Nails and screws protruding above the surface are unscrewed or recessed into the floor. Rotten, “playing”, chipped boards are replaced with new ones. Damaged parquet or laminate flooring is removed.
Attention! You can clean varnish or old paint with special paint removers, which are sold in hardware stores.
Potholes, pits, chips, cracks are covered with sealants, putty, sawdust and PVA glue. The glossy surface is sanded with sandpaper to make it rough for better adhesion to the filling mixture. All this is done to ensure that the base is perfectly flat and monolithic.
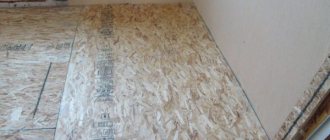
If the board base has dried out or is severely damaged, it is covered and leveled with plywood, chipboard, OSB with a thickness of at least 15 cm. To prevent them from creaking in the cracks, the voids are filled with chalk powder, and then sheets of particle boards are nailed to them or screwed with self-tapping screws. A gap of about 1 mm is left between them.
The optimal distance between fasteners is 35-50 mm. If nails or screws protrude above the surface, they are driven 0.5 mm deep with a hammer. Then the prepared base is cleaned of dust, dirt, construction debris with a vacuum cleaner, a damp cloth and allowed to dry completely.
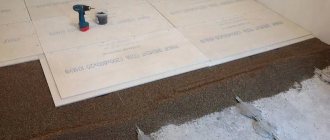
The cleaned surface is primed to protect it from moisture, mold, and mildew. Priming is carried out in two layers: first, they simply cover it and let it dry, and then sawdust or sand is added to the primer, which promotes better adhesion of the self-leveling floor to the base and is treated with this composition.
For your information! Instead of a second layer of primer, a reinforcing mesh is glued, which improves adhesion to the bulk solution.
The final stage of preparatory work is creating a waterproofing layer of polyethylene and laying damper tape around the perimeter of the room. Polyethylene is laid over the entire area of the room with an overlap of 10 cm. And its edges are placed on the walls to a height of at least 10 cm. The thickness of the damper tape is 1-2 mm.
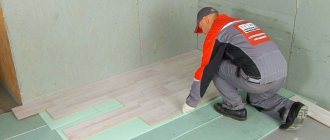
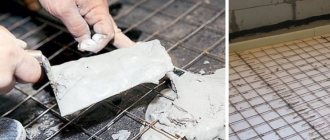
Leveling with self-leveling floor
The simplest and most modern method of leveling the floor is the use of a special leveling solution that fills all the recesses and cracks. The mixture contains cement. The entire surface of the floor is filled with it, and the characteristics of the material allow it to spread evenly, creating a smooth surface. The minimum layer of self-leveling subfloor must be at least 3 mm, and the maximum - no more than 35 mm. (some mixtures allow a thickness of up to 80 mm.). Among the advantages of the method:
- Obtaining a perfectly flat surface with a small amount of work;
- Quick drying of the mixture layer;
- Great for concrete floors with slight unevenness;
- Suitable for pouring heated floors;
- The price for work and the cost of materials are several times lower than with other methods.
The only drawback of this method is that it is not suitable for surfaces with irregularities deeper than 35 mm. Leveling floors in an apartment using this method is the best option when you need high speed work and a limited budget.
Expert advice
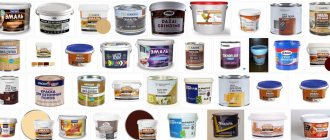
In any residential premises, it is recommended to use self-leveling mixtures only based on polymer resins. In rooms where high humidity is constantly present, it is necessary to use an epoxy type of self-leveling flooring, while in the rest of the house a polyurethane floor is used.
The technology is intended to be poured on a concrete base, but installation on a wooden surface is also allowed. At the same time, the labor intensity of the work increases, since it is imperative to carry out high-quality preparation of the base with a two-layer primer. The adhesion strength of the coating to the base wood depends on this.
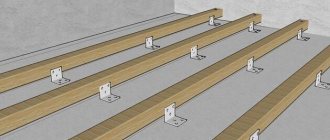
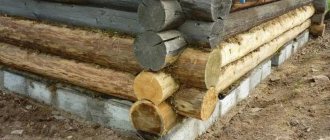
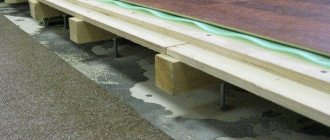
Leveling by extension
The build-up begins with the installation of logs - wooden bases on which boards or plywood are laid. This method is excellent for leveling wooden floors, including in old buildings. Its advantages include:
- the possibility of filling the voids between the joists with heat-insulating material;
- the best method for laying the floor under which communications should be carried out;
- Possibility of use for surfaces with any height differences;
- well suited for leveling floors under plywood, linoleum, wooden boards and other materials that require a reliable, level base.
It has practically no disadvantages, but it requires a lot of time to install the floors. However, this problem is solved by the speed of the master’s work and the number of assistants.
Installation cost
The costs of installing self-leveling floors in a home are strictly individual. They depend on the type of self-leveling mixture chosen, its manufacturer, and decorative costs.
Floors in 3D format with an exclusive pattern cost an order of magnitude higher than ordinary floors. The technology for installing self-leveling floors on a wooden base is not particularly complicated, so you can do the work yourself. This will provide a significant reduction in the cost of all repairs.
Here are approximate prices for work performed by professionals by stage:
Preparation of a wooden base for pouring a polymer self-leveling floor (average price 5 USD).
e. for 1 sq. m).Primer of the prepared base (average price 3 USD).
e. for 1 sq. m). Filling a wooden surface with a self-leveling polymer mixture (average price 6 USD).
e. for 1 sq. m).
Thus, for the entire complex of work on pouring a self-leveling floor, for example, in a room of 20 m2, you will have to pay 280 USD. e.
Agree that this amount is quite impressive. This is much more than the mixture itself costs. All these prices refer to a regular floor that you can do yourself.
The cost of pouring decorative floors is usually calculated individually. If you decide to make a self-leveling floor in 3D format at home, then you will definitely need to use the services of a specialist. This will guarantee:
- High quality of creating a decorative coating. A guarantee for all work performed. Carrying out the entire installation cycle in accordance with accepted technologies. The use of construction tools that are too expensive, but necessary in the process.
If you do the work yourself, do not neglect the practical advice of professionals. This experience will help you avoid costly reworking of the coating later.
Who to contact for floor leveling
Our company has been carrying out repair work in Moscow for almost ten years, including leveling floors and laying any type of covering. We carry out work both on logs and without logs using modern materials and equipment. By contacting Parquet Club, you can count on:
- high speed of repairs;
- fair prices per square meter;
- permanent discounts of 5% for government agencies and a 10% discount on parquet chemicals for all clients;
- highly qualified employees who have complete information not only about floor leveling methods, but also about materials, equipment, and new work techniques.
To find out how much leveling costs in your case and to order a visit from specialists, contact us using the contact phone numbers on the website.
| Preparing the base | Unit. | price, rub. |
| Primer of the screed. | 1 m2 | 100 |
| Self-leveling floor (leveling screed) up to 20 mm | 1 m2 | 300 |
| Vapor barrier device | 1 m2 | 80 |
| Plywood flooring on wood | 1 m2 | 200 |
| Plywood flooring on concrete (glue + screws) | 1 m2 | 250 |
| Sanding the plywood base for the installation of solid wood | 1 m2 | from 150 |
| Frame construction. | 1 m2 | 800 |
When to fix problems locally
Changes can appear either immediately after installation or after several years. There are two types of differences in height - when individual boards rise above the surface and when there is an empty cavity under the board. Before fixing problems, you need to evaluate the surface based on the following factors:
- The parquet boards are not damaged by mold or rot, and the difference is not due to the fact that the material has swollen from moisture or old age;
- Differences do not exceed 2 cm in one direction or another;
- There are no gaps larger than 5 cm between the damaged boards.
If one of these points does not comply, the coating will have to be changed, and local elimination of differences will become impossible. This is especially true for parquet damaged by mold.
Should old flooring be removed?
When laying hardwood flooring with adhesive, any old flooring should be completely removed before you begin installing the hardwood flooring.
When laying parquet boards using the floating method, it is necessary to completely remove only those coatings that allow moisture to pass through. These are primarily carpets, felt and other fleecy floor coverings, including carpet.
Moisture-proof floor coverings do not need to be removed. If the base of the floor along with them is level, dry and clean, then the parquet board can be laid directly on them. Such coatings include mainly linoleum, PVC tiles, ceramic tiles and some others.
Keep in mind that parquet boards can only be laid on old tiles using a floating method, but not with glue.
Is installation possible on uneven surfaces?
Installation is carried out independently by the owner of the apartment. Experts advise not to lay the product on an uneven floor.
Deviation from the norm is allowed no more than 2 mm per 1 linear meter. If this parameter is exceeded, the product will have to withstand additional load, which will negatively affect its external condition and functions.
Due to loose connections of laminate plates, the following negative consequences are expected::
- slabs connected with glue will last no more than a year;
- The parts connected by locking are suitable for use for several months. Then they require replacement due to cracks and discrepancies due to excessive load;
- Due to installation on an uneven surface, walking on the panels will be accompanied by squeaking.
Unique technologies
There are dozens of different types of substrates for solid boards, grids, fastenings to brackets and other things. Naturally, these are not unique technologies. Most of these technologies come to us from Europe and the USA. The point is not even that the heating season runs differently “over there”, but in relation to the parquet. In many countries, it is considered natural for parquet flooring to creak or crack, but here it is not. Substrates, meshes and everything else at the first sharp change in temperature and humidity conditions exhibit the defects described above. That is why the vast majority of parquet manufacturers operating on the Russian market offer installation of their products only on moisture-resistant plywood. Although the complexity and high cost of laying solid wood on plywood greatly reduces the profits of parquet manufacturers, and if any successful alternative were invented, all companies would recommend a simplified installation method.
Source