To save space, shower cabins are installed in small bathrooms. They come in different configurations, depending on which they are called a shower corner, a cabin or a hydrobox. However, all manufacturers have one sin: poor instructions. It contains a list of parts and general instructions: place the pallet, secure the walls... and everything else in the same spirit. No details. Because of this, assembling a shower cabin turns into a do-it-yourself task. There are many different models, it is impossible to describe them all, but we will describe and demonstrate common problems and methods for solving them.
All the nuances of installing a shower cabin:
Buying a shower cabin:
First of all, check the integrity and availability of all components (this is especially true for shower cabins ordered online).
Pay special attention to the integrity of the glass, check the cabin for scratches and chips, and review the instructions (they must be present). If there are any shortcomings, do not sign the documents under any circumstances; you have every right to ask for a replacement.
If you sign the documents before thoroughly checking the contents, then subsequent claims are practically useless; in 98% of cases, customers trust the supplier, which they take advantage of by loading broken or incomplete shower cabins into their cars.
What tools and materials will you need:
Tools:
- Adjustable wrench (Swedish)
- Phillips-head screwdriver or similar screwdriver
- Small diameter drill (not available on all models)
- Silicone extrusion gun
- Small flathead screwdriver (needed when tightening small bolts in faucet levers)
Necessary materials:
- Silicone antibacterial transparent
- Two Mama-Mama hoses, 1.5 meters each (optimal length)
- Transition to sewer diameter 32/50 (may not be needed, look at the corrugation of the siphon)
So, the cabin has been delivered and its integrity has been checked. Let's start installation.
Video description
Assembling the cabin frame in this video:
Panel installation
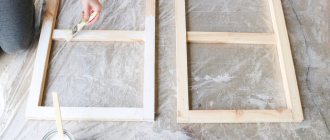
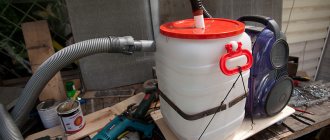
The prefabricated panel is a distinctive feature for hydroboxes. It should cover the wall and allow you to control all functions. All holes on which the panel will be installed must be treated with sealant to eliminate possible leaks.
Particular attention should be paid to the injectors. Hose sections are used to connect the injectors to each other. To avoid leaks, clamps are used to tighten the tubes. For additional protection against moisture, a sealant is used to coat all connecting elements.
Working with sealant Source e-stroy.pro
Assembling a shower tray with your own hands 2 Options:
Option #1:
Sort through the numerous boxes (everything is labeled). Find the shower tray. Carefully open the box with the shower tray, there you should find the following elements: the tray itself, the tray apron, the tray frame, the studs that will hold the legs, the brackets for the apron, numerous nuts, screws and a siphon.
If there are no elements, then there must be a box in which all this is located.
- Remove the protective film from the pallet.
- Then we turn it over and place it on a previously prepared large piece of cardboard, which will prevent scratches from appearing on the pallet left without a protective film.
- We take out the frame; if the pallet frame is not on the pallet itself and it does not need to be assembled from many elements, then we place it on the pallet so that the holes on the frame coincide with the fastening inserts on the pallet.
- We take four large studs, the diameter of which is usually 10mm or 12mm (which is rare, you're in luck =)). We tighten the nuts and place the washers as you see in the next photo.
- Once you have screwed two nuts onto all the studs, as shown in the photo, screw them into the mounting inserts, first cleaning the holes from excess acrylic and tape.
Precautionary measures:
- Be careful when touching the bottom of the pan; you may be injured
by the sharp, unpolished surface.
- Then put the frame on the studs, the frame should touch the tray a
. Next, tighten the nuts from above; there should be no gap between the pallet and the frame.
- Lightly tighten the nuts with an adjustable wrench. First the top nuts to hold the frame to the pallet, then the bottom ones.
- Do not overdo it - the frame is thin, it can bend and then the rigidity of the structure will be broken and the cabin will be unstable.
- Choose from a variety of screws that match the number of holes and length (profile height + 5mm) for fastening the frame to the pallet. We place the frame evenly on the mounting bulges with mortgages and fasten it with screws.
Important Tips
When building a shower stall yourself, you should remember several important points:
- The process of constructing a cabin begins with design, which in everyday conditions consists of developing a construction plan, creating a sketch, and calculating the amount of materials needed.
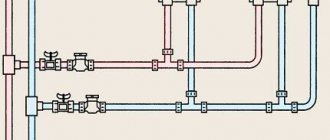
- When preparing communications, you should remember the required slope. For pipes with a diameter of 50 mm, the minimum slope is 2 cm per 1 linear meter.
- When connecting horizontal branches to a sewer riser, it may be necessary to create a turn. You should not make it at a right angle; it is better to use two bends at 45°. This approach will reduce the likelihood of blockage at the point where communications turn.
- When constructing a homemade pallet, one should not lose sight of the creation of high-quality waterproofing directly under the structure and in the places where it adjoins the walls.
- Filling all the voids with polyurethane foam will help eliminate the “play” of a factory pallet installed on a brick base. To prevent the pallet from moving relative to the base when the foam expands, it should be loaded by placing a bag of sand in it.
And one last thing. To avoid problems with a homemade shower stall during operation, you must carefully weigh the pros and cons, take into account the experience and recommendations of professionals, select high-quality materials and, most importantly, carefully follow all installation rules.
Installing a shower screen (apron):
- First remove the protective film from the apron and install the apron along the façade perimeter of the pallet. Take the brackets and screw them onto the mortgages; they are secured with two screws of suitable length.
- After that, take the brackets for attaching the apron to the top of the pallet (small white or black, bent in the shape of a question, or steel - there is always a lot of fuss with them).
- Then, screw nuts and put washers on three or four studs located on the facade. Place black brackets in the shape of the letter “L” with a perforated short side on top, then put washers (if any) and screw the nuts on top.
Frame option No. 2:
- We assemble it as in the photo. The only rule is to first fold it without twisting it
(try it on) so that the mounting plates with holes are on one side. Tighten without applying any force. The profile bends and loses rigidity. Also, a nut that is welded rotten may fall off.
- All operations are basically similar to the first version of the pallet. Only “hemorrhages” in the additional assembly of the shower cabin frame with your own hands. In order to quickly and evenly screw in all the studs to an equal depth in one plane, I used to use a tape measure, measuring the distance from the floor to the end of the stud, and then the legs.
- It is better not to measure from the body of the tray; it is rare to come across even shower trays, and especially even ones at the bottom. Now I have improved the method using a laser level. Everything is done much faster.
Important:
- Be sure to adjust the fit of the bottom of the apron to the brackets (the main thing is perpendicularity and normal curvature of the circle). Then it will be very difficult to do...
Mixer
The choice of shower faucet depends on three factors:
- Installation method (external, hidden).
- Design and overall dimensions.
- Functional.
Pipes for supplying hot and cold water are installed in the plumbing niche. When choosing a mixer for external installation, the mixer is secured by the threaded fittings themselves at the pipeline outlets. When choosing a hidden installation model, you should take into account the dimensions of the working unit, which is located directly in the plumbing niche. Only the control elements and the spout, if provided for by the mixer design, are brought into the cabin.
When determining the dimensions of the mixer for yourself, you should take into account that the space of the shower stall is very limited. The large size of the device and control elements can make the shower box inconvenient to use.
Installing a shower siphon:
- We install the siphon, find the lower plastic part and the upper steel part. We place one rubber gasket with a larger concavity at the top. We silicone it thoroughly. (later I will add other variations of siphons)
- We insert the steel part together with the gasket into the hole for the siphon. Take the second flat gasket and nut. There is a gap on the bottom side of the pan through which water can flow during operation of the cabin. Treat this gap with silicone. Place the flat gasket and screw on the brass nut.
- Apply a thick layer of silicone to the threads remaining after screwing on the nut, and also apply silicone to the internal threads in the lower inner part of the plastic siphon.
- Carefully, along the thread, screw the lower plastic part of the siphon to the steel one. Make sure that there are no distortions in the thread (the thread may break, and a new siphon is not cheap).
- Spread the excess squeezed out silicone over the nut. You can't spoil porridge with oil =)
Installing a shower tray by level:
- When you have completed all of the above operations with the pallet, you will finally be able to install the pallet in its installation location and adjust it to its level.
- Here, pay attention to this event with special pedantry. On other sites, when viewing the instructions, the pallet is leveled only after installing the upper structure - this is a huge mistake, adding unnecessary complexity to the work.
- After installing all the elements, we will also check the level and make a little adjustment.
- And so, you have done a great job! You can go smoke (smoking is harmful to your health), drink tea or sip beer (just not a lot) =)
- Yes, by the way, you should not connect the siphon to the sewer system yet, because during further installation the cabin will move more than once.
Install curtains
Frame: @Alexander Kvasha / YouTube
Sliding doors move along special grooves inside the upper and lower frame profiles. First of all, install elastic stops for the rollers there. To protect against splashes, place seals on the ends of the side walls that will be in contact with the doors.
For convenience, immediately screw the handles to the curtains. According to the instructions, attach the rollers to the doors in the right places and hang the assembled structure on the frame. Check how the doors close and, if necessary, adjust the position of the rollers.
Assembling the shower ceiling:
Lamp Installation:
- First of all, it is convenient to assemble the roof after the pallet (this is my personal opinion). To do this, we find a lamp, an epic shower (humorous joke), a cooler, a speaker and decorative covers (the configurations are different, all this may not exist) - all this stuff usually lies in a separate or common box.
- First of all, remove the protective film.
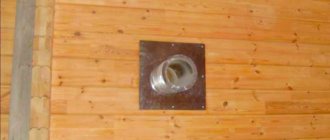
- First, we thread the wire into the hole that is completely suitable in size and shape.
- Be sure to check your work. The lamp must be well secured using steel spacers.
- To prevent the speaker from rattling, you can apply sealant around the circumference, just a little bit.
- We find 2 decorative, usually round, grilles.
- Ceiling screws usually come in one small bag. They can be identified by the required quantity and by trying on the length.
- It is better for you not to use a screwdriver, but to screw it with a screwdriver. Otherwise, you can damage the socket into which the screw is screwed.
Stage six
Front frame assembly
- Connect transverse (arched) and longitudinal (straight) aluminum profiles using self-tapping screws
- Install the front side fixed windows into the groove of the longitudinal profile, having first placed a silicone U-shaped rubber seal on the glass.
If the glass is difficult to insert, do not try to knock on it, do not hammer it in. Try to spread a little silicone sealant on the U-shaped seal and carefully, with pressure, without bending or deforming the glass, try to insert it into the groove.
3.Press the free edge of the glass with the corners of the front walls using self-tapping screws.
Fan (cooler) installation:
- The screws for the cooler should protrude 5 mm from the case, if more, then look again... .
- In order to quickly hit the holes with this action, you need to thread the screws through the cooler, hold the screws with your palm so that they do not fall out, and insert them into the holes. Then place the grate. This method is the fastest.
- The main thing is not to twist it, I think you succeeded.
Installing a rain shower in the shower ceiling:
- The nut must be screwed onto the thread and tightened lightly; on the reverse side, check the symmetry of the location; if you need to move the rain shower, then first loosen the nut a little, and then tighten it again.
Stage eleven
Connection to communications
1. Connect the hoses coming from the mixer to the hand shower, rain shower and to the nozzles (if any)
2.If you have an electrician, connect the wires going to the lighting, hood, and radio.
Assembling the frame for installing shower doors:
Option #1:
- We find all the frame elements. It is presented from the following elements: two semicircular profiles and two vertical ones; 8 stainless steel screws.
- We begin to assemble the frame for the cabin doors; it consists of two semicircular profiles and two straight ones. To do this, we find 8 screws of suitable length and assemble it.
- This is the time to think and carefully examine these elements, because if the door frame is assembled incorrectly, further assembly is impossible.
- Semicircular profiles usually have stickers on them indicating where the profile should be located. " Up
" - upper, "
Down
" - lower. But the main criterion that guides our master is not the stickers at all, but the position in the space of the recesses for installing enclosing glass.
- With straight profiles, the situation is simpler - in the lower part there is a square-shaped cutout for more tight installation of the profile to the edge of the pallet.
- Then, having figured out the location of the elements, we begin to twist them. The screwdriver is placed at approximately " three
“, take the screws and begin to twist these elements.
- If you have difficulty getting the screw you put on the bit into the frame hole (the screw slips and falls), take silicone and apply silicone to all the screw heads - this usually helps.
Assembling the frame for installing shower doors:
Option #2:
- The arrow indicates the upper semicircular profile or there is a sticker with the word “ UP
”
- The main difference between this option is the method of fastening the profiles together.
- They are held together with such cunning Chinese clamps - you can see it here in the photo.
- It is necessary to loosen it three turns, for this we find a hexagon, which the caring Chinese included in the kit. We twist, as always, counterclockwise.
- We connect them as shown in the photo.
Important:
- Do not overtighten and align the edges
. If these damn things are broken, there will be a lot of sadness.
- The assembly algorithm for such a frame, like the first option, is quite simple.
- If you are embarrassed by the instability of the structure, then you should not pull the bolts. The structure will become rigid when everything is in place.
- Next, take the rubber door movement limiters, as shown in the photo. They may be different, but this is not important, the main thing is to understand the principle that I will outline in the following information.
- Others “by appearance” must be placed with a semicircular recess to meet the vector of movement of the cabin doors, but in a simple way - they look towards the door.
- On the one hand, they limit the door so that it does not crash or fly off the guides, and on the other hand, so that the doors close. First we thread short screws into them so that they stick out from the stopper to a length of no more than 3 mm.
- If you insert the wrong screws, you can seriously screw up and damage the front profile in the most visible place. The solution is to look for screws of suitable length.
- We screw them into the holes that are located on the semicircular profiles in the recess where the door rollers will slide.
- By the way, about sliding. Here's my mega advice - lubricate the rollers with grease or other thick, high-quality lubricant. There is always lubrication in luxury cabins. Your doors will always open with effortless ease.
Pfft, how important:
- The holes must be located synchronously on both profiles. This can be checked even with a regular tape measure.
- If the Chinese drilled differently, don’t do anything about it for now. Then, when it comes to installing the doors, I will guide you. The screwdriver can be set to “one” or it is generally better to tighten them with a screwdriver.
- Because of this jamb, which an inexperienced installer misses, the doors fly off the shower stall.
- And the clients are told the following: “You bought a crappy cabin, I don’t know what’s wrong!”
Assembling the walls of the shower stall is not difficult, the main thing is patience and accuracy... .
- We begin to complete the walls and enclosures of the shower stall. Usually there is a watering can, holder, mirror, shelf, etc.
- The most important rule for a beginner is try it on, think about it, twist it, don’t overtighten it
. This rule always helps me out when I come across an unfamiliar shower stall configuration.
Tools
For installation we will need:
- wrench 19 and adjustable wrench 45;
- long Phillips screwdriver with PH2 bit;
- transparent sanitary silicone;
- construction gun for sealant;
- silicone spatula;
- spray;
- fairies;
- drill with 3 mm drill bit;
- roulette;
- bubble level 1 m;
- jigsaw;
- erasable marker;
- knife;
- thread locker or cold welding;
- water supply hose 1/2″ nut-nut - 2 pcs. (length is selected according to location);
- sewer crossing 40x50;
- toilet paper.
Assembly of the central panel:
- We assemble the central panel if it is disassembled. No need to roll the square one =)
- It is very important to place a decorative cover, which is correct in the photo. We are guided by the pictures that the people of one very numerous country have carefully depicted for us.
- The handles of the lever mixer are installed using a small mounting bolt with a flat-head screwdriver, or there is also an option with a small hexagon, which is most likely included in the shower cabin kit. If you don’t have it, a set of bits will save you .
Stage two.
Before assembling, place the remaining cardboard boxes on the floor . This way, you will assemble the pallet and, most importantly, the glass without damage.
Never place glass on a bare floor, especially tile or concrete.
In general, handle shower glass very carefully during assembly. Although tempered safety glass used in shower enclosures is very strong, it does have weak points, especially at the corners. Never place glass on a corner. Do not drill holes in the glass, it will simply crumble into small fragments.
All the necessary holes are already there and were made at the factory. If, in your opinion, a hole is missing, it means this is a manufacturing defect, or the manufacturer has replaced the equipment.
Hydromassage assembly:
- Typically, all spare parts for a hydromassage shower are tightly rewound in shipping bags in the central panel. Well, or in a box.
- In order not to mess up, we initially find the only one and unique nozzle
. It only has an inlet fitting, and there is no hole in the outlet
- The photo shows the “end” hydromassage nozzle. In order to assemble everything correctly the first time, if you read carefully, so that the mixer and mode switch are already assembled correctly. Otherwise, there will later be problems with displaying modes for switching functions of the shower cabin.
- Oh, by the way, one more mega tip - during operation, twist it less (usually children twist it), it breaks very often, because it’s crap. The simplest one is very expensive.
- The finger shows the mode we need. Now knowing which output goes to the hydromassage, you will accurately connect everything correctly
- This photo shows the correct location of the starting and ending jets of a shower cabin hydromassage.
- Insert the nozzle into the hole and tighten the nut. By the way, we don’t mess around, we don’t forget to put the washers, otherwise everything will come loose later.
- You don't have to pull with the key, you just have to turn it with a handle. After installation, you should get the same thing as in the picture.
Important
:
- The smelly Chinese hose must first be used for hydromassage in order to be enough.
- Then connect a regular watering can.
- Lastly, we connect the rain shower with the mixer.
- It would be better to change it altogether to our Russian oxygen one.
- We put the hose on the desired fitting and put the other end on the fitting of the initial nozzle. Then we connect all the injectors according to this principle. For pedagogical reasons, I will repeat, it is important to save the hose and not make a reserve - it may not be enough.
- The main thing is not to allow very sharp bends. Because of this problem, the injectors may not work the same way.
- If it turns out differently than in the photo, call a plumber
out of harm’s way (just kidding), re-read the article and
redo it as it should .
GO to Part No. 2
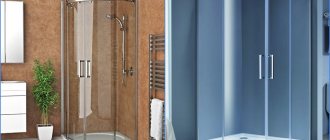
Types and types
First of all, shower cabins differ in shape: corner and straight. In our country, corner ones are more common, because they are easier to fit into small rooms.
Straight shower cabin
But corner ones can also be of different shapes. They are more common with a rounded front part - in the form of a sector of a circle, but there are also ones with a beveled and rectangular base.
The shape of the front wall can be not only round
Now about the packaging itself. On this basis, shower cabins are divided into closed and open. The open ones do not have a top panel or side walls. They are in closed ones. Open shower stalls are most often referred to as “shower corners” or nooks. Its configuration can also be different - with or without a pallet.
Various equipment
Some closed shower cabins have many additional functions - various types of jet massage, shower - regular, tropical, etc., a built-in sauna or steam generator for hammam. Such multifunctional devices are correctly called “hydromassage cabins”, or simply hydroboxes.
It is clear that the more complex the “filling”, the more labor-intensive the assembly will be. But hydromassage cabins are assembled at the very beginning in the same way as a shower corner with a tray. If you understand how to assemble the basics, installing the walls and roof will be easier. The main thing, as usual, is the foundation, and the assembly of a shower cabin of any complexity begins with the installation of a shower tray and door guides.