When carrying out repair or construction work, the problem of accumulation of debris and dust very often arises, which cannot be eliminated using improvised means. In such cases, the easiest way is to use a special construction device, but it is worth considering that the prices for such devices are high, and the need for its use may not exceed several times. It is more advisable to assemble a construction vacuum cleaner with your own hands.
Design principle
The most common device for these purposes is an industrial vacuum cleaner with a cyclone filter. In order to understand how to turn a regular vacuum cleaner into a construction one, it is necessary to make a number of changes in its design.
A regular household vacuum cleaner is not suitable for cleaning construction waste for a number of reasons:
- low power;
- filtering features.
Due to heavy dust particles, a household vacuum cleaner does not have enough traction and suction power to cope with it. Due to the design feature of the filter, its small cells become clogged with these particles. As a result, the motor receives additional load with a subsequent decrease in traction.
Homemade chip sucker
For a home craftsman who has a carpentry workshop at home, assembling a chip extractor is not a problem. This machine is necessary in order to collect shavings that constantly get in the way underfoot.
For assembly you will need plywood and an electric motor with a long shaft. It is better to take a more powerful engine with speeds within 3000 rpm.
An impeller in the form of a water mill is made from plywood. Here it is important to balance it so that there is no beating. This is done by drilling holes either in the sides of the impeller or in the blades. The first option is better.
Before assembling the vacuum cleaner, you need to make a body from the same plywood. These are two identical snail-shaped sidewalls and an upper part that will be located along the perimeter of the body, covering it from all sides.
Assembly is carried out according to the following principle:
- One side of the housing is installed. It is attached to the engine housing, fortunately there are mounting fasteners on its surface.
- The impeller is mounted on the electric motor shaft and secured with a washer and nut.
- The top part is installed. It is attached to the installed sidewall.
- The second side panel is being installed, which is attached to the upper part of the body of a homemade vacuum cleaner for the workshop.
All fastenings are self-tapping screws. You will need an additional container to collect the chips. This could be a regular bag, box or any other solution.
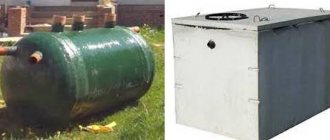
Cyclone type device
This type of design is the simplest from the point of view of modernizing the selected donor. Before assembling a construction vacuum cleaner with a cyclone filter, you should immediately take into account that the power of the vacuum cleaner must exceed 1500 W.
Necessary materials
To assemble the structure, you will need an object that has a cylindrical shape or a ready-made cone. To do this, you can use the following materials:
- plastic;
- thick cardboard;
- tin plate.
Types of dust collectors
There are two types of dust collectors in vacuum cleaners:
- Disposable. Designed to collect small debris, after which the container is sent to a landfill.
- Reusable. These bags suck up all the debris, but there is no need to throw them away - they can be used a large number of times.
The advantage of disposable containers is that a person does not come into contact with the rags, and they hold the garbage inside much more firmly than reusable ones. In addition, they are hygienic. Reusable bags are used for a long time, and there is no need to constantly spend money. But such dust collectors need to be washed periodically. If wet garbage has been collected, the reusable bag can become a source of pathogenic bacteria.
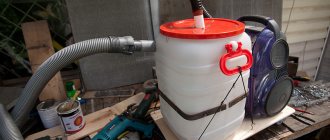
Water filter
The device can also be assembled using a water filter for a vacuum cleaner. It is not difficult to assemble such a structure with your own hands, but it is necessary to protect the electrical appliance from moisture.
To assemble, you will need a container with a lid with a capacity of at least five liters. A plastic bucket would be ideal. The container is filled one third with water. Two holes are made in the lid into which pipes are inserted; it is best to use plastic sewer pipes with a diameter of 50 mm. The first tube is immersed in water almost to the very bottom, and the second, on the contrary, should be as far from the water as possible.
Installation cost
Not everyone can install a built-in vacuum cleaner on their own. Most often, users turn to specialized organizations that can perform all the necessary design and installation work.
The cost of the complex of works depends on the complexity of installation and the amount of preparatory work.
Usually the price is calculated by a company specialist after he visits the site. But in general, prices for individual stages of work have already been established, and the majority of companies adhere to them.
- Installation of the main unit (working unit) – 6,000 rubles/piece;
- Installation of air inlets – 3000 RUR/piece.
- Installation of pneumatic scoop – 4000 RUR/piece.
- Standard installation of a pneumatic system for one socket – 9,000 rubles/piece.
- Commissioning works – 2000 rub./per one inlet.
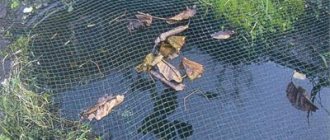
Garden device
For owners of private households with their own yard, the issue of removing leaves and other debris becomes relevant. Garden vacuum cleaners are collected for these purposes.
It is difficult to install a shredder with your own hands. But you can get by by increasing the diameter of the suction tube. The best donor in this case will be an old domestically produced device. A plastic container is installed in a device of this type with a prepared hole of suitable diameter. All that remains is to connect a wider corrugation to the container with a dense piece of pipe at the other end. A sewer pipe is perfect.
Whatever a homemade construction vacuum cleaner for the home is, it cannot compare with an industrial one, but if necessary, it can become an indispensable assistant for one-time use.
Originally posted 2018-03-28 15:19:32.
Central vacuum cleaner budget and simple
No home would be complete without a vacuum cleaner. However, its main disadvantage is that the stream of purified air - along with dust and microorganisms - is blown back into the room. A dust removal system, the air from which is removed outside the living quarters - a central vacuum cleaner - will help get rid of this problem.
It also has a number of other advantages: high power, noiselessness (the unit itself is located in another room) and ease of operation - you do not need to drag the unit around with you, getting tangled in the electrical cable and switching it from one outlet to another. In addition, a lot of additional accessories - pneumatic scoops, turbo brushes and various attachments - will allow you to quickly remove garbage from the kitchen, clean clothes, etc.
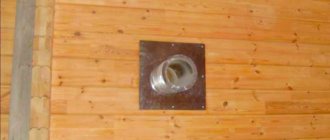
System installation features
The installation of a central vacuum cleaner is planned before the start of construction, because special pipes are laid in the wall, floor and ceiling. The central unit is usually installed in technical rooms: basement, storage room, boiler room, garage. The air is discharged outside using an outlet pipe. The main condition: the pipes must be laid straight, and their direction must be changed smoothly: each bend leads to an increase in resistance, which reduces the suction force of the vacuum cleaner.
The only exception is the safety elbow installed behind the air inlet with a 90° bend. This is done in order to hold back large objects that were accidentally pulled in by the vacuum cleaner: if they pass through a sharp bend, they will freely overcome smoother ones, reaching the garbage container and without clogging a pipe hidden under the floor or in the wall.
An important point when installing a central vacuum cleaner is to count the required number of air inlets: if there are too many of them, the valve that closes them over time may no longer fit tightly, which will lead to a weakening of traction; if it’s not enough, you will have to clean those places that the central vacuum cleaner cannot reach with a regular one.
As a rule, for a medium-sized house, two air inlets are installed per floor. You can check whether this quantity is enough using a 9 m cord (usual hose length). It should be taken into account that there will be furniture in the room, and therefore the hose will not stretch in a straight line.
Don't forget about utility rooms, stairs, toilet, terrace, etc. – the length of the hose should be enough to clean them!
As soon as the hose is inserted into the air inlet, the system turns on. A more convenient, but also expensive way is to turn it on using a special button located on the handle of the hose: you can temporarily interrupt cleaning without removing the hose from the air socket. It is advisable to secure the hoses for each floor: you do not have to move them from floor to floor.
To protect the hose from damage during cleaning (abrasions from corners of furniture, etc.), cover it with a quilted cover.
Personal experience
A member of the “Home and Cottage” forum, galexy456, whose hobby is using materials for purposes other than their intended purpose (cheap and beautiful), decided to assemble a central vacuum cleaner on his own, using a powerful construction unit.
He bought: a construction vacuum cleaner (about 205 EUR), a vacuum outlet (21 EUR), a 9-meter cleaning hose (50 EUR), a cheap 50 mm sewer pipe, various little things: silicone sealant, elbows, etc. In total, about 300 EUR.
Experts warn that PVC pipes for a central vacuum cleaner must be treated with a special compound that reduces electrification, with smooth walls that prevent clogging. Conventional sewer pipes do not meet these requirements.
The forum member assembled an automation unit to turn on the vacuum cleaner when connecting the hose to the socket from a 12 V power supply, relay, machine, socket, placing everything in a housing - an electrical box. I installed the pneumatic socket in a plasterboard partition, drilling through the ceiling with a core drill in the place where the socket was installed in the basement, and secured the sewer pipes with silicone sealant.
Galexy456 connected all the contacts of the sockets in parallel and to the socket on the vacuum cleaner (like plumbing fixtures - to the sewer). Because it does not have a central vacuum cleaner, without a low-voltage input for control, the forum member did the following: he placed a 220->12V power supply in the case. Its output was connected in series through a contact in the socket to a 12V relay. Thus, when the hose is connected, the contact in the socket is closed and the relay is activated. It, in turn, supplies 220V to the outlet into which the vacuum cleaner is connected. The switch on the vacuum cleaner should always be in the “ON” position.
The vacuum cleaner itself was placed in the basement: you can’t hear it, and if necessary (to remove the car, clean the wall, wash the floor in the gazebo, collect sand near the sandbox) it can be taken out. The owner did not exhaust it to the street: the room where the vacuum cleaner is located is washed with a hose (there is a ladder and a sloped floor), there is always an open window.
Results
Galexy456 notes that now the cleaning process is simple and fast: you can collect spilled water, wash carpets, etc. The sewer pipes passed the test with dignity: they did not become electrified and did not accumulate dust. In addition, a forum member came up with the idea of rinsing the pipe with water (for this you need a water separator). If the pipe gets clogged (which is extremely rare), he suggests using a plumbing cable.
Based on materials from participants of the “House and Dacha” forum