Wooden wall decoration is one of the traditional ways of interior design. Some modern finishing materials even allow you to imitate a wooden frame. With the advent of technologically advanced varieties of boards - parquet and laminated (laminate), they can increasingly be found not only on the floor, but also in the design of walls. Manufacturers of finishing materials are also ready to offer wall parquet, specially designed for cladding vertical surfaces. Thanks to subsequent treatment with tinting, mastics, oil, varnish or wax, such a surface acquires a unique appearance. In addition, natural finishes influence the formation of an optimal microclimate in the room. How to choose parquet for the wall, what are the features of installation and what alternatives are there – today’s material.
Parquet on the wall
Wall decoration with parquet boards: design options in the apartment
There are several design options when decorating walls with parquet boards:
- Across the wall;
- Along;
- In a diagonal direction;
- Over the entire surface of the wall;
- On a separate site;
- Arbitrarily.
Depending on the style of the room, the choice of parquet design may vary, which will merge into a single image with the rest of the room or emphasize its individual parts.
Sheathing on plasterboard walls
In the case where the walls were lined with plasterboard as part of a previous or current renovation, this only plays into the hands and also makes the work of the home craftsman easier. You will need to make a sheathing of wooden slats 20x20 mm, with a distance between the slats of thirty to forty centimeters.
The sheathing under the sheets must be installed level, and therefore it is recommended to use a building level.
The orientation of the parquet and sheathing slats is directed in different directions, that is, they must be perpendicular to each other. If the tiles are placed diagonally, the slats will go in the same direction, but they must be perpendicular to the floorboards.
If only the lower section of the wall is sheathed, then work also begins from below. But if the entire wall is to be sheathed, then the first tile is laid in the upper part. Then the movement is from left to right. In this situation, the same rules for laying parquet as on the floor apply - there is a need to provide a technological gap between the walls and the edge of the parquet.
The dies are attached using parquet glue or by driving staples into the corresponding locking joints. If glue is used, it is applied not only to the wall, but also to the back of the dies, using zigzag movements.
As the final stage, the installation of skirting boards and corners is carried out. Thanks to them, technical gaps left in advance are closed, as well as joints with the floor and ceiling.
How to mount on concrete or brick walls
The process of installing concrete or brick walls will be no different from a wall made of plasterboard or chipboard.
The main requirement is that the wall must be smooth and free from flaws, defects, and damage. If it is necessary to mount heavy objects on the wall, a concrete wall partially wins among other options.
The most powerful fasteners can be driven into a concrete wall that can withstand heavy loads. For other situations, you will need an individual approach when choosing the type of fasteners and the method of their location.
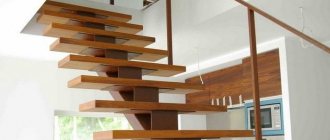
Parquet on the wall
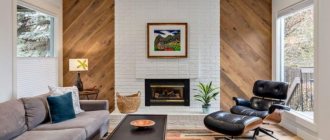
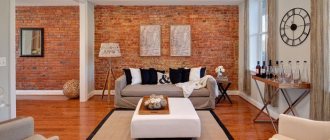
If ordinary wallpaper or other finishing seems boring, then you can use an interesting method - this is parquet. This is one of the original design solutions. In fact, using engineered boards for vertical finishing is a non-trivial way to decorate an interior that looks expensive and unusual.
In addition to the visual effect, parquet for interior partitions is also justified from a practical point of view - it helps improve sound insulation and additionally retains heat in the room.
The advantages of this finish include:
- Environmental friendliness. Parquet is made from natural raw materials and covered with water-based varnish or wax and oil. Only solid wood panels and barn boards have similar characteristics.
- High strength. The top layer of the board is made of hard valuable wood species - usually oak. Thanks to this, the panels can withstand heavy loads and impacts, especially since they were originally designed for floor coverings.
- Practicality. When using logs for installation behind the finishing, a technological gap is formed where hidden wiring can be organized and sound insulation can be further enhanced.
- Easy to maintain - the board is unpretentious and does not require additional processing after installation.
- There are a huge number of design solutions.
Among the disadvantages of installing parquet on vertical surfaces, we should highlight the need to arrange a frame. At the same time, if the room is small, you need to take into account that the decoration will further reduce the space.
It is important to remember that wooden slats increase the acoustics of a room. In this regard, the finishing is not very relevant for bedrooms or children's rooms. But for the living room this is a good original solution, where you can also set up a small home theater.
Parquet increases acoustics
When choosing parquet, you must also take into account the characteristics of the room. The shade will depend on the type of wood. Special boards for walls are most often made from linden - it releases beneficial essential oils and has a good service life. Linden has warm shades. If you need a cooler range, you can give preference to cherry or oak. If the humidity in the room is high, the best solution would be cork parquet, as it is not at all afraid of moisture.
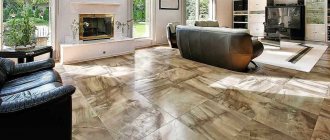
Examples in the kitchen and living room
With the right selection of materials for wall decoration, you can achieve significant design success.
The result also depends on the choice of textiles, furniture, colors and some other factors that are taken into account when decorating a kitchen or living room. In these rooms, variations in the laying of parquet are of considerable importance. Depending on the expected effect, you can use one of the main options:
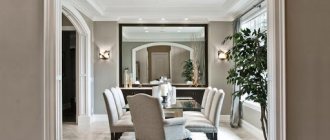
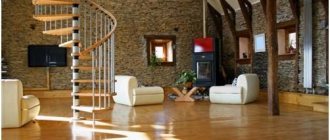
- The horizontal arrangement of the panels makes it possible to visually expand the room, which can be important for a kitchen, which is usually small.
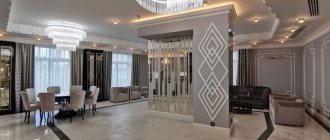
- Vertical installation visually increases the height of the ceilings. This trick is best applied to the living room to achieve incredible design solutions.
- Diagonal cladding is a universal option that makes it possible to blur the volume and boundaries of the room.
Classification
Table 1. Classification of parquet by appearance
| Illustration | Description |
Piece | The traditional version, made in the form of individual dies 3–10 cm wide with beveled ends. The length of the die can reach 50 cm, and the thickness does not exceed 1.5 cm. Performance properties and appearance depend on the type of wood used for manufacturing. Preference is given to deciduous trees, since conifers are characterized by the presence of knots. |
Shield | This variety is made in the form of tiles formed from strips of block parquet. Coniferous species are used to make the lower part, and hardwood with high strength is used for the front part. The thickness of the board is less than block parquet and is about 8 mm. |
Mosaic | This variety is not found very often. A specific pattern is created from elements of different shades and shapes. There is a protective film on the outside that protects the coating from damage during installation. |
Care
When the coating receives minor damage during installation or operation, they can be repaired using putty or special wax.
Parquet panels are cared for using specialized care products. Follow the correct humidity and temperature ranges as specified by the manufacturer.
Using parquet as a wall covering is an unusual, but original and practical solution. This is an easy-to-install and maintain material that is suitable for a wide range of users.
Tips for choosing
Since the load on wall parquet is not the same as on floor parquet, you should not look for particularly durable material. And it is better to pay all attention to the packaging of the goods. If it is broken, then the dies could be exposed to high humidity. And if the transportation conditions were not met, the packaging could fall.
Possible deformations and increases in size due to exposure to moisture may make installation difficult. And with critical damage it will simply be impossible.
Parquet mosaic on the wall in the living room Source otdelka-rykami.ru
Otherwise, the whole choice comes down to a visual inspection. In this case, the texture of the material, its parameters and shades are assessed. And for the installation to go smoothly, and for the parquet to always look like new, you need to use one trick. Before lining, it is necessary to let the material lie in the room for several days to undergo adaptation.
Examples
There are a great variety of design options with similar coatings. Some of them are shown in the photo below to show how varied such solutions can be.
It is absolutely not necessary to cover the entire surface of the ceiling with such material - there are compositions in which only part of the ceiling is decorated with wood, and the rest of the space is decorated with other materials.
Main works
Oak parquet or any other has its own installation technology. You shouldn't break it. Because this procedure is not standard, and not everyone knows how to perform it. Although, once you figure it out, even a person without experience will do everything correctly. As soon as all the conditions have been created in the house to begin finishing, you can bring the main material.
If the walls have been rough finished, then you need to wait until it is completely dry. Otherwise, the parquet board will begin to absorb moisture, which will lead to its swelling and change in shape. This cannot be allowed. Another reason is that when wet, the top layer may come off, which reduces the performance of the entire coating. It is also worth considering whether any heavy elements will be attached to the wall - a TV, shelf, etc. If the answer is yes, then you should take care of this and fix the anchors as deeply as possible.
Basically, the work is carried out in the same aspects as when applying oak parquet to the floor. Before finishing begins, the material is unpacked and laid out in the room where everything will take place. This is required for acclimatization. It takes two days for this process. You should not skip this period, especially if the boards were in a cold room and ended up in a warm one.
In such a situation, condensation forms. This is exactly what is dangerous for all parquet boards. Wood has the ability to absorb all the moisture that is around. And when installation begins immediately, cracks will appear, and nothing can be fixed. If there is a transition from the floor to the wall, then you need to leave minor gaps for deformation.
How to fix?
How to attach parquet to a wall? It has already been said that the board has a special tongue-and-groove lock. Therefore, it is not so difficult to assemble a perfectly smooth, interesting and beautiful surface. For greater strength, many people add a small amount of glue. “Moment” is considered a good option.
But this addition is not always used - the choice is at the discretion of the owners. But in general, all work is carried out in the same way as on the floor.
First row
Let's take a closer look at how to properly lay parquet boards. The first stage involves laying the 1st and 2nd rows. They should be located parallel to the light falling from the window. Therefore, before laying the parquet board, you should install wedges against the wall to provide clearance. The gap between the coating and the wall is at least 10 mm. This distance is necessary to protect the panels from mechanical damage when changing temperature and humidity conditions in the room. The first two panels are pressed tightly against the spacer wedges.
What do you need to know about the material?
Before starting work, it is worth understanding what a person is dealing with. Hygroscopicity is a quality that is inherent in many finishing materials, including parquet boards. How to understand this? If there is high humidity in a room with such a coating, the material begins to increase in size, which leads to protrusion and change in shape. Conversely, when drying, cracks form. To minimize these negative aspects, the parquet board has several layers. But it is better if the air temperature is in the range from +18 to +24, and the humidity is not higher than 70 percent. If the house has parquet on the wall, you will have to stock up on additional equipment. This:
- Air temperature and humidity meters.
- Humidifiers.
- Air conditioners.
Each is applied at its own time of year so as not to spoil the finish. But why exactly has this trend gained popularity? Each person tries to create in their home not just comfortable conditions, but also completely safe for health. It’s difficult to do this with plastic, but wood carries everything you need. But is it possible to make parquet on the wall yourself? The answer is yes. If you follow simple recommendations, even a beginner will not experience any difficulties.
Decorative panel
If there is not enough parquet left, you can assemble the planks into an interesting decorative panel. This decor will add a touch of eco-style to the room, which is now in fashion. You can apply an original design to a wall decoration using paints or photo printing on wood, and create a geometric print from small dies. Use colors and patterns that echo the decoration and decorative items - this way the parquet picture will organically fit into the interior and effectively complement it.
architectureartdesigns.com
1/3
homewowdecor.com
2/3
etsy.com
3/3
Concrete base - preparation features
If you plan to lay it yourself on a concrete base, then the preparation process will not be as complicated and time-consuming as in the case of a wooden floor.
First of all, a visual assessment of the surface is necessary. At this stage, cracks, bumps, potholes and areas of brittle crumbling concrete are identified. Even small defects must be repaired, for example, using self-leveling mixtures. Before treatment, the surfaces are primed, or, as an option, the old coating is dismantled and a new, smooth and strong one is poured in.
Quick adjustments to small areas of the floor can be done using improvised means.