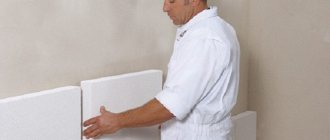
Effective and reliable materials for thermal insulation of loggia floors include loose expanded clay and tile extruded polystyrene foam Penoplex. They are installed under any floor covering: concrete screed, wooden floor, parquet, linoleum, ceramic tiles, carpet, laminate.
These insulation materials have low thermal conductivity, are easy and quick to install, and have an affordable price. The only thing that distinguishes them is the method of installation on the loggia floor: expanded clay is placed in bulk in the spaces between the sheathing, and Penoplex is attached to the base with panels of different thicknesses.
Expanded clay as floor insulation or mineral wool - the choice of specialists
Nowadays, the cost of heating housing and premises in general is constantly increasing.
At the same time, for some reason, salaries remain almost the same - not a good trend, but it has to be taken into account. In such conditions, almost every owner of a house or apartment begins to worry about the issue of saving energy. Today, walls, floors, ceilings, and slopes are being insulated en masse - such measures make it possible to distribute heat throughout the room as efficiently as possible due to the fact that the level of heat transfer of the building is reduced. This article will touch upon such a difficult issue as floor insulation - we will figure out what is better suited for this: mineral wool or expanded clay. In principle, foam plastic is also often used, but this is not the best option, because the possibility of ventilation and ventilation of the ceiling practically disappears. Although, undoubtedly, the thermal insulation characteristics of polystyrene foam are excellent.
So, mineral wool and expanded clay, which is better - you can start with a review of the first material and compare everything based on specific properties.
Floor insulation with penoplex
Penoplex (extruded polystyrene foam, XPS) is a thermal insulation material with unique characteristics, produced by the domestic manufacturer of the same name.
Several types of XPS are produced, differing in density and, accordingly, area of application: “Comfort”, “Foundation”, “Wall”, “Base”, “Geo”, “Facade”, “Roof”, “45”, “45C”, "Block".
| Type of penoplex | Density (kg/m3) | Thickness (mm) |
| "Comfort" | from 20 | 20-100 |
| "Foundation" | 27-35 | 50-100 |
| "Wall" | from 20 | 50 |
| "The basis" | from 20 | 20-120 |
| "Geo" | 28-36 | 40-100 |
| "Facade" | 25-33 | 20-150 |
| "Roof" | 26-34 | 30-100 |
| «45» | 38-47 | 40-100 |
| "45C" | 35-40 | 40-100 |
| "Block" | at least 25 | 120-1000 |
You should choose penoplex depending on the design of the floor covering. Any type of XPS is suitable for installation between joists, and when laying under a screed it is better to use material with a density of 25 kg/m3 or more. In both cases, insulation with a thickness of at least 3 cm is used.
- Environmental friendliness;
- Low moisture absorption (up to 0.5% of volume per year);
- Frost resistance;
- High compressive strength;
- Biostability;
- Durability.
Thermal insulation technology
Let's look at two main methods of how to insulate floors in a private house under a screed.
Insulation on the ground
This method is used at the construction stage of a house if a basement is not provided. The order of work should be as follows:
- The bottom of the pit must be leveled. Then the first layer is crushed stone, gravel or slag. This layer should be 20–25 cm.
- Then a layer of sand (10–15 cm) is poured, it must be thoroughly compacted.
- A layer of reliable waterproofing is the most important component when insulating any floors. Thick polyethylene film laid in several layers is excellent. The seams need to be taped.
- Now you can directly fill in the insulation – expanded clay. The thickness of this layer may vary depending on the climate of the region. The minimum thickness of the thermal insulation pad must be at least 15 cm. In order for the insulation to fit more tightly, it also needs to be compacted.
- Next, the reinforcing mesh is laid on the floor. The cross-section of the squares should not be too large; the optimal size is 5×5 cm.
- Now you need to prepare the cement mortar and make a screed. As already noted, foam granules can be added to the solution and additional insulation of the floor can be made. The only thing worth noting is that it is better to fill the top layer (1–2 cm) with a clean solution. It will be easier to level, rub and control the horizontal position.
Advice! The horizontal plane and uniformity of the layers of the insulation cake should be controlled from the very first stage - backfilling the base. This will avoid uneven heating of the floors in the future.
Insulation on a concrete base
This method is used in already built private houses and in city apartments. This method is less labor intensive and faster, but still requires a carefully thought out approach. Let's figure out the sequence in which floor insulation is carried out using this method:
- First of all, you need to dismantle the old flooring (if any). In city apartments, it is also recommended to remove the old cement screed.
- Then you need to inspect the base and, if necessary, make repairs: seal cracks and crevices.
- Now the waterproofing is installed - thick polyethylene. Installation is carried out with an overlap, the seams must be sealed with tape.
- Insulation can be laid on the waterproofing layer. You can use any insulation: filling with fine-grained expanded clay or laying sheets of extruded polystyrene foam.
Advice! There is a small nuance here: if the concrete base is uneven, then in order to save materials and time on leveling, it is better to use expanded clay while simultaneously leveling the floor. Expanded polystyrene boards are best used for insulating pre-leveled floors.
- The top of the polystyrene foam must be covered with another layer of waterproofing to prevent moisture from the cement mortar from getting into it. It is recommended to pour expanded clay with cement laitance: this will increase the strength of the top layer.
- After installing the reinforcing mesh, you can directly screed the floor.
After the screed has completely dried (usually this takes from two weeks to one month), you can begin installing the finished floor covering. Any material is suitable for this: laminate, linoleum or ceramic tile.
If you have some skill and follow the given technology, it will not be difficult to insulate floors in a private house or city apartment. When doing such work with your own hands, you need to follow the sequence and technology of the installation process, and then the result will not disappoint you.
Materials and tools
To insulate the floor of a house or cottage with expanded clay, you will need the following tools :
- Master OK;
- rule;
- putty knife;
- hammer;
- screwdriver
Materials required for insulation:
- expanded clay;
- plywood;
- self-tapping screws;
- cement-concrete mixture;
- waterproofing film;
- vapor barrier film.
In conclusion, we can say that when choosing insulation you need to start from its properties and characteristics. Expanded clay screed allows you to achieve not only perfect leveling , but also improve the insulation characteristics of the structure.
More complete information about expanded clay as an insulation material can be obtained in the article “Expanded clay as an insulation material: the correct choice of weight and fraction.”
For a master class on insulating floors with expanded clay using the dry screed method, watch the video:
Watch the video below for a master class on expanded clay screed:
Installation features
Before you start insulating the floor with foam plastic under a screed with your own hands, you should familiarize yourself with some useful information that will help you do everything correctly (more details: “Insulating a floor with foam plastic under a screed - installation instructions”).
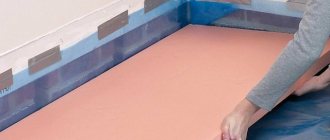
If you plan to make a screed from cement-sand mortar, then a waterproofing material must be laid on top of the insulation. This is done to protect the material from exposure to moisture from the solution. The waterproofing must be laid overlapping, the joints must be secured with tape.
If a “floating floor” is being made, then even before screeding, it is recommended to lay strips of wooden slabs, which should be equal in height to the thickness of the future screed.
A small gap of approximately 1-3 mm should be left between the screed and the wall. This will help avoid the formation of “sound bridges”.
Conclusion
After studying all the information about thermal insulation materials for screed, you can choose the most suitable one for yourself. You should also remember about consistency and compliance with the rules when performing floor insulation, otherwise you may get a completely different result than you would like.
Forced insulation of a finished wooden floor
A cold floor in a room does not leave a pleasant impression and sometimes you have to insulate it.
To do this you need:
- Remove the baseboards around the perimeter of the room.
- Carefully, without damaging, remove the finishing boards. Number them in order of location, remove the nails.
- Remove the subfloor.
- If necessary, add expanded clay just above the bottom level of the joists, carefully level it and tamp it down.
- Cut penoplex plates according to the distance between the joists and along the length of the room.
- Lay the first layer, seal the joints with tape.
- Lay the second layer in the same way, ensuring that the joints overlap. Tape the joints.
- Restore the subfloor.
- Lay the finishing coating, installing the boards according to the numbering in reverse order.
- Nail the baseboards.
In this case, we recommend using plates with a minimum thickness of 20 mm in two layers. This is enough to successfully resolve the issue.
Useful article? Add to your bookmarks!
Types of thermal insulation for floors
The modern market of finishing and building materials provides a wide selection of insulation for floor screed. Each variety has its own characteristics, which are expressed in a combination of quality characteristics and installation technology.
Expanded clay
This material is quite popular for screeding in private homes on a pre-prepared soil base.
This option has a number of advantages:
- Non-flammability. The material does not burn, does not support combustion and does not emit toxic substances when exposed to temperature.
- The created layer of thermal insulation does not contribute to the appearance of mold and mildew. No rotting occurs when exposed to water.
- Excellent soundproofing effect.
- Ability to withstand large temperature changes without changing characteristics.
- Reasonable price making it affordable.
Expanded clay is clay that has boiled at a high temperature; therefore, the material is absolutely harmless.
The material is laid according to the following scheme:
- The base is being prepared. If the work is carried out on a foundation made of soil, then a foundation pit is built with a layer of sand, everything is carefully compacted.
- Depending on the necessary requirements for thermal insulation, a layer of expanded clay is poured.
- Additionally, a reinforcing layer is made.
- The prepared solution is poured over the structure.
Thus, the screed is created quite quickly, and the result is of high quality.
Bulk insulation materials are more suitable for arranging a dry screed; in the wet version, expanded clay is better used as a mortar filler (expanded clay concrete)
Styrofoam
Foam plastic under floor screed is used for installing flooring in apartment buildings or private cottages, on the second or first floor if there is a basement.
- The porous structure of the material provides a high level of thermal insulation, which makes it possible to retain heat inside the object.
- Excellent sound insulation. Foam plastic is able to neutralize vibration, which significantly reduces noise flows coming from the outside and inside.
- Resistant to fire. Although the material is subject to combustion, it has a self-extinguishing effect. Due to the fact that this process is accompanied by the release of harmful substances, it is necessary to exclude the use of the product in places with an increased fire hazard.
- There is no need to create an additional layer of waterproofing, since the products are moisture resistant.
Not every brand of foam plastic is laid under the screed; experts recommend using boards with a density of PSB-S35 and higher.
Installation is performed as follows:
- The base is carefully prepared; all cracks and crevices must be completely sealed. If required, preliminary alignment is performed.
- After drying the coating, a layer of foam is laid and fixed in a checkerboard pattern with special glue.
- Reinforcement is performed using mesh.
- The final layer of screed is poured.
Foam insulation is mainly used when arranging screeds in residential light-loaded premises
On a note! In addition to sheet foam, there is a variety that is small granules. Often this option is poured directly into the screed solution being prepared.
Penoplex or expanded polystyrene
Penoplex is a type of extruded polystyrene foam. This option is used to insulate all rooms in apartment buildings. The products are produced in the form of sheets that are perfectly attached to the concrete base of the floors.
"Penoplex" is a brand that produces high-quality extruded polystyrene foam
- Durability. With the correct installation technology, thermal insulation has a long service life and is not subject to destruction.
- Strength. Indeed, expanded polystyrene, and especially its more modern version penoplex, have significant strength.
- Ability to withstand large temperature changes, the range varies from -50 to +60 degrees.
- Excellent moisture resistance.
The technology for laying thermal insulation may differ; this is influenced by the specific situation and the method of pouring the screed.
The strength of extruded polystyrene foam allows you to pour a layer of reinforced concrete of any thickness
The general principle is:
- Preparing the base. To prevent moisture from entering from the rooms below, a layer of vapor barrier is laid.
- The slabs of material are evenly distributed over the coating so that there are no cold bridges. For better insulation, the joints are sealed with tape with layers of foil.
- A layer of waterproofing is laid on top of the insulation, which is completed with additional reinforcement.
- At the final stage, the screed is poured.
Briefly about the main thing
Penoplex is characterized by two properties. The first is its low thermal conductivity, due to which it has good thermal insulation. Secondly, the slabs are not susceptible to mold and mildew; they create a good soundproofing layer, while rejecting moisture.
Another advantage is that penoplex is universal in use - it can be used regardless of the base flooring.
But here it is important to understand what thickness of penoplex to use for the floor under the screed. Further load on the surface (purpose of the room) has a huge impact.
If this is, for example, a warehouse or a garage where a car will be stored, it is better to choose denser slabs.
The type of finishing does not matter. It all depends on the preferences of the owner of the premises. You can choose laminate, tile, plywood or parquet.
Another mandatory point is waterproofing. If this layer is skipped or installed incorrectly, spilled water may accumulate under the finish coat. Penoplex does not absorb moisture, and it will be quite difficult to dry it.
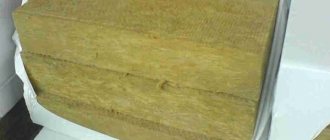
Insulation with mineral wool
Mineral wool has high sound insulation properties. Due to the high hygroscopicity of the insulation, the mineral wool thermal insulation layer must be completely isolated from contact with moisture.
Technology of floor insulation with mineral wool mats
Before installing mineral wool mats, it is necessary to remove the old floor covering
Before installing mineral wool mats, it is necessary to remove the old floor covering, clean the floor from existing contaminants, cover cracks and crevices, then lay a waterproofing film, mineral wool mats and a vapor barrier membrane. Clamps are installed on top of the structure in order to provide the necessary ventilation gap, and a reinforcing mesh of 3 mm wire is mounted on top of the clamps.
A leveling concrete screed is applied on top of the reinforcing mesh. If significant static and dynamic loads will not act on the floor, then the concrete screed can be lightened by adding expanded clay to it.
What are the requirements for insulation?
Let's figure it out - what kind of insulation should be that can be laid on the floor. You must understand that increased demands are placed on him:
- Low thermal conductivity.
- High strength (it should not be pressed through).
- Minimum weight (it is not recommended to heavily load the floors).
- Resistant to moisture and temperature changes. The underground is always humid, so mineral wool is not very suitable for insulation.
- Environmentally friendly material.
- Easy installation and possibility of further finishing.
- The material should not be chewed by mice, and fungus or mold should not grow in it.
- Durability. The insulation is laid once and until the next major renovation of the floor, which may be in 15-20 years.
Pnoplex - a modern material for floor insulation
With high-quality installation, penoplex can provide ideal thermal insulation properties.
The use of expanded clay for floor screed
In terms of thermal insulation qualities, the material is inferior to a number of modern insulation materials: expanded polystyrene, mineral wool and other foamed, porous and fibrous synthetic insulation materials. This becomes especially critical in rooms with low ceilings. For reliable thermal insulation, the expanded clay layer should be 10 cm or higher, while using polystyrene foam, 5 cm is sufficient (in specific situations it may be less).
In what cases is it advisable to use expanded clay:
For screeds with expanded clay, three methods and their combinations are used:
- Expanded clay concrete. When mixing concrete mortar, expanded clay is introduced in different proportions and different fractions depending on the purpose;
- Backfill. Expanded clay is not mixed with concrete, but simply piled on (a thermal insulation layer, leveling, like a filler). This layer can subsequently be either isolated from liquid concrete or concrete poured directly onto it;
- "Dry" screed. In fact, this is a layer of expanded clay covered with sheet flooring material (gypsum fiber, plywood, chipboard, fiberboard).
Expanded clay concrete
To obtain an insulating layer, a thickness of expanded clay concrete of at least 10–15 cm is required. No preliminary preparation of the base is required before pouring. The exception is large uneven ground (holes, dips), which are recommended to be filled and compacted first. Waterproofing is also done on the basis of general construction indications. Those. if there is a need to hydroprotect the structure from groundwater or high humidity.
The process of laying expanded clay concrete screed is identical to the process of laying conventional screed. The only differences are in the preparation of the mixture.
Advice! If the thickness of the screed is more than 6 cm, then for simplification it is poured in two layers. The first layer does not reach 4 - 5 cm to the floor level. The second layer is leveling.
Stages of expanded clay concrete screed:
- Floor level markings. Marking can be done using a building level or a water level (preferred).
Marking using a water level. First, a level is marked at any convenient height along the entire perimeter of the room. Then the required distance is measured from these marks.
Waterproofing with polyethylene film.
Installation of reinforcing mesh.
Installation of beacons on the solution.
Fixation of the damper tape is only necessary at the time of pouring; durability of the fastening is not required.
The method is used both as an independent screed and as one of the layers in multi-layer pouring. Under tiles, self-leveling floors on this screed are quite sufficient.
Backfill
Something between dry screed and expanded clay concrete. Also, depending on the purposes, different fractions and types are used. For thermal insulation, the expanded clay layer must be at least 10 cm, and the gravel fraction must be at least 20 mm. For leveling, smaller fractions, crushed stone and sand are preferable. It is not advisable to use the backfill method if there is a high risk of direct water ingress. Moisture insulation, if necessary, on the first and semi-basement floors is required.
In fact, this is a screed device for expanded clay:
- Floor level markings.
- Preparing the base (if necessary).
- Installation of beacons based on fill level.
- Backfilling and leveling the expanded clay layer. Sometimes, to improve the insulation properties, you can additionally lay a layer of waterproofing from the liquid solution - a regular polyethylene film. It is advisable to spill the top layer of expanded clay with a liquid solution so that it does not float up when pouring the screed and it is convenient to install beacons. The only plus is that expanded clay will not float when pouring a sand-cement screed if the solution is too liquid. The polyethylene film also prevents the granules from floating.
- Installation of fittings (if necessary).
- Pouring sand-cement screed along the top. It is recommended to dilute the solution thicker, possibly in smaller batches, or to prevent the granules from floating using the above methods.
The method is also used as an independent screed, and as part of multi-layer “pies”.
Methods of laying heating systems
Warm floors can be equipped with or without a concrete screed. Which method is better to choose depends on the technical features of the room.
Into a concrete screed
For a concrete screed, the building must have reliable floors
The arrangement of a concrete system assumes that all heating elements are located under a layer of screed. This technology is used for water and electric floors. In the latter case, only a separate heating cable can be covered with a layer of screed. Do not place a layer of concrete on heating mats. They can only be covered with ceramic tiles.
Concrete floors, due to their thickness, cannot be used in buildings with weak floors. The base should be a rough covering or monolithic slabs.
Advantages of concrete screed:
- Possibility of uniform heat distribution over the entire surface. Thanks to this, the room will warm up more efficiently.
- The concrete layer warms up slowly, but at the same time cools down slowly.
The disadvantages of the system are the complexity of the installation work. The concrete structure is made in layers:
- base;
- waterproofing;
- insulation;
- reflective foil;
- reinforcing mesh;
- heated floor pipe;
- pipe-cable.
Finishing materials are laid out as the top layer.
Into heat distribution plates without the use of concrete screed
Heat distribution plates in penoplex
When a concrete screed cannot be made due to its weight, heat distribution plates will help. They are made from aluminum or galvanized. Installed directly on the thermal insulation layer. The structures are equipped with gutters into which pipes are inserted. The plates make it possible to create warm floors in buildings with any ceilings. They perfectly reflect heat and distribute it evenly over the entire surface of the floor covering.
Unlike concrete screed, the plates heat up instantly. After turning off the heat supply, they remain warm for a long time.