A sewer plug is a valve that closes the drain hole. Such a device is necessary for the proper operation of the engineering system and to prevent leaks of the pipeline contents. Since 2011, management companies (MCs) began to use plugs as a legal enforcement tool for unscrupulous utility payers.
Purpose of a stub for debtors
A cap can be placed if the debt is not paid within 30 days after notice.
If a person does not pay for the supply of water on time, it is quite reasonable to stop supplying this utility to him. However, in apartment buildings, the liquid supply is carried out through a common building riser, which means that it will need to be shut off completely. But respectable payers also live in the entrance.
You can stop the water supply to a certain apartment only inside it, but the owner has the legal right not to allow inspectors into his apartment.
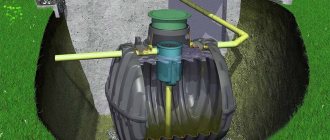
Utility service specialists have found a solution - to block the debtors' sewer pipes. This is realistic for a separate apartment and is done by means of a plug - a valve that closes the drain hole between the common building riser and the private drainage network.
Installing a damping part will not cause problems for respectable residents. It is installed so that the sewerage is blocked only for a certain apartment. Typically, installation of the device results in debts being paid after two to three days. After this, the utility workers return the riser to its previous appearance. However, there are exceptions. For various reasons, homeowners decide to remove the plug themselves - there are plenty of methods for this.
Secret passage to Poseidon: sewer audit
In this article, I'm going to talk about what a sewer inspection is and where inspections should be placed when designing sewer systems. In addition, I will touch on problems that may arise when clearing blockages and suggest possible ways to solve them.
Cast iron revisions with a diameter of 50 and 100 mm.
Legality of installing and removing plugs yourself
In general, the installation of such devices is not against the law. However, before installation, the management company must send a letter notifying the restriction of sewerage services so that the owner is aware of the impending problems. The most savvy defaulters, having received such a document, prevent the installation of a plug valve. They put an anti-plug on the sewer pipe. For these purposes, a through pin or bolt is used. The anti-plug is inserted slightly above the tee and prevents the valve from being mounted.
If a warning was not given to the homeowner, the legality of installing a plug on the sewer riser for debtors can be challenged in court.
It’s easier and faster to simply remove the interfering device. In matters of the legality of such actions, the law is on the side of the residents. After all, the valve creates a sewer blockage that needs to be eliminated.
Experienced defaulters recommend not removing the plug immediately after it appears, but waiting until the pipe is slightly clogged. After this, the legality of the actions to clean it up will be undeniable.
What it is
Let's start with what a sewer inspection is. This is the name of the hatch for clearing blockages, equipped with a hermetically sealed lid. Under the same name, you can find a shaped part on sale, which is a short pipe with a socket and the notorious hatch.
Currently, there are two types of revisions that are most common:
- Cast iron , with a flat cover fixed with two or four bolts. The tightness is ensured by a rubber gasket underneath. To open a cast iron inspection, you need at least a pair of open-end or adjustable wrenches;
- Plastic , equipped with a screw cap with corrugation around its circumference. This hatch is opened manually.
Plastic shaped part. With a diameter of 110 mm, the price of such products starts from 75 rubles.
If desired, you can find a more exotic design - for example, a plastic product with a lid that is fixed with bolts or studs with nuts. However, exotics are not in great demand in the very conservative plumbing market.
Plastic revision for external sewerage with the cover secured with bolts.
Types of devices and principle
The sewerage system is closed using three types of valves:
- Solid. Such valves completely block the drain flow into the central sewer system.
- Lattice. They allow liquid waste to pass through, and solid waste accumulates on the surface.
- Pneumatic plugs. Complete shutdown of the pipeline is carried out by pumping compressed air into the device, which then looks like a rubber ball.
Lattice plug
Complete blocking
Pneumatic plug
It is difficult to say exactly which valve the housing and communal services specialists will install. This depends on the layout of the highway and the financial capabilities of the management company. Solid plastic valves have the lowest price, so they are more likely to be installed.
How to choose the right drain pipe diameter
Even at the stage of the initial design documentation, the dimensions of the sewer pipes in the future building must be agreed upon. In 90% of cases, parts with a diameter starting from 100 mm are used to install a wastewater system in a bathroom. To install the system in the bathroom or kitchen, it will be enough to use a 50 mm pipeline. The difference in the given values was chosen for a reason. It is determined by several factors:
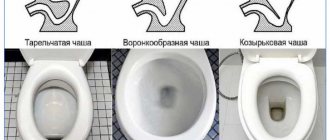
- A toilet is a plumbing fixture, the peculiarity of which is the passage of a significant volume of water in a short period of time (when the flush button is pressed). At the same time, the water may contain solid particles, which will be problematic for elements of the waste structure with smaller circumferences than those given above to cope with. There is a high probability of blockages.
- Even without looking at the fact that when draining water from a bathtub, its volume is no less than the volume of water from the toilet, the diameter of the sewer pipe will be smaller due to a simple rule of hydraulics - the permeability of the system should be equal to the value provided in the place with the narrowest circumference parameter. This release value in the bathroom is significantly less than in the toilet. Therefore, it is impractical to mount parts with a large diameter.
Required pipe slopes (Example - 1:30. Where 1 linear meter per 30mm slope)
Valve installation
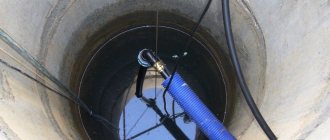
This manipulation is carried out by a plumber after carefully studying the piping diagram throughout the riser and directly leading to the debtor’s living space.
Further actions are as follows:
- Carrying out accurate calculations of the location of the drain hole from the apartment.
- Lowering a manipulator with a fixed plug from the roof into the desired hole in the common sewer riser.
- Finding the required “fork” using a monitor and LED.
- Inserting a plug into the side hole of the system.
After this, all that remains is to remove the equipment from the pipeline and report to the authorities, and the management of the management company must wait for the debtor to come to pay the bills. Only after this will utility workers remove the cap from the sewer riser, unless the homeowner solves the problem himself.
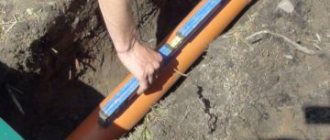
Installation
The inspection for sewer pipes is installed during the installation of the pipeline. In a private house with no more than 3 storeys, it is placed in a riser on the top floor, more precisely in the attic, approximately at a height of about 1 m from the floor. A fan pipeline is installed a little higher on the riser column.
At the bottom, an inspection on the sewer pipe is placed before the outlet - the transition of the vertical sewer riser to the horizontal section (Fig. 6).
Installing an inspection outlet when installing a riser pipeline is not particularly difficult and consists of the following operations:
- Cut the lower 110 mm pipe to the required size for a convenient height for placing the revision using a grinder or a hacksaw. If a tee with an inspection hatch is placed in front of a horizontal outlet, this pipe fragment is replaced with an elbow bent at an angle of 90 or 45 degrees. A smaller bend angle of 45 degrees is preferable from the point of view of reducing the likelihood of blockages, however, in order to make a general transition from the vertical to the horizontal section of 90 degrees, you will have to use another shaped element with a deflection angle of 45 degrees (Fig. 6).
- Clean the internal burrs with sandpaper and chamfer the outer edge of the cut pipe section.
- Lubricate the pipe with soapy water and insert it into the lower socket.
- Cover the pipes of the inspection tee from the outside and inside on both sides with a soap solution and place it in the socket of the lower pipe.
- The next riser pipe is installed on top of the tee in its socket outlet and then the column is assembled upward in a similar way.
Rice. 7 The principle of installing an inspection in an already working pipeline
Inserting an inspection into the riser pipeline
If for some reason it is necessary to install an inspection in an already installed vertical or horizontal pipeline, in addition to the shaped tee, you will need an intermediate element - an expansion pipe or a repair coupling.
Methods for removing plugs
You cannot push the plug into the common riser.
The easiest option to get rid of the problem is to pay the bills. After this, utility workers will remove the plug. But even after payment there is no guarantee that the plumber will come on the same day. It is unknown how long you will have to wait for it, and the blockage in the pipe will get worse, emitting a stench. Therefore, those who have paid off their debt also sometimes decide to remove the plug from their sewer themselves. To do this, the same methods are used as for eliminating blockages.
Removal with a plunger and plumbing cable
Using these tools is the easiest way to remove the plug yourself. To do this, you need to determine its location. This can be determined by tapping the pipes. A dull sound indicates filled spaces, and a voiced sound indicates empty spaces.
Then proceed like this:
- Turn on the water in the plumbing fixture closest to the valve and wait until it reaches the drain.
- Place the plunger over the drain grate.
- Perform several pumping cycles to create increased pressure in the pipeline. Water does not compress, which will cause the plug to be pushed out of the pipe by the flow.
If the valve installation is not done well, a plunger is enough to solve the problem. But the part may get stuck in the main pipe, after which all residents will not be able to use the sewer.
If the problem is not solved with a plunger, you can use a plumbing cable. This is the ideal method to deal with a pneumatic valve. A hole is punched in it into which the hook is inserted. With little effort, the device is removed from the pipeline. However, it is not difficult to use a hook to pick up and pull out the grille.
Dismantling the toilet
If the toilet is cemented, it is extremely difficult to dismantle it.
Using this method is possible only if the plumbing fixtures are fixed to the floor with bolts. If the toilet is an old model, the installation of which was carried out with a cement-sand mortar, this option disappears due to inexpediency, unless a replacement is planned. After dismantling, it is simply not possible to put the plumbing fixtures back in place.
Dismantling proceeds as follows:
- Shut off the water supply.
- Remove the tank and disconnect all communications.
- Unscrew the bolts, move the toilet and get to the outlet into the common riser. Typically, the location of the outlet allows you to reach the inserted plug and remove it. If the obstacle is located close to the entrance to the inter-apartment pipeline, it is pulled out by grabbing it with pliers.
It is strictly forbidden to push the plug into the common riser, as this will worsen the problem. The part can clog a common pipe and create a problem not only with utility workers, but also with neighbors. Therefore, the obstacle to the sewer drains should only be removed into your apartment.
If cement mortar was used when installing the toilet, but there is an inspection hatch nearby for cleaning the pipeline, you can use it. Removing the plug will be more difficult. To remove the obstacle, you will need a plumbing harpoon or an ordinary long stick with a hook attached to the end.
The procedure is as follows:
- Open the revision.
- Insert the prepared hook or harpoon.
- Hook up the plug.
- Push her into the boner.
Before doing this, you should worry about your safety. You need to wear a warm shirt and rubber gloves, having first wrapped your hands up to your shoulders with polyethylene. Not only feces, but also boiling water can come down from neighbors above during the work process.
Pulling out a part from polypropylene or mesh is not difficult, but this technique has a number of imperfections. There is a danger of dropping the broken plug and blocking the common riser with it. The difficulty is that all actions are performed blindly.
Chemical cleaning
When choosing a chemical product, you need to take into account the material of the pipes.
The household chemicals market offers a wide range of drain cleaning products containing hydrochloric or oxalic acid. They can be used to eliminate the stub. This method will cause the least hassle, but the chances of success are much lower:
- The compositions only affect metal varieties.
- There is a risk that the chemical will corrode not only the barrier, but also the pipe itself.
- The result will appear in a few days, or even a week - that is, the elimination of the problem will be postponed.
Plastic solid valves and air plugs cannot be removed with chemicals. For their manufacture, materials similar to pipes are used. A large volume of “nuclear” chemicals will destroy not only the valve, but also the pipes throughout the sewer system. Its repair will result in an amount greater than the debts.
If you cannot solve the problem, you can dismantle part of the sewer pipeline and get to the required location. Or seek help from specialists.
This service can easily be provided by the same plumber working privately, since the owner of the home bears full responsibility for the condition of the sewer pipes. Prices for professional removal of sewer plugs depend on the complexity of the work. The average cost of removing a part by a specialist is from 500 to 2500 rubles.
Installing a cap for non-payment of utilities is not illegal. But at the same time, such actions can be challenged in court. Removing an obstacle yourself is quite a difficult task - you need to have plumbing skills. It's easier to pay off your debts. In addition, it should not be ruled out that after the plug is removed, utility companies will install a new one.
Location
Apartment buildings
Dear reader, let’s simulate a very typical situation: due to a clogged riser, your toilet began to fill with your neighbors’ drains, but for some reason the emergency service is in no hurry to respond to the call. Where to look for revision hatches?
All the necessary information can be found in the text of SNiP 2.04.01-85. According to this regulatory document, audits are provided:
If the building has more than four floors, additional revisions are installed every three floors. In particular, in a five-story building, hatches can be found on the first, third and fifth floors.
Hatch for cleaning in the bathroom of a new building.
- Sewer bends that cannot be cleaned through tees and other shaped elements.
In all the buildings whose basements I visited, the sewer inspection was always present on the riser below the first floor ceiling. It is needed so that the blockage can be cleared even in the absence of the residents of the lower apartment.
In addition, straight horizontal sections of the sewer pipe must be equipped with hatches for cleaning: blockages can also occur in them. The inspection step depends on the diameter of the pipeline:
| Diameter, mm | Step between revisions, m |
| 200 or more | 20 |
| 100-150 | 15 |
| 50 | 12 |
The given values are relevant for domestic sewerage. For industrial wastewater, different standards apply.
Private houses
Where to mount inspections if you are installing utility networks in a private house under construction with your own hands?
In my opinion, they are necessary:
- At the exit from the basement, before release to the well. The outlet, as the coldest section of the waste system, is often clogged with grease, which gradually settles on the walls of the pipes. It is much more convenient to clean the blockage from the side of the house, and not from the well: the cleanliness of its walls leaves much to be desired, and besides, it is not always possible to avoid the fetid stream after a successful operation;
- On each riser above its connection with the drainage pipe (horizontal sewer branch);
- On the corners of the benches;
Rotary sewer well.
At a turn, it is often more convenient to install not a revision, but a tee, plugging one of its branches.
- Above the sewer riser setback (a short horizontal section that allows the riser to bypass an obstruction).
The location of the inspection will allow you to clean the bend and the outlet to the well.
Additional audits can be installed when you have accumulated some experience in operating the sewer system in your own home. If a certain area periodically becomes clogged, it is worth installing an additional inspection in close proximity to the place of blockages just above it. How to do it?
Installation of inspection on a straight section of sewerage.
The photo shows a revision installed using a compensating pipe.
The cause of repeated blockages is often unevenness and burrs on the inner wall of the pipe (most often on socket joints), as well as areas with a negative slope. Eliminating these problems is much easier than constantly heroically fighting the flooding of your home with sewage.
The occurrence of blockages
List of reasons
- Wear and tear of sewer pipes (poor flow capacity)
- Ingress of large debris
- Residents doing renovations flush waste construction materials down the toilet.
What to do?
When there is a blockage in the sewer riser, the reason is no longer important. Apartments on the first two floors suffer. The sewer column rarely rises higher.
The speed at which our emergency services work is needless to say. By the time they get there, they will identify and eliminate the cause. The entire home may be filled with sewage. To put it mildly, this will cause discomfort.
Providing sound insulation
Additionally, you can take measures to soundproof the sewer riser; they will be useful both in a private house and in an apartment.
Noise in the sewer can occur for a number of reasons, namely:
- When wastewater hits the walls of the pipeline;
- Penetration of foreign air into the system;
- Contact of pipes with walls or ceilings.
Soundproofing work will help eliminate noise-related inconveniences. This can be done in different ways:
- Installation of risers from special pipes. Of course, this measure is mainly used in the process of replacing an existing sewer system or laying a new one. Such products are distinguished by increased wall thickness and high density of the manufacturing material;
- Use of soundproofing materials. Most often, roll insulation or foamed polyethylene is used for this;
- The use of a special insulating “shell”. It is a finished product that is mounted on a laid pipe;
- Installation of the box and lining it from the inside with mineral wool.
Sound insulation work using roll materials includes the following actions:
- It is necessary to check the tightness of the joints, clean and degrease the surface of the riser;
- Apply vibration-damping material and roll it on top with a regular paint roller;
- Wrap the pipe with rolled sound insulation, securing it with flexible clamps (craftsmen often call them ties).
Installation of a soundproofing plasterboard box is carried out as follows:
The pipes are carefully checked for leaks, because if a leak occurs, the entire structure will have to be disassembled; Wrapped with rolled soundproofing material; Markings are being made for the future box
Please note that its walls should be 50-60 mm away from the surface of the pipe; A frame made of a metal profile is installed, with horizontal jumpers attached every 400-500 mm; We begin to install drywall, it is better to give preference to moisture-resistant. After one side is assembled, we lay mineral wool and sew up the remaining part.
Features of use
The operation of the audit is sporadic. There are many elements that have never been used during their entire service life, so home craftsmen have no experience working with such devices. There are no fundamental requirements for the use of revisions, the only condition is accuracy and attention - it is easy to damage the edges of the outlet with a cable, which will break the tightness of the connection between the cover and the pipe. This can cause a bad odor and leaks, which will require labor-intensive replacement of the entire element. During cleaning, you should take into account the danger and act as carefully as possible, then the result of the work will be fully expected and favorable.