Here you will learn:
- Boiler device
- Operating principle of an electric heating tank
- Identifying causes and typical faults
- Do-it-yourself Termex boiler repair
- Verdict
Thermex models are storage type water heaters. The main cause of breakdowns is most often poor quality water in the pipeline. Unfortunately, because of this, the tank will have to be cleaned quite often. For example, if water consumption is high, then system maintenance is carried out once a year. However, it doesn’t always make sense to call a specialist; you can repair Termex water heaters yourself, having at your disposal a small amount of knowledge, tools and spare parts.
Boiler device
Before we begin repairing the boiler with our own hands, let’s look at the design features. The design of the water heater is quite simple, the main components are as follows:
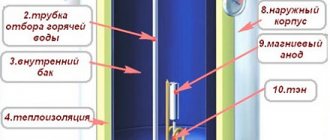
Diagram of the Termex water heater
- body made of steel sheet with stainless steel coating;
- Inner tank made of alloy steel, durable and corrosion resistant;
- the steel flange is a platform on which the elements of the device are attached: heating element, magnesium anode, thermostat;
- a large magnesium anode is a metal rod that is coated with a magnesium alloy; Thus, the element reduces the corrosive activity of water, protecting the tank and increasing the durability of the water heater ;
- stainless steel tube for releasing hot water;
- thermal insulation made of high-density polyurethane foam;
- The heating element, which, in fact, heats the water;
- a thermostat that acts as an auto-regulator of water temperature (turns off the boiler when the water is heated, and vice versa);
- cold water supply tube made of stainless steel.
When you need specialist help
Some types of Termex boiler malfunctions can only be repaired by a specialist, and it is highly not recommended to carry out repairs yourself in such cases. Problems that only a specialist can solve:
- incorrect operation and emergency shutdowns of new equipment that is not out of warranty;
- settings on the electronic thermostat are reset;
- The RCD often turns off the unit;
- tank leaks, although the effectiveness of such repairs is questionable - it will be cheaper to purchase a new device.
But before you call the service, make sure that there is pressure in the line through which cold water is supplied. There are models of units that turn off the boiler if there is no pressure in the supply.
Operating principle of an electric heating tank
The operation of the water heating tank is based on the principle of convection:
Cold water always enters the storage water heater from below, and when heated, it rises upward, where the hot water intake tube is located.
- cold water enters the tank through the inlet tube;
- the heating element turns on and heats the water to the set temperature (there is a regulator on the dashboard with which the temperature is set);
- thanks to convection, hot water rises independently to the top of the tank;
- the hot water outlet tube is located at the top of the device, through which the heated liquid enters the pipeline;
- when the water temperature in the tank drops, the thermostat turns on the heating element, and when it reaches the maximum, it turns off.
it-yourself repairs are carried out in the same way for both the 80-liter Thermex water heater and the 50-liter Thermex water heater . Their design is identical, only the tank volumes differ.
Required Tools
There are several reasons why you need to disassemble the equipment:
- warm water is cloudy, there is a foreign odor;
- scale flakes are visible;
- when touching the body, a current discharge is felt;
- when the tank is turned on, the machine is activated;
- the device takes a long time to heat water or does not heat up at all;
- water is slowly rising;
- weak pressure of warm water when exiting;
- the housing is leaking.
To disassemble and subsequently assemble the Termex, Aquaverso es30v, Oasis water heater, you need to use the following tools:
- Screwdrivers - straight and Phillips.
- Wrenches. You need a universal gas wrench or a socket wrench - horn size - 22; 14; 10; 8, for some models you may need 32, 24 mm.
- Slotted screwdriver.
- Hexagon 4 mm.
- With pliers.
- Indicator screwdriver.
Identifying causes and typical faults
Since the boiler is a device with a simple design and operating principle, it can have only four malfunctions :
If the water heater is electrocuted, you need to check it with a multimeter. To do this, arrange the contacts as in the pictures, and set the multimeter to the audio test mode, there is sound - the heating element needs to be replaced.
- Water leak. The cause of this breakdown can be either a rotten body of the water heater or a failure of the heating element. But most often the tank begins to leak due to loosely fitting rubber gaskets (they can become stuck or simply deteriorate over time).
- Electricity breakdown on the body (the tank receives an electric current). Most often, the cause of such a malfunction is a burst heating element. But sometimes a chamber or control panel fails.
- The water in the boiler heats up slowly or does not heat up at all. If the tank does not heat the water at all, then most likely the reason lies in the thermostat (broken) or heating element (burnt out), but the control board may also fail, which happens extremely rarely. If the water heats up slowly, then the heating element is covered with scale and it’s time to clean it.
- The water in the water heater cools down quickly. If this happens, prepare for the fact that you will have to buy a new tank, since the thermal insulation is outdated. Of course, you can try to change it yourself, but it is quite difficult.
In most cases, if a problem occurs, you will have to disassemble the tank. To do this, you will definitely need a minimum working set of tools. Don't rush to buy new spare parts. It is better to do this after inspecting the device and determining the breakdown.
Video description
This video demonstrates what happens when repair attempts are unsuccessful, when the cause of the leak is not the flange, but the housing itself.
Most often, such a breakdown occurs due to the following reasons:
- Rotten tank . This is an advanced case of corrosion that could eat through the metal. Therefore, it is necessary to periodically check the tank for the presence of red spots. They can only occur if the magnesium electrode is faulty.
- Manufacturing defects . Typically, in this case, a leak occurs immediately after installing the device.
- The body began to deform . This occurs due to exposure to too high temperatures. It must be taken into account that the heating element can heat water to this level only if the thermostat has stopped working correctly.
- The sealing rubber began to crack and lose its elastic properties, which is why water began to leak through the flange.
A rotten tank just needs to be replaced. Such breakdowns cannot be repaired, since the inner layer of glass ceramics is also damaged - after all, this is the only way water can come into direct contact with the metal. The need to purchase a new tank may also arise if the housing is damaged.
Do-it-yourself Termex boiler repair
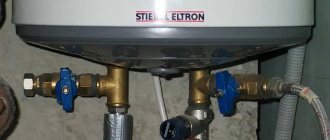
Before you begin the repair, first gather the necessary tools: a set of wrenches, an adjustable wrench, electrical tape, various screwdrivers, pliers. After this, turn off the water by closing the inlet and outlet valves to the water heater. Then drain the water from the boiler tank and disconnect it from the power supply .
The next step is to remove the protective cover. If you have a vertically located boiler, then the lid is located at the bottom, and in the case of a horizontally located one, it is on the left or in front.
When removing the cover, pay attention to the stickers. Often the screws for securing it are located under these stickers. If you have unscrewed all the screws and the cover still does not come off easily, check the stickers again.
Replacing the heating element
First, perform all of the above steps and remove the tank cap.
To make it more convenient to work, you can even remove the tank from the wall.
It is worth noting that most Thermex models have not one, but two heating elements. Therefore, it is imperative to remember how and in what sequence the parts need to be connected . It’s better to photograph the whole process.
To remove the heating elements from the Thermex water heater, remove the top cover by unscrewing the bolt; disconnect all plugs and unscrew the bolts securing the heating elements.
The heating element itself is turned off as follows:
- After removing the cover, find the protective thermostat, remove the tips from it;
- also remove the tips (3 pieces) from the heating element;
- cut the plastic clamp;
- Unscrew the screws, removing the sensor;
- now disconnect the cable and unscrew the four screws;
- then you need to dismantle the nut on the clamping bar and pull out the heating element.
After dismantling the heating element, it is necessary to clean the surface of the tank from dirt and scale. Only after this can you install a new heating element and put everything back together.
Do not forget that the heating element does not always need to be changed. If the water in the tank still heats up, but it happens slowly, then, most likely, scale has formed on the heating element. Then dismantle it and descale it. Then install. The problem should go away. Also, do not forget that it is advisable to clean the heating element with chemicals rather than scrape off the dirt. In the latter case, there is a possibility of damage to the part.
To clean the heating element, you can use a solution of citric acid or vinegar (its percentage in the solution should be about 5%). The part must be immersed in liquid and wait until the scale falls off. Then you need to wash the heating element.
Faulty thermostat
The thermostat in Termex water heaters is located under the cover, next to one of the heating elements, and its sensor is located inside the tank.
Sometimes the thermostat fails. This element cannot be repaired; it must be replaced . To perform the replacement, you need to do all the preparatory steps, remove the cover, then remove the thermostat. But before dismantling, we recommend checking this part. To do this, use a lighter to heat the tip of the sensor (copper). If the thermostat is working properly, you will hear a characteristic click, which means that the protection mechanism has activated and the circuit has opened. Otherwise, you will have to replace the part.
Tank leak
No matter how trivial it may sound, but first you need to find where the water is coming from. A lot depends on this, since if the tank is rotten, you will have to buy a new water heater. So:
- if water oozes from the side seam, then the container is rusty and repairs will not be possible;
- If water comes out from under the lid at the bottom, then you need to disassemble the tank.
If traces of leakage are found in the places where the heating elements are attached, then your water heater is not hopeless and can be saved by replacing the gasket.
In the case of the second option, complete all preparatory steps, then remove the plastic cover. Next, take a close look at where the water is leaking. If it comes out near the flange, then the rubber gasket has deteriorated (less often this is a problem with the heating element). Otherwise, the tank is rusty and the boiler can be thrown away. To replace the gaskets, you need to remove the heating element. But it is necessary to carefully examine the heating element itself. If it is cracked, it is also better to replace it.
Other faults
If you have checked and replaced all the parts, but the boiler still does not work, then it is quite possible that the electronics have failed. The control board cannot be repaired, and it will be extremely difficult to find a similar one in a store. Therefore, in this case, we recommend contacting specialists.
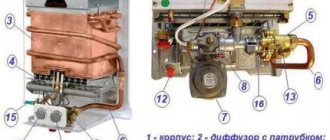
Types of instantaneous water heater control systems
Depending on the model and design of the water heater, the control system for its operation can be designed differently. For example, in the THERMEX STREAM model, temperature control is carried out by controlling the water flow. The flow itself is regulated by special shower or washbasin nozzles included in the delivery set. In this case, the protection components are a pressure switch and a thermal fuse (temperature sensor).
Flow-through heater THERMEX STREAM disassembled
Accordingly, the electrical circuit diagram of this water heater differs significantly from the electrical circuit given above - here the phase current passes sequentially through the pressure switch and the thermal fuse, which returns to the on position after the temperature drops. Before repairing the water heater yourself, you should definitely study the electrical diagram and instructions from the manufacturer.
Example diagram of instantaneous water heaters THERMEX STREAM
As can be seen from a comparison of two circuits from the same manufacturer, the principles of control and protection in these models of water heaters differ significantly. Water heaters have a completely different design, and the circuit will be different. Below, for example, is the electrical circuit of the Atmor water heater.
Scheme of instantaneous water heater ATMOR, power 7 kW
Also, some models may have an electronic interface directly connected to power relays for controlling the supply of heating elements. This means that a breakdown in this electronic board, or a failure of the algorithm, can lead to the stoppage of the water heater. Some instantaneous water heaters may have temperature control, which is achieved by switching heating elements, or using an electronic circuit.
Verdict
In most cases, the Thermex water heater can be repaired independently, since it has a fairly simple design and operating principle. The main causes of failure are a non-working heating element or scale . This is what you need to pay attention to first. If the boiler does not heat the water well, do not rush to run to the store and buy a new heating element. Perhaps the old one is simply covered with dirt and just needs to be descaled. If the water heater leaks at the joints or the water in it cools down quickly, you will have to buy a new device.
When purchasing spare parts, do not be lazy to take broken parts to the store. This way you will definitely buy what you need.
Video description
This short video clearly and concisely explains in a few minutes what can be done with a rotten tank so that the device will work for some time:
The simplest situation is with a factory defect. Since the problem appears at the beginning of the device’s operation, all you need to do is contact the store where you purchased the water heater so that they can replace it with a new one under a valid warranty.
The only case when a leak can be eliminated without calling specialists is damage or incorrect installation of the seals. To replace them, you need to remove the flange, and with it the rubber itself will fall out. For additional protection against moisture, sealant can be applied on all sides.
Operating rules
To avoid situations like this with a water heater leaking, you need to know how to use it. Even at the installation stage, strictly follow the manufacturer’s instructions
When connecting the boiler to the electrical network, it is important to provide a magnesium anode, a fuse and grounding
Basic rules of use:
- Before installing the boiler, check the pressure in the water supply system. It should not exceed two atmospheres. If the pressure is higher, the water heater will not be able to function normally. To reduce the water pressure in the system, a reducer is additionally installed.
- When using the water heater, you should clean the rod once every three months and monitor its condition.
- When using a water heater, you should not set its temperature above the optimal mark (50 0C).
- Water with increased hardness in the system or the content of an abundance of chemical additives and impurities in it cannot but affect the operation of the water heating device. In the case of such water, it is imperative to install a filter on the inlet and periodically carry out maintenance on the heating tank by cleaning it from contaminants and replacing the necessary components.
Proper operation of the device will extend the life of the boiler and eliminate possible minor breakdowns.
Power board with sensor, water heater Thermex id 80 h
Photo of the board. I have the payment lying idle, I can give it to anyone who asks for a nominal fee.
Power electronic board of wall-mounted water heater Thermex ID 80 H
Power electronic board of wall-mounted water heater Thermex ID 80 H
Power electronic board of wall-mounted water heater Thermex ID 80 H
Power electronic board of the wall-mounted water heater Thermex ID 80 H. View of the +5V integrated stabilizer L7805CV
Power electronic board of the wall-mounted water heater Thermex ID 80 H. View of the key transistors of the relay.
Power electronic board of the wall-mounted water heater Thermex ID 80 H. Board parameters.
Power electronic board of the wall-mounted water heater Thermex ID 80 H. Printed wiring, view from the soldering side.
Note
Today, electric storage water heaters are very popular. Thermex reviews are positive. These devices can also be operated according to an easier principle. To do this, it is recommended to install a drain valve. This applies to those models that do not have a drain pipe included. If it is necessary to install a water heater in a system where the pressure is greater than the above, it is necessary to place a reducer at the inlet in front of the equipment, which will have to be purchased additionally. With its help, you can reduce the water pressure to the nominal level.
How to remove the touch screen from a Thermex water heater
The control and external boards are connected by a ribbon cable. It is disconnected from the power unit and a thin half-meter cord is tied to it. Next, carefully and carefully peel off the sticky plastic sticker of the touch screen from the front side of the case.
Plastic Touch Screen Sticker
In the opened socket there is a display module panel secured with self-tapping screws. By unscrewing them, you can carefully remove the module and pull out the ribbon cable. If the cable gets stuck, you can use the tied cord to pull it down and try to remove it along with the module again.
Instructions for storage heater
The instructions are publicly available without any problems, but just in case I’m posting them: Download instructions for Thermex storage water heaters.
This concludes the story; anyone who has anything to say or ask is welcome in the comments!
The THERMEX IF 50 V water heater has an electronic control unit that has a display showing the current temperature, a power-on indicator, a heating indicator, as well as on/off buttons, control of the heating temperature and an accelerated heating function. To add a water heater to the overall smart home control circuit, we need an Arduino pro mini and an ESP8266 module.
What's under the lid
When the cover is removed, the wiring of the heating element is visible, which needs to be disconnected. Before doing this, you need to sketch or photograph the original position of the wires. This will come in handy during the reverse assembly stage. After photographing, you can unscrew the bolts of the wires.
Wires under the removed housing cover
Many models have a thermostat under the cover. To remove the device, you need to grab it firmly and pull it down. It is better to do this with a sharp but precise movement. You can watch the video in detail:
Some Ariston models have a thermometer on the body. To remove it, after disassembling the electrical circuit, the device is pryed off from both sides with flat screwdrivers. This allows it to pop out of the nest with a click. Next, carefully pull out the wires disconnected from the thermostat.
Some boilers are designed in such a way that a non-return valve may prevent the removal of the lid. Then you need to unscrew it. A temperature sensor is sometimes attached to the back of the cover. It must be removed by disconnecting the contacts from the heating element.
In Termex boilers, an electronic control board (power unit) is located under the lid. It is secured with self-tapping screws and is also easy to remove. The control board and the external sensor board are connected by connectors that need to be unscrewed. The grounding attached to the nuts is also disconnected.
Heat exchanger clogged
How to understand that the radiator is clogged:
- Long-term heating of water.
- The stream is not hot, but warm.
- Pieces of scale come out along with the water.
These are indirect signs, so it is better to inspect the device. Scale on the heat exchanger plates and coil appears from poor quality water and high heating temperatures. It is recommended to set the temperature to 55°C and not mix the flows on the mixer.
There are two ways to get rid of a blockage.
- Without removing the assembly from the column. You will need a special pump with tubing. A reagent is poured into it, which can be bought in a store or made based on hydrochloric acid. Connect the hoses to the coil and start pumping until all the scale comes out of the holes.
- With dismantling. This is a more budget option. A deep container is filled with water and a heat exchanger is lowered into it. A solution of citric acid (150 g/750 ml) is poured into the coil through a watering can. Place the container on the stove and boil for 15 minutes. Then the radiator is washed under running water, dried and installed in place.
Removing the Housing Cover
Inexpensive heaters without adjustment devices usually have two screws on the bottom cover of the housing. They need to be twisted with a Phillips screwdriver and the cover removed. If the cover is too tight, you can pry it off with flat-head screwdrivers.
A special place is occupied by models with oval flanges. They are dismantled directly on the wall; it is not advisable to turn them upside down with the fittings. Near the fittings (they are marked in blue and red) there are two bolts, unscrewing which you can remove the cover.
On some models it is not immediately possible to immediately find the screws to remove the cover. They are hidden under stickers. After removing the stickers, you can unscrew the housing cover. Sometimes, before removing the cover, you need to remove the plastic shields and plugs from the screws.
Replacing the temperature controller board
In Taganrog, the search for such a board did not lead to success, and the Internet showed that its price was more than 7 thousand rubles, with delivery on order within a week. Winter was upon us, and action had to be taken.
It was decided to repair the Termex water heater by using a different thermostat, since this is the main function of the heater.
It was decided to leave the control board (panel), but only because it covers the hole in the tank). And the power board also had to be removed, since it is useless without a controller.
I installed a temperature controller from a Russian Heat RTC 70.26 heated floor, which I had been lying around for several years without use. Although it is intended for a different purpose, electrons do not care what it is to heat water or the floor.
They are generally weak-willed, don’t give a damn, wherever the potential pulls, that’s where they flow.
Floor thermostat as a water temperature regulator.
A small minus is that the regulator for a heated floor can produce a temperature of up to about 45 degrees, but for comfortable use of a storage heater, a temperature of up to 70 is needed so that the water can be diluted. I solved this simply - I inserted the temperature sensor into place not as deep as the original one was, but only 3/4 of the way through the body, and fixed it. During field tests, it turned out that due to this, the actual temperature of the water in the tank is approximately 20 °C higher than that set on the regulator scale.
This arrangement of the sensor leads to the fact that the regulator has greater inertia, i.e. a wider hysteresis loop and a wide temperature spread during adjustment. That is, he thinks for a long time, but clicks less often. But the temperature spread in this case depends mainly not on the method of installing the sensor, but on how intensively the water is drained from the tank.
There will be more articles about the thermostat and heated floors, but for now - how I installed and connected this regulator in this case.
Installation of a thermostat for a Termex storage heater.
A detailed connection diagram is printed on the thermostat, so there were no problems during installation. I installed the regulator on the external box; the cable channel was already there.
I installed the sensor that is connected to the warm floor. As a result, this is what happened:
Repair of Thermex storage wall heater - replacement of temperature controller
The cable that went to the control panel was left out of use.
The original (original) board included sections of the heating element separately. In this case, the Russian Heat regulator has one relay, so I connected both parts of the heating element in parallel.
The cost of repairs in this case was reduced by about 3 times, and the time - by 10 times.
What you might need
- Adjustable wrench - for disconnecting pipes.
- Wrench – for unscrewing the bolts securing the unit to the wall (not required if the mounting is on hooks).
- A hose to the return valve or to the water inlet - for draining (not required if you use containers to collect water).
- Phillips screwdriver for unscrewing the protective cap.
- Two flathead screwdrivers: needed to lift a protective cap that is too tight.
- Gas wrench number two or hub wrench 55. Sometimes a socket wrench is preferable for tightening nuts.
- A thin screwdriver for unscrewing and removing power cables.
The dismantling of boilers is preceded by the following preparatory stages:
- de-energizing the installation;
- draining;
- removal from the wall.
First, the device is disconnected from the outlet. Then you need to lighten it as much as possible by removing the water. An eighty-liter heater weighs about twenty kilograms. With water its weight approaches a hundredweight.