Let’s make a reservation right away: drainage and waterproofing are different concepts and one of them does not exclude the other. Drainage around the house (drainage system) allows you to remove or reduce the water level in the area.
The danger lies both outside (precipitation, flood waters) and inside (groundwater). Waterproofing protects the foundation of a building from water getting inside.
But even a foundation that is well insulated from water will not protect the foundation of a private house (basement) and basement from water ingress for a long time. After all, if water presses constantly, it will find weak spots in the waterproofing. And on the contrary, if you take her away in time, your home or dacha will be safe.
DIY drainage around the house
Drainage: what is it and why do it?
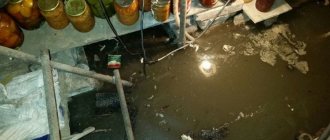
Drainage is used to protect buildings from internal flooding. This is a dehumidification system designed to eliminate excessive water accumulation around a home or property. This is especially important for houses located in the valley. Water can accumulate around objects due to various reasons: it could be melting snow, an increase in the level of ground moisture, or the special properties of a given type of land. And also because of the special location of the building, due to which the water around it cannot drain on its own.
A home owner should think about building a drainage system in the following cases:
- in this area, elevated groundwater levels are normal;
- if liquid begins to accumulate in the basement due to melting snow;
- mold began to appear in the corners on the floor of the first floor rooms;
- if the foundation of the building is constantly wet or washed away by water;
- the area is characterized by high levels of precipitation;
- the soil on which the house stands, due to its natural properties, does not absorb moisture well;
- fungus began to appear on the walls;
- The plot with the house is located in a lowland.
In practice, drainage is a device based on pipes that remove excess moisture that enters them. Experts advise always creating such a system, since it is an effective method of extending the service life of any buildings.
Design
Installation of any type of drainage system around a residential building must necessarily begin with the design of all stages of work to create structures that facilitate the removal of excess moisture. To protect the foundation of the house and basements, the optimal solution would be to use wall drainage, which ensures complete removal of precipitation from the building.
If the groundwater is located quite high on the site, then the presence of waterproofing alone will in no way save you. In this case, sediment can be removed from the foundation of a residential building only by installing a well-thought-out drainage system.
If you approach the issue of creating an engineering structure in a comprehensive manner, you will need to complete the following scope of work:
- By using high-quality materials, waterproof the foundation .
- Install a system that can affect groundwater in terms of reducing its level ( drainage ).
- Install surface drainage at home .
Types of structures
Before you make drainage around the house with your own hands, you should decide on the desired option. There are several ways to do this. If drainage is done correctly, then any of the methods will be effective. But everyone requires time and financial resources differently.
The following types of systems can be installed:
- Open drainage. This method is quite simple and consists of creating open trenches (ditches) around the house where water will drain and then soak into the soil. Despite the simplicity of constructing such a drainage system, it looks unpresentable in appearance and quickly becomes unusable - the trenches crumble and break.
- Closed drainage. This method involves laying perforated pipes in trenches in the ground. Moisture gets into them and is removed from the house. This method is the most effective, but relatively complex in terms of execution.
- Backfill drainage. Here you should dig ditches around the object, as with the open method, and then fill them with crushed brick, crushed stone or rubble. The trenches are covered with turf. This drainage method is durable, but has a low degree of moisture transmission. Backfill drainage is almost impossible to maintain.
How to choose a site for wells
For a well, where all the water that is removed through the drainage system will always flow, it is worth choosing the lowest location in the suburban area. Water is removed from it using a modern country drainage pump, and it can also seep into the deepest ground layers of the soil.
Wells for water drainage, which are part of the systems, are of two main types - absorption, that is, filtering, and also water receiving tanks. The first ones are installed in areas with sandy loam or special sandy soil composition, and a small volume of water is also important. Ground brick elements are poured onto the bottom of such a well; simple crushed stone is also suitable. Pre-prepared geotextiles are also laid on top, which will serve as a filter.
As for water intake wells or collectors, a pair of concrete rings are placed in a dug hole, then a layer of small brick is poured in, and turf is laid. If there is a lot of moisture present in the soil, the thicker the layer of backfill produced will be. Liquid from such devices can be pumped out using a simple pump.
Types of drainage
Having understood the types of drainage, let’s consider its popular types. Each has its own advantages and disadvantages. When choosing a method of arrangement, this must be taken into account.
Wall drainage
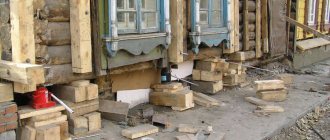
This structure is created along the perimeter of the foundation. If the house has a basement or ground floor, it is better to make just such a drainage system. Of course, it is more correct to provide for it at the construction stage, when the foundation is just being erected and the area around it is not backfilled.
If the house has been built for a long time, it is also quite possible to create wall drainage, but large-scale excavation work will be required.
Features of wall drainage arrangement:
- Pipes are placed in the excavated areas; they should lead to inspection wells from the corners.
- The bottom edge of the equipment should be adjacent to the end tank, which leads beyond the site.
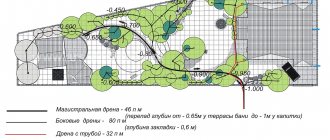
Ring (trench) drainage
This type of drainage is installed further from the foundation than wall drainage. It is necessary to retreat 2-3 meters from the building, and then carry out the work. Ring drainage is used mainly on clay soils, since it is quite simple to create and use there. If the house does not have a basement or basement, this system will be the best option.
Features of arranging ring drainage:
- A clay castle demarcates the foundation and the drainage structure.
- This type of drainage should be created deeper than the lowest point of the foundation.
- Drainage products should be placed on a layer of crushed stone or small stone, since these materials allow water to pass through well.
Trench or ring system
This type of drainage is used to protect a house that is located on a site with sandy soils and does not have a base. The trench system is located at a distance of 3 to 12 meters from the house foundation; it is best to remove it at least 5 m from the building to avoid soil shrinkage, which will lead to the destruction of the foundation of the structure. When constructing such a drainage system from the foundation of buildings, all the same elements as in the classical system described above are used.
For additional protection a clay castle is also . In addition, the general rule is to install drains at a depth of 50 cm from the lowest point of the floor. The remaining parameters are determined in each specific case.
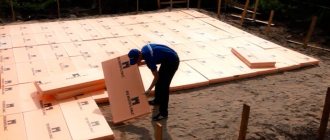
Do-it-yourself drainage work
Having decided on the type and type of drainage system, you need to purchase all the components and begin installation work. Knowing the technology, even a novice builder can cope with the task, so there is no point in hiring professionals, because it is not difficult to do everything yourself.
To create a drainage system of any type, you will need perforated pipes. Experts advise replacing special products, if it is not possible to buy them, with ordinary sewer products, making holes in them.
The gravel used for backfilling should be larger than the holes to prevent it from getting inside. It is important not to forget about the final element, that is, the place where the water will finally fall. This could be a common drain off-site. You can also create your own drainage well, discharge sediment into a septic tank or into a natural reservoir located nearby.
Typical errors
The desired result will not be achieved if one or more of the following shortcomings are allowed:
- no slope in the direction of the catchment basins;
- insufficient depth of pipes;
- using a drain diameter or perforation that is not suitable for a particular soil type;
- ignoring crushed stone bedding and installation of geotextiles;
- insufficient number of drainage elements;
- accelerated filling of the drainage well.
Types of drainage pipes
There are many types of drainage pipes on sale that can be used to create a high-quality drainage system. When installing drainage around the house with your own hands, you need to study the characteristics of such products.
You can choose from the following options:
- Porous. Made from expanded clay glass or plastic concrete, they do not require perforation. But this is quite expensive material. For good drainage, it is worth taking pipes of large diameter.
- Asbestos-cement. The most reliable, but quite heavy and require holes to be made in them.
- Polymer. Made from plastic, they are comfortable and lightweight, and easy to use. Nowadays, these pipes .
- Ceramic. Functional, but fragile, require perforation. Due to additional grooves, moisture is collected more effectively.
Service Features
The drainage system needs to be regularly inspected and checked for blockages. This should be done at least once every month and a half. If debris is found in the well, it should be removed to avoid clogging.
During periods when there is particularly heavy rainfall, inspection and cleaning should be performed more frequently. This is usually required in the spring, when there is a lot of meltwater, and in the fall, when seasonal rains begin.
By the way, the installation of a drainage system can be combined in time with the installation of an autonomous or conventional sewage system in a private house. This will definitely help to avoid re-digging up a large part of the garden area.
Main stages of installation
The first step is to draw a site plan on paper and decide exactly how the drainage will take place. Remember that water should drain to the lowest point - there must be a water tank. To determine such an area, you can use a theodolite device. Based on the plan, the required amount of materials is calculated.
Step-by-step instructions for performing the work:
- In accordance with the project, it is worth marking the area on paper on the ground.
- After this, trenches are dug, the size of which must take into account the pipe and gravel that will be buried there.
- For digging, it is better to take a bayonet shovel - it will increase the speed of work.
- The width of the ditch should be approximately half a meter.
- The next step is to create a ditch slope for the system.
- In this case, differences in height, which are marked with poles, are taken into account.
- To ensure that the bottom forms the desired slope, we use sand.
- Geotextile material is laid at the base of the trench, which should have a good odor at the joints.
- Next, it is filled with gravel taking into account the slope.
- In the fine fraction we make a trench into which the pipe should fit.
- Next, we lay the drainage products, connect them in accordance with the technology, and check that the required slope remains.
- You can control the direction using a stretched thread.
- The pipe joints are connected using a special tape.
- The next stage is the installation of inspection wells.
- If drainage products do not have a filter layer, then it is worth wrapping them in geotextiles and securing them with rope.
- After this, gravel is poured on top in a layer of up to 18 cm and on top, on both sides, we cover the system with the edges of the lower geotextile.
- The final step will be to fill the drainage with coarse river sand.
Before closing the pipes, pour water into them and see how correctly it flows through the system. While the structure is not buried, everything can still be fixed.
This way we get a good and functional system. Now excessive precipitation and moisture accumulation are no longer a problem for your buildings. Drainage should be installed not only around residential buildings, but also along the perimeter of utility buildings.
Some tips for arranging drainage:
- If the system runs under a road that is frequently used by vehicles, then the pipes along the route must be metal. Next, they must be tightly connected to the rest of the structure.
- When the trench is ready, you should first compact the bottom, and only then begin to fill it with components.
- Drainage products should be filled with gravel to a depth of 18-30 cm.
- Geotextiles are used to prevent contamination of the system. For the same purposes, you can wrap the components with filter material.
- When installing the structure, the possibility of its maintenance should be taken into account. For this purpose, inspection wells are created. The best places for them are bends and joints.
- It is important that drains do not touch or block existing communications in the ground - wires, pipes.
- You need to start digging a trench from the highest point of the ground.
- You should not skimp on the amount of geotextile, since this material is designed to protect the drainage pipe from silting.
- The easiest way to attach a metal welded box as a water sump.
Creating a Project
Conduct a soil survey on the site. Design is an important stage on which the efficiency of the drainage system depends, so it is better to invite specialists for survey work.
Engineers will study:
- geological conditions;
- features of the natural landscape;
- soil characteristics.
Before installation begins, a set of documents is developed, which includes drawings and explanatory notes.
The drawings show:
- location of drains, their diameter;
- contour design indicating the location of drainage wells and pits;
- the depth of the route elements, the gaps between channels;
- pipe slopes, length on each segment;
- highway connecting nodes;
- pump connection points.
For convenience , each module is drawn in detail , showing the dimensions, wall thickness, and the presence of a geotextile shell. Based on design data, the amount of materials and components is calculated. For convenience, an estimate is drawn up to see the amount of financial costs.
The project provides the composition of installation work and the complexity of operations . The possibility of using equipment for digging trenches and lifting elements is indicated, depending on the technological parameters of the future drainage.
For a private house with a standard set of communications, an open trench drainage system is designed. A house located on a slope with a risk of landslides will require a combined system. For underground parking lots, garages and similar structures, a multi-level drainage system is provided and a pumping station is equipped.
Inspection well
An inspection well is necessary to provide access to the system and carry out repair and maintenance work. The easiest way is to purchase a ready-made element: it can be found in construction stores. You can also make a well yourself. To do this you will need a wide plastic pipe. Concrete rings are also suitable for creating, or you can make a solid concrete tank. The structure must easily accommodate the human hand for repairs or cleaning. The inspection well must have a lid.
Requirements
When creating drainage, you need to consider:
- proximity of bodies of water to the site (probability of floods);
- how high the groundwater is (and the likelihood of its quantity increasing);
- how much precipitation falls on average per year;
- site development plan (neighboring buildings, communications);
- type of blind area (how much water can pass through the coating);
- site structure, slope;
- geodetic soil parameters (composition).
Only after receiving all this data can you clearly imagine what drainage will look like in a particular area. Next, you need to follow all installation rules.
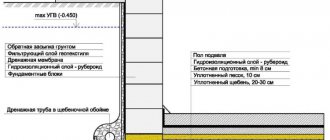
Parameters that need to be taken into account when installing drainage under the blind area:
The slope of the pipes depends on the diameter of the pipes that will be placed. For large-sized elements the degree will be less. For example: for 4-5 cm the slope is 3 cm/m, for 8.5-10 cm the slope is 2 cm/m, for 15 cm the slope is 0.8 cm/m.- Polymer perforated pipes are considered the most convenient to use. The holes in the pipe should be smaller in diameter than the diameter of the crushed stone with which the trench will be filled.
- To see the condition and monitor the functionality of the drainage system, inspection wells are installed. The distance between them should be about 12 m.
- Depth - below the freezing level, at the level of groundwater passage, width - 10 cm more than the diameter of the pipe.
Inspection wells can have a solid bottom, but it is preferable to leave an empty base and fill it with crushed stone. The same system is used in a common drain well.
The trench for backfill and surface drainage has parameters that directly replicate the tray or part of the pipe that will run inside.
The deep ring drainage system must meet the following parameters:
- a layer of sand cushion of at least 5 cm, preferably 10;
- crushed stone up to 15 cm, under and above the pipe;
- It is recommended to use perforated pipes of at least 11 cm in diameter;
- At the finish line, the soil is covered with a thickness of 20-30 cm.
In all variants of drainage systems, a slope towards the drainage well is maintained.
Blind area: meaning and installation
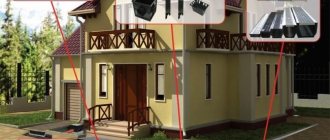
An additional element to protect the building from excess moisture is the blind area. It complements drainage. The blind area is the laying of waterproof material around the perimeter of the foundation, adjacent directly to the building.
The material should be positioned strictly at an outward angle to allow moisture to drain away. Thus, when water hits the blind area, it is immediately removed from the house. Contact of the foundation and walls with moisture will be minimal.
As a material suitable for the blind area, you can take asphalt, concrete, clay, stone, paving slabs. The first two are the most popular for blind areas and are used most often. This is due to the fact that they require less labor and capital investment. But such surfaces will not look very profitable. Paving slabs, stone and clay require more time and effort, but all work will be justified by a wonderful result and attractive appearance.
We talked about what drainage is, what types and types there are. They also gave advice on how to independently install various types of drainage. If you follow the technology, the process will go quickly and smoothly, and the result will definitely please you. Modern and high-quality drainage will protect your home from the negative effects of excess humidity, make it comfortable, and extend its service life.
Average device price
The price depends on the volume, complexity of the soil, and the depth of the trench. A separate cost is assigned for creating a drain well:
| Type of work | Moscow and Moscow region, rub/pg.m | St. Petersburg and Leningrad Region, rub/pg.m | Krasnodar, rub/pg.m | Kazan, rub/pg.m | Rostov-on-Don, rub/sq.m |
| Deep drainage, up to 80 cm | From 1200 | 1100 | 1100 | 990 | 900 |
| Deep drainage, over 80 cm | From 2500 | 2500 | 2500 | 2500 | 2500 |
| Surface drainage | From 900 | 900 | 800 | 750 | 800 |
| Drain well | From 20000 | 20000 | 20000 | 19000 | 20000 |
The most important and useful information on the construction of blind areas is collected in this section.
How much could it cost
Many craftsmen preparing to install a drainage system are concerned about the issue of its final cost. If you hire professionals, you will have to pay about 2.5 thousand rubles per linear meter of pipe. This is the cost taking into account the installation of wells, calculation of the depth and slope of the system.
If you do everything yourself, the cost will be reduced by 2 times. You can attract friends or relatives as assistants and labor. If any questions are still unclear, watch our video. From the videos you will learn how to choose pipes and other materials for laying a drainage system, and you will also be able to see an example of how it all looks in practice.