When a garage is purchased ready-made from a cooperative or other place, you do not have to choose its height. But a situation may arise in which you have to think about how to raise the roof of the garage. This can happen when it is necessary to park a minibus in it, which is significantly larger in size than a regular passenger car. This article will describe how such an operation can be carried out.
How to act
You may think that it is better to completely redo the roof and make a new deck. But in fact, lifting it, rather than completely dismantling it, turns out to be a more profitable solution. To implement the idea of raising the roof, you can consider three options:
- transfer to another site;
- use of internal supports;
- use of hydraulic jacks.
The first and second methods for raising the roof involve the use of a powerful crane. The first option is suitable when the roof consists of concrete slabs or is assembled in such a way that it can be easily strengthened to create a single contour. The roof is simply lifted and transferred to the prepared area. During this time, the walls are raised to the required height, and the roof is placed in its old place. There are some difficulties with the second option. They consist in preparing special metal racks that are easily and quickly assembled. Once the crane lifts the roof, the supports are set up and support the roof. Next, brick or other material is laid into the resulting openings.
The third method will require more time and more thorough preparation of the roof. It will be necessary to install additional tie beams on the inside of the roof. They will allow you to organize a continuous contour that can be raised without distortions. You will need an even number of jacks, which will be used for lifting and subsequent fixation. This method is suitable not only for slab garage roofs. You can also raise a wooden rafter system if it is properly strengthened.
If you are the owner of a steel garage on which the roof is firmly fixed, then you can lift not only one roof, but also the walls. At the same time, it is important to correctly assess the condition of the structure in advance so that unforeseen situations do not arise during the process due to rusty areas. An example process can be seen in the video below. If the roof is laid on a rafter system of metal beams, then only diagonal jumpers will be required from the modification, which will assemble the entire roof structure together. You can raise it in all of the above ways.
We eliminate shortcomings
In most cases, everything can be fixed quite easily by removing the horizontal beam from above. In our situation, there is no load on the beam at all, because the slab itself is installed exclusively on the side walls. This is evidenced by the carelessly plastered plane that is located between the slab and the beam.
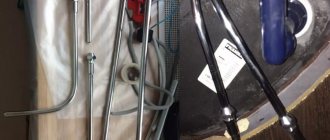
Beam on top of garage door - photo
Already in the beam itself there are two holes that are designed to supply electrical wires and fresh air. This fact should never be forgotten during further reconstruction work on garage doors.
Tools we will need:
- — Grinder with a circle for concrete and metal;
- — Medium or high power hammer drill. Power is needed because you need to make holes in a thick concrete wall with possible stones;
- — Semi-automatic welding machine;
- — Sanding machine with several spare belts;
- — Metal sheets and channels;
- — Ten millimeter drill;
- — Five square meters of lining and screws.
But the most important thing is free time and the desire to work.
Lifting the roof with your own hands
The process of raising the roof can be complicated by some of its design features and the location of the building itself. It can be separate or connected to adjacent garages. Each of these cases will require a different approach when raising the garage roof. It is allowed to use combined schemes with a crane and jacks.
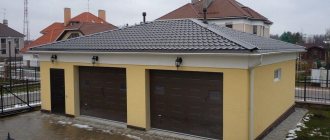
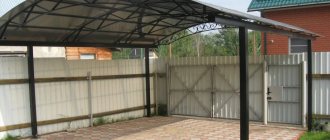
Detached garage
The beginning of the whole process will consist in the fact that the slabs need to be lifted so that they can be further manipulated. Since it is not possible to insert the crane slings and secure them as required, then you can use ordinary jacks. Special supports are made for them. They can be made of bricks or blocks. The main requirement for them is reliability and stability. After this, hydraulic jacks are mounted on them and rest against the slabs. The initial lift must be carried out to a height of up to 10 cm. This will be enough to secure special strips of I-profile under the roof slabs, by which they can be lifted separately by crane.
Further raising of the roof slabs is carried out to the required height. After that, temporary supports are installed under each of them, which will be removed after the construction of the wall is completed. Hydraulic jacks can be used as supports, the rod of which will be raised to its full length. Supports made of durable brick, which can later simply be knocked out, are also suitable.
The slabs can be lifted all at once, but then additional modification will be required. The roof will need to be secured using a belt of I-beams. Additionally, a beam is also installed in the middle of the roof. You will need seven jacks that can lift a weight of more than 5 tons. They are installed on supports near each corner, in the middle of the wall and in the center of the roof. After this, the roof is raised using all jacks. This must be done half a centimeter for each. It would be good if there were enough people who could do this at the same time. At the same time, using rulers on the racks, it is necessary to control the process so that distortion does not occur. After the jack sleeve has been raised to its maximum height, it is necessary to substitute supports and raise the jack to the next level. This must be done until the roof is raised to the required height. The overhang is fixed with racks and bricks or foam blocks are laid in the resulting gap.
Instructions for increasing metal garage doors
The repair procedure will be as follows: you reduce the height of the beam using a hammer drill. This is all done to reduce the total load and free up passing electrical wires.
Then you need to tie the remains of the beam to the upper corner of your gate with metal wire (you need to tie it every 15 centimeters). Then use a grinder to saw the remaining part of the beam into three parts, then gradually unscrew the wire and carefully remove these parts. Next, you need to remove the upper corner of the gate using an angle grinder and a circle for cutting stone and metal.
Garage door extension process
Along the side edges of the gate we attach the corners by welding, which remain from the above procedure. They need to be attached with a channel that will serve as support for the slab of your improved gate design.
Using the remaining pieces of the corner and a small amount of scrap material, you need to increase the gate frame. This way we strengthen the very foundation of the gate, because due to a change in design, the force and direction of the load changes.
Then you need to weld all the metal sheets into a joint along the inside of the gate. It is best to weld the sheets gradually, using ten centimeter gaps between the seams. It is good to use such seams to achieve maximum strength in welding areas. Only this effect can be achieved if you make small, five-centimeter seams.
The process of adding metal sheets to garage doors
Now we need to replace the old top deadbolt with a new one. To do this, we cut out the old lock and weld the remains of water pipes in its place. We make a hole in the channel for the bolt, and then strengthen this channel additionally by welding.
That's all. When finished, you need to paint the new gate with paint of a suitable color. Don't forget to restore the ventilation and wiring in the garage. Otherwise problems may arise. Now your garage door has reached its normal size so that you can park your favorite car in the garage without any problems.
Garage doors enlarged - photo
Garage in a bundle
You will have to tinker when the garage where you need to raise the roof is adjacent to one or more. The main problem is that adjacent walls are usually not made as thick as load-bearing ones. This means that before the lifting process begins, it is necessary to build additional support near the adjacent wall. This can be done using bricks or pouring a monolithic plane of reinforced concrete. In these two cases, it will be necessary to bandage the wall that is already installed. This can be done by means of metal fittings, which will be inserted into the drilled holes.
The additional wall must be brought close to the ceiling level. Only in this case will it be useful during the ascent. Instead of brick and reinforced concrete, you can use metal supports made of I-profiles. In this case, they must be connected with several transverse bars to form a strong, homogeneous structure. Raising the cover is carried out as in the case described above. In this case, you will need to lay brick on both the main and secondary walls. Only in this case will it be possible to evenly distribute the force that will come from the weight of the roof. It will also be necessary to provide a junction between the roofs of other garages and the walls that have been raised. To do this, roofing material is laid, which is covered with galvanized metal.
Note! The procedure for raising the roof can only be carried out if the building has a reliable strip foundation. It must be designed to support the additional weight.
Once the roof is in place, you can inspect it and repair the roof. How to do this will depend on what material is used for it. You may need to seal damage to the tiles using roofing felt and bitumen. If this is a slate option, then one or more sheets may need to be replaced. A raised and repaired roof will last for decades. A video about roof repair will be provided at the end of the article.
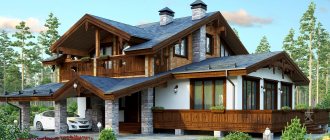
Selection of material, calculation of its quantity
Popular materials for making a pitched roof truss system are wood and metal. An iron frame has more disadvantages than advantages (metal structures are heavy, inconvenient to process and require a lot of money), so preference is given to the first option.
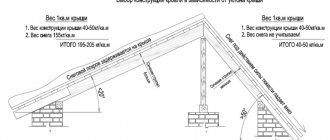
To build a wooden frame for a pitched garage roof, you will need the following materials:
- Bars with a cross section of 100x100 mm and a length of 500 cm (5 pieces). This is the basis for the roofing material - rafters.
- Bars with a cross section of 100x100 mm and a length of 100 cm (5 pieces). These elements will serve as racks for the rafters.
- Bars 100x200 mm, 500 cm long (2 pieces) for making Mauerlat.
- Bars 100x100 mm, 400 cm long (5 pieces) for floor beams.
- OSB sheets or tongue and groove boards measuring 40x50 mm for sheathing.
- Boards (25x45) for attaching insulating material.
The fastening of the rafter legs should be as tight as possible
Tips for choosing material for the rafter system
When buying material for a garage roof, you need to think carefully, having carefully studied the recommendations of specialists before doing so:
- When choosing wood, you should pay special attention to its quality. Material with a humidity not exceeding 22% is best suited. This parameter can be easily determined using a special device - a portable needle moisture meter.
- An important point when choosing wood is to study its properties. You should focus on the type of wood. For the rafter system, it is best to use larch and other conifers. This material contains resin, which prevents negative processes, keeps the product in its original form, significantly extending its service life. However, even such beams must be protected from the harmful effects of fungi, wood-boring insects and rot before starting construction work. For this purpose, special impregnations are used.
- On sale you can see glued timber. You should not neglect it, since in terms of its performance characteristics it is more reliable than ordinary wood.
Glued laminated timber is ideal for installing a rafter system - If wood is selected for sheathing, then it is permissible to use a material with worse qualities than for rafters. The main criteria in this case are dryness and the absence of large burrs. The thickness of the boards is selected taking into account the characteristics of the roof insulation.
Self-tapping screws, anchor bolts, and nails should be used as fastening elements. When installing roofing material in regions with high wind loads, two different types of similar parts should be used.
List of tools
When building a wooden frame for a pitched roof, you cannot do without the following tools:
- hammer;
- ax;
- measuring tape;
- plumb line;
- square;
- building level;
- protractor;
A construction protractor will help you choose the desired roof angle - hacksaw or jigsaw;
- construction knife;
- screwdriver;
- long cord;
- pencil or marker.
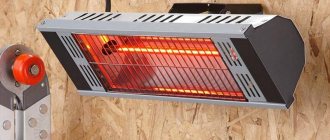
Main disadvantages
Metal structures also have significant disadvantages. There are several of them:
- Fire vulnerability. If something burns nearby the structure, the fire can spread to a steel garage, especially if insulating flammable materials were used in its finishing.
- Initially there is no protection against low temperatures and noise penetration. It is worth considering that temperature changes cause condensation to form. In this case, condensation may fall onto the car, which will negatively affect the paintwork. Corrosion is the main enemy of metal; some parts may begin to wear out quickly because of this. Therefore, it is recommended to protect the structure from exposure to high humidity.
- Problems in winter include icing of locks. This makes it difficult to open them and increases wear on the main elements. In addition, such garages make it difficult to carry out repair work in winter due to low temperatures. As for cars with diesel engines, it is difficult to start them in the cold; wear on the structure increases significantly due to oil starvation.
- If the garage structure is not secured to the site, then intruders can gain access. To do this, it will be enough to adjust the lifts and raise the structure. The light weight of the structure determines the possibility of using a jack.
- Low security against burglary is also characterized by the fact that a padlock is used to lock the gate. It is almost impossible to install a mortise gate due to the fact that the gate does not have the proper width.
- The design features do not allow the installation of communications. The lack of electricity means that it will not be possible to carry out repair work in such a garage.