How to make a non-freezing water tap in the yard with your own hands
Until relatively recently, on the streets of small towns or urban-type settlements one could see water tapping systems, through which residents were supplied with clean tap water. Street pumps were placed where the underground water supply network was located.
In order to install the water tap, the workers previously formed a well underground, in which the structural column part was located.
Requirements for a standpipe
The production of outdoor speakers is based on state standard number 15150. The main requirements relate to the location of the device, and the number of consumers is also taken into account.
- A column is installed at the location of the water well. If there is no well, it is recommended to build it as close to the sidewalk as possible. The ideal place is a crossroads.
- Consumer coverage is carried out at the rate of one column per area with a radius of 1000 m.
- It is optimal if the street water intake is formed on sandy soils for easy drainage of water into the ground.
- An elevated installation location is better than a low-lying one.
- In winter, it is better to insulate the column, because the metal casing will not be able to protect the water from freezing.
- Installation is carried out on water supply networks in which the pressure does not drop below 1 atm.
All fulfilled requirements guarantee long-term and efficient operation of the device. In this case, the depth of the water pipes must be taken into account. Based on this parameter, the device model is selected.
The principle of operation of geysers
Diagram of the internal structure of a classic gas water heater.
The operating principle of a gas water heater is quite simple. The column works as follows: cold tap water is passed through the device’s heat exchanger. There it is heated by burners located under the heat exchanger.
Oxygen, which is necessary for this process, enters naturally through the ventilation system of the home, and exhaust smoke gases escape through a special chimney, which is intended only for the gas water heater. Hot water from the water heater enters the sink through a pipe.
Each type of geyser works differently.
For example, when turning on the device manually, ignition occurs by igniting the gas with a match, and the burner ignites when the gas supply knob is turned. However, columns with a manual operating method are already outdated.
Installation diagram of a homemade instantaneous water heater with multi-point water supply.
There are two types of ignition on modern gas water heaters: electronic and piezo ignition. With piezo ignition, the column is turned on by a mechanical force that is converted into a spark.
In this case, the equipment is turned on using a button located on the front panel. The piezoelectric element produces a spark that helps ignite the pilot light. Then everything happens automatically: when you open the tap, the column lights up and hot water begins to flow.
Geysers that are switched on using electronic ignition are considered the highest quality and most reliable. Such devices are turned on using two batteries, which provide a charge for the spark. This type of speaker does not require buttons or matches. To turn it on, simply open the tap. Batteries usually last a long time.
Specifications
Water dispensers produced in Russia are strictly manufactured in accordance with GOST. Therefore, they have standard technical characteristics:
- operate at a water pressure within the water supply network of 0.1-0.6 MPa;
- the diameter of the pipe connecting the device to the water supply is 20 mm;
- outlet pipe diameter – 15 or 20 mm;
- vertical valve stroke – 16-18 mm;
- The weight of the device with a length of 1.25 m is 31 kg, the weight increase is 2.6 kg for every 25 cm of increase in the length of the device.
The speaker body is made of steel or cast iron and painted to prevent it from rusting. The device itself is a collapsible device, so it can be easily repaired. Manufacturers offer any parts and components as spare parts.
How to make a non-freezing water tap in the yard
Despite the fact that there are ready-made solutions for non-freezing taps on the market, we will present a couple of schemes for installing simple shut-off valves, and such schemes will save the pipeline from ice plugs and sticking of the tap in winter. First, you should consider the ready-made solution that the market offers and understand the working principle. The trick of this material is that the shut-off element itself is placed inside a warm room, and the ceiling control is placed outside, and due to this there is no freezing of water in the body of the product. This is an expensive solution; as the length of the pipe increases, the cost will also increase. For a more or less high-quality product, the price will start from 2,500 rubles. To take it outside with a wall thickness of ½ meter, you will have to spend from 7,500 to 10,000 rubles. To replace such a faucet, there are 3 installation diagrams for simple shut-off valves that help save your budget.
- There are two ball valves - one is in the warm zone, and the second is placed outside. As a rule, the pipe in the wall is made of polypropylene so that there is no cold bridge. The laying is carried out with a slight slope towards the street, and before the water collection starts, the street tap must be locked, and the inside one will open. Afterwards, you can use the water for its intended purpose, and when the water is not needed, the tap is closed, and the street tap is opened to drain the remaining water. Of course, water may be retained in it, in which case it will be possible to improve this scheme and install a faucet with an American one. After use, unscrew the fittings and take them to a warm room. If you don’t mind 40 W/h, then you can combine the design with a heating cable in thermal insulation.
- Extension of the rod - the scheme completely repeats the first design, the rod is placed outside. It is extended using a 0.8 cm pin, but there are completely collective farm options, when the extension is made from a PPR pipe - recesses are cut out from the pipe end, which fit flush with the crane handle.
- Solenoid valve - there is a similarity with diagram No. 2, but an electromagnetic valve is used as a shut-off element. This is a device that remotely blocks the ceiling, and for this purpose a cable is laid to the control unit, which is located outside.
The main rule when creating a water supply system in winter is to provide a slope towards the street so that water drains from all system elements after use!
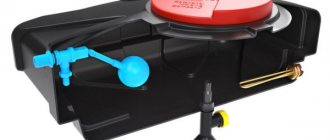
Design and principle of operation
The design of a street water pump includes a small number of parts. The main one is the ejector. With its help, the water supply is opened and closed:
- pipe riser located inside the housing;
- an ejector consisting of three parts: a neck, a socket and a receiver (sump);
- in the lower part of the device (receiver) there is a cylindrical mesh, the task of which is to filter the water entering the column;
- The speaker body is covered with a metal cover in which the lever is installed.
The column works as follows:
- when pressing the lever, the pipe riser is lowered;
- at the end of the latter there is a neck, which is a cylindrical object with a chamfer widened at the end;
- when the lever is pressed, the latter rests against the socket to prevent the riser from falling;
- at the end of the riser there is a valve, which is located in the lower part of the column - the settling tank (receiver);
- the valve closes or opens the receiver opening;
- when you press the lever, it goes down, opening the hole, that is, water moves;
- the lower end of the riser rests against a spring, which is located at the lowest point of the sump; it ensures the reverse motion of the entire structure;
- when the lever is released, the compressed spring expands, raises the riser, and the valve closes the hole in the upper part of the sump.
The design of the column is very simple, so it works effectively for many years. Most often, the spring that is constantly located in the water fails. It began to be made from tool steel, which is not afraid of contact with moisture.
Sometimes the riser gets clogged. It is replaced with a new one or cleaned by first disassembling the column.
The unique design of the standpipe is that there is never any water left inside the riser. Using an ejector, it enters the housing through a hole in the coupling. Therefore, outdoor devices can be operated at temperatures from -40C to +40C. This must be indicated in the product passport.
If the riser freezes in winter, the reason is a drop in water pressure in the water supply system or the temperature reading is below the permissible level.
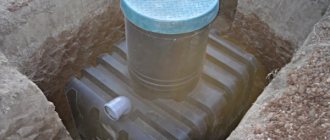
Preparatory stage of pit construction
The top layer of soil is prone to crumbling, so the well is protected with a special structure - a pit, in other words, a hole one and a half by one and a half meters, the depth of which is no more than 2 meters. Boards are used to strengthen the walls, and they also line the floor. The strength of the floor depends on the thickness of the boards, so products no thinner than 5 cm are used. The pit is covered with a second flooring on top.
The holes for sand wells are small in size and are located at shallow depths, while the holes for artesian wells go several meters into the ground
Then prepare the holes in the following order:
- erecting a drilling rig;
- remove the top flooring;
- find the center point on the lower flooring;
- make a hole whose diameter coincides with the shoe and couplings;
- cut out a second hole - in the upper flooring.
The vertical precision created by the two guide holes guarantees high-quality drilling.
Types of water taps
Manufacturers offer two types of designs, which are labeled as KV and KVO. In terms of technical characteristics, both devices do not differ from each other. The main difference is the method of attaching the receiver to the device body.
In KV models, fastening is done with two bolts, which are passed through the ears. One is located on the speaker body, the second on the receiver. Gaskets are installed between the two units to ensure the tightness of the structure.
In KVO models, fastening is done using square flanges. One of them is welded to the body, the second to the receiver. This design uses four bolts.
General structure of a household water heater
A geyser is a flow-through water heating device. This means that water passes through it and heats up as it goes. But, before moving on to an analysis of how a household gas water heater works, let us recall that its installation and replacement are associated with a centralized gas supply system.
Therefore, you must submit documents to the gas service of your region along with the appropriate application. You can read about the norms and necessary documents in our other articles, but now let’s move on to the device.
Different models of geysers differ from each other, but the general structure of a household geyser looks something like this:
- Gas-burner.
- Igniter/ignition system.
- Exhaust hood and connection to the chimney.
- Chimney pipe.
- The combustion chamber.
- Fan (on some models).
- Heat exchanger.
- Gas supply pipe.
- Water node.
- Connections for water supply.
- Pipe for hot water outlet.
- Front panel with controller.
The central element of the column is a gas burner, in which gas combustion is maintained, which helps to heat the water. The burner is installed in a housing; hot combustion products are collected in it, the purpose of which is to heat water.
The housing is made of metal and completely covers the front and sides of the speaker
It is important that the material of the housing conducts heat well, because the quality of heating depends on the transmission of heat.
Structural components of a geyser located inside the housing. Closed type gas equipment is shown here
On top of the device there is an exhaust hood and a chimney through which combustion products leave the column and the room. Their design depends on whether the column is open or closed, which will be shown below.
The pipes meander like a coil inside the body, water passes through them under natural pressure and is warmed by hot gases. This entire pipe system is called a heat exchanger. At the bottom there are two pipes: on the right - for receiving cold water from the pipeline, on the left side hot water flows out.
A filter is often installed between the water supply network and the gas water heater, which regulates the water hardness. Without a filter, the column may become covered with scale at high water temperatures. When entering the column, water passes through a water unit, which serves as a kind of “connection” between the water flow and the gas flow. We'll talk about this connection a little further.
Burning gas burner with electric ignition and flame sensor. Sensors play an important role in the functioning of equipment. We'll talk about their functions further.
Using another tube, which is also located below, the column is connected to the gas main.
There is also a front panel with a control unit. It is equipped with regulators to control gas and water consumption. Depending on the model, these can be either simple knobs that need to be turned, or liquid crystal displays, where you can see many characteristics of the column, or even the nature of its malfunction if the column does not work.
Installation features
On the side of the receiver there is a pipe with a diameter of 20 mm with an external M20 pipe thread.
A pipe of the same diameter is connected to it, which is removed from the water supply circuit. The connection of the pipe to the water supply is electric welding. A valve must be installed between the column and the supply pipe. The connection is made using flanges or threads. The first option is simpler in terms of installation and maintenance. The purpose of the valve is to shut off the water supply and regulate its pressure.
Under the column inside the well, be sure to lay a solid foundation on which it will rest. To do this, pour a concrete pad or lay a ready-made reinforced concrete slab.
Before commissioning, the water dispenser is washed with an aqueous solution of bleach. In this way the device is disinfected. The well is closed with a cast-iron sewer hatch.
Removing the column lining
Repairing a geyser with your own hands, such as replacing batteries, is the only way to troubleshoot problems that does not require removing the outer casing of the unit. To repair geysers Vector, Oasis and any other malfunctions, you will need to open the device. To begin removing the casing from the water heater, you need to turn off all the water and gas supply valves, and then do the following (for example, we take the Neva 5611 water heater, which we will disassemble on the table).
At the very beginning, you need to remove the control knobs from the unit panel. They are not secured in any way, so just pull them towards you. If you can’t pull the handle out freely, you can use some flat object and carefully pry it from below so that it doesn’t break. The Oasis gas water heater (Turbo series) also has a third “winter-summer” handle, located at src=”https://tehnika.expert/wp-content/uploads/2017/03/image003-11.png” class=” aligncenter» width=»450″ height=»341″ Under one of the handles of the water heater there is 1 screw that needs to be unscrewed. The presence of a screw under the handle is observed only in the Neva 5611 model, while it is not present in the Neva 4510 and Neva 4610.
A display is attached to the casing of the device, to which 4 wires are connected. A pair consisting of red and black conductors is connected to the control module, and a black and blue one is connected to the temperature sensor. For convenient disconnection, the ends of the wires are provided with connecting blocks that can be easily opened
Disconnect all 4 wires by pressing the small release tab on the block (if this is not done, the block may break).
Next, you need to unscrew the screws from the housing that hold the cladding in place.
After this, place your fingers under the cladding (be careful, you can cut yourself) and slightly pull it towards you so that the guide pins located on the unit body come out of the slots.
The casing is then pushed up, after which it must be removed from the hooks. The picture below shows the holes for the hooks.
The following illustration shows the holes for the alignment pins and the locations for the mounting screws (blue arrow).
Installation of the cladding in its original place occurs in the reverse order.
Operation and Maintenance
The speakers need to be serviced monthly. Check the ejector for leaks:
- a plug made of wood is driven into the drain pipe located in the upper part of the riser;
- press the lever;
- water fills the entire volume of the speaker body;
- the lever is released, and if the water has not increased in volume within 10-20 minutes, it means that the ejector fits tightly to the hole in the receiver;
- you need to pull out the plug, press the lever again and empty the column housing completely.
If the ejector works correctly, water in a 175 cm long water column will be removed from the housing in 5-6 minutes.
If it is necessary to carry out repair work, first of all it is necessary to close the valve, disconnecting the device itself from the water. Next, the cap with the lever is removed, then the riser, after which you can inspect and repair the parts of the ejector and sump. Often the mesh becomes clogged and simply needs to be replaced with a new one.
The best manufacturers
In Russia, manufacturers of standpipes are large factories that specialize in pipeline fittings or metalworking.
Korkinsky Mechanical Plant (Chelyabinsk) - produces water standpipes of the KV-4 type, the total length of which varies from 1.5 to 4.5 m, and the above-ground part is 1 m. The operating pressure is from 0.15 to 0.5 bar .
Among foreign manufacturers, the following most famous brands can be distinguished.
Fabryka armatur Jafar (Poland) – produces outdoor speakers with water separating properties. The body of the product is made of cast iron and painted with blue, red, green or black powder paint. The column can operate within a range of ±50°. The materials used to manufacture the column have anti-corrosion properties.
What is a driving well?
This type of well is extremely common in northern latitudes and has another, more popular name - the Abyssinian well. The popularity of the design is due to the desire of all people, even those living in remote regions, to have their own source of clean drinking water.
The advantages of this design are:
- Low (compared to other options) cost;
- Possibility to install a column/pump in any part of the yard;
- Durability of operation;
- Energy independence;
- Ease of implementation;
- High speed of work completion.
An example of a drilling well arrangement
Before starting to drive, it is necessary to carefully study the soil and understand how deep the aquifer lies. The easiest way to do this is to consult with neighbors who have already made a well for themselves. The discrepancy with their “readings” is usually insignificant – up to half a meter.
If it is not possible to clarify the information on site, the owner will have to contact a specialist who will determine the depth during the drilling process.
Of course, it is possible to do the work yourself, but the likelihood that titanic work will be done in vain is very high. With the help of special equipment, you can reach the aquifer within a few minutes. And if it is not found at a depth of 10 m, the work can be quickly curtailed or moved to another location.
How to make a tripod for drilling
To properly make the simplest device for hanging a drill column with your own hands, it is enough to take 3 beams or logs that are connected at the top, forming a pyramid with a triangular base. You can also use metal pipes as supports. A winch is suspended from the center of the connection. Through an adapter in the form of a freely rotating spindle with a ring or clamp, a drill string is connected, in the upper part of which a collar is fixed.
Thus, to operate this device, at least 2 people are needed, but 3 are better, then two will rotate the drill, and the third will operate the winch.
To make it easier to work, we first dig a well or pit up to 2 meters deep. Flooring is placed on its bottom, and the walls are lined with boards to prevent crumbling. Leave the center of the hole free for drilling. The second flooring is laid on top, the tripod is installed with a support outside the pit or well.
As the drill sinks, the column is built up with new rods, the topmost of which is attached to the collar. To make the passage of hard rocks easier, you can add water to the well, but then it will be more difficult to understand when wet soil begins to flow, signaling that the aquifer has begun. After finishing the work, you can think about how to cover the well with your own hands. It is better to use an inspection hatch.
A suburban area without water is a small desert. Neither to plant a flowerbed, nor to equip a swimming pool, nor to other common and simply necessary benefits of civilization associated with water supply. There can be only one way out in such a situation - a well at the dacha with your own hands or to order. It all depends on whether you have money and the desire to work. If you have enough energy and enthusiasm, then such a troublesome task as installing a well in your country house will be up to you. Let's look at what kind of wells there can be and what is their difference.
Making a speaker yourself
Drilling a well on your own is not an easy procedure, so the owner must immediately foresee the possibility of attracting 1-2 people to help.
In order to quickly cope with the task, work must be performed in stages:
- Preparation. Before starting work, it is necessary to clean the surface from small debris and level it as much as possible. A rational approach to the location of the column is also mandatory - it should be based not where it is convenient, but in a place where the aquifer passes as close to the surface as possible.
- Digging a hole. For the convenience of carrying out further work in the chosen place, you need to dig a “pit” up to 1.5 m deep. The width of the depression should be approximately 2 m. To prevent the soil from falling back, it is advisable to strengthen the walls with wooden plates.
- Working with a drill. Which mechanism to prefer - manual or mechanical - depends on many factors. From about a depth of 2 m, sand and wet soil begin, complicating the work. Approximately every 15-20 cm, the drill must be removed and cleaned of the adhering mass, otherwise it may break under the weight of the soil.
- Equipment installation. A pipe is stretched to the bottom of the well, through which water will flow into the column located at the very top. In order to at least slightly protect the system from small debris, it is advisable to install a special filter in the pipe.
After drilling a well, you can install the column yourself.
Drilling a well and installing a column takes from 1 to 3 days.
It is better to perform them during the sultry heat, when the water lies as deep as possible. And if you enlist the support of assistants, things will go much faster.
Drilling process sequence of actions
If you prepare the necessary equipment and follow the sequence of steps, there will be no questions about how to properly make a well. The finished drilling rig is equipped with a head and a mechanism in the form of a winch. The bar is passed down through both holes, if necessary, it is extended and the collar is secured. Usually two people rotate the gate, and a third person is needed to correct the position of the bar.
If the well is shallow, then only a drill column is used, directing it down strictly vertically. A tripod with a lift is necessary for deep wells
A mark is placed on the column, retreating 60-70 cm from the top flooring. Having lowered the column to the designated distance, it is removed back, removing the rock raised along with the drill. The cleaned column is immersed in the same way several times. Greater depth requires extension of the bar. To do this, another pipe is connected using a coupling.
Depending on the stability of the soil, the drilling method is chosen - with or without casing pipes. With stable, dense soil, you can drill the entire well without using casing pipes. Crumbling rocks indicate that after 2-3 meters a pipe equipped with a shoe should be installed. The diameter of the pipe is wider than the diameter of the couplings, so the pipe enters the shaft with difficulty. Sometimes, to place it there, they use a screw or a sledgehammer.
Products for laying water pipes are used as casing pipes - metal or polypropylene pipes of the required diameter for external work.
If rocks are crumbling, collapse should be avoided. For this purpose, the drill is not lowered too low - below the end of the casing by a certain distance. Usually it is equal to half the length of the drill. Thus, the process consists of alternating drilling and installation of casing pipes, which are built up as they go deeper.
How to drive a pipe under water yourself
Hammering is a technology that is used exclusively on soft, pliable soils. It is almost impossible to drive a pipe into dense black soil, because the original structure will certainly be damaged.
The driving technology looks like this:
- A small well is dug, no more than 1 m deep;
- Two strong metal clamps are attached to the bottom of the pipe;
- A blank is placed on the central part of the metal structure through which the cable will be pulled;
- A pipe is installed vertically into the well.
The work is performed by two people who periodically lift the workpiece by the cable and lower it at the highest point.
You can drive a pipe under water with your own hands if you carefully follow the step-by-step instructions
During such manipulations, mechanical stress is exerted on metal clamps that transmit force to the pipe itself. Under this influence, it gradually sinks into the ground.
The main thing in the work process is accuracy, because the pipe needs to be hammered, not pierced.
The principle of operation of the gas water heater
https://youtube.com/watch?v=—nsb1QhsZE
In gas water heaters, which are controlled using an electronic system, several conventional batteries are installed in a special compartment. These batteries power the electronic unit that controls all geyser systems.
The principle of operation of the gas water heater is such that when the hot water tap is opened, a flow is formed in the water main of the water heater. This duct moves the membrane, which is installed in the water unit. This membrane is connected to a rod that opens a mechanical gas valve and turns on a microswitch. The switch energizes the solenoid gas valve, which also opens. Both of these valves provide gas supply to the burner.
The microswitch also supplies voltage to the ignition unit, which, in turn, supplies a spark to the ignition electrode. With the appearance of a spark, the gas in the combustion chamber ignites, and the flame completely engulfs the heat exchanger. The water that passes through the heat exchanger quickly heats up and is supplied to the hot water main through the outlet fitting of the column. When a flame appears in the combustion chamber, the ionization sensor reacts to this flame and the spark stops.
When you close the hot water tap, the flow in the water unit instantly disappears. The membrane of this unit returns to its original position, dragging the rod with it. This rod closes the mechanical gas valve and also disables the microswitch that supplies power to the gas solenoid valve. The gas supply to the burner stops.
Advice and recommendations from experts
When planning to make a water well or well in your yard, you must first draw up an action plan and organize the work strictly according to it.
Experienced experts advise even those who have thoroughly studied the technology to remember a number of the simplest rules:
- Clogging is carried out for more than one year, so you should not skimp on materials;
- Those who are not confident in themselves should enlist the support of specialists or simply ask them for advice;
- Wells, pipes and columns require periodic cleaning;
- It is very important to properly preserve the system (even if unfinished) for the cold season.
The decision to drill a well yourself is completely justified from an economic point of view. Don’t be afraid of the work, because it doesn’t involve any pitfalls. Punching is carried out using a drill, which is simply screwed into the ground until the aquifer is found. Once one is discovered, you can safely install pipes and a water pumping system.
Common installation mistakes
It is best to entrust the design of a water supply system, both collector and tee, to professionals familiar with building codes and capable of performing hydraulic calculations. But even the best project will be useless if mistakes are made during its implementation.
Shut-off valves are part of any water supply scheme: both sequential and collector. They are installed at the entrance to the water supply system, as well as in front of each plumbing fixture.
For example, some would-be craftsmen, driven by the thought of unreasonable savings, neglect the requirement to insulate hot water pipes that are laid under the floor or in the thickness of the walls.
As a result, part of the thermal energy is transferred to the materials surrounding the pipe, which deteriorates the quality of the water. In addition, condensation from the surface of pipes without thermal insulation can damage the finishing of the room.
During installation work, experienced craftsmen recommend covering the ends of pipes that have not yet been installed to prevent debris from getting into them. The absence of this protective measure may lead to the fact that immediately after installation the water supply system will have to be thoroughly and for a long time flushed or even repaired.
When soldering polypropylene water pipes, you should remember that slight dirt or moisture at the soldering site can significantly impair the quality of the work
If soldering of plastic pipes is necessary, all work should be performed in a clean room to avoid contamination. It is also unacceptable to solder pipes that contain even a small amount of moisture. A drop of water or particles of debris at the soldering site can significantly weaken the connection and degrade its quality.
You should not design the water supply system in such a way that all pipes pass through the ceiling through one common hole. This may degrade the performance of the water supply. Professional designers never make such mistakes.
When drawing up a wiring plan, it is necessary to ensure that the pipes do not block access to the joints. This will make repairs much easier in the event of a leak.
An insufficient number of locking devices can also cause a lot of trouble during installation work. Such fittings must be present in front of each device to which water is supplied, as well as for each riser. If the house has more than one bathroom, you can install a shut-off valve for each of them.
Simultaneously with the water supply system, sewerage is usually designed and installed. It is necessary to ensure that the pipes and risers of individual systems do not overlap each other. This will make maintenance and repair work easier in the future.
Do-it-yourself water supply in the country: the simplest installation methods
There is no need to convince anyone that running water in a dacha is necessary. This is already obvious. Therefore, we will immediately dwell in more detail on how to make a water supply system in a dacha with our own hands, taking into account its operation at different times of the year.
First of all, you need to choose a water source. The cheapest and easiest way to provide fresh water to your dacha is to build a well. It can have different depths. It all depends on the depth of groundwater. Basically, it does not exceed fifteen meters, and therefore the construction of a well costs minimally. However, such a structure provides small volumes of water (up to 200 liters per hour), and it also contains various impurities (nitrates, heavy metals, bacteria).
Less popular manual modifications
In addition to piston models, which have proven themselves well in factory and homemade versions, other devices are also used.
They are less productive, but interesting from the point of view of design and operating principle.
Image gallery
There are factory models that are not practical to make yourself. For example, equipment based on an impeller. Such devices are used in the industrial sector; they are not very convenient for the garden.
In addition, buying a compact metal device that looks like a can twister will cost no more than making it yourself.
None of the considered homemade pump designs suits you? Then we recommend that you look at more options for homemade products, the production of which we have considered.
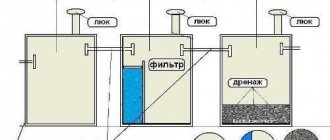
Wells and wells: what you need to know
Well design diagram
A more acceptable option is to build a sand well, the depth of which, depending on the aquifer, can be from 15 to 30 meters.
Such a structure can produce approximately 1.5 cubic meters of water per hour, which is enough for a small house.
What is better, a well or a borehole?
Drilling a sand well is carried out using the auger method - the rock is extracted to the surface. This usually takes from 3 to 5 days. However, the sandy aquifer contains a lot of clay and sand, and therefore filtration equipment will be needed in this case.
The deeper the well, the more likely it is that there will be no unwanted impurities in the water.
The best way to supply water is an artesian well. The water rises from it under pressure. Such a well can produce about 10 cubic meters of water per hour. In this case, a casing made of metal pipes must be used. The service life of such a well is about fifty years.
Do-it-yourself summer plumbing
First, let's look at the installation of a water supply system at the dacha, which will be used only in the summer. This type of water supply is used for watering plants at the dacha, connecting a summer shower and for current household needs. It is not intended to be used in winter. Summer water supply at the dacha can be either permanent or collapsible.
The most common is water pipes (hoses) which lie directly on the ground. Such a water supply is made from simple rubber or silicone hoses connected to each other by adapters. Connection adapters are commercially available and are made of galvanized steel or plastic.
There are also special latches on sale on one side, which have “ruffs” where the hose is put on, and on the other side there is a convenient spring-loaded connector. These latches can be connected and separated in one motion. They are quite capable of providing a reliable joint. Note that when purchasing hoses, you need to buy rubber hoses with thick walls, which are reinforced with nylon fibers. Of course, plastic water supply at the dacha will cost less, but such hoses will last longer - at least 15 years.
Summer water supply at the dacha made of plastic pipes
For a permanent summer water supply, pipes must be laid in the ground, and water taps must be brought to the surface. In this case, it is enough to just cover the pipes a little with earth to avoid tripping over them and to protect them from theft.
The main disadvantage of a permanent summer water supply is the need to maintain a slope to the connection point - to the main line. A drain valve is placed at this lowest point in the water supply to drain water for the winter. Otherwise, the water may freeze and burst the pipes.
Winter country water supply
Now let's talk about more solid and capital schemes. Let's start with a description of the winter water supply. Winter does not mean that it can only be used in winter; it simply means that the water supply is carried out according to a permanent scheme and can be used at any time of the year.
An example of an autonomous winter water supply in a country house
To supply water from a well, it is better to use a submersible pump. Its power is selected depending on the depth from which water will be supplied. For a well up to ten meters deep, a small “stream” or “aquarius” is enough. If water is supplied from a well, you will have to buy a more powerful pump, which will cost much more.
Due to the fact that when installing a winter water supply, the pump must be connected to a voltage source, it is permissible to combine the cable and water supply in a single casing made of plastic sewer pipes. It will protect well from freezing and mechanical damage.
Laying water pipes made of plastic
To lay the water supply, you can use plastic pipes with soldered connections or special plastic fittings. For soldering connections, use a special electric soldering iron. It is not very expensive, and specialized stores often offer such soldering irons for rent. To install the pipeline, you will need a soldering iron for no more than a day. Connections on fittings are made with bare hands without a soldering iron. For an ordinary dacha, pipes with a diameter of 20 or 25 millimeters are quite suitable.
Pipe fittings and connections
When laying water pipes, pipes must be placed below the freezing level of the soil. The value of this value for each specific climate zone can be found in special reference books.
But often, in order not to dig too deep a trench, you can use one of the following methods:
Cover the pipe laid at a depth of 60 centimeters with a 20-30 centimeter layer of insulation made of foam chips, furnace slag, expanded clay, etc. The main condition is that the insulation does not absorb moisture well and is strong enough.
Insulate the pipeline with an insulation system consisting of special thermal insulation and a casing made of corrugated polyethylene. Using such a system, the depth of the trench can be made much smaller (about 30 centimeters).
Lay a heating cable that allows pipes to be laid on the surface. But you will have to pay a lot for electricity.
It should be taken into account that the trench should approach the house at a right angle, because it will be necessary to dig up the foundation, which is fraught with its settlement and the formation of cracks in the wall.
Connecting the pump to the water supply
To connect the pump to the water supply, it is necessary to build a pit next to the well, one meter deep and measuring 70x70 centimeters. The walls of the pit are lined with bricks or reinforced in another way, for example, with boards soaked in antiseptic. It would be better to fill the bottom of the pit with concrete or, as a last resort, fill it with crushed stone and compact it.
Connecting the pump to the water supply
A water pipe with a “ruff” for attaching the hose that comes from the pump, as well as an electrical wire, is brought into the pit and fixed. The function of the pit is that, if necessary, the pump can be easily disconnected and removed. The pit is insulated to prevent water from freezing in the pump hose.
Pump connection example
To connect the pump, install a waterproof socket or use a sealed contact connector, better known as a “male-female” connector. The main condition is that the pump can be safely connected and disconnected, even if the cable is energized.
Water taps
Water-folding ball valve
We have decided how to make a water supply system at the dacha. Now let's take a closer look at water folding devices. For outdoor use, bronze or cast iron valves, as well as ordinary taps with axle boxes, are quite suitable.
Mechanisms for self-construction of wells
Usually, special drilling equipment is used to construct a well, so a completely logical question arises: how to drill a well in a country house without using it? It turns out that there is a simple manual mechanism consisting of a drilling rig and a column suspended from it. Let's take a closer look at the individual pieces of equipment.
The base is a tower resembling a tripod. The material for the supports is either metal pipes or logs connected at the top with a pin. The drill column lifting block is also located there. The two legs of the tower are connected by a winch (gate).
The design of drilling equipment may vary. In some cases, if the impermeable layer lies close to the surface of the earth, a hand drill is sufficient
The drilling column is the main functional element. It consists of several three-meter rods connected by couplings. Sometimes a length of one and a half meters is enough. It is the column that is immersed in the ground, and its length is adjusted using rods. Replacement of special equipment are water pipes equipped with steel couplings.
Drilling heads must be selected depending on the nature of the soil. Here are the most commonly used: 1 - “spoon”, 2 - “snake”, 3 - “chisel”, 4 - “bailer”
The impact or soil-cutting element is the drill head. It is screwed onto the column using a threaded adapter. As the head is lowered into the soil, soil fills the drill cavities. For different types of rocks, different attachments are used: a “spoon” is suitable for soft soil, a “coil” for dense soil, and a “chisel” for hard rocks. Use a bailer to lift the loosened soil up.
To prevent the walls of the well from crumbling, casing pipes are used - as a rule, these are ordinary plastic plumbing products, lightweight and easy to install. The bottom of the pipe is a kind of shoe, with a smooth or jagged edge at the bottom.
There are two main types of casing shoes: a – toothed (mill), b – smooth. Cutting area: 1 – teeth, 2 – smooth edge
Thus, the construction of a well takes place using special equipment, some of which can be purchased at the store, some of which you can make yourself.
Water stand near the house
A standpipe is especially needed for use in populated areas where there is a lack of water supplied from the centralized water supply.
It is impossible to say that the device works perfectly, but it performs its functions perfectly, at least in the warm season.
The design of the water column is simple. It is installed in a well or on the ground and consists of:
- valve;
- ejector;
- pipes for lifting water;
- columns;
- lever mounted to the column (these two elements are on the surface).
Types of devices for pumping water
Physical force alone used to lift water upward is not enough, since the process becomes difficult and labor-intensive.
Therefore, mankind has long ago invented many devices that facilitate the rise of liquid from a well or natural reservoir to the surface. All devices are united by a common operating principle, which is based on the interaction of the valve system.
There are many varieties of hand pumps, but four main types can be distinguished:
- piston;
- rod deep (varieties of piston);
- winged;
- membrane
For manufacturing at home, they usually choose the first type if it is necessary to service a well of shallow depth (3-6 m), or the second if it is necessary to lift water from a well from a depth of 10-12 m.
These models are considered to be the most productive, easy to assemble and install, and reliable. The rest have significant shortcomings, the biggest of which is considered to be insufficient productivity.
It is piston devices that have occupied the main niche among factory manual equipment; they are popular among home craftsmen.
Image gallery
The advantage of piston column pumps is their ease of assembly and installation. All the parts necessary for the manufacture of the body and dynamic parts can be found on the farm or purchased in addition.
And to connect the elements into a single device, home tools are usually enough: a drill, a circular saw, a hacksaw, pliers, and keys. If you need a welding machine, you can rent it or borrow it from your neighbors.
Disadvantages of standpipes
Despite the obvious need for use when the water supply is poor, this equipment also has disadvantages:
- there must be a sufficiently high pressure in the water supply network, otherwise the performance of the dispenser is noticeably reduced, in particular, when drawing water from a centralized network;
- freezing of water in winter, especially at low pressure;
The main functions assigned to the column: water intake and supply. Therefore, it is better to choose high-quality equipment for installing the column; moreover, this will increase the chances of maintaining the integrity of the gasket for collecting exclusively purified water from the water supply.
Water taps are used not only in populated areas, but also on construction sites and in suburban industrial establishments.
Speakers powered by gas cylinders
In country houses where there is no gas pipeline or problems with the power of the electrical network, a gas water heater powered by a gas cylinder will be a salvation.
A cylinder with a capacity of 50 liters of gas is enough for daily use of hot water with a minimum consumption of 3 people per month.
To comply with safety standards, you must make sure that the dispenser model is designed to use the type of gas with which the cylinder is filled. If the dispenser is to be re-equipped, then it is required to leave a mark on the dispenser with the re-configure number and the type of gas permitted for use.
There are standard indicators for work:
- the cylinder is used with a reducer with a stabilization pressure within 300 mm of water column;
- the minimum vapor phase capacity for a cylinder is 1 m3/hour;
- a hose used for working with gas equipment is 2.5 meters long, with an internal cross-section of 12 mm.
Basic requirements for a water standpipe
In order for the installation of the water dispenser to be correct and the device to work for a long time, the following requirements must be met:
- It is better to install it near an intersection or near the sidewalk (however, it all depends on the location of the well. If installation takes place in a well, the location is determined; if not, it is recommended to do it as close to the sidewalk as possible);
- installation of a water standpipe should be carried out on the basis that the service radius of the device should not be more than a thousand meters;
- To avoid problems with drainage, it is better to install it at an elevated location (but not at a significant height). The main thing is to maintain natural drainage;
- It is not recommended to install on a dead-end line if it is carried out in the ground.
In general, standpipes are used over a wide temperature range: from -40 degrees to +40 degrees.
Buy a manual water dispenser
So, for Moscow residents who want to buy a garden water pump, we have 2 warehouses:
1) Kantemirovskaya metro station; 2) Pyatnitskoye Shosse metro station.
You are free to sign or not offer suggestions, and we encourage you to make multiple quotes when you are working from home. So you have read the quote and you have accepted it as you indicate. Sometimes the store-shop is paid by the customer when signing the quote, this mode of operation is specific to each of the companies by breakdown.
Sometimes convenience stores are driven directly by a credit card reader for security or speed reasons, and this is quite normal and even more common. You indicate that you want to receive funds from the repair or repair company because your washing machine is still not working after the repair. The company is obligated to get results for the work they do, and this doesn't sound like your situation.
For residents of the regions of the Russian Federation, we cooperate with TC “Business Lines”, which will quickly and inexpensively deliver your order.
We can talk for a long time about the benefits of owning a piston rocker in the country.
Let's list the main advantages:
1) You become absolutely independent of the presence or absence of electricity at the dacha. The pumping station is quickly disconnected from the well and a manual column is installed in its place and the liquid supply is resumed. 2) It is not expensive compared to electric pumps. 3) It is very easy to carry out routine maintenance. No special tools required: just your hands and a wrench. 4) A wonderful decorative element
Neighbors or just guests will always pay attention to your summer cottage
The cost of the repair might have alerted you, since the asking price was equivalent to the price of several new washing machines. We invite you to contact the company that came to your home the first time by telephone to let them know that their repairs are not sufficient and will not allow you to use your washing machine. They should come to do the repair quickly if the first intervention has just happened.
If you refuse to move again, we recommend that you send them a registered letter explaining the situation. You can also write your registered letter with the help of a lawyer who will represent your interests. A lawyer can still be expensive if you don't meet one during the free sessions at your town hall.
To supply water from centralized systems, devices such as water dispensers are used. The main element of the mechanisms is considered to be ejector units. In terms of operating pressure, the models on the market differ quite significantly. On average, this parameter fluctuates around 2 bar.
Top floors down skimmers in my toilet. You indicate that the toilet waste on the upper floors is returned to your bathroom. It is very likely that there is a blockage in the common line of your building. In this case, it will be necessary to use the curation cart through the building trustee to end the building's general column.
You should notify the guardian of your building because if you call your company for the truck, the intervention may be your responsibility. Warn your neighbors also about the problem you are experiencing, it is possible that others are experiencing the same problem as you.
The supply tube is usually installed with a large diameter. However, in this case, a lot will whistle from the brand. Additionally, it should be taken into account that different types of valves are used in water dispensers
In order to understand this issue in more detail, it is important to familiarize yourself with the design of this device.
You point out that the truck passed several times to unblock the convoy. You indicate that the water rises to the edge of the toilet, as well as the edge of the sink and bathtub. You will need to contact your condominium manager to contact the pumper. If water is rising in your pipes, it is because the common drain column is clogged, creating a large plug.
The water will continue to flow back into your home and onto the ground until you turn on the truck's pump to clear the common pump. I need to skim off some flash water take it and clean it again so the water is clean again. You indicate that you have problems with water in the toilet. You point out that this water is dirty, and there should not be any water in the bowl before rinsing. You indicate that the building's general column has been changed.
application features and main characteristics of hydrants
A water standpipe is a mechanical equipment designed for supplying and withdrawing water from a centralized water supply main.
As has already been reported, the equipment is used to provide water to populated areas or individual construction sites that are not equipped with a water supply.
Let's look at the recommendations and basic requirements that you should take into account when installing and operating standpipes yourself:
- The classic location for a water standpipe is now considered to be an intersection or a roadside part of the sidewalk.
- In accordance with the requirements of national standards, the service radius of equipment should be no more than 100 m.
- When choosing a location for these installations, it is preferable to use areas on a hill, since in this case it will be easy to ensure natural drainage of wastewater.
- Installation of the column can be carried out on a street water supply line, on a looped line, or on branches from the main line.
- Due to the high possibility of freezing, installation of equipment on a dead-end line is advisable only if a constant and impressive water flow is expected.
Structural highlights
The design of the device consists of the following elements:
- valve;
- ejector;
- water riser pipe;
- housing with a lever movable in a vertical plane.
Thanks to its operational features, the design of the water column is durable and strong.
- The column body is a vertically located pipe with an average cross-sectional diameter of 90 mm. The body is made of low-carbon steels, which perfectly withstand sudden temperature changes, mechanical loads, etc. The surface of the case may be painted with simple paints, the price of which is low, but for long-term operation it is better to choose those devices whose case is coated with powder paint.
- The water-lifting pipe (rod) is installed in the housing and is responsible for the water supply. In order to achieve optimal water supply intensity, the nominal diameter of the water pipe has a diameter of at least 15 mm. Once the water supply is stopped, the remaining water is drained to prevent freezing in winter.
- An ejector is a type of jet pump installed in the column body to pump out residual water from the rod.
- The valve is part of the water intake column in which the ejector is installed. The design of the valve is dismountable, as a result of which, if necessary, it is possible to replace worn out seals. The valve, like the entire column body, is made of strong and durable low-carbon steel.
Operational defects of equipment
If anyone with a simple installation tool can figure out how to connect a gas water heater to a water supply system, then with the water heaters discussed in this article everything is not so easy.
Let's look at the most pressing operational shortcomings of hydrants and try to find ways to eliminate them:
- Unsatisfactory operation of equipment at low pressure with a high risk of freezing in winter. The reason for this phenomenon is contained in the limited lower limit of pressure in the water supply system.
- The ingress of surface groundwater into the dispenser spout through the ejector is a significant drawback that has a very bad effect on the quality of water purchased by the consumer. The reason for the penetration of groundwater is an incorrectly installed gasket.
- The need for enormous reinforcement when opening the shut-off valve. The circumstance is contained in the resistance of the return spring and in the water pressure specifically on the valve plate. Nothing can be done about this defect, since these are structural features of the equipment, which cannot be changed.
- The column freezes in winter, regardless of the presence of an ejector. The cause of freezing is the remaining small volume of water in the rod and in the valve.
How to make sure that water in small quantities does not remain in the device and does not freeze? First of all, you can try to configure the ejector correctly. This is not easy to do, since the pressure in the water supply system is not constant.
To completely get rid of residual water in the boom, it is possible to drill a drain hole or loosen the connecting pipe flange, creating a natural drain. Both methods are difficult to implement, and besides this, they contradict the instructions for using the device. Based on this, it is advisable to entrust such work to experts.
Materials
To install a garden water pump, you need a source from which it will pump water. If there is no running water, you need to drill a well. First, the hardness of the soil and the depth of the aquifer are assessed. Based on this, a conclusion is made about which well to drill.
If the aquifer is deeper than 50 meters, deep drilling of an artesian well is assumed. It is impossible to carry out such drilling on your own. Deep drilling is carried out by specialists with the appropriate equipment:
- drill with drill rod;
- drilling rig;
- working winch;
- casing.
The Abyssinian well is the simplest water intake, which is drilled manually. To drill a well you need:
- thick-walled metal pipes 1.5-2 m long, with threads at the ends, 25 mm in diameter;
- 1m pipe with holes 8mm in diameter, staggered;
- steel cone with a diameter of 45 mm;
- steel connection couplings;
- sledgehammer for driving in pipes;
- fine metal mesh;
- check valve;
- manual pump (water column), electric pump.
The depth of the Abyssinian well is no more than 15 meters. How many meters of pipe, cut into pieces, are used when installing a well column. The diameter of the pipe is calculated based on which pump will be used to pump out water. If the pipe diameter is 5-7 cm, steel rods are used for driving.