Ideas on how to save money, but at the same time have all the benefits of civilization on a personal plot without a centralized electricity and water supply, do not give “homemade” people peace. But often, when it comes to engineering equipment running on “green” energy, developers brush it off. They say that all this is not suitable for our latitudes and harsh natural conditions with short summers, frequent rains and a small number of truly hot days. However, the experience of FORUMHOUSE users suggests the opposite.
From this article you will learn:
- How to assemble an inexpensive solar collector with your own hands.
- Is there any economic benefit from a solar collector installed in the Moscow region?
Kinds
The standard device has the form of a metal plate, which is placed in a plastic or glass case. The surface of this plate accumulates solar energy, retains heat and transfers it for various household needs: heating, water heating, etc. Integrated collectors come in several types.
Cumulative
Storage collectors are also called thermosiphon collectors. This DIY solar collector without a pump is the most profitable. Its capabilities allow you not only to heat water, but also to maintain the temperature at the required level for some time.
This solar heating collector consists of several tanks filled with water, which are located in a thermal insulation box. The tanks are covered with a glass lid, through which the sun's rays shine through and heat the water. This option is the most economical, easy to operate and maintain, but its effectiveness in winter is practically zero.
Flat
It is a large metal plate - an absorber, which is located inside an aluminum case with a glass lid. A do-it-yourself flat-plate solar collector will be more efficient if you use a glass cover. Absorbs solar energy through hail-resistant glass, which transmits light well and practically does not reflect it.
There is thermal insulation inside the box, which can significantly reduce heat loss. The wafer itself has low efficiency, so it is coated with an amorphous semiconductor, which significantly increases the thermal energy accumulation rate.
When making a solar collector for a swimming pool with your own hands, preference is often given to a flat integrated device. However, it copes just as well with other tasks, such as heating water for household needs and heating a room. Flat is the most widely used option. It is preferable to make an absorber for a solar collector from copper with your own hands.
Liquid
From the name it is clear that the main coolant in them is liquid. A do-it-yourself water solar collector is made according to the following scheme. Through a metal plate that absorbs solar energy, heat is transferred through pipes attached to it into a tank with water or antifreeze liquid or directly to the consumer.
Two pipes approach the plate. Through one of them, cold water is supplied from the tank, and through the second, already heated liquid enters the tank. Pipes must have inlet and outlet openings. This heating circuit is called closed.
When heated water is directly supplied to meet the needs of the user, such a system is called open-loop.
Non-glazed ones are more often used to heat water in a swimming pool, so assembling such thermal solar collectors with your own hands does not require the purchase of expensive materials - rubber and plastic will do. Glazed ones have higher efficiency, so they are able to heat the house and provide the consumer with hot water.
Air
Air devices are more economical than the above-mentioned analogs that use water as a coolant.
The air does not freeze, does not leak, and does not boil like water. If a leak occurs in such a system, it does not cause as many problems, but it is quite difficult to determine where it occurred. Self-production does not cost the consumer much. The sun receiving panel, which is covered with glass, heats the air that is between it and the heat-insulating plate. Roughly speaking, this is a flat-plate collector with space for air inside. Cold air enters inside and, under the influence of solar energy, warm air is supplied to the consumer.
A fan, which is attached to the duct or directly to the plate, improves circulation and improves air exchange in the device. The fan requires the use of electricity to operate, which is not very economical.
Such options are durable and reliable and are easier to maintain than devices that use liquid as a coolant. To maintain the desired air temperature in the cellar or to heat a greenhouse with a solar collector, just this option is suitable.
Solar collector for home heating: reviews and recommendations for choosing a device
When choosing a solar collector, you should take into account some nuances. Flat models are more durable than other varieties. However, such structures are not suitable for repair. A minor breakdown can damage the entire absorption system, which leads to the cost of purchasing a new one. You can save money by making a flat solar water heater with your own hands, which heats the coolant 30-40 °C above the ambient temperature.
Vacuum solar heating systems are very sensitive to external influences and are more susceptible to damage, which is due to the fragility of hollow pipes. However, if one of the flasks fails, it can be replaced with a new one. This collector is much more efficient in winter than the flat version, since it provides heating over a wider range and is able to maintain the temperature for a long time.
The performance of a vacuum manifold depends on the size of the tubes. The shorter they are, the less thermal energy generation. The best option is a system with several flasks 2 m long and 6 cm wide. To ensure effective thermogenesis, a straight or U-shaped insert should be located in the inside of the flask.
Air options have a simple design, rarely require repairs, and can withstand very low temperatures. Their service life exceeds the service life of other systems. However, they do not heat the room very well.
It is important to choose the right location to install the system. A DIY solar water heater must be placed on the south side or with a deviation of 30° from it. Measures must be taken to remove precipitation during the winter period. The device can be positioned vertically, which will eliminate the problems associated with clearing snow from the collector. However, this situation will negatively affect the efficiency of the heater.
How it works
The collector collects energy using a light accumulator or, in other words, a solar receiving panel, which transmits light to an accumulating metal plate, where solar energy is converted into thermal energy.
The plate transfers heat to the coolant, which can be either liquid or air. Water is sent through pipes to the consumer. With the help of such a collector you can heat your home, heat water for various household purposes or a swimming pool. Air collectors are used mainly for heating a room or preheating the air inside it. The savings when using such devices are obvious. Firstly, there is no need to use any fuel, and secondly, electricity consumption is reduced.
In order to get the maximum effect from using the collector and heat water for free for seven months of the year, it must have a large surface area and additional heat exchange devices.
We equip housing correctly
To preserve heat in the house, you should pay attention to the choice of interior doors. Where can you buy interior doors so that you don’t regret your purchase for a minute? How to protect yourself from possible counterfeits and unscrupulous manufacturers? What to do if you are ready to invest a sufficient amount of money to buy interior doors, but are not inclined to trust specialists with low qualifications? The conclusion in this case is simple - turn to the services of a company that sells a wide range of models of interior doors, represented by various design solutions and manufacturers. Our range is constantly expanding and updating, and the high qualifications of our staff are beyond doubt.
In our store you can always find interior doors designed in line with the main trends of traditional classics or corresponding to one of the many trends in modern interior design. Each product is not only equipped with reliable, functional and effective fittings, but also has a certificate of quality compliance with the main existing standards. By purchasing interior doors from us, you thereby give preference to absolutely harmless products made from environmentally friendly raw materials.
Collector Stanilova
Engineer Stanislav Stanilov presented the world with the most versatile solar collector design. The main idea of using the device he developed is to obtain thermal energy by creating a greenhouse effect inside the collector.
Collector design
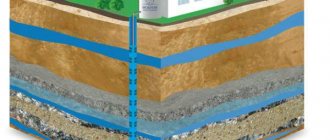
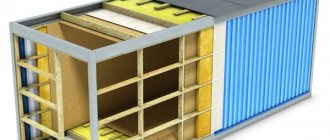
The design of this collector is very simple. Essentially, this is a solar collector made of steel pipes welded into a radiator, which is placed in a wooden container protected by thermal insulation. Mineral wool, polystyrene foam, and polystyrene can be used as thermal insulation materials.
A galvanized metal sheet is placed at the bottom of the box, on which the radiator is mounted. Both the sheet and the radiator are painted black, and the box itself is covered with white paint. Of course, the container is covered with a glass lid, which is well sealed.
Materials and parts for manufacturing
To build such a homemade solar collector for heating a house you will need:
- glass that will serve as a lid. Its size will depend on the dimensions of the box. For good efficiency, it is better to select glass measuring 1700 mm by 700 mm;
- glass frame - you can weld it yourself from corners or put together from wooden planks;
- board for the box. Here you can use any boards, even from dismantling old furniture or plank floors;
- rental corner;
- coupling;
- pipes for radiator assembly;
- clamps for attaching the radiator;
- galvanized iron sheet;
- radiator inlet and outlet pipes;
- tank with a volume of 200−300 liters;
- aqua chamber;
- thermal insulation (sheets of polystyrene foam, expanded polystyrene, mineral wool, ecowool).
Stages of work
Stages of making a Stanilov collector with your own hands:
- A container is made from boards, the bottom of which is reinforced with beams.
- A heat insulator is placed at the bottom. The base must be especially carefully insulated to avoid heat leakage from the heat exchanger.
- Afterwards, a galvanized plate is placed at the bottom of the box and a radiator is installed, which is welded from pipes, and secured with steel clamps.
- The radiator and the sheet underneath are painted black, and the box is painted white or silver.
- The water tank should be installed under the collector in a warm room. Between the water tank and the collector you need to install thermal insulation to keep the pipes warm. The tank can be placed in a large barrel into which expanded clay, sand, sawdust, etc. can be poured. and thus insulate.
- An aqua chamber must be installed above the tank to create pressure in the network.
- Do-it-yourself solar collector installation should be done on the south side of the roof.
- After all the elements of the system are ready and installed, you need to connect them into a network with half-inch pipes, which must be well insulated in order to reduce heat loss.
- It would be a good idea to build a controller for the solar collector with your own hands, since factory devices do not last long.
Features of gluing PVC pipes
To obtain a high-quality cut, it is better to use a pipe cutter equipped with rollers. After cutting, the inside of the pipe must be chamfered using special chamfer cutters.
After measuring the depth of the tees and angles, you need to place a mark on the end of the pipe being connected and treat the ends of the pipes and fittings with a primer (cleaning agent).
Thanks to the smooth movement of the cutting part, the roller pipe cutter allows you to avoid cross-section deformations and the formation of burrs along the edge when cutting
The next step is to apply and spread the glue around the outside of the pipe and the inside of the fitting. The glue must be applied with a brush, and its size should be smaller than the diameter of the pipes. All that remains is to insert the pipe into the prepared tee or corner and turn it a quarter turn to evenly distribute the glue.
It should be taken into account that the work of gluing one corner or tee should be completed in no longer than 30 seconds. After fixing, it is necessary to remove any remaining adhesive.
Size calculation
Calculation of dimensions in order to make a solar collector for heating with your own hands is, first of all, aimed at determining the load of the heating system, the coverage of which is assumed by this device. It goes without saying that this implies the use of several energy sources in combination, and not just solar energy. In this matter, it is important to arrange the system in such a way that it interacts with others - then this will give the maximum effect.
To determine the collector area, you need to know for what purposes it will be used: heating, water heating, or both. By analyzing water meter data, heating needs and insolation data of the area in which installation is planned, the collector area can be calculated. In addition, it is necessary to take into account the hot water needs of all consumers that are planned to be connected to the network: washing machine, dishwasher, etc.
Price and payback
From a financial point of view, solar solar collectors must be considered an investment. The payback period can vary from several months to several years. It depends on when and how many times the system will be used. The service life of solar solar collectors can be more than 30 years. But they will pay for themselves in any case, given that they require virtually no maintenance.
The performance of the entire system depends entirely on the quality of each element and correct installation. Solar solar collectors will not be able to work at full capacity if the rest of the equipment is incorrectly selected. Installation and design are best left to professionals.
Selective coating
Selective coating performs perhaps the most basic function in the operation of a collector. A coated plate or radiator attracts many times more solar energy, converting it into heat. You can purchase a special chemical as a selective coating, or you can simply paint the heat storage tank black.
To make a selective coating for solar collectors with your own hands, you can use:
- special finished chemical;
- oxides of various metals;
- thin thermal insulation material;
- black chrome;
- selective paint for the collector;
- black paint or film.
Application specifics
Unlike heat generators and heat pumps, which convert energy from groundwater and air masses warmed by the sun, solar collectors operate from direct sunlight acting on their surface. The only nuance of solar collectors is that at night they are in passive mode.
The daily performance of a solar installation is influenced by factors such as:
- Length of daylight , which in turn depends on the geographic latitude of the region and the time of year. So, for example, in the central part of Russia, the solar collector will function at its maximum in summer, and at its minimum in winter. This is due not only to the length of the day, but also to the change in the angle of incidence of sunlight on the solar panels;
- Climatic features of the region. As a rule, on the territory of our country there are many areas over which for more than 200 days a year the sun is hidden behind layers of clouds or behind a veil of fog. Despite the fact that the solar collector can capture even scattered sunlight, in cloudy weather its productivity is significantly reduced.
Collectors from scrap materials
Assembling a solar collector for heating a house with your own hands is both cheaper and more interesting, because it can be made from various available materials.
From metal pipes
This assembly option is similar to the Stanilov manifold. When assembling a solar collector from copper pipes with your own hands, a radiator is welded from the pipes and placed in a wooden box lined with thermal insulation from the inside.
Copper pipes will be the most effective; aluminum pipes can also be used, but they are difficult to weld, but steel pipes are the most successful option.
Such a homemade collector should not be too large so that it is easy to assemble and install. The diameter of the pipes on solar collectors for radiator welding should be smaller than that of the pipes for coolant input and output.
From plastic and metal-plastic pipes
How to make a solar collector with your own hands, having plastic pipes in your home arsenal? They are less effective as a heat storage device, but are several times cheaper than copper and do not corrode like steel.
The pipes are laid out in a box in a spiral and secured with clamps. They can be coated with black or selective paint for greater effectiveness.
You can experiment with pipe laying. Since pipes bend poorly, they can be laid not only in a spiral, but also in a zigzag. Among the advantages, plastic pipes can be easily and quickly soldered.
From the hose
To make a solar collector for a shower with your own hands, you will need a rubber hose. The water in it heats up very quickly, so it can also be used as a heat exchanger. This is the most economical option when making a collector yourself. A hose or polyethylene pipe is placed in a box and secured with clamps.
Since the hose is twisted in a spiral, natural circulation of water will not occur in it. To use a water storage tank in this system, it must be equipped with a circulation pump. If this is a summer cottage and little hot water is consumed, then the amount that flows into the pipe may be sufficient.
From cans
The coolant of a solar collector made from aluminum cans is air. The cans are connected to each other to form a pipe. To make a solar collector from beer cans, you need to cut off the bottom and top of each can, dock them together and glue them with sealant. The finished pipes are placed in a wooden box and covered with glass.
Basically, an air solar collector made from beer cans is used to eliminate dampness in the basement or to heat a greenhouse. Not only beer cans, but also plastic bottles can be used as a heat storage device.
From the refrigerator
You can make your own solar water heating panels from an unusable refrigerator or the radiator of an old car. The condenser removed from the refrigerator must be rinsed thoroughly. Hot water obtained in this way is best used only for technical purposes.
Foil and a rubber mat are spread on the bottom of the box, then the capacitor is placed on them and secured. To do this, you can use belts, clamps, or the fastening with which it was attached in the refrigerator. To create pressure in the system, it would not hurt to install a pump or aqua chamber above the tank.
Option with two barrels
What is required for the solar collector (in this example, the area is 1 sq. m):
- corrugated “fifteenth” pipe;
- water will flow into a 160 liter tank with 1 cm foam insulation.
The difference between the point of intake and the entrance to the collector is 2 m.
The water discharge point has been moved from the top to the bottom third of the tank. This way the warm and cold layers mix better. Reaches +45... +50° on sunny days, on cloudy days - +35° C.
Two 160 liter barrels are tied with polypropylene pipes - they are easier to work with than metal-plastic ones. The system operates on the thermosiphon principle, convection: hot liquid goes up, cold liquid goes down. No pump, fuel or electricity is required; circulation occurs automatically.
They build a frame from a pipe for the solar collector, tilt 45°, orientation - strictly south. They make stands for barrels.
The hot water barrel can be equipped with a heating element so as not to be left without water on cloudy days. At the bottom of this tank there are 3 outlets: 2 for the line from the solar collector (warm water is pumped into the tank, cold water is returned to it). The third conclusion is for the shower mixer. The pipes, additionally insulated, are connected by American connections, that is, they can be disconnected if necessary, without damaging the elements, by simply unscrewing. It’s also more convenient to assemble the system right on site.
Ordinary garden hoses, insulated with foamed polyethylene, are laid from the tanks to the mixer; they are fixed to the fittings with ordinary clamps. These hoses are combined in front of the mixer: a shunt with a ball valve is installed. This element is for comfort: if you run out of warm water, you can open the valve on the shunt and the liquid level in the tanks is equalized, and when it is supplied, both barrels are filled equally, eliminating the need for separate filling.
The tap is closed after filling the tanks. Then the system functions like this: cold liquid enters the manifold through its lower pipe, expands when heated in it, rises and through the upper pipe goes to the storage tank, and from there to the shower. It is important that the barrels are located 0.5–1.5 m above the collector. It is necessary to organize the intake of water from the warm upper layers, for which a corrugated intake hose (can be taken from a washing machine) is equipped with a foam float.
To monitor the amount of liquid, a transparent tube with a black float is inserted into the warm water tank (heat accumulator). The tanks are insulated with penofol - 2 layers of 5 mm each. The warm container was covered with a 5 cm thick circle of EPS.
The above insulation is not particularly effective, it can be used for the period of preparation of a more thorough finishing, consisting of 100 mm mineral wool, 5 cm polystyrene foam. This element is extremely important: the barrel will work on the principle of a thermos, it will cool down by only a few degrees per day, which will make it possible use warm liquid at night.
How the system works: an example from real experience
The solar collector system with shower described above showed itself to be excellent even in the not particularly warm, compared to the South, climate of the Moscow region. In the evening, the tanks are filled with 120–130 liters. The sun starts heating them and the solar collector at 8:30 or earlier. In our case, until this time the shadow of the house was falling. By 18:00 the rays begin to lie tangentially - the efficiency decreases.
Result: 120 liters, poured from a well with t° +8 at an air t° of +22...+24, by 15:00 they warm up to +45° C. By 17:00 - up to +52° C. On cloudy days at The temperature of the environment is 18–20° C and reaches +35° C. The heating is quite enough for a well-warm shower. It should be taken into account that insulation can be improved. In 5 months savings on your electricity bill reaches RUB 3,500.