The accumulation of moisture in the cellar always negatively affects both the objects and products stored in it, and the structure of the building itself. Therefore, every owner should know if water accumulates in the basement of a private house, what to do and how to protect the property. “Plumber Portal” will tell you about the main ways to protect and drain the cellar from groundwater, precipitation and excess moisture. But first we need to know the reasons why the basement is leaking.
Reasons for collecting water in the cellar
To find out how to get rid of water in the cellar, you need to determine the reason why it gets there.
The main reasons for the accumulation of excess moisture in the basement are as follows:
- the appearance of cracks in the foundation of a private house. Cracks in the foundation of a building appear as a result of violations of the construction technology of the foundation of the house. Even if the cracks are microscopic, moisture penetrates into the cellar through the smallest capillaries, causing mildew to appear and mold and mildew to multiply;
- increase in groundwater level. If the basement waterproofing was not done well, then when the groundwater level rises, moisture accumulates in the basement, also causing damage to the foundation;
- seasonal heavy rainfall. The main source of groundwater is heavy rain and melting snow.
When a basement frequently floods, calcium is removed from the concrete in the building structure, reducing its strength and reliability. To avoid the destruction of a building, you need to know how to get rid of water in the cellar of a garage or residential building.
Lighting
Electrical wiring in the cellar is carried out externally. The wires must be placed in cable channels. Experts recommend using double-insulated copper wiring for the cellar. The switch is placed in a dry place, usually at the entrance. Sockets in the cellar cannot be installed categorically. The lamp must have a moisture-proof lamp with a degree of protection against moisture of at least IP44. If the basement is damp, then the lighting should be safe. Install a 220/12 Volt step-down transformer and a 10 mA RCD. If the ceiling is low, it is more advisable to place the lampshade on the wall of the cellar.
Construction of a cellar: video
Cellar at the dacha: photo
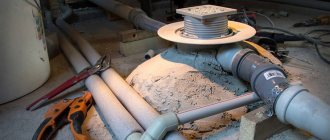
How to get rid of water using a pump
What to do if flooding has already occurred, how to pump out water from basements? The easiest way to do this is to use a drainage pump. Even if you do not have such equipment, then in almost any city there are organizations that rent pumps or provide water pumping services for a very reasonable price.
To remove liquid accumulated in the cellar yourself using a drainage pump, follow these instructions:
- Make a recess in the center of the room below floor level. Insert a plastic barrel or other vessel into it, which will serve as a caisson.
- Make several perforated holes in the sides of the tank walls.
- To prevent liquid from getting into the holes, wrap the barrel with waterproof cloth.
- Place a layer of fine gravel at the bottom of the vessel, which will act as a foundation for the pumping equipment.
- Then install the pump inside the caisson, and fill the wall space with concrete mortar.
- Connect a liquid suction hose and a liquid discharge pipe to the device.
- When the recess begins to fill with water, a special float will determine the liquid level, and the pump will automatically start working, pumping out unnecessary moisture.
- When the water is pumped out, the float will lower and the pump motor will turn off.
In this way, you can prevent flooding of the basement and preserve the property located in it. In addition, a drainage pump can quickly dry the foundation of a building and get rid of accumulated moisture. Even if some water remains in the cellar, a properly equipped ventilation system will remove excess moisture and dampness.
Ventilation device
High-quality ventilation will prevent the formation of mold, rotting of root crops and ensure optimal humidity in the cellar. Otherwise, only souvenir photos will be left of the harvest.
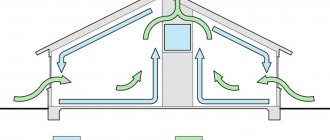
You will need two plastic or galvanized pipes with a diameter of 15 cm. One pipe will provide air flow, and the second will provide exhaust. Exhaust occurs naturally when there is a difference in air temperature between the cellar and the street. The pipes are located in different corners of the cellar.
Cellar ventilation
The exhaust pipe is installed under the ceiling of the cellar, the upper end is located 50 cm above the roof level. The supply pipe is mounted 10 - 15 cm above the floor level, the upper end is located 30 cm above the ground level. Valves are installed in the pipes to regulate air flow and meshes to prevent rodents from entering the room from the street.
For large cellars, the cross-section of the pipes is calculated using the formula; it is possible that forced ventilation will even be required.
If the basement is leaking, build a pit!
When the basement constantly leaks, what should you do in this case? The most effective way is to build a pit inside the cellar of a private house. This is a budget and less troublesome option for a drainage system.
To build a pit correctly, https://santehnikportal.ru recommends following our instructions:
- Dig a square hole right in the center of the cellar, with a volume of at least 1 cubic meter. The larger the room, the larger the pit should be.
- In the center of the recess, make another hole approximately the size of a 10-12 liter bucket.
- Lower an enameled or galvanized bucket into the recess and carefully compact the soil around it.
- Line the walls of the pit with solid bricks, and then fill with a layer of cement mortar 2-3 cm thick.
- Place a grid of reinforcement on top with such a cell size that you can use a pump or manually, for example, with a mug, to pump water out of the bucket.
- For drainage in the pit, make small grooves or lay tiles. The joints between the parts will serve as grooves for liquid drainage.
As you can see, it’s very simple to make a simple drainage system if the basement is constantly leaking, the main thing is to do everything step by step and according to the rules.
Basement waterproofing
A high-quality water barrier will help ensure waterproofing of floors and walls. Typically, waterproofing layers contain three layers: penetrating waterproofing, mastic, and plaster. All three layers are applied with a reserve in height, since it can be quite difficult to predict the height of flooding.
What we need for high-quality waterproofing:
- First, let's purchase materials for waterproofing (for example, Penetron or Hydrotex).
- You will need bitumen mastic, waterproof cement, sand and mesh for plaster.
- From the tools we will take a spatula, a hard brush and a container for preparing the solution.
- And finally, we will need a clean, prepared room, from which, if necessary, we need to pump out water.
Installation of waterproofing:
- First, we treat the walls and concrete floor with waterproofing. This composition has the property of being absorbed to a great depth and closing cracks.
- Bitumen mastic will hide the joints and seams of concrete structures. Finally, apply an even layer of a couple of centimeters of mastic to the remaining surfaces.
- For better fastening of the plaster, a mesh should be installed on the wall. The plaster itself should be applied in an even layer, 3 cm thick.
- Finally, the mesh on the floor is poured with cement mortar. And when all the plaster has dried, we can consider that the waterproofing process is complete!
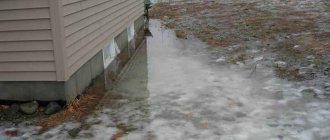
Protecting the cellar from groundwater
A common problem that owners of private houses face: groundwater in the basement, what to do in this case?
Since the main cause of flooding is the rise in groundwater levels as a result of seasonal precipitation, two methods can be used to protect the basement from groundwater:
- Arrange a ring drainage around the walls of the structure at the level of the base of the foundation.
- Make high-quality waterproofing of the walls and floor of the cellar.
An external drainage system is the most effective way to protect a basement from flooding, but it is also the most technically complex and expensive. But in the end, you will get the best protection against basement flooding.
To install an external drainage system, follow the following procedure:
- Along the perimeter of the house, retreating 30-70 cm from the foundation, dig a trench approximately 100-120 cm wide.
- Make additional bends about 5 meters long on four sides of the trench.
- At the end of each additional bend, make a recess to install a concrete ring.
- Cover the bottom of the main trench with geotextiles.
- Lay a drainage pipe on top of the geotextile substrate and install inspection wells every 7 meters
- Then fill the pipe with several layers of the following materials:
- the first layer of crushed stone is filled to a level 10 centimeters before the end of the foundation;
- a second layer of sand to the top of the building’s foundation;
- the third layer of coarse crushed stone to a level 15 centimeters before the end of the soil.
- Then fill the crushed stone with a layer of concrete mortar up to the ground level.
Properly executed external drainage, together with high-quality internal waterproofing and a ventilation system, will help avoid flooding of the basement.
In addition, the synthesis of functional systems will help create an optimal microclimate and help dry out the basement in case of increased humidity.
DIY floor slab
You can buy a factory-made floor slab, or you can make it yourself. The slab will rest on the walls of the cellar.
We produce wooden formwork. We place the I-beam and lay asbestos-cement sheets. We pour a layer of crushed stone on top of them and support a reinforcing mesh of wire with a diameter of 10 mm on the I-beam and walls. We tie the wire so that we get cells measuring 10 x 10 cm. Fill it with concrete and, after complete hardening, waterproof it.
Creating a concrete floor over the cellar
Drainage system from the basement and foundation
The surface drainage system will protect the basement and foundation from flooding by seasonal natural precipitation - rain or melting snow.
The choice of one or another method of eliminating water in the basement depends on many factors: the terrain, the depth of groundwater, the chemical composition of the soil and other factors.
There are three types of drainage, each of which has its own characteristics:
- Wall-mounted. The arrangement of this type of drainage system is necessary for those buildings where there is a basement or basement. Its arrangement is carried out immediately after the foundation of the house is poured and hardened.
- Trench, or ring. Such drainage can be easily organized with your own hands. It looks like a deep trench dug around the house.
Important! Ring or trench drainage should be 0.4-0.5 meters below the level of the building foundation.
- Plast. The drainage layer system is laid at the stage of digging a pit for the future structure. It is rarely used in modern construction, as it is used only in slab construction.
When choosing one or another way to remove water from your home, you must proceed from your own capabilities and architectural features of the building. The trench system is considered the most effective.
Walling
Building walls is one of the simplest tasks: they are simply built to the required height from the selected material.
If the walls are assembled from individual bricks or blocks, then a water-repellent additive must be added to the cement mortar for the joints, prepared from the same cement, that was used to fill the bottom.
Monolithic walls should be filled with the same composition as the bottom.
However, for better waterproofing, it is much more convenient to build walls from blocks, since they can be coated on the outside with special liquid rubber, which causes the material to absorb water and collapse.
It also wouldn’t hurt to cover the finished walls with a layer of waterproofing.
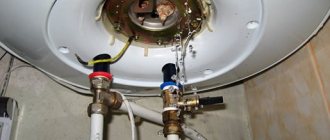
How to drain a basement after a flood?
What to do if the cellar is flooded and how to drain the basements, because accumulated water in the basement is a violation of the comfort of living and a serious threat to the reliability of the entire structure.
Important tips for basement flooding include a few things:
- Choose the right fertilizers. As soon as water appears in the basement, you need to remove the liquid. If the flooding is minor, then dry the wet areas using towels and a mop. In case of deep flooding, equipment must be used: sump pump, water vacuum.
- Remove the liquid. Pumping equipment will need an outlet to pump out water. If the crawl space is flooded, then the drains in the basement may not be able to be drained. You will need a hose to attach to the pump to lead it through windows or doors to drain the liquid.
- Dry the room. If the rainstorm has stopped, open the windows to remove moisture from the room. Once the water has been removed from the basement floor, it is time to start drying the area. If your heating operation has not been affected by the flood, turn the heat up to a higher temperature to help with the drying process.
Don't forget to open the windows so that the moisture in the air also evaporates. And also use a fan to circulate the air to speed up the drying process.
Another way to dry out the cellar is to use a dehumidifier. When operating this equipment, be sure to close windows and doors to ensure efficient operation. When the dehumidifier has finished removing moisture in one area, move it to another area.
Additives for concrete
Universal complex antifreeze additive for concrete.
Complex antifreeze additive for work at subzero temperatures
Multifunctional special additive for foundation work.
Highly effective complex additive for masonry and other building mortars.
Universal superplasticizing and superwater-reducing additive for concrete.
All-purpose concentrated cleaner for removing efflorescence, grout and rust
Waterproofing additive for concrete.
Complex moisture-repellent agent for surface treatment.
Universal protective impregnating agent for concrete and other building materials.
Multifunctional plasticizing and water-reducing additive for concrete.
Elasticizing additive and construction adhesive
CemFix
Basalt fiber
Basalt fiber (from roving) is intended for volumetric reinforcement of concrete, mortars and composite materials.
Universal polypropylene reinforcing fiber for adding to the solution.
Prevention measures
To get rid of water and avoid such a problem in the future, take all measures to arrange high-quality drainage in a timely manner. There are several methods to keep your basement dry and avoid flooding:
- Focus on prevention. Before a flood situation arises, you need to inspect your property inside and out and determine what options there are for rainwater to escape from your home.
- Remove leaves from your gutter in spring and fall. Blocked channels cause all the water on the roof to flow onto the foundation, increasing the likelihood of basement flooding.
- Stretch a rain gutter outside the house, it can be hidden in a pit. To fix the part, strengthen it with mortar using a small concrete plant, which is located on the site. Do not connect drainpipes to underground dry wells. This will lead to the fact that the water on the roof will further saturate the ground and in the future the liquid cannot be stopped; it will reach the basement.
- During a heavy rainfall, watch the water accumulate around the house and see the underlying flow of the liquid. If surface water is directed toward a built home, contact a local contractor for tips on how to protect the yard so that water is directed away from the structure.
Thus, if water accumulates in the basement of a private house, what to do is known: create high-quality waterproofing and drainage system. Drainage will take the brunt of heavy rains, melting snow, groundwater, and high-quality external or internal waterproofing will protect the cellar from water seeping through the pores of concrete, from dampness and flooding of the room.
Preventing dampness
As usual, this “disease” is easier (and cheaper) to prevent than to treat. Still being decided at the design stage:
- If groundwater is close or its level rises significantly in spring/autumn, external waterproofing is necessary. Liquid compounds are applied to the outside walls (better) or rolled ones are fused (cheaper, but less effective).
- If the cellar is being built on a slope, a drainage pipe must be laid in the ground above it, which will drain the precipitation flowing down the slope.
- A blind area is made around the cellar (or the building under which it is located), which removes precipitation flowing from the roof.
- Inside the cellar, in opposite corners, there must be two ventilation pipes with a diameter of at least 125 mm. One of them ends at floor level - 10 cm higher. Air from the street or room enters through it (supply pipe). The second ends almost at the ceiling - 10 cm below its level. This is a hood. Ventilation pipes on the street should be covered with umbrellas to prevent leaves and precipitation from getting into them. The exhaust pipe (the one that ends near the ceiling) should be higher and it is better to install a deflector on it to activate the draft. It can be painted black: due to heating from the sun, the draft should be better. Another subtlety: for good traction, ventilation ducts with natural air movement must be straight. If it is necessary to make a bend to the side, its angle of inclination must be at least 60° relative to the horizon, and the length of the inclined section should not exceed 100 cm.
- Between the room located above and the basement there should be a vapor barrier that prevents moisture from penetrating both from the basement and into the basement.
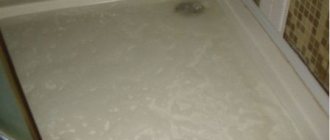
Inspecting the floor
Very often the floor in the cellar is made of earth. This is often the source of excess moisture. Through it, the moisture contained in the soil gets inside. To reduce humidity in the cellar, you need to level the earthen floor, compact it and cover it with thick plastic film. You can use roofing felt, but it breaks more often. Although it seems more durable, it breaks due to less elasticity.
There is no need to pour sand or soil on top of the film. Sometimes there is a large amount of water in the basement (accidental flooding). Then you simply remove the film, the water goes partly into the ground, partly evaporates through the ventilation. After the dampness has gone, you can re-cover the floor. If there is earth or sand on top, you will need to poke around in this slurry, extracting the film.
If the floor in the cellar is earthen, most of the moisture enters through it
If after laying the film the humidity level in the cellar has decreased, then you have found the reason. You can leave everything as is, just change the “flooring” periodically, or you can make a concrete floor with full waterproofing. The choice is yours. To prevent the film from tearing when people walk on it, knock down the wooden panels and throw them on the floor.
Improving waterproofing
The second reason why humidity increases in the basement is an insufficient degree of vapor barrier or waterproofing of the walls. This usually occurs if the cellar is lined with brick, especially silicate brick. The material is very hygroscopic and allows water vapor to pass through well. They settle in drops on the ceiling and all objects.
The problem can be solved if you make good external waterproofing: dig out the walls and apply bitumen mastic in two layers. Previously, they were coated with resin, but mastic is more effective and easier to handle.
Brick walls require additional waterproofing
But excavation work is not always a joy, and it’s not always possible to dig out the walls. In this case, you can make internal waterproofing of the cellar walls. For this purpose, there are cement-based impregnations: “Pnetron”, “Kalmatron”, “Hydrotex”, etc. They penetrate to a depth of up to half a meter into the thickness of the material (concrete, brick, etc.) and block the capillaries through which water seeps. Water permeability decreases significantly. Their only drawback is the price. But they are really effective.
All these measures will prevent the appearance of high humidity in the basement. But what to do if there is already moisture, how to dry the cellar? Next, we’ll look at ways to reduce humidity.
External drainage
Along the entire perimeter of the future structure, it is necessary to dig drainage trenches about 40 cm wide, preferably 20-30 cm below the proposed base.
It is necessary to dig trenches at a slight slope so that the water drains faster, and to make digging easier and the bottom does not wash away, you need to dig so that the shovel goes towards the flow of water.
Then, at the bottom of the trench, a compacted sand cushion is created, which is covered with geotextile to prevent mixing of layers.
It is important to remember that some inexpensive types of geotextiles conduct water in only one direction, which must coincide with the direction of water flow in the trenches. Larger drainage material in the form of pebbles, expanded clay or crushed stone is laid on top of the geotextile
Larger drainage material in the form of pebbles, expanded clay or crushed stone is laid on top of the geotextile.
Special drainage pipes made of asbestos or polymers, equipped with holes on top or on all sides, are laid in prepared trenches and connected into a single system.
If there is too much groundwater, then it is likely that at the place of its main exit from the drainage pipe system it is necessary to dig a special reservoir into which it will flow during a flood or after rains, and then seep out of it back into the ground.
The storage tank will also have to be protected from the soil sliding with geotextiles, concrete walls or a large plastic container.
When filling drainage trenches with pipes, the operation is repeated: first sand, then geotextiles, then gravel.
The area under the bottom of the cellar is leveled with gravel. The advantage of external drainage is that it removes water before it reaches the structure, but requires a little more excavation.