Almost all equipment in a modern apartment runs on electricity. The location of light switches and sockets for electrical appliances, the correct installation of electrical wiring in the apartment is the key not only to comfort in everyday life, but also to a guarantee of safety from short circuits and fires.
Any renovation in an apartment must begin with planning the location of the main electrical appliances, creating diagrams and then laying wires. This article will discuss various options for electrical wiring diagrams, the pros and cons of one or another solution, and step-by-step instructions for proper wiring.
Important nuances when laying country wiring
When planning the installation of electrical conductors in a suburban area, you should decide on the scope of work. A full replacement or restoration of the existing network can be carried out. In any case, it is recommended to follow the following rules:
- Distribution boxes, electricity meter, switches and sockets should be located in easily accessible places.
- Switches must be installed so that they are not blocked when the door leaf is opened. Switches are installed at a height ranging from 60 to 150 cm.
- Sockets are installed at a sufficient distance from the water supply system and heating devices at a height of at least 50 cm from the floor.
- Power wires to sockets are supplied from bottom to top, and to switches - from top to bottom.
- Direct connections of copper and aluminum conductors are not allowed.
- It is necessary to exclude the location of sockets in rooms with high humidity (bathrooms and restrooms);
- The wiring must be laid according to the prepared diagram, which is recommended to be saved.
Placing distribution boxes in a wooden house
All work is carried out in compliance with safety precautions.
Connecting wires
When cables are inserted into the distribution block, the main insulating material splits, freeing the cores. Each individual group is connected using clamps. Approximately 15-20 mm of insulation is removed from all conductors. The crimping or soldering method is ideal for connecting copper cables. After this, the wiring is neatly placed in the box. Connection blocks must be hermetically sealed to prevent metal corrosion. It is necessary to thoroughly approach the grounding of all common structural elements without breaking the circuit.
External electrical wiring is easy to install and maintain; using a variety of products, you can achieve an attractive appearance. However, compared to hidden wiring, it is less safe. If there are small children in the house, then the cables must be laid in hard-to-reach places, for example along the ceiling, or carefully hidden in special devices.
Problems caused by the location of the summer cottage
Most holiday villages are located outside the city. At the same time, old power lines are usually used to power them. They are not designed to withstand large flows of electrical energy that arise due to the use of a variety of household appliances. This is accompanied by periodic interruptions in electrical networks, which can lead to failure of equipment installed at the dacha. To eliminate this problem, you will need to use highly sensitive circuit breakers and voltage stabilizers.
Voltage stabilizer for a private home
The condition of the wiring of a summer cottage is strongly influenced by the frequency of stay in it. This fact must be taken into account when choosing a wiring method, since without heating in winter, moisture will accumulate inside the room. Oxidation of the contact connections will gradually occur, which will lead to a short circuit, and as a result, the need for restoration work.
Important! Taking into account the fact that the dacha plot is private property, the owners must take care of the installation of the grounding loop and lightning rod themselves.
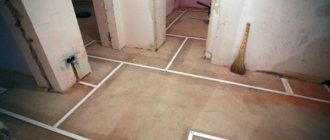
Installation of hidden electrical wiring in walls
Hidden electrical wiring is installed following the following steps:
- The line for laying the electrical route is marked and the tracing is done. At this stage, you can use existing voids in the walls;
- Next, the walls are grooved according to the markings, niches are made in the walls for installing electrical sockets;
- The room is put in order;
- In places where electrical outlets are installed, mounting boxes (plastic cups for outlets) are attached. Installation areas for mounting switches are also equipped;
- The wire is inserted into the socket boxes; for the socket blocks, not a wire, but a cable is used. The length of the free ends of the wire according to the requirements of SNiP ≥ 150 mm.
Electrical wiring and cables for low-current circuits (communication lines, TV cable, surveillance systems) are supplied through separate grooves; it is allowed to lay them parallel to power lines. The cable channel should be laid without twisting the wires.
Before attaching wiring to electricity distribution points, it is necessary to secure all wiring with alabaster or plaster in grooves. The channels are leveled from above with plaster. Small cross grooves can be connected to each other with plaster immediately after laying the power lines.
If the electrical wiring diagram provides for the installation of junction boxes, then the wires. Which went into the box should first be unsoldered, all connections checked for contact and strength, the junction boxes themselves should be tightly and firmly closed.
The wire is passed into corrugated (cemented) pipes after all surfaces are plastered and puttied.
Installation of electrical sockets and switches is carried out only after completion of final repair work.
What type of wiring to use at the dacha
To determine the best option, you should familiarize yourself with each of them separately. At the dacha you can use open and closed wiring. Each option has its own pros and cons that must be taken into account for the final choice. There are also differences in installation.
Open gasket
This option involves an open arrangement of cable lines (CL) directly on the walls of the dacha, including on top of finishing materials. Special protective boxes can be used, which are made in different colors. This will allow you to match the elements to the color of the design. The main advantage of open wiring is quick installation. There is also the possibility of trouble-free troubleshooting and installation of additional power points.
Open wiring in cable channels
The only negative point is the aesthetic side. All installed wiring is visually accessible, which some owners of country estates may not like.
It is rational to use open wiring in dachas that are used exclusively in the summer.
Hidden gasket
It is impossible to use this wiring option in dachas with wooden walls without finishing. Closed wiring involves laying cables in grooves, which are subsequently hidden under a layer of plaster. This will require more time and effort, but you will be able to achieve an aesthetic appearance.
Closed wiring is accompanied by increased safety. But in case of damage to individual supply cores, it is necessary to remove the finishing layer.
Hidden electrical wiring device
What materials are needed for installing open wiring?
Cable ducts are fastened with ordinary hardware, or even simply with adhesive tape. Vintage and other “loft” sets are already equipped with no less “vintage” ceramic rollers and clips. For other methods, you will have to select fastener kits.
Corrugated pipes and cable pipes can be conveniently mounted on special clamps.
They have a standard configuration and allow you to neatly organize “paths” from any number of wires.
Fastening of wires and cables directly to the wall is also carried out using quick-installation clips.
For any size and shape. We simply drill a hole in the wall and drive the fastener there.
Ready-made cable ladders are also easy to install.
Although at home you rarely see such a picture.
Preparing the wiring diagram
To draw up a power distribution diagram at your dacha, you can use two options:
- classic - using a regular pencil and paper;
- modern - using specialized computer programs.
When performing work, it is not necessary to comply with established norms and rules. It is enough to accurately display the installation locations of switches, sockets, lamps, equipment, junction boxes, as well as the location of cable lines. It is first recommended to draw a schematic plan of a country house.
Electrical wiring diagram in a country house
Line layout diagrams
The principle of wiring power lines is simple - the higher the load, the thicker the wire or cable should be. At the entrance to the apartment, the cable must have the largest cross-section, since the entire apartment load falls on it. For branches to distribution points and lighting, a wire of a smaller cross-section is used.
Based on these requirements, three electrical wiring options were developed:
- Daisy chain circuit (bus connection). This is the laying of a common power line with a large cross-section cable, from which branches are laid through distribution boxes to consumers;
- The radial scheme is considered more reliable. It is implemented as a supply of separate wires from the distribution board to each point of distribution or consumption. The disadvantage of the scheme is the high consumption of wire or cable;
- The last scheme is a combined one, assembled on the basis of a loop and a radial one.
In new buildings, combined wiring is used, in houses of old construction - the first two variants of circuits.
Important! You cannot hide electrical wiring in the joints and seams of walls - PUE Chapter 7.1.
Determination of design loads
After drawing up a preliminary wiring diagram for a suburban estate, you should begin calculating the load. To do this, you will need to take into account the power of all electrical appliances, as well as lighting lamps. To minimize costs for cable lines, it is recommended to divide electricity consumers into several groups. The formation of groups is carried out taking into account the location and type of equipment.
With the correct calculation of the loads, it will be possible to avoid current overloads of the cable cores, and, accordingly, damage.
Load distribution among consumer groups
Types of terminations
The connection can be boxed or daisy-chained:
- The box type connection has a simple solution - the cable runs through all the rooms of the apartment, and in each individual room, through a junction box (junction box), wires for electricity distribution points, switches and lighting fixtures are routed from the cable. When implementing this connection option, the cost of purchasing wiring is minimal, and this is the main advantage of the method. The disadvantage of this scheme is that there is no physical possibility to control individual local sections of the internal electrical network from an external switchboard;
- Daisy chain wiring is a more modern option, which is why it is often called European. The essence of the scheme is that two cables are supplied from the external switchboard to each individual room: one for connecting lighting devices, the second for distribution points. Each cable is insured by connection through an RCD installed in the panel. The wire consumption when disconnecting with a loop is greater than in the first option, but much safer. Also, daisy chain connection allows for control and monitoring of the internal electrical network.
Selection of the required cable cross-section
After determining the loads of all supply lines, you can begin to select the cross-section of the current-carrying conductors. To do this, it is necessary to divide the calculated rated power by the network voltage, which will determine the current value. Based on the obtained value, the cable line section is selected using tables PUE 1.3.4 and 1.3.5. Using the first, conductors with aluminum conductors are selected, and the second, with copper conductors.
Table PUE 1.3.5 permissible cable currents
The required length of the conductors can be approximately determined from a previously prepared diagram.
Selection of wire cross-section
An incorrect choice of wiring cross-section can lead not only to an overload in the general network, but also to a fire in the local overload area, which often means overheating of the wiring. The tables in this section will help you correctly determine the cross-section and select the type of wiring depending on the loads and characteristics of the wires.
| Number of cores and cross-section | Class | ⌀ with insulation in mm | ⌀ with shell in mm | Ωmin (Ohm) with a wire length of 1.0 km and t = 20°C | Coil length in meters | Wire weight (kg/km) | Dmin bending in mm |
| 3 x 4 | I | 3.73 | 11.62 | 4.61 | 100.0 | 235.19 | 7,5 |
| 3 x 6 | I | 4.22 | 12.67 | 3.08 | 100.0 | 305.92 | 7,5 |
| 3 x 10 | I | 5.46 | 15.34 | 1.83 | bar | 475.30 | 7,5 |
| 3 x 16 | II | 7.02 | 18.69 | 1.15 | bar | 724.59 | 7,5 |
| 4 x 1.5 | I | 2.67 | 10.03 | 12.1 | 100.0 | 153.33 | 7,5 |
| 4 x 2.5 | I | 3.05 | 10.95 | 7.41 | 100.0 | 201.75 | 7,5 |
| 4 x 4 | I | 3.73 | 12.59 | 4.61 | 100.0 | 285.59 | 7,5 |
| 4 x 6 | I | 4.22 | 13.77 | 3.08 | 100.0 | 375.54 | 7,5 |
| 4 x 10 | I | 5.46 | 16.76 | 1.83 | bar | 588.92 | 7,5 |
| 4 x 16 | II | 7.02 | 20.52 | 1.15 | bar | 902.80 | 7,5 |
| 5 x 1.5 | I | 2.67 | 10.81 | 12.1 | 100.0 | 178.58 | 7,5 |
| 5 x 2.5 | I | 3.05 | 11.84 | 7.41 | 100.0 | 237.36 | 7,5 |
| 5 x 4 | I | 3.73 | 13.67 | 4.61 | 100.0 | 338.80 | 7,5 |
| 5 x 6 | I | 4.22 | 14.99 | 3.08 | 100.0 | 448.59 | 7,5 |
| 5 x 10 | I | 5.46 | 18.34 | 1.83 | bar | 707.92 | 7,5 |
| 4 x 16 | II | 7.02 | 22.55 | 1.15 | bar | 1089.41 | 7,5 |
Using the data in the table, you can quickly calculate the wiring cross-section in mm2, based on the maximum load current values:
| Open laying scheme | Section in mm | Closed routing scheme | ||||||||||
| Cu | Al | Cu | Al | |||||||||
| I (A) | P (kW) | I (A) | P (kW) | I (A) | P (kW) | I (A) | P (kW) | |||||
| 220 V | 380 V | 220 V | 380 V | 220 V | 380 V | 220 V | 380 V | |||||
| 11 | 2.4 | — | — | — | — | 0.5 | — | — | — | — | — | — |
| 15 | — | — | — | — | 0.75 | — | — | — | — | — | — | |
| 17 | 3.7 | 6.4 | — | — | — | 1.0 | 14 | 3.0 | 5.3 | — | — | — |
| 23 | 5.0 | 8.7 | — | — | — | 1.5 | 15 | z.z | 5.7 | — | — | — |
| 26 | 5.7 | 9.8 | 21 | 4.6 | 7.9 | 2.0 | 19 | 4.1 | 7.2 | 14 | 3.0 | 5.3 |
| 30 | 6.6 | 11 | 24 | 5.2 | 9.1 | 2.5 | 21 | 4.6 | 7.9 | 16 | 3.5 | 6.0 |
| 41 | 9.0 | 15 | 32 | 7.0 | 12 | 4.0 | 27 | 5.9 | 10 | 21 | 4.6 | 7.9 |
| 50 | 11 | 19 | 39 | 8.5 | 14 | 6.0 | 34 | 7.4 | 12 | 26 | 5.7 | 9.8 |
| 80 | 17 | 30 | 60 | 13 | 22 | 10 | 50 | 11 | 19 | 38 | 8.3 | 14 |
| 100 | 22 | 38 | 75 | 16 | 28 | 16 | 80 | 17 | 30 | 55 | 12 | 20 |
| 140 | 30 | 53 | 105 | 23 | 39 | 25 | 100 | 22 | 38 | 65 | 14 | 24 |
| 170 | 37 | 64 | 130 | 28 | 49 | 35 | 135 | 29 | 51 | 75 | 16 | 28 |
Options for supplying power cables from power lines
In the process of installing electrical wiring at the dacha, the owner will certainly be faced with the question of how to connect the power supply to the household. The cable line will need to be pulled from the nearest overhead power line support, naturally after obtaining the necessary permits, together with representatives of electrical network services. You can use one of the following options for connecting to a power line support:
- by air;
- underground.
Supplying a cable to a country house by air
Next, we will consider in detail the advantages, disadvantages, as well as important installation nuances for each of the options.
Air supply
Supplying power to a country house by air can be done using two methods. The first involves the use of SIP cable, which means self-supporting insulated wire. It stretches directly from the power line to the facade of the house. The second option is accompanied by pre-tensioning of the metal cable from the support of the centralized electrical network to the walls of the house using special hooks or talpers. This allows you to use any cable cables that are subsequently fixed to the cable.
Regardless of the chosen method, you will need to use additional insulating fasteners to secure the conductive wires. The following factors will need to be taken into account:
- If the distance from the power line support to the construction site is more than 25 meters, intermediate support pillars should be installed.
- In winter, the load on the wires will increase due to the accumulation of ice. In this regard, it is necessary to correctly calculate the load-bearing capacity of the cable.
- Ultraviolet radiation contributes to the mechanical destruction of the insulating layer of conductor cores. Therefore, it is necessary to use additional protection in the form of corrugation.
Standards for connecting a house to a power line
Connecting electricity to a country house from a pole via air is carried out in the shortest possible time. You will need to purchase special fasteners and also use a tower. This comes with additional costs.
Power supply underground
When powering a country home with a cable laid underground, it is recommended to adhere to the following rules:
- The wires are laid in a trench at least seventy centimeters deep. Except for the case when the cable line is laid in a protective pipe, and the length from the power line support to the input panel is less than five meters. Under such conditions, it is possible to prepare a trench 50 cm deep.
- The trench must be dug at a distance of at least 60 cm from the foundation. If there is a need to lay a cable through the foundation, then you will need to use an additional pipe in it. It is prohibited to pull conductive conductors directly under the foundation.
- When excavating a trench, the following distances should be maintained from various objects:
- 75 cm - bush plantings;
- 100 cm - sewerage, water supply;
- 200 cm - trees, gas pipeline.
- The cable must be armored and have appropriate insulation protection.
Supplying electricity to the house underground
The listed instructions are determined by the requirements of the PUE, PTE and SNiP, regardless of the selected cross-section of the current-carrying conductors.
The main advantage of this option for connecting a country house to a centralized power supply is the minimal cost of the required material. You can also do without using special equipment. Laying the power cable underground will be difficult if the area is tiled or concrete is poured.
Features of installing an open type electrical line
The open method of installing electrical wiring is most often used when laying wires above the baseboard, at the junction of walls and ceiling tiles, as well as in the corners of rooms. The conductor used must be perfectly straight.
If open wiring is laid in an apartment with suspended ceilings, then the cable should be attached to the walls. If there are a large number of wires, it is worth using throughput channels.
Under no circumstances should you simply run an electrical wire through a suspended ceiling. The installation of connection and branch boxes must be done in such a way that access to them is not difficult.
An example of installing a socket with open wiring in the video:
Place of installation of the input panel and connection of the power cable
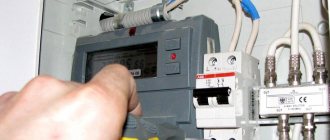
It is recommended to install the shield in an accessible place. This could be a corridor or a technical room, for example, a heating unit. It must be installed at a height of at least half a meter from the ground. Currently, you can easily purchase a shield of the required size. In this case, it is necessary to take into account the location for installing the meter and protective circuit breakers, including RCDs.
When inserting the power conductor into the panel, you will need to comply with the requirements of the electrical networks. The main thing is to lay a solid cable. When choosing its type, you should take into account the material from which the overhead power line wire is made, as a rule, it is aluminum.
Electrical panel in a wooden house
How to place electrical wires
Let us dwell on the rules for placing electrical cables. They should only be placed in vertical or horizontal positions. Diagonal placement is prohibited. An exception may be diagonal laying in the attic, however, provided that the cable is placed parallel to the ceiling line.
It is recommended to lay horizontal hidden wiring at a height of 30 centimeters from the floor level, or at a level that is 30 centimeters below the ceiling level. The wiring can be placed higher, but there must be at least 15 centimeters between the ceiling and the wiring.
Helpful advice: it will be better if the distance between the ceiling and the wiring hidden in the plaster or behind the drywall is 30 centimeters. This will avoid difficulties in the case of installing a suspended ceiling.
As for vertical laying, there are also some restrictions here. The distance from the corner of the wall, door frame or window opening to the cable should be greater than 15 centimeters. If a gas pipe runs along the wall, then the wire should be located at a distance of 40 centimeters from it.
Required safety standards
To ensure the electrical safety of installed wiring in a country house, the use of elements such as protective grounding, RCDs and automatic circuit breakers should be provided in advance.
Protective grounding
As mentioned earlier, in most cases, old four-wire power lines are used to power country houses. This means that a combined neutral and ground wire is used. If it breaks, life-threatening voltage may appear on the equipment housing. The machine will not turn off due to the rated current flowing through it. To eliminate such situations, it is necessary to install an additional grounding circuit on the site.
Design of a protective grounding loop
Note! To install a grounding system in a dacha, it is recommended to use factory-made modular-pin circuits. They can be installed in any type of soil without loss of performance.
RCD
Installing a residual current device allows you to ensure the safety of a person from electric shock, as well as prevent the development of a fire. The RCD reacts to leakage currents that are formed when the insulating coating of the cores is damaged or when the neutral wire breaks. It is recommended to mount the RCD directly at the power input.
The shutdown setting is selected taking into account the calculated leakage currents of all electrical equipment used in the country. The resulting value must be increased three times. RCDs with the following rated differential currents are available for sale: 10, 30, 100, 300 mA.
Connection diagram for RCDs and circuit breakers
Automatic circuit breakers
To protect cable lines from overload currents and short circuits, circuit breakers should be used. They are established for each individual consumer group. Selection is carried out in accordance with the calculated current consumption. As a rule, individual machines are mounted on lighting and socket networks.
Tips for properly connecting electrical points
To create effective wiring in an apartment, it is necessary to distribute different directions and combine groups of electrical points in these directions.
So, for laying electrical wiring from the electrical panel, it is worth highlighting the following lines:
- lighting for living rooms, kitchen and corridor;
- electricity supply to living rooms;
- separate power supply to the kitchen;
- lighting and power supply for the bathroom and toilet;
- a separate power line for electric stoves and appliances that consume high power.
For each group it will be necessary to install a special protective shutdown device, which will promptly turn off a specific line, which will protect the wiring and the equipment powered by it from damage.
When connecting electrical points, you should definitely use distribution boxes, since they are, first of all, one of the ways to isolate connections
It is worth noting that the connection of the electrical panel to the power lines in the apartment should be entrusted to the electricians of the management companies, since this work must be performed exclusively by specialists in accordance with the requirements of legislative documents.
Tools and material required for the work
To carry out work on installing country electrical wiring, it is recommended to prepare the following tools in advance:
- CL cutting scissors;
- pliers;
- screwdrivers;
- screwdriver;
- grinder with diamond discs;
- hammer;
- mounting chisel;
- putty knife;
- roulette;
- knife.
Tools for laying electrical wiring
It is best to purchase material after drawing up a full-fledged project of the planned electrical network. The following items will be required:
- circuit breakers;
- electric meter;
- wires;
- sockets;
- switches;
- distribution boxes;
- socket boxes;
- connection terminals;
- fastening hardware.
Hidden wiring device
Hidden wiring can be done using two methods. The first, classic option is to place cables and network elements inside the grooves or under the casing. The second option, which has been gaining popularity recently, is the use of special pipes and cable ducts. In fact, the wires are hidden from view, but not located inside the wall.
Wiring can definitely be called hidden only in the first case, when the cable is hidden inside building structures. The latter include partitions, various ceilings, floors, walls and ceilings. In most cases, this option involves making special grooves. To make them, use a wall chaser or grinder, but you can get by with a hammer drill or a scarpel with a hammer. The same pipes and channels from the second method should also be present in the first: they are laid in grooves to increase the protection of the wires.
Laying wires in grooves
Attaching cable ducts to the surface of walls and ceilings and then placing wires inside is more of a method of organizing open electrical wiring.
The nuances of laying current-carrying conductors
Do-it-yourself cable laying at the dacha is carried out in a certain sequence, taking into account important nuances for open and closed types of installation. At the initial stage, it is necessary to mark the installed channels. To do this, you can use a regular pencil. Further actions vary depending on the type of installation chosen.
Open laying
This type of wiring involves the use of remote switches, sockets and junction boxes. The cores are laid in special channels, which are mounted on top of the finishing material. In this case, fasteners are used for a specific type of wall surface. Subsequently, the channels are closed with a protective cover. The convenience of this method lies in the speed of installation and high maintainability.
To create an aesthetic appearance, the boxes should be laid under the ceiling. You can also use special floor skirting boards.
Hidden gasket option
To form hidden wiring in a suburban area, you will need to ditch the walls. To do this, use a grinder with diamond discs, a hammer drill or a wall chaser. Holes for distribution boxes, switches and sockets are made with appropriate crowns. Subsequently, the cables are laid in channels and fixed with putty or special staples. At the final stage, the walls are finished.
Installation of hidden wiring in foam concrete walls
Every person can carry out wiring in a summer cottage, even without special skills. The main thing is to follow electrical safety rules. At the final stage, you must make sure that the generated electrical wiring is working properly.
Installation
The wires are connected in special boxes and distribution blocks. The piece that goes into the boxes should be bitten off with a small margin, 60-65 mm will be enough. If over time the contact deteriorates or burns, you can easily cut out the damaged cable and restore the connection. At the exits from the distribution boxes, at a distance of about 50 mm, the conductors are attached to the walls.
All sockets and switches are installed on a special substrate, the thickness of which should be 10 mm greater than the thickness of the walls of the product. If sockets or switches of old types are installed, then such a gasket can be cut out of wood or plastic yourself. First, a base is attached to the wall surface, and then the product is installed on it.
All rules and recommendations were compiled by highly qualified specialists and are aimed at ensuring the safe operation of the electrical network. If you decide to install open wiring yourself, then knowledge of these requirements is mandatory.
Requirements
The main requirement for electrical wiring is compliance with safety requirements and compliance with the tasks that will be assigned to it.
The basic rules for installing electrical wiring are contained in the main document for electricians - PUE (Rules for Electrical Installations). In particular, Chapter 2.1 defines the rules, regulations and requirements for indoor and outdoor electrical wiring. Compliance with the requirements of regulatory documents is mandatory, since these standards were derived through verified calculations and confirmed experimentally.
According to the latest requirements, residential electrical wiring must adhere to the TN-CS power supply system standard or, in extreme cases, TT. The systems imply a different approach to grounding and connecting the neutral conductor. This is necessary to prevent electric shock if you unintentionally touch the body of the device, which has a short circuit to the body as a result of a malfunction. In addition to grounding, the level of safety is additionally affected by the installation of protective equipment that automatically interrupts the power supply when leakage currents occur.
The PUE specifies permissible current values for wires of various cross sections, copper or aluminum, as well as methods of laying, fastening, connections and branches.
Photo of retro wiring
3+
Read here! Zero bus - the main purpose and installation of the grounding bus. 115 photos of modern tire varieties
What is important to know
The key elements of the cable channel are the “U” section profile, the standard length from the manufacturer is 2 m. Also included is a lid (a strip of plastic) to cover the insides. Essentially the design is a long plastic box for storing wiring.
The structure is fixed to a plane (wall, floor, ceiling), cables (wires) are “laid” into it, when everything is laid, the channel is closed with a lid. The cover is a separate advantage of this design; it can be quickly removed, which allows you to repair the electrical network, change the wiring, or add new elements.
The best materials for the box are fireproof plastic, aluminum or galvanized steel. There are a great many types of cable channels; this assortment allows you to choose the necessary box and its unusual properties for your specific building and its specifics. In short, the main types are trays, corrugated pipes and the most popular option – floor skirting boards.
Trays and corrugated pipes are mainly intended for outdoor work, as well as installation in utility and industrial premises; they do not have any special aesthetics, but they are not short on reliability. Skirting boards have decorative properties and are intended for floor installation of low-current household cables (wires). The most popular solution in offices is wall boxes; this is the simplest solution for wiring in a large room without being tied to the floor.
With a little effort, cable channels can fit into any interior, because in addition to the standard white solution, manufacturers produce many colors that allow you to choose the palette necessary for the interior.
Quantity of materials
To most accurately calculate the length of wires and the amount of piece materials, it is better to use a laser level. With its help, the most optimal routes for laying cables are determined. The required number of insulators is calculated based on the desired installation step. For example, to lay 10 m of wire, you will need about twenty insulators.
Summing up
Retro wiring is a stylish interior element that emphasizes the individuality of your home. Its high cost can be reduced somewhat by doing some of the work yourself. However, in pursuit of savings, you should not use cheap and low-quality Chinese cables and components. In addition, the final check of the electrical network and its connection to the electrical panel should be entrusted to professionals.
If you liked our article, found something useful here, take part in the discussion and recommend it to your friends.
Save time: selected articles delivered to your inbox every week