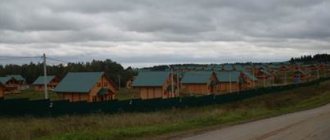
A gazebo attached to the house is an interesting solution, from an economic and territorial point of view, that can help you create an excellent place to relax. The design of the building allows you to save on both material and square meters of area - you will not need to additionally arrange the landscape in the area.
Designer extension
An extension to a house requires less building material and less space on the site. For small cottages this is a great idea for a gazebo.
This article will look at various types of extensions from which you can get ideas for your own construction.
I will share my own experience of building such a gazebo at the dacha: my father decided to implement this solution on his site. A review with photographs will be presented towards the end of the publication.
Arrangement of the base, installation of walls and floors
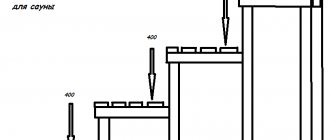
The support pillars will serve as the foundation.
To do this, dig holes that should be slightly wider than the pillars and 0.5–0.7 m deep. Make a ten-centimeter cushion at the bottom of the hole from compacted sand and crushed stone. Set the posts level, secure them, and then fill them with concrete. The timber is pre-treated with an antiseptic, and the part that will be immersed in concrete must be wrapped in roofing felt. On one side of the gazebo, the support pillars should be lower, so that the slope of the pitched roof can be formed. Next you need to complete the top trim of the support pillars. Then you need to install the transverse beams to which the sheathing will be attached.
The sheathing pitch depends on the roofing material you choose. For example, if it is a metal tile, then the lathing pitch should be 40–50 cm. After this, you will need to install the roofing material.
A decorative lattice, decorated with climbing plants, can serve as walls. Another option is to install railings around the perimeter of the gazebo, which are secured to support posts.
The floor in the gazebo can be made of paving slabs laid directly on the ground, or install decking.
What is
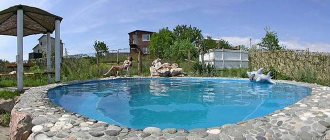
A pergola is a decorative landscape design object used for recreation. The basis of the structure is the supports on which the roofing surface and railings (trellises) are fixed. Thanks to the presence of thin straight elements, climbing plants planted near the supporting pillars spontaneously wrap around the arch.
The materials used for the pergola must be durable and environmentally friendly. Preference is often given to metal and wooden structures. It is appropriate to combine them with polymer elements, natural stones, and brick. Wrought iron arches look impressive.
The supporting elements of the pergola are buried in the ground, followed by concreting. This gives the structure durability and rigidity. Such an object lasts longer, delighting household members with an attractive and sometimes artistic appearance and functionality, especially in the sultry heat.
Which building style should you choose?
Choosing the most suitable style of gazebo can be difficult. When selecting a project, the following are taken into account:
- Purpose of the building.
- Allotted budget.
- Registration of other buildings on the site.
The material for the gazebo is selected taking into account how long it can last. Brick, concrete and natural stone last much longer, but wood is cheaper and, if properly processed, retains its basic properties over a long period.
Shapes of gazebos for summer cottages
The most important criterion for choosing a project is the shape of the structure. It could be as follows:
- The most common is the square or rectangular option, as they are easy to construct.
- A polygonal shape is chosen if the structure will have a large area.
- The most difficult project to implement involves the creation of a structure of a round or semicircular shape.
Necessary materials and tools
List of materials and their sizes:
- pillars for foundation reinforced concrete or wooden 300*300*1200 mm;
- wooden floor logs 150*50*6000 mm;
- floorboard 90-130*36*4000 mm;
- beams for the frame 150*150*6000 mm;
- boards for the rafter system 100/150*50*6000 mm;
- sheathing for railings;
- metal tiles or ondulin for the roof;
- vapor barrier membrane, roofing felt;
- fastener
Wood for building a gazebo-extension to the house must be dry and treated with an antiseptic.
The list of tools includes:
- a circular saw;
- plane, chisel;
- hammer;
- drill or screwdriver with drills;
- building level, tape measure.
Wooden construction will ensure a comfortable stay
We advise you to choose the most environmentally friendly, natural material for construction - wood. A wooden building will be cheaper, and purchasing wood is easy. In a wooden gazebo you will feel comfortable and cozy. But wood also has its drawbacks. Firstly, wood is highly flammable. It is necessary to protect yourself from fire. In addition, it is susceptible to fungi and mold.
This is due to the appearance of profile pipes. Installation of such a building is carried out using welding. It is impossible not to mention country houses made of stone - brick, cinder blocks. And finally, summer structures of a combined type. In their construction, combinations of different materials are used, for example, stone and metal, stone and wood. As for the roofing material, choose it according to your desire, and also based on the amount of money you planned to invest. You can choose:
- slate,
- metal tiles, flexible or ceramic tiles,
- corrugated sheets,
- roofing felt,
- polycarbonate
The tools you'll need most are
- different types of hammers, axe, wood saw, pliers,
- construction level,
- nails, screws, angles,
- other modern power tools, if you have them.
Do-it-yourself pergola - the way to achieve your goal
In our difficult times, when prices are constantly rising, enterprising craftsmen are independently equipping their summer cottages. And, of course, they try to make them real paradises. Why not start from the original holiday destination. Those who have heard the word “pergola” and know what it is will probably start creating just such a structure. It can be made from the following materials:
- tree;
- plastic;
- metal;
- aluminum;
- fiberglass;
- PVC;
- vinyl;
- bamboo;
- combined options.
We advise you to study - Insulating the foundation with polystyrene foam - how to do it right
When the choice is made, the first step is to determine the appropriate dimensions of the pergola so that it is proportional to the garden area. If it is small, then the maximum distance between the main posts should not exceed 1.5 m. The main thing is that it is convenient to enter, taking into account the greenery that will grow luxuriantly on the structure. The standard height of a pergola structure is approximately 2.5 m.
When building an arch, special attention should be paid to the strength of the connecting nodes and the stability of the load-bearing supports. Even inexperienced craftsmen understand the importance of these factors
After all, the structure is constantly exposed to natural elements: wind, rain, snow and scorching sun. The step-by-step instructions for a pergola with your own hands, shown in the thematic video, will help beginners build this original arch. Having carefully reviewed the basic principles of construction, you can safely get down to business and make your dream come true.
Advantages and disadvantages of an extension gazebo
Regardless of the design, a gazebo attached to a country house has many advantages compared to free-standing structures:
- saving site area;
- architectural decoration of the main building;
- the presence of a finished load-bearing wall;
- close proximity to home;
- possibility of use as a summer kitchen;
- additional protection of the house from climatic influences;
The disadvantages of an extension gazebo include:
- need for connection with home.
- choice of design taking into account the architecture of the main building.
Sergey Yurievich
Construction of houses, extensions, terraces and verandas.
Ask a Question
By the way, a recreational extension can be installed not only near a residential building, but also next to a bathhouse, garage, or outbuilding.
Construction process
Saving money, the desire to do it “right” or just a love of construction - there can be many reasons to take on the manufacture and installation of an extension yourself. The main thing is to clearly understand the technology and correctly perform all stages.
We attach a gazebo to the house with our own hands
Like any construction project, it all starts with a design for a gazebo attached to the house. This point is especially important if the design is supposed to be complex in shape and large in size. And financial savings will not be possible without accurate preliminary calculations of the amount of material.
Base structure
If the house is just being built, you can build a gazebo on a common foundation, but there are reasons not to do this.
So, the extension will be lighter than the main building, and it simply does not need such a powerful foundation.
And load distribution also plays a role.
The best option is a pile or columnar foundation. Waterproofing is required between the piles and the floor sheathing.
A bathhouse, barbecue and fireplace require a monolithic foundation.
Frame installation
Wooden support pillars are installed on the piles, which are connected by beams using metal corners. If glazing is planned, you need to mark and install ceilings for it in advance. The optimal height of the railing is up to 1 meter.
Roof installation
The roof is most often single-pitched and is attached to the wall of the house by a support beam.
First, a rafter system made of massive beams is installed and secured, forming a solid structure.
The roofing covering (slate, ondulin) is mounted on a wooden sheathing in increments of 30 cm. For other materials (fused and clay tiles), special base preparation systems are provided.
Lean gazebos attached to the house: photos of beautiful pergolas
Unbearable heat or unexpected rain can ruin your plans for a barbecue, as you will have to spend a boring weekend within four walls. The modern area near the house will be even more functional if you enrich it with a stylish gazebo. The folding pavilions, which shake from strong gusts of wind, have disappeared once and for all. In fashionable gardens, their place has been taken by innovative pergolas - elegant metal or wooden structures that guarantee 100% protection from rain and harsh sun, while at the same time adding luxurious character to the garden space.
Pergolas today are made from durable, stable aluminum or wood profiles. Each model is equipped with a folding roof made from several layers of technical fabric or polycarbonate. The material guarantees 100% shading and is a barrier that insulates you from rain and harmful ultraviolet rays. Pergolas are available in two versions: wall-mounted and free-standing. Each option is equipped with an invisible drainage system. To take advantage of the benefits of your own garden, it's worth expanding the standard version of the gazebo with additional accessories such as roller shutters, recessed LED lighting and sliding side panels.
Pros and cons of a pitched roof
Like any other roofing structure, a pitched roof has its advantages and disadvantages. Before choosing this option, it is worth comparing the pros and cons. If the latter are not critical, it is worth considering the possibility of installing such a system.
The advantages of a pitched roof include:
- Availability. Compared to designs of other types, this option can safely be called budget. By making a choice in its favor, you can save not only on the amount of materials purchased for roof installation, but also for other structural elements of the building. Requirements for the strength characteristics of walls are reduced due to the lower weight of the roof;
- Ease of design. Not only specialists, but also ordinary consumers can correctly calculate a pitched roof;
- Maintainability. If necessary, you can always quickly repair the rafter system and sheathing due to the simplicity of their implementation;
- Reduced windage if the building is located in an area with a predominance of winds of a certain direction. In this case, you just need to choose the right location for the slope of the slope;
- Possibility of using various roofing materials, subject to compliance with the manufacturers' requirements for the angle of inclination.
Among the disadvantages it is worth noting:
- Impossibility of organizing an attic or attic. If you plan to expand your living space in the future, it is worth considering other options for roofing systems;
- Non-standard appearance. In some cases, departure from traditions is an advantage, as it allows you to emphasize your individuality;
- Low level of thermal insulation.
Area
Construction begins with site preparation, at this stage the following actions are performed:
- clear the area, removing vegetation and debris. If the canopy is intended to protect a resting place or barbecue, fine grass is left;
- particularly prominent mounds and depressions are cut off or filled in, respectively;
- if the area under the canopy is supposed to be concreted, covered with crushed stone or covered with paving slabs, cut off the top layer of soil to a depth of 10 - 15 cm. It contains plant seeds, they would break through the covering;
- carry out markings, noting the location of the supports. The number of supports and the pitch between them are determined by calculation at the design stage. As a result of marking, the outline of a rectangle should appear on the ground. To make sure that the figure is drawn without distortions (due to its large dimensions this is quite likely), measure the lengths of the diagonals: for a rectangle they are equal;
- in the places where the supports are installed, excavations are made with a depth exceeding the soil freezing mark by 10 - 15 cm. If the depth is less, the frozen soil will squeeze out the posts in winter (the force of frost heaving).
What to make the floor for a summerhouse from?
You can make a floor in a gazebo using various materials and in various ways. The final choice will depend on the design features of the gazebo. The floor in it can be made of asphalt, boards or paving slabs. An original option for a gazebo under a tree is to lay a rolled lawn. Only you can determine the best option, based on your personal preferences, for reasons of comfort, convenience and harmonious appearance.
Gazebo floor diagram.
For stationary structures that the owners plan to use for many years, it is best to arrange the floor on a reliable foundation according to the same principle as in the room. This approach will add strength to the structure.
Wooden floor
The most common flooring option for a tree gazebo is a wooden floor.
To lay the boards, you need to lay logs made of 50 * 50 timber on the top frame. They need to be secured with bolts or mounting angles. Planed boards can be laid on these logs. The optimal thickness of wood for the floor is 2 cm. Laying on logs helps improve ventilation in the space under the tree. Thanks to this, it will last much longer. For the same purpose, it is recommended not to install the boards too tightly to each other. And although walking on a floor with cracks will not be as comfortable, its durability will be ensured.
Installation of a plank floor in the gazebo.
The surface must be coated with an antiseptic, this will prevent the floor from rotting. Antiseptic must be applied to the floor in several layers, just like on other wooden surfaces in the gazebo.
Using boards is the most environmentally friendly option. Besides, it's very beautiful. However, this type of floor requires some care. 1-2 times a year you need to carry out preventive measures that will protect the floor from rotting and fungus. There are also more practical materials.
Other floor materials
You can arrange the floor covering in a gazebo under a tree not only with the help of wooden boards. More practical materials can be used. One of them is cement-bonded particle boards (CPB). For their production, cement of small and medium chips is used. During manufacturing, the raw materials are mixed and pressed into slabs, the thickness of which varies from 1 cm to 1.7 cm. This material is resistant to moisture, does not rot and is fireproof. After laying the slabs, there is no need to putty them; you can immediately begin painting or priming.
Drawing of a hexagonal gazebo.
The slabs can be covered or left untreated. The surface of the DSP is smooth, gray in color. Walking on a DSP floor is not cold.
Another option for a gazebo is deck and terrace boards. This is a wood-polymer material, which is made from a mixture of polymers and wood. The surface of the deck board is smooth, while the surface of the deck board is corrugated, with special grooves on it that prevent slipping. The advantages of such wood over natural wood: durability and insensitivity to external influences. The appearance of wood-polymer materials is in no way inferior to natural material. The only drawback is the higher cost.
Gazebo floor tiles
The most practical option for the gazebo floor is porcelain tiles. It is necessary to use corrugated slabs to prevent slipping on them in winter. To make such a floor, you must first prepare a concrete screed. A small hole is dug under the concrete, coarse gravel is poured into it, sand is placed on top, and concrete is poured onto the sand. The concrete layer should be about 4 cm. The surface of the concrete must be leveled and wait until it hardens. The tiles are laid on the frozen surface.
The gazebo can also be equipped using ordinary paving slabs. The technology for laying it is similar to laying porcelain tiles. In this case, concrete is not used; the cushion under the tiles consists of the following layers: sand/granite/sand/a mixture of sand and cement. Each layer should be approximately 2-3 cm. Each layer should be compacted, the base under the tile should be moistened, and only after that the paving slabs should be laid.
You need to choose the material for installing the gazebo floor yourself. Their diversity allows you to choose the best option for each individual case. Wooden boards are a simple and affordable option, but at the same time the most short-lived. Artificial materials are more durable, each of them has its own advantages, disadvantages and installation features.
You can do all the work yourself, since in any case the installation will not require excessive effort from you. you can relax in your gazebo under the tree with pleasure at any time of the year.
What is a pergola
So what is a pergola? Initially, the pergola was made in the form of an arch, the role of which was expressed in supporting climbing vines. Even in the times of Ancient Rome, nobility rested in pergolas. These designs have proven themselves to be elegant, noble and very practical structures.
If we take pergolas as support for vines, then, as a rule, they will be arches 1 meter wide with lintels. As for the height of the structure, much will depend on the plants planted under the arches themselves, which will be able to entwine them completely. Therefore, for vigorous plants, a pergola four meters high is quite common.
To create a corridor of arches, you need to install them one after another at a certain distance. Climbing vines and grape vines will weave along these arches. This option is a classic pergola.
Particularly convenient, cozy and practical materials for arches are wooden slats, which combine perfectly with the foliage and greenery of plants. In order to create entrances in the pergolas, gaps are made in several places between the arches.
As for canopies and gazebos, which are woven with vines, such structures can easily transform part of the space of the site, for example, into a cozy courtyard. Also, using pergolas, you can safely divide the territory of the site into zones intended for recreation and farming, a main entrance and a vegetable garden, etc.
A wooden pergola will create coziness near your home
Gazebo schemes
Modern technologies make it possible to build gazebos according to a variety of design schemes. The comfort of using the gazebo depends on how successful the choice of design is.
Scheme of a simple wooden gazebo
An option for a simple building for recreation. This is a gazebo for a summer house with a pitched roof on concrete posts. Its main advantages are efficiency and ease of construction. This gazebo can be decorated in Japanese style or country style. By adding a few decorative elements made of wood, it can be stylized into a folk style, and it will fit perfectly with a classic mansion cottage or wooden log house.
Scheme of a wooden gazeboSource moysadogorod.com
Scheme of a gazebo-canopy with a flat roof
This option is also budget-friendly. However, this structure can be made more comfortable by erecting a floor in the form of a wooden podium and beautiful partitions. Gazebos with a flat roof look great against the backdrop of fashionable, laconic cottages.
Gazebo with a flat roofSource stroicod.ru
Scheme of a closed gazebo with a stove
A compact gazebo, the central element of which is a Russian stove with a chimney. Instead of a stove, you can design a fireplace or barbecue. The stove is installed on a base made of non-combustible material. The wall to which it adjoins must be provided with additional fire protection. You can furnish the gazebo with garden furniture to suit the taste of the owners.
Gazebo with stoveSource www.arh-for.ru
Scheme of the gazebo-dining room
Semi-closed gazebo. Designed to serve as a dining room in warm weather. The structure is protected from wind and rain at the corners. Her design provides wide openings on all 4 sides
This ensures good ventilation of the gazebo, which is important during the summer heat. This construction option is ideal for family meals and entertaining guests.
Diagram of a semi-closed gazeboSource koka.lv
Small gazebo-extension
It would seem that small extensions do not allow you to create a beautiful and practical arrangement. Nothing like this. Thanks to the large number of furniture and solutions, a small gazebo does not have to be limited. A small gazebo attached to your home will become a charming oasis of relaxation when you arrange it. This area is perfect for an afternoon relaxation in the fresh air. Where there is not enough space for plants in pots, it is worth relying on vertical gardens - an undisputed hit of recent seasons. Thin lanterns, an infrared heater and a high-quality, neat umbrella with a side leg perfectly complement the composition.
A gazebo for your home is a great option that allows you to enjoy nature right from your living room.
Blueprints
It is worth noting that all of the presented options can be made of wood or metal, or the columns can be made of stone, concrete or marble.
The idea is important, but the implementation may be different. Simple rectangular with powerful beams
Chinese style
Pergola drawing with dimensions
The columns are interestingly designed - an excellent option for installation near the house. You can make an entrance to a garden or rose garden.
Instead of wooden columns, steel ones covered with wood were used
Types of verandas
Any construction should begin on paper. First of all, you will need to make a polycarbonate veranda project, and you have the power to give the structure any shape. It is not at all necessary to limit yourself to the usual geometry - make the extension oval, round, wave-like or any other shape - polycarbonate opens up new horizons for DIY construction. With it, anyone can become an architect and designer.
There are built-in and attached verandas. The former are often built simultaneously with the house on the same foundation and often under the same roof. In the second case, a separate foundation will be required for the veranda. Among attached verandas, terraces are very popular. Often these are open-type structures that visually increase the area of the house and perform useful functions. Thus, the terrace is at the same time a place for relaxation, a porch, and protection of the walls and foundations of the house from precipitation. Polycarbonate is ideal for constructing an open veranda. It makes the space even lighter and airier. For the roof, more durable cellular polycarbonate is used - this is a sheet inside of which there are ventilation gutters that give strength and prevent condensation from forming.
If you live in a cold climate zone, it is better to give preference to a closed veranda, making the walls from the same cellular polycarbonate. In addition to protection from rain and wind, it will help keep the room warm thanks to its air layer inside.
Advantages and disadvantages of the material
To summarize all the information presented above, we propose to outline the advantages and disadvantages of an attached polycarbonate veranda. First and most importantly, construction from this material is much cheaper than from any other. This results not only in the price of polycarbonate, but also in the installation method and the low load on the foundation. For very small and light verandas, some do not even build a “real” foundation at all, but simply place a regular fence or concrete road slab on a drainage pad in the ground, on which I mount the frame.
Even if you choose almost transparent light polycarbonate, in summer it will not be very hot on such a veranda, because the material scatters most of the rays. And to ensure the flow of fresh air into a closed room, several ventilation hatches can be made in the polycarbonate ceiling. Use blinds to create dense, cool shade. In the case of polycarbonate, even the most ordinary plastic models will look harmonious.
To heat such a veranda in winter, it is enough to use infrared films. During the daytime, they will help you save a lot on heating costs. In other words, making the microclimate in a polycarbonate veranda comfortable is not so difficult or expensive.
One of the disadvantages of such buildings is the fact that in winter, the polycarbonate for the veranda roof needs to be regularly cleared of snow, and this must be done very carefully. Do not use iron scoops, brushes or shovels to avoid scratching the surface.
Otherwise, the material will lose its previous light transmittance and protective characteristics. You can wash the walls of the veranda only with delicate products that do not contain alkalis or caustic acids.
Polycarbonate verandas have many more advantages than disadvantages, so cast aside all doubts and start construction.
Frame or monolith
The choice of building materials and construction technology affect the complexity of the project. In particular, we are talking about the expenditure of effort, money and time. The extension can be:
- Frame - assembled from profiled timber, profile or pipes;
- Monolithic - built from bricks, foam concrete, cinder blocks.
It is recommended to place a bet on the frame, because This technology involves the rapid assembly of a structure from ready-made building materials. Moreover, the finished extension puts less load on the foundation. On the other hand, monolithic analogs are more stable and are necessary if the house itself is brick or cinder block.
Wooden construction will ensure a comfortable stay
We advise you to choose the most environmentally friendly, natural material for construction - wood. A wooden building will be cheaper, and purchasing wood is easy. In a wooden gazebo you will feel comfortable and cozy. But wood also has its drawbacks. Firstly, wood is highly flammable. It is necessary to protect yourself from fire. In addition, it is susceptible to fungi and mold.
Please note that it will be necessary to treat it several times with appropriate antiseptic and fire-fighting agents. However, wood is not the only material for making gazebos. Metal is increasingly being chosen
This is due to the appearance of profile pipes. Installation of such a building is carried out using welding. It is impossible not to mention country houses made of stone - brick, cinder blocks. And finally, summer structures of a combined type. In their construction, combinations of different materials are used, for example, stone and metal, stone and wood. As for the roofing material, choose it according to your desire, and also based on the amount of money you planned to invest. You can choose:
- slate,
- metal tiles, flexible or ceramic tiles,
- corrugated sheets,
- roofing felt,
- polycarbonate
The tools you'll need most are
- different types of hammers, axe, wood saw, pliers,
- construction level,
- nails, screws, angles,
- other modern power tools, if you have them.
Let's figure out how to build a gazebo with your own hands with a pitched roof. First, study your summer cottage, choose a place to build. It must be carefully prepared: dig up the plants planted there before, clear it of construction debris, and level it. After this, you can start working by following the step-by-step instructions.
Decor
When decorating a gazebo, it is better to adhere to the stylistic unity of this extension with the main building. In the case where the structure is wooden, then the gazebo should also be wooden, and if the house is decorated with brick, then this material should also be present in the gazebo.
The gazebo can be lined with slats along which flower bindweed or any other garden crop will grow. It will be a pleasure to collect its fruits without leaving your spot. In any case, this plant will provide welcome shade on a hot summer day.
The gazebo can be sheathed with wooden veneer or eurolining - this way the structure will gain protection from the wind, and at the same time a noble, modern look.
With a transparent roof, the structure will appear lighter and more light will be able to penetrate it. If you need exactly this option, then you can use the same polycarbonate or, for example, install windows in the roof.
This is accomplished through the use of removable wall structures, which will allow the building to be used for a fairly long period and regardless of what kind of summer it is: in hot weather, you can use an open gazebo, and if the warm season did not turn out to be so, a closed structure will be your salvation .
The canopy can also be made removable. An awning made of plastic or thick, waterproof fabric completely replaces a full-fledged roof in the summer. Sometimes the fabric is attached to carabiners in the ceiling area under the rafters and sheathing. It slides and slides apart at the request of the owners, who have the opportunity to regulate the access of sunlight to the gazebo, as well as to protect the extension space from precipitation or in extreme heat.
You can simply and beautifully decorate an open gazebo using Roman blinds. It will be very pleasant to hide behind their canvases from the cool breeze on a summer evening.
For a comfortable pastime, it is better to take care of creating a comfortable and stylish interior in the extension. You can put benches and a table in it, made using wood carvings and taking into account the size of the building itself. Wicker chairs and a table will also be in place here - such furniture goes well with the open version of the gazebo.
The attached structure will look good in the light of a decorative lantern, which can simultaneously illuminate the courtyard and the interior space of the gazebo, creating an atmosphere of intimacy on a summer evening.
The extension will look especially picturesque and cozy surrounded by flower beds. Therefore, you need to competently approach the issue of external floral design. If funds allow, then in this matter you can resort to the services of a landscape designer.
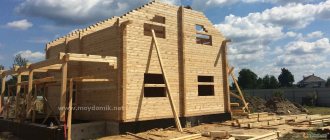
Construction of a frame gazebo with a pitched roof
To avoid serious mistakes and minimize construction costs, you need to start with the simplest. As an example, we take a rectangular gazebo with a pitched roof and on a slab foundation.
Construction of a frame gazebo with a pitched roof
Necessary materials:
- large stone or crushed stone;
- sand;
- concrete solution;
- boards for formwork;
- timber 100x100 mm and 50x50 mm;
- boards with a section of 30x150 mm;
- wood primer;
- dye;
- slate or corrugated roofing;
- screws and bolts;
- reinforcing bars.
You will also need tools:
- shovel;
- building level;
- rule;
- hacksaw;
- jigsaw or circular saw;
- screwdriver;
- hammer;
- paint brushes;
- Bulgarian.
Construction of a frame gazebo with a pitched roof
Marking the base of the gazebo
Marking the future gazeboMarking the future gazebo
Select a flat, open area of the garden and mark it. To do this, determine the location of one of the corners of the gazebo and mark it with a peg. Measure the distance to the remaining corners, place beacons, and stretch a string between them. The diagonals are measured in the resulting rectangle: if they are the same length, the markings are made correctly.
Pit preparation
Backfilling and compacting sand
Using a shovel, select soil to a depth of approximately 25-30 cm, level the bottom, and compact it thoroughly. The walls of the pit must be strictly vertical. Next, pour coarse sand in a layer of 10 cm, level it well and moisten it abundantly to compact it. Formwork made of boards up to 10 cm high is placed around the perimeter and reinforced with timber.
Pouring the foundation
The pit is laid out with large flat stones or filled almost to the top with large crushed stone. At the corners of the perimeter, sections of reinforcing bars are driven between the stones; the rods should rise at least 10 cm above the finished foundation. Prepare a concrete solution and fill the foundation pit. The surface is leveled with a rule or smoothed with a trowel.
Foundation
Frame installation
For the frame, take 4 beams 100x100 mm and cut to the height of the gazebo. The front beams are left 15-20 cm longer than the rear ones to create a roof slope. After this, the supports are well treated with a primer and dried. At the lower end of each support, a small hole is drilled along the diameter of the reinforcing bars that protrude from the concrete at the corners of the base. Place the beams on the rods, align them vertically using a level and further strengthen them with metal plates and anchor bolts.
Frame made of timber
After installation, the side supports are connected to each other with 50x150 mm boards, and then braces for the rafters are installed. At a height of 10 cm and 0.5 m from the floor, the racks are connected by horizontal jumpers made of 50x50 mm timber. Vertical bars are attached between the lintels at intervals of 40 cm. The doorway is left free. All fastenings are carried out using bolts and steel angles, which are screwed to the wood with self-tapping screws.
All fastenings are carried out using bolts and steel angles, which are screwed to the tree with self-tapping screws. Construction of the gazebo
Prices for various types of timber
timber
Roof installation
Roof diagramRoof installationWooden joistsGazebo roof
Logs are placed on the boards connecting the support beams in increments of 30 cm. The top of the logs is sheathed with 30x150 mm edged boards. Gaps ranging from 5 to 15 cm wide are left between the boards. Of course, all roof elements must be treated with an antiseptic primer and well dried. You can cover the top of the board with glassine and secure it with staples. Thin slats are placed on top of the film so that there is a ventilation gap between the roofing and the film. Slate is laid on the slats and secured with 120 mm nails with galvanized heads.
Arrangement of the gazebo
Painting the gazebo
After installing the frame and roof, all wooden surfaces must be painted. When the paint has dried, place a wooden table inside the gazebo and benches along the walls. Electricity is carried out from the house to the gazebo, a light bulb or lamp is hung. To give the room a cozy feel, you can cover the walls with thick, light-colored fabric. The interior decoration completely depends on the taste and capabilities of the home owners.
This version of the gazebo is basic. If desired, you can improve the design: install wooden gratings between the load-bearing beams, cover the walls with clapboard or waterproof plywood, lay logs on a concrete base and make a wooden floor. Instead of beams for the frame, you can take metal pipes, and replace the slate with polycarbonate or soft tiles.
Arrangement of the base, installation of walls and floors
The support pillars will serve as the foundation. To do this, dig holes that should be slightly wider than the pillars and 0.5–0.7 m deep. Make a ten-centimeter cushion at the bottom of the hole from compacted sand and crushed stone. Set the posts level, secure them, and then fill them with concrete. The timber is pre-treated with an antiseptic, and the part that will be immersed in concrete must be wrapped in roofing material.
On one side of the gazebo, the support pillars should be lower, so that the slope of the pitched roof can be formed. Next you need to complete the top trim of the support pillars. Then you need to install the transverse beams to which the sheathing will be attached.
The sheathing pitch depends on the roofing material you choose. For example, if it is a metal tile, then the lathing pitch should be 40–50 cm. After this, you will need to install the roofing material.
A decorative lattice, decorated with climbing plants, can serve as walls. Another option is to install railings around the perimeter of the gazebo, which are secured to support posts.
Ideas for using pergolas in landscape design
As mentioned above, the pergola is multifunctional, therefore it is widely used in landscape design.
Perhaps the most popular way to use it is to create a seating area in the shade. It simultaneously allows you to get the necessary shade and separate this zone from the rest of the site, and in addition, it is also the main decoration of the resting place - a wonderful shadow pattern will delight you in the pergola-gazebo, entwined with climbing plants!
Relaxation area under the pergola
Pergolas are also used as arches. The green corridor itself will delight any guest, and it also zones the garden. With the help of a pergola for climbing plants, you can achieve the desired effect of intrigue in the garden - the observer sees only a small part of the landscape through the arch at the turn.
There, around the bend...
Often there are buildings on the site that worsen the overall appearance: a utility block, a fence, a chicken coop, fences, and so on. With the help of a pergola you can unobtrusively hide them. Also, sometimes the neighboring property offers too good a view of your yard, which does not allow you to relax and feel privacy. In this case, a pergola can protect you from unwanted views.
Pergola over the terrace
Important stages of construction
You can make such a simple garden building in the shortest possible time without outside help. The main thing is to follow the recommendations of experienced builders and correctly draw up a design drawing.
Preparation and laying of the base
To pour a high-quality foundation, you will need to do the following:
- Level and clear the area of debris and vegetation.
- Carry out markings in accordance with the project, using twine, pegs and tape measure.
- Mark the locations where the foundation pillars will be installed. There must be at least 6 of them.
- Calculate the amount of concrete, taking into account the size of the pillars and the depth of their installation.
- In the places where the pillars are marked, make holes 60 cm deep.
- Make formwork 25*25 cm, no more than 20 cm high. Edged boards are suitable as material.
- Pour crushed stone, sand into the resulting holes, and fill with cement mortar of a viscous consistency.
- After pouring, check the evenness of the tops of the pillars with a building level.
In this form, the foundation should be allowed to stand for a week until it dries completely.
Construction of frame and flooring
While the base is gaining strength, it is worth starting the manufacture of frame parts. The boards can be cut in advance and walked over them with a plane.
After the foundation has completely dried, you need to:
- Instead of formwork, make waterproofing from roofing felt on the pillars. Pieces measuring 30*30 cm, laid in two layers on each of the pillars, will be enough. For reliability, it is recommended to treat the roofing material on top with bitumen.
- Form the bottom trim by laying the timber in a tongue-and-groove manner. Metal brackets are suitable for fastening.
- Install 6 frame posts at right angles, temporarily supporting them with struts.
- Make the top trim using the tongue-and-groove method. You can also use brackets or corners for fastening.
- Install floor joists. To do this, you need to lay the boards at a distance of 80 cm from each other.
- Cover the floor with pre-sanded edged boards.
- If necessary, you can cover the openings and secure the railings.
Roof installation and assembly
To get a high-quality shed roof, you need to assemble a rafter system with a selected angle of inclination, which depends on the roofing material and the climate of the region.
Stages of roof construction:
- The timber used must be pre-treated with antiseptics to protect against the influence of the external environment, and with antipyretics for fire safety purposes.
- Measure and saw the required number of rafter legs, leaving 50 cm on both sides for overhang.
- Install the front and rear rafters using corners and nails to the framing beam. It is recommended to stretch a string between them to secure the other rafter legs at the same angle.
- Lay strips of waterproofing film to the rafters, overlapping by 15 cm. Do not pull. Secure with a construction stapler.
- Make a sheathing with a distance between elements of at least 20 cm. Use an unedged board as the material.
- The creation of the roof is completed by ondulin flooring. It needs to be overlapped by 10 cm.
Monolithic foundation
The corresponding substrate in its finished form is a single piece that extends under every square meter of the extension. A monolithic foundation is used to contain heavy loads and is erected as follows:
- First you need to prepare the area for the extension - clear and level the soil;
- Next, a 1.5-meter recess is dug, which should protrude 1-1.5 meters beyond the future structure;
- The next step is laying a drainage layer at the bottom of the pit and formwork (covering the soil walls with wooden boards);
- Next comes the installation of the reinforcing frame and its filling with cement mortar.
A monolithic foundation is especially relevant for stationary brick kilns. However, it is enough to erect only a small monolithic slab under the fire source.