Pallets are a material that can easily be used in construction. They are most often used to build country houses and children's houses, for which strength is not a priority. Having at your disposal a couple of dozen pallets, a few hours, imagination and desire, you can build a house with your own hands, which will become a favorite summer vacation spot.
Ready-made pallet house project
Choosing pallets and pallets for your shed
Pallets or pallets are containers that ensure the safety of goods during transportation. Such containers are made of plastic or wood. Moreover, for the construction of a barn it is worth paying attention to wooden pallets. One of the best options is larch . This wood has sufficient strength and is resistant to moisture. A larch barn will last a very long time.
In Russia, wooden pallets are made in the following sizes:
- 80x120 cm, flooring thickness 2.2 cm;
- 100x120 cm;
- 120x120 cm, board thickness up to 2.5 cm;
- 120x160 cm;
- 120x180 cm.
Pallets are also available in other sizes, for example, 32x40, 36x42 and 48x48 inches. Euro pallets have dimensions of 120x80x15 cm and 120x100x15 cm. Pallets with a deck thickness of 2.5 cm are best suited for construction.
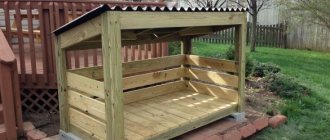
General variety of summer cottage buildings made from wooden pallets
In addition to the structures presented above, you can create many others. These ideas will serve as a starting point for further construction. A competent approach, as well as knowledge of theory, will allow a summer resident to implement almost any building for a summer cottage from wooden pallets.
Relaxation area and fence for a summer house made of pallets
But it is still advisable to make structures of a utilitarian nature due to the insufficient reliability of the material. Or additionally strengthen it with a metal frame, logs and other resistant elements.
Design of a change house
A barn is a stationary building that should ensure the safety of country tools, personal belongings and other similar items. Based on your own preferences and free space on the site, you should determine the desired dimensions of the building. Ideally, the length, height and width should be multiples of the pallet dimensions. In this case, you will not have to cut the elements.
You may also be interested in the technology for building a woodshed in your country house.
Example: if pallets of 120x120 cm are available, then the optimal dimensions of the barn are 480 (L) x 240 (W) x 240 (W). You will need 24 pallets for the walls and 8 for the floor.
It is better to make the ceiling covering from boards. Also, boards will be needed to fasten the pallets together. And it is recommended to use timber 100x100 or 150x150 cm as the lower, upper trim and corner posts.
For construction you will also need: sheets of moisture-resistant plywood, fasteners, a screwdriver, vapor barrier film, insulation, fire-retardant impregnation, roofing material, roofing felt, bitumen mastic.
Calculation of approximate costs, prices of materials
New pallets are sold at a price of 250-300 rubles. Used pallets are half the price. Pine timber will cost approximately 5-6 thousand rubles per cubic meter, larch timber - two and a half times more expensive. A 25x100 mm edged board made of pine costs from 3,500 to 6,500 rubles per cubic meter.
Moisture-resistant sanded birch plywood:
- 8x1525x1525 mm – 550 rubles per sheet;
- 12x1220x2440 – 1050 rubles per sheet.
A set of doors with fittings or a gate for a barn can be purchased for 1-5 thousand rubles. Ruberoid costs about 300 rubles. per roll, bitumen mastic - from 270 rubles per container weighing 16 kg.
Materials for the roof and foundation arrangement will cost 2-5 thousand rubles. Mineral wool (8 pieces per package, 1,200×600×50 mm) costs from 65 rubles/m2 or 385 rubles/pack. Izospan (vapor protection) costs approximately 1,650 rubles/roll (70 sq.m).
Other crafts
There are still many different things that can be done in a short time using such inexpensive and pliable material as pallets.
Hanger
You can easily make a very practical and attractive hanger from pallets. It can become an original decoration for a country house or an ordinary city apartment.
To do such a thing, you will need to use the flooring from the pallet (its base). The side parts will need to be carefully removed. There is no need to throw away the leftovers right away - they can still be useful.
The base will need to be thoroughly sanded, coated with protective solutions, and then painted in a suitable color. All that remains is to attach a few hooks to the prepared part. Their number and intermediate distance depend only on the wishes of the owners. The finished structure is installed near the entrance door in the hallway.
Shoe shelf
A great idea is to create a shelf out of pallets to place pairs of shoes on.
You need to cut one pallet into 2 halves, and then put them on top of each other and fasten them together as securely as possible. In the space occupied by such a shelf, it will be possible to place many more shoes than before. In addition, a well-decorated shoe rack can easily become an original interior decoration.
Outbuildings
Few people know, but you can build an entire gazebo or outbuilding from pallets. Of course, these crafts will be more complex to make than shoe racks or hangers, but their functionality will be much higher.
Using the same principle, you can make gazebos, sheds, chicken coops, and so on from pallets. Ready-made designs are complemented with various decorations and decorations.
- If you plan to build a large structure, then you will need to prepare a good foundation for it. The choice of its type depends on the characteristics of the soil located on the site. In places where the soil is clayey, it is better to install a pile-type foundation. If the soil is rocky, then a tape option is suitable. The floor in a home-made building can be laid out with a beautiful terrace board or from the same pallets.
- The frame base for the construction of outbuildings can be made from wooden blocks or metal pipes. It is to them that the pallets will be attached in one or two layers.
- Using pallets it will be possible to completely cover absolutely all the walls of the gazebo or install them only to a certain height. One way or another, the interior space will still be sufficiently filled with natural light and will be well ventilated.
- The easiest way to construct the roof of a homemade gazebo on a summer cottage is from polycarbonate sheets. If polycarbonate seems too simple and boring, then you can use flexible tiles, ondulin or metal tiles instead.
- If you line the inner walls of the gazebo from pallets with plywood sheets, you will get a full-fledged summer house. From the outside it can be decorated with different plants and flowers. They should be placed in the “pockets” formed in the structure. Some summer residents decide to decorate the outside of such buildings with siding panels. As a result, few people can discern homemade pallets in such buildings.
Support for flowers
You can make neat flower stands from wooden pallets. To make them, a minimum of actions will be required: you just need to turn the pallet on its side and it can already be used as a stand for flowerpots with seedling material. Additional shelves with hooks will allow you to turn your homemade structure into a beautiful garden shelf.
Dog bed
From wooden pallets you can make not only furniture for people, but also for animals. Many summer residents often go to their plots in the company of four-legged friends. To take care of your pet, you can make a cozy and cute bed for him from wooden pallets: build small sides, and in the space between them put a soft mattress with thick foam rubber pillows. The end result is a very cute and convenient homemade product. This is an excellent alternative to a simple closed booth in fresh air conditions.
You can make a lot of cool products for your garden from pallets.
Use these wooden structures for beautiful vertical gardening in your summer cottage. The pallet will be an excellent base for hanging flower pots and entire containers of flowers.
How to make a sofa from pallets, watch the video.
How to build it yourself
Laying the foundation
It is not necessary to make a capital foundation. For example, you can clear the area, fill it with sand, crushed stone and pour a floating concrete pad, which will also serve as the floor of the barn.
Another option is a columnar base. In this case, concrete will be poured into pre-dug holes, the walls of which are wrapped with roofing felt. It will be necessary to install metal rods into the freshly poured solution, to which the walls of the shed will be attached.
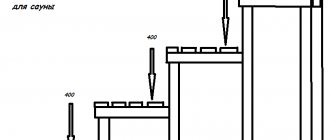
Making the bottom trim
You can skip this point of work, saving on building materials. The beams are cut according to the dimensions of the poured foundation. At the corners, 4 beams are joined using the “wood floor” or “paw” method . The frame is connected to the foundation with anchors through holes drilled in the beams.
Before laying the bottom trim, it is recommended to coat the foundation with mastic and cover it with roofing felt. Wooden elements must be cleaned and treated with impregnation.
Installing corner posts
This point is also a recommendation. The lower trim and racks will increase the rigidity of the structure, but if you need to save money, you can do without these beams. Corner posts are attached to the bottom frame with dowels, metal perforated corners and self-tapping screws. Additionally, jibs are nailed for reliability.
Laying the subfloor
The floor joists are connected to the bottom trim with metal plates (fastening perforated corners) and self-tapping screws. Edged boards are laid on the joists. The lags and boards are fastened with nails (20 cm long).
You will find all the information about the construction of wooden outbuildings and cabins here.
Walling
Work begins from any of the corners of the barn. The first pallet is taken, placed on its edge (with the flooring inside the shed), screwed or nailed to the bottom frame and vertical beam. It is advisable to check verticality with a bubble level.
The second pallet is nailed in the same way. The structure can be further strengthened with perforated mounting angles.
The first row of pallets must be fastened with boards, nailing them into the grooves between the pallet decks. Don't forget to pre-cut the opening for the door or gate . Pallets can also be fastened with wire.
Even if vertical beams were installed in the corners, before installing the second row, it is necessary to nail vertical boards to the pallets of the first row. They will become stiffeners and prevent the walls of the barn from tilting.
Roof and roofing
Before installing the roof and roofing covering, a ceiling is constructed and the top trim is attached. The latter is either a 100x100 beam, nailed along the perimeter of the shed walls, or double 25x100 boards installed on the edge. If the roof of the barn is single-pitched, then the framing is done only on two sides - from the rear of the building and from the facade.
Floor boards are laid edgewise on the mounted frame, which can simultaneously serve as rafters.
The design of the roof may change, but the general rules for arranging the roofing pie remain unchanged.
A waterproofing film (or roofing felt) is stretched over the rafters and the lathing is stuffed . Next, the roofing finishing covering is installed - profiled steel sheet, ondulin, slate, etc. If necessary, roof overhangs are sheathed.
What tablets are best to use for pool water to keep it clean is described in detail in the article.
What to do. when the water in the pool quickly turns green, the contents of this article will help you figure it out.
What stationary polypropylene pools look like can be seen here:
How to build summer cottage buildings from wooden pallets
Before you start creating a building, you should think about its design, as well as its future location. For small structures, it is acceptable to do everything for the eyes. For large buildings, you should calculate in advance all the dimensions of the parts and the load. Approximate calculations are undesirable, as they may affect reliability.
Drawing of a utility block for a summer cottage made from pallets
The process of creating buildings can be divided into two main parts: preparing materials and assembling the structure. Also, at any stage, decoration, painting, varnishing and other decorations of wood can be carried out.
Wooden pallet for country houses
Pallets are assembled pieces of wood. Therefore, the process of constructing buildings from wood is absolutely the same as in the case of using boards. However, in the end there are more possible variations.
Preparatory stage
Wooden pallets should be prepared for subsequent use. First of all, they should be inspected for the presence of various defects, the possibility of splinters and general integrity. If necessary, get rid of negative factors that may affect the safety of the structure.
If part of the pallet is rotten, then separate it from the whole part. Use a hammer and a double-sided crowbar or nail puller to remove all nails and screws. Smooth out all roughness with sandpaper.
Sand the pallets before starting construction
The preparatory stage is completed by shaping the wooden pallets for assembly. Here everything depends on the final design of the building. A power tool is best for preparing the workpiece, but a simple saw will suffice.
Preparation of workpieces according to the drawings
Assembly
Assembling the elements is the main stage of constructing a building for a summer house from wooden pallets. The further service life and reliability of the design will depend on its quality, as well as the thoughtfulness of the plan.
The assembly process is individual for each structure. But, there are also similarities. The main methods will be to fasten the pallets.
Connecting pallets with self-tapping screws
The simplest option for connecting would be to use nails or self-tapping screws. They simply attach the pallets to each other. In particularly thick places, hammer nails or screw in screws at an angle.
A more difficult option to implement is remote connections. With this type of fastening, additional materials are used. For example, metal fittings or wooden beams. They are applied to the junction of the pallets and then attached.
Fastening pallets with metal corners
The first method is less expensive in terms of materials and easier to implement, but provides low reliability of the design. The second method will make the structure more durable and strong, but requires additional materials.
Treatment
At any stage, additional processing of wooden pallets can be done. This can be done both for the purpose of decoration and with the intention of increasing the service life of the building.
First you need to degrease the wood and also remove microcracks. This is done by grinding the surfaces of the pallets with sandpaper. It is not necessary to process all the edges; only those that will be visible on the front and inside of the building are enough. This is necessary so that the paint and varnish last longer.
Before starting assembly, sand the pallets with sandpaper
After the tree has already been processed, the next stage begins. The pallet is painted on it. One layer will be enough. Enamel, oil-based, and aerosol paint will work. It will take a day to dry. After or instead of the painting process, you can apply a water-repellent varnish. Exterior products are preferred.
At the end of the work, treat the finished building for a summer house made of wooden pallets with varnish
Wood carving and other types of decoration are carried out before painting and varnish work.
Insulation, vapor barrier and cladding of the structure
The roof of the barn can be insulated from the inside. To do this, insert mineral wool slabs between the rafters, stretch a vapor barrier film, nail thin slats of additional sheathing and attach finishing material, for example, moisture-resistant sheets of plywood.
The walls of the barn also need insulation. The selected insulation (budget options: polystyrene foam scraps, straw, sawdust) will have to be inserted from the inside of the walls into the space between the flooring and the pallet runners. The inside walls are also covered with a vapor barrier (the film is stretched horizontally, the second row should overlap the first by 10-15 cm). It is convenient to secure the film with a stapler.
Plywood, OSB or other sheathing material will be attached over the vapor barrier. Additionally, the sheathing can be plastered or painted to extend the “life” of the wooden walls of the barn.
One of the most economical finishing methods is plastering walls with clay.
To make the plaster mortar, only environmentally friendly components are used: sand, clay, dung, sawdust, wool, straw, felt, pine needles. Occasionally add a small amount of cement.
For finishing the shed, a clay-sand mixture with the addition of any fiber (for decorative purposes) is suitable. It is better to experiment in advance by mixing various components in small quantities. The clay must be soaked for a day before adding it to the solution.
Before plastering, a fine mesh mesh is stretched over the walls of the shed. Clay plaster is molded onto the mesh in pieces. The optimal thickness of the finished coating is 3 cm.
Before applying the second finishing layer, you will have to wait for the already applied solution to dry. This may take up to 4 weeks . The second layer of plaster is quite thin. When applied, it is leveled with a spatula.
Material calculation
The number of pallets is determined by the size of the future barn. If you build a standard box with a width of two pallets and a length of five, you will need 14 pieces per row. It turns out that for walls in two rows you will need 28 pieces, for a three-row barn - 42 pieces.
We also plan to disassemble at least five pieces as material for internal ties and linings. In addition, you need to buy at least 25 pieces of 70x70 mm timber, each 3 m long.
If you build a strip foundation, you will additionally need to prepare at least 100 kg of cement and 230 kg of sand.
It is best not to buy roofing, insulation and facing material right away; first build a shed, and only then make an estimate for the consumption of components.
Door installation
The door to the barn can be made from an edged board, nailing it on both sides to a rectangular frame made of bars. It is better to assemble the door frame from high-quality lumber, securing the structure with long self-tapping screws and polyurethane foam. Once the box is secured in the opening, all that remains is to screw on the hinges, door handle, and locking hardware (such as padlock lugs).
What kind of cellar can you build in your country house? Read the article on our website.
We build an enclosure for a dog on a personal plot with our own hands.
How to install a plastic utility unit? The answer is in the article.
Drawing up a project with drawings
If you are planning a construction with more or less comfortable conditions, then it is best to build a warm shed from pallets using a frame scheme.
In this case, the design of the walls makes it possible to lay insulation and sew cladding onto the outer surface with siding or regular clapboard. A gable roof will ensure good drainage of rainwater and at the same time improve ventilation of the room.
If the barn will be used only for household needs, then the box can be built from pallets, only reinforced with frame inserts. In this case, the roof is made pitched, but it is better to also line the walls of the house with plastic or siding panels.
In the first case, the barn can be built on a columnar foundation, which greatly simplifies the process of constructing the building. In the second option, the foundation will need to be poured, otherwise the structure will be unstable.
How to ensure long service life
A long service life of the shed can be achieved by treating all wooden parts with an antiseptic. The wood will not rot or deteriorate.
- It is also advisable to arrange ventilation in the barn so that the air does not stagnate and conditions are not created for the growth of mold and mildew.
- If you plan to store vegetables in the shed, it is important to ensure that there are no rodents and insects that will damage the wall material.
- For convenience, floor shelving can be installed in the barn. It is convenient and functional, and it is better to avoid using classic wall hooks and hanging shelves.
How to properly build a chicken coop is described here.
His Majesty the pallet: where the danger lurks
Pallets can be hazardous to health, therefore, before using pallets in construction, you should definitely inquire about the history of their origin.
The following pallet options are not suitable for construction:
- Pallets heavily painted with bright colors - they may contain life-threatening toxic formaldehyde;
- Pallets that were previously used at retail outlets in markets and spontaneous bazaars - absorbed odors and moisture can negatively affect not only the quality of the wood, but also the smell of the entire building;
- Marked pallets are IPPC, since they are treated with chemicals that can provoke various diseases in a person who has direct contact with the pallet.
Therefore, the first rule for choosing pallets is an environmentally friendly material without visible defects or damage to the integrity of the wood.
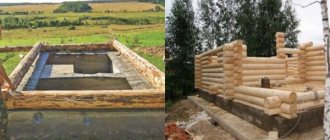
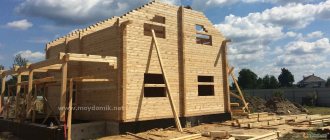
The process of building a large house from pallets
The second rule for successfully choosing pallets is trusted suppliers. You can order pallets from any transport company that deals with cargo transportation. Here the necessary information will be provided and the pallets will be selected better and cleaner.
Rules for choosing pallets for construction
It is better to purchase pallets from the manufacturer.
Pallets are ready-made fragments for assembling the frame of the floor, walls, ceiling and even roof. In some cases, blocks can be obtained for free or for a symbolic amount from transport companies, where scheduled write-offs of consumable property are regularly carried out.
Not all types of such products are suitable for such construction. An important role in the selection of raw materials for the construction of a house from pallets is played by its origin, storage and operating conditions.
The following products are not suitable for building a house:
- Covered with bright, sometimes reflective paint. Such mixtures may contain toxic substances harmful to human health.
- Previously used for selling vegetables, in open areas, stored in damp and cold rooms. Such wood absorbs a lot of moisture and unpleasant odors, which can disrupt the feeling of comfort and cause allergies.
- With IPPC marking. It means treatment with chemically active substances that are incomparable to residential construction and human habitation.
- Having dark spots, inclusions of mucus and many small holes. This is evidence of damage to the material by fungus, mold and insects.
When choosing material for a pallet house, it is necessary to study the condition of the wood. It should be clean, dry, even. The overall gray tint is not a cause for alarm - this is a natural property of the raw material. Stains of dried dirt are also not a problem. It could just be splashes from a passing car.
The best option for purchasing building materials is to purchase directly from the manufacturer or at a food base, where cleanliness, constant temperature and humidity are maintained.
Features of building a house from pallets
Structurally, pallets consist of bars on which boards are packed. If you look at the products creatively and from an engineering point of view, they are very similar to the frames that are used in frame construction. Their sizes are very suitable for arranging window and door openings.
When planning the assembly of a panel structure, the following features of the project should be taken into account:
- It is not necessary to create a strong foundation. A few concrete or brick pillars are enough.
- It is better to take material with a large reserve. The surplus can be used to make home and garden furniture and many light utility rooms.
- Pallets have a large volume. You should take care in advance of a dry place for storing them, protection from the sun and precipitation. It is advisable to spend a little more, but keep the goods intact.
There are different opinions regarding construction technology. Some people prefer to disassemble pallets into parts and erect buildings from the pieces. Others use them as is, supplementing them with the necessary elements. From an optimization point of view, it is advisable to use assembled blocks, using someone else’s previously completed work to your advantage.
Roof arrangement
A barn or house made of pallets needs protection: pallets alone cannot protect the building from rain. To do this, it is necessary to treat all the wood with an antifungal agent, and then apply paint to all elements of the building. In addition, using roofing felt or any type of soft roofing, cover the wooden elements.
The interior decoration remains, and you can move into the constructed building for the whole summer. Such a structure can only serve as a short-term shelter during the warm season and protection from precipitation. But this does not mean that it cannot be equipped in such a way that one can live in it even in winter. Of course, such a structure can hardly be used as a permanent place of residence in regions with very cold winters, but for temporary residence on weekends from November to March it is quite suitable if it is additionally insulated.
Necessary materials
1. Pallets. Their number for building a house will depend on the size of the room planned. 2. Logs and beams. 3. Cable reels. 4. Self-tapping screws. 5. Ruberoid. It will be used as a roof. Here, too, you can save money if you take an old advertising banner instead of roofing felt. 6. OSB boards. They will be used to cover the walls. We should not forget that the house will need at least one window and one door. It is not practical to order new metal-plastic windows for such a structure. Solving this problem is not difficult. Due to the massive replacement of windows in new buildings after the completion of the house, many residents are replacing window frames with better ones, since the developer initially installs technical windows. You can find an inexpensive door in the same way. An alternative and most profitable option is when the house has old windows and doors.
Floor
First, boards (or OSB-3) of the subfloor are attached between the joists. The protruding edge of the bottom trim beam (150×100 mm) is used as a support.
Do-it-yourself change house floor installation.
Then the surface of the subfloor is covered with waterproofing film. For this purpose, dense polyethylene is often used, but roll materials with bitumen or polymer-bitumen impregnation Gidroizol are considered more reliable. The film is laid with an overlap between the strips of at least 20 cm, with the seams taped with construction tape. The edges of the strips should extend onto the walls (the same 20 cm).
Insulation is placed between the joists. It is better to choose mineral wool, for example URSA. Unlike polystyrene foam, it is not flammable and does not harbor rodents. Its only drawback is its hygroscopicity and the property of losing its insulating properties when saturated with moisture (the same condensate). Therefore, you need a gap between the finished floor covering and a vapor-permeable membrane or use Izospan, which does not allow water to pass through - this will protect the mineral wool from direct contact with water and allow water vapor to erode from it.
The best choice for a finished floor is a tongue and groove board. The tongue-and-groove connection principle of the coating makes it possible to further protect the insulation from water getting into it.
But you can lay the same OSB, and linoleum on top.
Ceiling
To keep the cabin warm, it is necessary to insulate the ceiling. Of course, cold air will not descend from top to bottom, but warm air will “evaporate.” In addition, if it gets on a cold floor, it will cause condensation. That is why, even for a pitched roof, it is necessary to arrange a small “attic” space and insulate it with mineral wool. The principle is the same as for the floor: ceiling (board or OSB), moisture-proof Izospan film, insulation (mineral wool).
Decorative cladding from the inside is carried out similarly to the walls.
Recommendations
It is best to line the outer surface of the shed walls with clapboard or siding. This will not only improve the appearance, but will also make the entire structure stronger at the same time. Often a situation arises when there is simply not enough money or time to build a shed in one go. In this case, the box of pallets can be treated with drying oil and covered with polyethylene.
If the shed is built on a foundation, then the box can be sheathed with clapboard without fear. For free-standing buildings, the walls are usually not lined in a continuous plane, otherwise the wind will topple the barn
If the barn had to be built without a foundation, then the walls cannot be covered with finishing until partitions or spacers are installed inside. Otherwise, a powerful gust of wind in winter can easily collapse the entire structure like a house of cards.
Walls
The classic sandwich frame structure has several layers: internal lining, vapor-proof Izospan , insulation between the frame posts (mineral wool), vapor-permeable membrane, spacer strip (for the ventilation gap), OSB and decorative cladding.
In practice, the external cladding for a change house can be “simplified” to one outer layer - either OSB or decorative finishing. Considering the low “aesthetic” properties of OSB, the second option is often chosen, although the slabs can be painted in any color like a regular wooden surface.
Most often, a block house is chosen for exterior decoration.
It is stronger and “warmer” than lining and is more suitable for exterior decoration. You can use imitation timber.
As an alternative to wood siding, some people prefer vinyl siding. It does not require maintenance or paint treatment.
Interior finishing can also have an economical option made of OSB (OSB) or fiberboard ,
which can be painted or covered with vinyl wallpaper.
But cladding with wooden clapboard is more common.
The internal partition must be provided for while developing the design of the change house, but it is not too late to equip it later. The main thing is that it is attached to one of the floor joists from below and the beam of the ceiling beam from above.
Kinds
Depending on the design features, the barn can be permanent or temporary. Country houses that are planned to be used on an ongoing basis are usually erected in such a way that they fit beautifully into the overall appearance of the site and resemble a residential building. Such mini-houses perfectly decorate landscape design, since the same building materials are used to decorate their walls and roofs as for the main house. A permanent shed must be strong, so it is installed on a foundation
In this regard, for this type of buildings it is important to choose the right location, because after installation it is problematic to move them
The foundation for a permanent shed is selected taking into account the material of its walls and the type of soil on the site. As a rule, a columnar, shallowly buried, monolithic or strip foundation can serve as a reliable foundation. As for the walls, aerated concrete blocks are considered an excellent option for them, which are easy to install and light in weight. In addition, many craftsmen use frame technologies for exterior decoration, covering the walls with decorated corrugated board, clapboard or siding.
The roof of permanent structures is usually covered with ondulin. This sheet material is in great demand, as it is characterized by excellent performance properties and is available in various colors. Traditionally, these types of sheds are built with a toilet or shower.
Modular structures that have a collapsible appearance are no less popular among summer residents. They are placed mainly in small areas or when the construction of a residential building is not completed and further planning of the territory remains to be done. Temporary sheds are built as quickly as possible from scrap materials. Since the design is simple, you can build it yourself, without the help of specialists.
The dimensions of the block are selected depending on the number of items that are planned to be stored in it. Usually these are small sheds measuring 2x2 or 3x3 m. Their structure is framed, choosing wood as the cladding. This allows for quick disassembly and assembly. As for the interior decoration, the walls are often left unclad, since the structure is designed for a short service life.