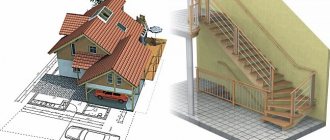
Not a single owner can do without a utility unit in private ownership. You need to store inventory somewhere; It is also not recommended to bring chemicals or fertilizers into the house, and a barn is much more suitable for storing items that need repair. But it is not necessary to allocate a capital, expensive building for it. A shed made of corrugated sheets will meet all the requirements for a utility unit, but at the same time it will cost significantly less. And its main advantage: the ability to build a shed from corrugated sheets with your own hands. Indeed, in this case, you will not have to additionally pay for the work of the craftsmen, which usually costs the same as the materials purchased for construction. And sometimes such costs exceed the estimate for consumables.
Benefits and Advantages
Building a shed from corrugated sheets allows you to get a lot of advantages that are not available when using other materials.
- Installation is extremely simple, so even a non-professional can build a shed from corrugated sheets. At the same time, he will not have to purchase or rent specialized tools or equipment.
- Corrugated sheeting has high moisture-resistant properties, due to which the barn will be perfectly protected from precipitation without the use of additional materials.
- Having decided in favor of building a shed from corrugated sheets, you will be firmly convinced of its fire safety: the material is not flammable.
- Corrugated sheeting does not lose its qualities in a wide range of temperatures, therefore it is suitable for use in any latitudes.
- Corrugated sheeting is a lightweight material. This quality simplifies and reduces the cost of both transportation and construction work: the foundation for the shed can be poured in a lightweight form; a particularly strong frame for the building is not required.
- A shed made of corrugated sheets has an extremely long service life.
- The material is produced in a rich range of colors, which allows the building to fit into any planned interior of the site.
To be fair, we note that corrugated sheeting also has its drawbacks. These primarily include insufficient sound insulation, as a result of which a roof made of this material is “noisy”. However, in the case of utility unit equipment, this defect is insignificant. In addition, corrugated sheeting loses its anti-corrosion qualities if the material’s protective layer is damaged. However, this nuisance can easily be prevented by eliminating potential threats. Simply put, there should be no heavy branches above the shed that could break from the wind.
Selecting a location
Place the woodshed away from barbecues and other sources of ignition. You should not build a woodshed near a garden or vegetable garden, as this is usually a rather large structure and shades the area. This should be an elevation (in the lowlands the firewood will become damp) where the wind blows. In this case, it is worth considering the possibility of travel to the building. For fire safety, a distance of at least 4 meters is maintained from the house to the woodshed.
Preparatory stage
First you need to choose the place where the corrugated shed will be built. The location is chosen in such a way that the utility block does not occupy good land suitable for gardening or gardening, does not shade existing plantings, and is located at an optimal distance from the main house. It is preferable to make the barn rectangular in cross-section - it will be easier to build and finish. The drawing is carried out without fail, with the designation of windows (if they are planned) and the entrance door - the sketch will allow you to accurately calculate how much materials will be needed for construction.
Before you build a shed from corrugated sheets with your own hands, you need to stock up on everything you need. First of all, you need the corrugated sheet itself. For a shed, the most suitable material is that of the wall variety, with a thickness of at least 4 mm. The dimensions of an individual sheet are standard (one meter by two), so you need to calculate the number of sheets based on the dimensions of the planned building. In addition to corrugated sheeting, a number of other materials will be needed.
- Self-tapping screws of several types.
- Blocks for forming the foundation.
- Metal fittings.
- Mounting corners.
- Wooden beam with a section of 100 by 150 mm for the construction of the frame. Instead, you can use metal racks or pipes, but this will significantly increase the cost of construction.
- Sand and gravel, which will form the basis of the foundation.
- Doors and windows.
The interior decoration will also require attention. The inside of the barn will need to be sheathed with something. What exactly is up to you to decide. The most budget-friendly and easiest-to-install option is plastic siding. Chipboard boards are cheaper, but require treatment against biological threats, are quite heavy and more troublesome to install.
Every craftsman has the necessary tools: a level (or at least a plumb line), a saw, a screwdriver, a hammer, a shovel.
Before starting construction of the shed, all wooden elements are impregnated with antiseptics and left until completely dry.
Foundation arrangement
What structures can be made from metal profiles?
Depending on the tasks set, you can implement different designs that differ in the complexity of construction, material consumption, shape of the main elements, and so on. The following types can be distinguished:
- A rectangular box with external lining and no insulation - such a structure is suitable if the shed needs to be erected as quickly as possible and there are no plans to store anything in it except garden tools and other items that are not afraid of heat and cold.
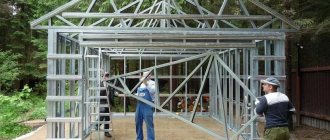
Skeleton of a frame shed from a profile pipe
- The design can be complicated by adding partitions inside and dividing the internal space into compartments for storing different things. Here only the structure of the frame becomes more complicated, and the consumption of material increases. It doesn't take much longer to install it.
- Both of the above options can be made with even greater functionality. To do this, you need to add interior finishing with any sheet materials, and install insulation inside the frame - mineral wool or expanded polystyrene. In terms of price, such a shed will cost at least twice as much, since the cost items for interior decoration and insulation are added. But such a structure is suitable for storing homemade preparations, fresh vegetables and other products. In winter, the structure, if everything is done correctly, will not freeze.
- An even more advanced solution would be a shed with windows. Here you will have to spend money on the windows themselves and on their installation. But there will be more light inside and it will be possible to quickly ventilate the room.
Such a barn will be blown by all winds.
Another important point that affects the speed of construction and the operational characteristics of the building is the type of foundation. The following are suitable for a metal frame:
- Under no circumstances should dirt floors be used with insulated structures, since the insulation is neutralized by the entry of cold from below. They are suitable for the simplest temporary structures.
- Wood Flooring – This is where you need to look at the floor construction. If it is two-layer (bottom and lid), then a heat insulator can be placed inside between the joists. This floor is suitable for insulated construction. If only flooring is provided, then there will be no significant difference with an earthen floor, except that the inside of the barn will be cleaner.
- A concrete base is the most capital option for a barn field. It should be used for the largest and most insulated structures. In terms of material consumption, price and manufacturing complexity, this floor is ahead of previous analogues.
Interesting to know! Concrete floors are rarely combined with frame barns. The most common combination is wooden flooring and its analogues (plywood, OSB, chipboard and others).
From the inside, the outbuilding is divided into two parts by a partition - a workshop and a woodpile.
Roof type for metal profile frame
The next important point to decide is the shape of the barn roof. For such a light structure the following are suitable:
| Roof view, photo: | Description: |
The simplest structural solution is a flat roof. At the same time, the shed for the dacha does not require any extra material for the walls, for organizing the slope (everything can be done to the standard dimensions of the purchased sheet cladding material), and there will be a small saving on roofing material. Whether this approach is justified is up to everyone to decide for themselves, but it is worth considering the following:
| |
| A pitched roof performs much better. Due to the slope, you can organize high-quality water flow in the desired direction. The design of such a roof is not much more complicated, although it is more difficult to sheathe the walls of a barn - there are a lot of scraps left, the material is joined and cut at an angle. An indirect disadvantage can also be called the not very beautiful appearance, but people are not very critical of the appearance of barns. You can find out more about building a barn with a pitched roof by following the link. | |
| The most reliable, aesthetic and practical option for a frame shed is a roof with two slopes. You can choose any angle of inclination, and the material consumption increases slightly. Plus it simplifies the process of wall covering. Structurally, such a roof looks like a more complex solution, but installing it from a metal profile is not as difficult as it seems. When organizing drainage from the roof, it will be necessary to install more storm channels, although many people neglect these elements in barns. | |
The arched roof option for a metal shed is the most difficult to implement. It requires a special tool for bending pipes in an arc, and experience in handling it. From a technical point of view, such a shed is inferior to pitched solutions for the following reasons:
|
Based on the information presented, we come to the conclusion that a gable roof is the best solution. It can be sheathed with any roofing materials, and it has all the necessary properties. In second place we choose the lean-to option, and then at your discretion.
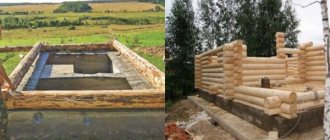
Barn foundation
The construction of any building, including a shed made of corrugated sheets, begins with the construction of the foundation. Step by step this part of the work will look like this.
- In the selected area, according to the dimensions of the utility block, soil is removed to a depth of 50 cm.
- A cushion of sand and gravel is formed.
- A layer of crushed stone is poured and compacted.
- If desired, metal reinforcement can be laid on the resulting pillow. But only very responsible people resort to this step: a shed made of corrugated sheets is a fairly light structure, so the foundation does not need to be strengthened. The entire “pie” is filled with concrete.
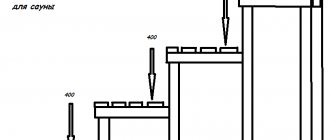
When the foundation is completely dry (hardening time depends on weather conditions and the thickness of the concrete layer), blocks are installed around its perimeter, which will become the basis for the floor of the barn. A plumb line checks whether the top points of each block are in the same plane. A frame is mounted from timber under the floor and placed on concrete blocks.
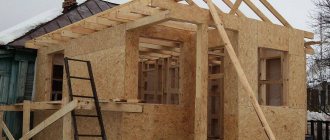
Frame construction
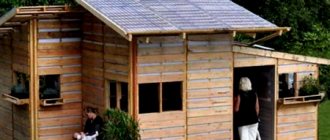
What are they building for?
After purchasing a plot of land and at the initial stages of its improvement, the owners need somewhere to store construction and finishing materials, all kinds of tools, hide from the rain themselves, and even live. To do this, they build a small building from the simplest materials, but this, of course, depends on the time of year during which construction is taking place. During construction work, this is necessary to ensure that all the required tools are always at hand.
In the future, this or a new structure can serve as a good shed, where various kinds of gardening equipment are usually stored. The room is also suitable for organizing a woodshed, toilet or shower.
Household frame
After arranging the foundation, it’s time to build the foundation for the walls. For the frame, the required number of timber elements is cut, calculated according to the drawing. First, the vertical racks are made. The step between them is a maximum of 70 cm. Cross members are attached to the posts with self-tapping screws at a distance of no more than 40 cm. To give stability, the structure is secured with metal corners, which are again fixed with self-tapping screws. All verticals must be controlled using a plumb line or level. The frame is sheathed with any materials you choose. Boards, plywood, and chipboard sheets are suitable for cladding. The elements are fastened with self-tapping screws, ensuring tight joining of the fragments.
Please note: the frame can also be built from pipes. But usually home craftsmen avoid such a step due to a significant increase in the estimate. In addition, when using lightweight corrugated sheeting, there is simply no need for a reinforced pipe frame. Unless you have an abundance of them on your site, and there is simply nowhere else to use metal stands.
Sheathing with corrugated sheets
How to fold a round woodpile
You have probably seen firewood stacked in a cylindrical woodpile (or photo) many times. They look good, and, more importantly, the wood dries quickly in them.
Round woodpiles for drying firewood
Everything is very simple, but without knowing the secret it’s impossible to do it well. Below is a photo report that shows step by step how to fold a round log of chopped wood.
First, dig in and securely fasten a pole about 2 meters high. Place small diameter logs around. The distance to the center is twice the length of the firewood (if the firewood is 40 cm, the distance to the center is about 80 cm).
The first step of laying a round woodpile
Next, lay out the chopped firewood. One end of them rests on the laid out logs, the other lies on the ground. Lay it so that everything lies almost end to end along the inner edge (with small gaps). There will be gaps on the outside. It's not scary - the second row will fit in them.
Lay out the first row
Place the second row on top of the first. Trying to fill in the gaps as much as possible. We begin to stack the firewood tightly around the pole while standing.
Continuation: lay out the second row, start filling the middle
We continue to stack the firewood in a circle and fill the middle
As soon as you notice that the outer edge of the firewood has begun to slope down, lay out a row in a circle that will raise it. Then you continue to stack the firewood in the same way: in a circle until half the height of the firewood (20 cm), then fill the middle. The second row in the middle is not just placed, but stuck into the cracks. Try to insert the pieces of wood tightly.
Continuation of the process
View of the woodpile from above
Woodpile installation completed
The same process can be repeated with more wood. Lay two or even three rows in a circle. The sizes of such firewood loggers can be enormous. The photo gallery shows an example of how to fold a large woodpile.
Since you have started arranging your site, perhaps you will find this article useful on how to make paths (from the same wood, for example) or benches.
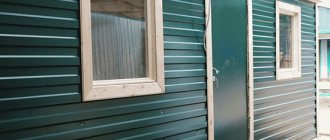
Barn walls
Installation of corrugated sheets begins with the longest wall of the building. The corrugated sheet is fastened with self-tapping screws; To make the procedure easier, it is advisable to use a screwdriver. During installation, several rules must be observed.
- Self-tapping screws are purchased in the required variety: fasteners can be used both for working with wood and for working with metal. In addition, the length of the screw must exceed the wave height of the sheet by at least 35 mm.
- There should be no more than six screws per square meter of corrugated sheet.
- Sheets of corrugated sheets are mounted with an overlap. The entry of one element into another is usually equivalent to one wave.
If you want to make the barn warm, then you need to take care of vapor and heat insulation. The issue is most often solved simply: the voids between the outer sheathing of corrugated sheets and the vertical posts are filled with mineral wool. You can replace it with a vapor barrier, but this will increase the cost of the barn.
The interior decoration of the building is reduced to covering the walls with siding or antiseptic-impregnated chipboard sheets. The choice of material remains with the owner of the site and depends on his preferences and financial capabilities.
What is a woodcutter
There are several varieties! A wood shed is a separate shed for drying and storing firewood. Once upon a time, this word was used by wood merchants, and it was also the name given to boats or barges on which timber was melted down the river. The woodshed is an extension to the house made for storing lumber for heating the stove. A firewood rack is a metal stand that resembles a basket. A bundle or two of firewood is stored and transported in it (they are placed near the fireplace, solid fuel boiler, barbecue, etc.).
Woodshed - a separate shed for firewood
The most convenient place for storing logs is considered to be a woodshed, since it is dangerous to attach it to wooden surfaces if the house is made of wood - wood-boring beetles (grinder) and its many relatives may appear.
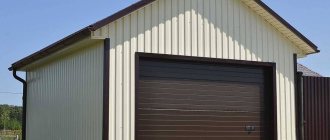
Roof
A shed made of corrugated sheets can be equipped with both a gable and a pitched roof. More often they choose the first option - it can be easily insulated if necessary. This is the work plan.
- Arrangement of sheathing. The same timber used for the construction of the frame is used for it.
- Fastening corrugated sheets. If for the walls you can take a sheet of ordinary galvanized steel, then for the roof it is better to purchase material with a polymer coating - the roof is more exposed to precipitation. The corrugated sheet is again attached with an overlap, self-tapping screws, and preferably with a rubber gasket, to ensure greater tightness of the roof.
If the shed is supposed to be equipped with the utmost capital, steam and heat insulation is installed under the corrugated sheet roof, which is covered from the inside with a sheathing made of antiseptic-impregnated plywood.
Barn floor
Materials for a change house with firewood
To choose a material, you need to decide whether the utility block will be rebuilt in the future or whether it is a permanent structure.
In the first case, preference should be given to materials that are not too expensive:
- beam;
- thick board;
- lining for wall decoration;
- slate for the roof;
- tin.
If the structure is stationary and there are no plans to rebuild it in the future, then it is better to use:
- wooden materials;
- brick;
- gas blocks.
A permanent permanent utility unit with a bathroom and shower will require communications and a foundation.
Important! It is not recommended to use plastic lining for covering the walls of a stationary utility unit; they are best used for interior decoration of a bathroom
The final touch is the floor
In the most primitive version, the floor in the barn can be left concrete, that is, the foundation can be poured. In this case, you can cross out from the list of works the frame installed on the blocks after constructing the base of the shed. However, such a choice will make the building completely uncomfortable, and the humidity inside it will be unacceptably high. In addition, the conditions for storing the same fertilizers in a barn will be unsuitable. It is better to equip the flooring.
The most commonly used boards are nailed to the frame or fixed with self-tapping screws. They need to be laid end to end, but not too tightly, leaving technological gaps of about 2 mm for the wood to “breathe”. Some craftsmen prefer to use chipboards instead of boards. This is a more affordable option, but it will require laying transverse joists under the floor for fastening individual elements.
After completing the main work, a window is inserted into the barn and doors are hung.
As you can see, building a shed from corrugated sheets with your own hands is not so difficult. However, if you are not confident in your own abilities or are limited in time, you can always hire a team that will quickly and efficiently provide you with a utility unit.
Watch a video on the topic:
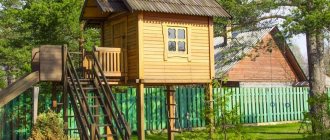
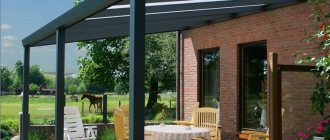
Household block with woodshed
Before you start designing a shed (shed, outbuilding) with a woodshed, you need to figure out what it is. In short, it is a small structure used for various purposes. Most often, cabins are installed in areas near a country house.
A change house with a woodshed is a room combined with an open space for fuel. Firewood will always be close to you. Since the change house is combined with a place for storing firewood, fuel will always remain dry thanks to the presence of a roof
It is important that due to the free circulation of air in the open structure, firewood is stored in ideal conditions
A utility unit with a firewood shed is a great idea for saving space, as well as combining the convenience of a shed with the functionality of an open space for firewood under a canopy.
A utility block with a woodshed for a summer residence is used for very different purposes and therefore has different construction options. The owner himself chooses the dimensions and layout of the cabin individually.
What is important to remember when building or creating a project for a utility block with a woodshed? Following:
- Since at the dacha the issue of hygiene very often comes up, it would be a good idea to build a utility block with a toilet and a firewood shed. A toilet and shower under one roof will help you combine both work in the country and keeping your body clean;
- You also need to remember about tools that can be stored in a separate room.
It is important to approach it responsibly when building a shed with a woodshed for your summer cottage with your own hands. If you have additional space, it can be used to spend quality time with friends
If you visit your dacha at different times of the year, it is important to think about heating. A potbelly stove can handle this task perfectly.
A dacha cabin with a woodshed can serve as temporary housing during the construction of a dacha and its furnishings.
If you have a potbelly stove, you can survive even the most severe frosts, since firewood is always at hand thanks to the presence of an indoor woodshed.
After completion of the work, this room can be used for various purposes, for example, for storing tools, barbecue, or for a change of work clothes. Here you can also place a bicycle and other things that you will need for a holiday in the country.