Forum member Demoncheg and his wife have long dreamed of getting out of the dusty city and settling near a river and forest so that their child, and they themselves, could breathe clean air. The family settled on the golden mean: the plot they liked was located 100 km from the city - not too far, but not so close either. They were captivated by the beauty of the spruce forest, which is located not far from their future place of residence. There they decided to purchase 10 acres of land. Initially, the family wanted to buy a ready-made 6x2.3 m change house, but they had to abandon this idea, since the desired quality did not correspond to the asking price. Therefore, it was decided to build a guest house with our own hands. Drawings of the future house 6x3 m were independently developed and an estimate was drawn up. They built the house in 15 days, the costs according to the estimate amounted to 120 thousand rubles.
Content
- Construction of the foundation
- Bottom frame frame
- Wall installation
- Roof installation
- Do-it-yourself cladding of frame walls and exterior finishing of a frame house
- Interior decoration of the house
- Installing a fence from corrugated sheets with your own hands
- Well house
- Basic materials and tools used in the construction process
- Bottom line
Attachments:
- Project in Sketchup
- Estimate for the frame of the house
Which houses belong to the "economy" class?
An economy class country cottage is the most affordable housing. During any economic crisis or during economic recovery, this has always been and is a huge segment of the capital and suburban real estate market. As for the construction of economy-class country houses, this is generally the most popular choice when constructing additional housing.
Experts include cottages with the following characteristics in this segment:
- building area from 80 sq. meters;
- plot less than 12 acres;
- local area about 1 hectare;
- the cost of an economy house is less than 6 million rubles;
- may be located at a distance from socially significant objects;
- engineering communications are often not central, but individual;
- in the Moscow region, economical housing is located no closer than 30 km from the Moscow Ring Road.
- are built according to simple standard designs that do not include optional architectural and design elements;
A brick cottage may also well belong to economy-class real estate Source domofond.ru
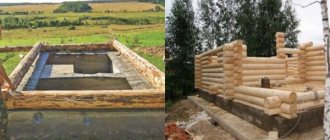
Construction of the foundation
Developers learned how to build a guest house with their own hands after studying materials from numerous self-builder forums. First of all, we brought a truck of sand and crushed stone to the site and ordered building materials. As for the foundation, we decided not to overthink it, so we decided to install the structure on concrete blocks. This type of foundation is also often used when building a cabin with your own hands.
Advice: Before you start building the foundation, you need to choose high-quality concrete blocks, since the strength of the future building will depend on them. When choosing blocks, you need to pay attention to the following characteristics: boundary load, frost resistance of the blocks, the presence of granite crushed stone and the size of the blocks.
First, we marked the soil using metal pegs, rope and a construction meter, that is, we outlined the boundaries of the future building and foundation.
Note: During marking, it is necessary to take into account that the width of the foundation should a priori be greater than the width of the wall.
After completing the work on marking the territory, we began to prepare the soil for the construction of the foundation. For a columnar foundation, it is necessary to make holes in the ground for supports. Their depth should be approximately 1.5-3 cm, this depends on the unevenness of the area. That is, the recesses must be made so that after installing the blocks, their level matches.
You should definitely make cushions in the holes: pour sand and gravel at a level of 10-15 cm, fill with water and compact thoroughly. Next, the support platforms were installed and the blocks were placed.
Note: Support platforms allow you to increase the load-bearing capacity of the soil, and accordingly, a large weight of the structure is possible. It is not recommended to use paving slabs as support due to their fragility. The most reliable option is to fill the reinforced support platform in one row with road mesh or reinforcement.
Requirements for arranging a guest room
When creating the interior of a guest room, you need to take into account a number of nuances that will help you find the right vector:
- A guest room most often has small dimensions, but the optimal size is considered to be an area of at least 10 sq.m. If the room’s square footage does not reach this figure, then a person will not feel comfortable in it.
- It is imperative to provide generous artificial lighting when natural lighting is in short supply.
- The minimal furniture set includes a bed, a wardrobe, a bedside table (dressing table) or a chest of drawers with a mirror. In more spacious rooms, this set can be supplemented with shelves with books, an armchair and even a fireplace for special comfort. In small rooms, it may be worth considering multifunctional furniture to save space.
- We must not forget about entertainment, so a TV must be installed in every guest room.
- It is desirable to have a separate bathroom.
To better navigate when creating decorations, study interior solutions in hotel rooms.
Bottom frame frame
We made the bottom trim from 150x100 mm timber. The bottom trim is the first layer of timber; it is necessary to fix the future structure on the foundation. Also, the strapping acts as a reference point for the walls and floor.
Tip: Traditionally, the bottom trim is made from softwood. The builder can choose from a timber, a board or a bunch of boards and a log. If a bunch of boards is used, then it should be secured with screws or nails of different lengths and in a checkerboard pattern.
The size of the bottom trim should be 5-7 cm smaller than the foundation in order to install the ebb and make the outer cladding of the house. We laid out the prepared timber with the quarters cut out on the foundation, checked the dimensions, compared the diagonals and the horizontal level. You can assemble the harness using self-tapping screws or wood glue-sealant.
Tip: In order for the connection of the lower trim to be sufficiently strong and rigid, it is recommended to make it in a “quarter”
The gaps between the lower beams and the foundation were sealed using a gasket made of polystyrene foam. As expected, the entire timber was treated with Senezh antiseptic.
At first it was planned to build the building according to the “platform” principle, but during the construction process they decided to build it according to a different principle.
We attached the logs made of antiseptic timber “in a quarter” to the bottom trim with self-tapping screws and glue-sealant. We also made the basis for the future floor: along the lower edge of the floor joists, bars were attached, on which a subfloor made from edged boards was laid. The entire structure must be antecepted.
About lighting
As for lighting, guests are given the opportunity to independently adjust both types: artificial and natural. In the first case, in addition to the central ceiling chandelier, the room is equipped with local fixtures (sconces, floor lamps, lamps) and decorative light bulbs around the perimeter. So that a person can customize the lighting to suit himself, it is advisable to equip the system with a control panel that will allow you to adjust the intensity. Guests can come not only from a neighboring village or suburb, but also from another country with a completely different time zone.
During the acclimatization period, a person will initially have the habit of sleeping at unusual times for others. Therefore, be sure to hang thick curtains so that the fabric reliably protects the sleeper from sunlight. Alternatively, you can leave a special night mask-glasses on your nightstand. The tulle is chosen to be translucent, since perhaps the guest (city dweller) likes to fall asleep under the lulling light of street lamps.
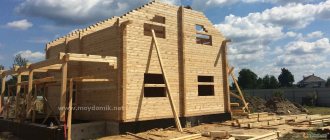
Wall installation
After the logs were laid, we began installing the walls. The distance was made a multiple of the insulation; the material chosen was 100x50 mm timber. The assembly of the house frame proceeded as follows. At the corners of the frame building and between them, load-bearing frame posts were installed, which were aligned and secured with temporary jibs from the outside.
We installed the top trim on the frame racks. Here you need to once again carefully check the horizontal and vertical positions of the supporting structure of the frame mini-house. Now you can install the remaining wall posts, focusing on the distance of the floor joists. Secure the entire structure with corners and screws.
Tip: Fastening with nails is cheaper, but it is unreliable because the wood often cracks. It is recommended to select metal corners and fasten them using self-tapping screws and a screwdriver.
We started installing the upper floor joists. They were laid in grooves in the same way as the floor joists, the only difference being that the floor joists were longer. This is provided in order to later attach the roof rafters. The frame racks were strengthened with jibs.
At this stage, construction was suspended for 10 days due to the drilling of a well. Upon completion of the work, construction continued.
Guest house in modern style
Area: 740 sq. m Where : Odessa, Ukraine Authors of the project: Ilya Temnov, Konstantin Turbin (architectural bureau M3Architecture)
Photo by Anton Garets, Ilya Temnov
Photo by Anton Garets, Ilya Temnov
Another private country residence is located on the Black Sea coast, within the city. The house consists of two separate volumes with the same set of rooms: one for the owners, the second for guests. The blank facades of the building face the multi-storey residential building and the road - in conditions of dense urban development this is very important.
Photo by Anton Garets, Ilya Temnov
Photo by Anton Garets, Ilya Temnov
Due to the U-shaped configuration, a private space was formed, a patio-courtyard closed from prying eyes. Two swimming pools and numerous outdoor and rooftop recreational areas make it a cozy place to relax.
Photo by Anton Garets, Ilya Temnov
Photo by Anton Garets, Ilya Temnov
During construction, materials safe for health were used, as well as the most modern technologies. The buildings are equipped with solar collectors, which not only heat the houses, but also heat the water in the swimming pools. To ventilate the premises, a supply and exhaust ventilation system with air regeneration and built-in heat pumps are used. In a word, White House is a real energy-saving eco-house, because it consumes the same amount of energy as an apartment with five times smaller area.
Photo by Anton Garets, Ilya Temnov
Photo by Anton Garets, Ilya Temnov
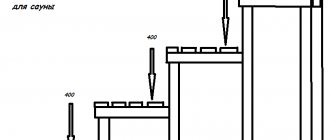
Roof installation
After a short break we moved on to installing the roof. First they made the overlap. It is important to lay the timber strictly on the wall posts of the frame house to ensure the strength of the structure. The ceiling is laid with a projection of more than 40 cm from the outer wall - this will protect the walls of the mini-house from rain.
Six farms were assembled right on the ground. The trusses were built from the same timber from which the frame of the house was made, and were guided by the standard size of metal tiles. The trusses were fastened with metal plates.
Tip: To add rigidity to the structure, it is recommended to additionally secure the rafters with metal plates. You can purchase them or make them yourself from a sheet of galvanized iron using a jigsaw.
After installing the truss, we moved on to roofing work: waterproofing and sheathing. Waterproofing material was placed over the entire roof area and secured with bars. These bars are assigned several tasks: to maintain waterproofing, create a ventilation gap above the roof and serve as the basis for the counter-lattice.
The sheathing must be done staggered to avoid ruptures of the roofing material in the event of shrinkage and warping of the lumber. To create a cornice, the lathing should be laid with an extension of 30-40 cm. Next, a counter-lattice was installed for laying the metal tiles.
It was time to lay the metal tiles, and here we encountered some difficulties. The installation of metal tiles should begin by placing the first sheet in the lower corner of the rectangular slope directly onto the sheathing and fastening it with a self-tapping screw.
Note: It is important to remember that metal tiles should be laid parallel to the eaves.
When installing the next sheet, you need to pay attention to the line that the edges form. It must be perfectly level, otherwise there is a possibility that the structure will collapse. All other sheets are attached in the same way. And finally, we sewed up the gables with sheet moisture-resistant material.
Popular designs of beautiful one-story houses
| Project No. 57-06K | Project No. 57-37 | Project No. 58-01 |
The projects website contains a catalog of residential one-story houses with layouts. It contains photos, operational and technical characteristics and basic parameters of buildings. Over 15 years of productive work, the employees of our bureau have developed a large number of modern options for one-story houses and cottages; the best projects are included in the catalog.
Various materials are used for construction:
- brick;
- gas, foam and expanded clay concrete blocks;
- wood and processed products (rounded logs, types of timber - glued or profiled).
The site presents a variety of options, from budget-priced country houses to luxury buildings with beautiful design. A potential buyer can easily find a one-story house project to suit his taste:
- square or rectangular in plan;
- economical or premium price segment;
- standard or original;
- a small area or with spacious rooms.
Do-it-yourself cladding of frame walls and exterior finishing of a frame house
First, the walls were covered with windproofing film from IZOVEK, after which we moved on to covering the back wall. It was decided to cover the facade of the frame house with imitation timber measuring 185x21x6 mm. We made this choice because the material imitating timber has a number of advantages:
- Does not deform;
- Does not change its appearance over time;
- Does not rot or wood fungus;
- Easy to install.
To minimize the ingress of moisture, the lining panels were fastened in a horizontal plane.
We installed Chinese doors and plastic windows purchased in advance.
The walls of the house were painted with white Dufatexaqua antiseptic. The impregnation was applied in two layers, trying to ensure that the wood texture remained visible.
We made trims for the windows, painted the corners and trims dark with PinatexUltra paint in rosewood color.
Finally, we installed the drainage system and screwed in the lanterns.
Option with one bed
The bed will be the center of the guest room. It personifies the main purpose of this room. Guests can sleep here or just “lounge” after a long journey. You should not choose “experimental” options in the form of round or “water” beds. Some people may not like this innovation. Wood is considered the best material for a bed. This beautiful material is welcome in any style and will give guests a sense of security. Solid wood can be supplemented with forged elements.
Interior decoration of the house
First of all, we insulated the walls with 100 mm thick Rockwool, made a vapor barrier on top, sheathing and sheathed the walls with PVC panels. The panels were fastened with a stapler, we also built a sheathing on the ceiling and installed corners. To begin with, we covered only one wall to connect electricity, and then all the others.
The next stage of finishing is laying the floor. They did it on the same principle as the walls. From the very beginning, it was planned to insulate the floor with 50mm thick material, but in the process of building a frame house with our own hands, it was decided that this would not be enough. Since the floor joists were already lying down, we decided to get out of the situation in the following way. We wove a web from synthetic twine, laid windproofing, laid 100 ml of insulation on top, and at the end - vapor barrier and plywood.
The doors were installed and linoleum was laid. The kitchen was also covered with panels, shelves and a coffee table were assembled. We can assume that we have successfully completed the task of how to build a guest house with our own hands.
Option with two or more beds
The situation is much more complicated with rooms designed for a couple of guests or more. It’s good if a married couple arrives, but what do you do when you need to put a guy and a girl who didn’t even know each other in the same room? Of course, the compact, but completely inappropriate in this case, option with bunk beds is not even considered. Linear placement along one wall is considered optimal. In this case, the beds can be separated if necessary.
In order not to complicate the interior with massive zone dividers, it is recommended to use mobile partitions, curtains or screens. If necessary, each sleeping place is fenced off. During the day, the room is freed from partitions, and its interior again becomes a single composition. Of course, there can be no talk of any sound insulation. You have to either be content with what you have, or design several separate guest rooms, which not everyone can afford.
Installing a fence from corrugated sheets with your own hands
It was also planned to install 90 meters of a two-meter fence made of corrugated board. We ordered the following material: for the pillars a six-meter profile 60x60, it was cut into 2 parts, for the veins we used a 40x20 profile, for gates and wickets 3.5 m in size 80x80. We sanded the iron and painted it with Hammerite metal paint. They decided to drive in the pillars because the soil was clay. They were hammered with a sledgehammer from a stepladder to a depth of approximately 1-1.2 m, the tops were cut off. Before driving in, they dug holes the depth of a spade bayonet, then filled them with crushed stone. The posts were completely driven in on both sides of the site.
On the long side of the site, holes were drilled with a gas drill approximately 1 m deep and filled with crushed stone with a tamper. We poured a concrete strip with reinforcement under the gate posts and gates.
During this construction season, three sides of the site were sheathed. The sheathing required 85 sheets of corrugated sheets. It was decided to do the gate and the fourth side of the fence next year.
WOODEN GUEST HOUSES. PROJECTS AND PHOTOS
“Sivezh” is an exclusive project made of large diameter cedar Total area – 73 m2 Construction price on request
VIEW THE PROJECT AND PHOTO
“Egoist” – a project for a recreation center in the Vologda region Total area – 35m2 Price on request
VIEW THE PROJECT AND PHOTO
“Ivan” – a project for a hunting club in the Ivanovo region Total area – 33 m2 Price on request
VIEW THE PROJECT AND PHOTO
“Rassvet - 1” Total area – 46m2 Price on request
VIEW THE PROJECT
“Kolovrat - 1” - a Russian-style project for a residence in Altai Total area - 235 m2 Construction price on request
VIEW THE PROJECT AND PHOTO
“Rassvet” - a project for a recreation center in the Pskov region Total area – 46 m2 Price on request
VIEW THE PROJECT
“Tower” – a project for a private wooden residence in Yaroslavl Total area – 200m2 Price on request
VIEW THE PROJECT
“Hut for Friends” Total area - 270m2 Price on request
VIEW THE PROJECT
Well house
In parallel with the construction of the frame house, we started constructing a well without a caisson using an adapter. We loaded the pump, laid out the base with paving stones and made a house for the well in one day. They covered it with clapboard, covered the roof with the remains of imitation timber material, and laid flexible tiles on top. It was planned to leave equipment for the well in this house.
Layout of economy class houses
Since houses of this class are designed with minimal dimensions, it is very important to use every square meter of internal space wisely in their layout. First of all, the composition of the premises is thought through. A house should have everything for a comfortable stay. The layout of modern private housing, regardless of its class, includes the following required premises:
- hallway;
- living room;
- kitchen;
- dining room;
- bathroom;
- bedrooms.
The projects do not include additional premises, such as, for example, an office or a library in economical houses on 6 acres, since they can be easily dispensed with. In this case, general purpose premises are usually combined into a single multifunctional space. This applies to public access groups - hallway, living room, kitchen, dining room. Instead of several separate small rooms, the project includes one large and bright room, which then, when decorating the interior, can be divided into zones.
Open plan living area Source dizainall.com
Such a room as the hall deserves special attention in the planning of economy cottages. Its function in the layout of the first floor can be performed by the hallway. The hall is planned as a common communication hub from which you can access any room on the floor. However, some designers prefer not to include a hall in the project, but to use a common room as a unifying unit, making it a passageway. But this architectural move can only be applied by highly qualified specialists who can design a walk-through living room or dining room in such a way that it turns out to be quite comfortable, cozy and functional.
When combining the kitchen, dining room and living room, the kitchen area is located in the back of the room. The kitchen should not be a walk-through room, otherwise it will not be possible to conveniently and compactly place all the necessary equipment in it.
Convenient location of the kitchen in an economy class house project Source pic2.me
In a small cottage, one bathroom is enough. But economical cottages are often used to accommodate large families. In such cases, it is necessary to provide 2 bathrooms - one in the guest area and one in the bedroom. In two-story houses, bathrooms should be designed one above the other. The kitchen should be adjacent to the bathroom. All this will allow you to save on the installation and operation of the water supply and sewerage systems.
There should be no corridors in the layout of economy class houses. Moreover, in bedrooms and general premises it is advisable to plan a place for installing built-in furniture. It is more spacious than ordinary wardrobes and chests of drawers.
See also: Catalog of low-cost house projects presented at the Low-Rise Country exhibition.
Basic materials and tools used in the construction process
- Concrete blocks
- Sand and gravel
- Rockwool1 cm for wall insulation;
- Boards 150x50 m;
- Antiseptic for treating all wooden coverings Senezh;
- Metal tiles;
- windproofing IZOVEK
- Windows and doors;
- plywood for floor 18 mm
- PVC wall panels
- Dufatexaqua antiseptic for house painting
- PinatexUltra impregnation, rosewood color for painting window frames and corners
- For the fence: profile 60x60 6m, profile 40x20, gates and wicket 80x80 3.5m
- Hammerite
- Imitation timber material for house cladding
Houses made of foam blocks
Foam concrete is a modern wall material with good technical and performance characteristics. It is often used in the construction of economy class cottages due to the optimal price-quality ratio. At a relatively low cost, foam blocks provide the building with strength, reliability, a high level of heat conservation, and good sound insulation.
Construction and architectural companies offer all kinds of ready-made projects for country houses made of economy class foam blocks. Foam concrete walls do not require additional thermal insulation, and they are characterized by an almost ideal smooth surface. Therefore, any finish can be used to decorate the facades and interior walls of a foam block house.
Construction of an economy class country house with foam block Source analytspectr.ru
Examples of projects
It is very important to choose from a huge variety of inexpensive cottage projects the most suitable one for the family that will live in it. When choosing, you need to take into account all the features and nuances of the options you like.
Open plan cottage project
Option for an architectural solution for an economical and comfortable home. A spacious room has been allocated to accommodate the kitchen, living room and dining room. A staircase is planned in the same room, which allows you to avoid wasting space for a staircase hall.
There is a spacious storage room on the second floor. Another place for storing things can be made under the stairs. Instead of a hall, you can arrange an additional bedroom on the second floor.
Economy class cottage project Source vyca.muviro.ru.net
Interior features of a mini-hotel
Carefully consider the interior of your mini-hotel, calculate the required amount of furniture, household appliances, plumbing fixtures, textiles, dishes, cleaning products, etc. Each room must have at least one window (a metal-plastic one that opens for ventilation or a regular one, but with a window) and a bed (a single bed measuring at least 80 by 190 cm, and a double bed measuring at least 140 by 190 cm). Windows must be equipped with mosquito nets.
It is recommended to take at least two and a half times more bedding sets for a guest house than there are beds. They change, as a rule, once a week. In addition, you need a large supply of towels and hangers for outerwear. For furniture, you will also need a wardrobe plus a bedside table or coat hanger, a mirror, a table lamp or floor lamp, a table, a chair and/or an armchair. For household appliances, depending on the “status” and price category of the mini-hotel, as well as the region, you will need a split system or air conditioning (in budget options - a fan) and a TV for each room.
Showers and toilets, as a rule, are shared in a guest house - in each room or on the floor. Of course, all these rooms must be equipped with a good ventilation system. Recently, mini-hotels have installed showers rather than bathtubs with showers. On the one hand, this option is cheaper and more practical. On the other hand, the service life of a shower stall is shorter - it often breaks down. Therefore, the option with a bath, shower and a closing plastic curtain is more preferable.
You will also need to purchase everything you need for the kitchen:
- washing,
- plate,
- kitchen table,
- chairs,
- fridge,
- wall cabinets and shelves,
- dishes,
- inventory,
- cutlery,
- detergents, etc.
If possible, it is better to equip the dining room in a guest house separately from the kitchen in a non-passable room or in the courtyard (with a canopy from insects). Don't forget about office space, including laundry (its services may be paid for for your guests).
As for the help of a specialist to draw up an interior design project, it certainly won’t hurt. However, unlike an architect, you can do without the services of a designer if you have taste and a general understanding of different styles. Pay attention to detail and give preference to materials that are easy to clean.
For example, it is more advisable to use laminate, cork or wood flooring in light shades rather than carpet as flooring in rooms. You can lay a rug or runner near the bed. No matter how beautiful tablecloths and curtains made from natural materials look, it is better to give preference to more practical and durable textiles with the addition of synthetic fibers.
The issue of providing your guests with food deserves special attention. Most guest houses only offer their clients breakfast, which is included in the room rental price. As a rule, such breakfasts include a hot drink (tea, coffee, cocoa), light snacks and desserts. For lunch and dinner, residents of guest houses go to nearby canteens, cafes and restaurants. Sometimes they have a kitchen at their disposal (in the house or in the yard - summer) with all the necessary equipment, dishes and appliances (stove, microwave, toaster, blender, etc.). Vacationers can purchase groceries in stores and cook their own food in the kitchen.
Guest houses that emphasize a “homey and comfortable atmosphere” may also offer home-cooked lunches and dinners in addition to breakfast. Of course, we are not talking about choosing dishes from the list, however, the owners can take into account the wishes of their guests for the daily menu.
The cost of three hot meals a day in such a guest house ranges from 500 rubles per day for an adult and from 250 rubles per day for a child. Experienced entrepreneurs advise charging separately for food and accommodation. Not all of your guests will have time for lunch or dinner, and not everyone will like the food you offer. With split payments, you give your customers choice and reduce your own worries.