Very often, additional recreation space is added to country houses, cottages, and private houses.
Namely, various covered verandas or terraces are being built. As a rule, such an extension has the same base as the house and is an additional room. But the terrace is built on a separate foundation, so it can be built after you build the house. If you understand what this structure is, then drawing up a project and erecting a veranda near a brick house or near a timber house will not be difficult for you. What is needed to get started? How to attach a veranda to a house made of timber or brick? Let's look further...
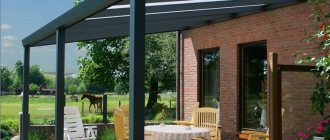
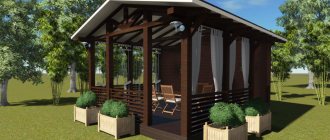
Open terrace with canopy
Perhaps the most common and most practical option for arranging a country terrace is an extension with a canopy or roof. Ideal for the summer season, allowing you to comfortably spend time in the fresh air outside the home and at the same time reliably protecting you from the scorching sun and drizzling rain.
Without walls
A roof or canopy and supporting pillars or columns made of wood, brick and other materials is a simple and very elegant structure, offering all the main advantages that we expect from an open country terrace adjacent to the house.
The “roof” of the terrace can be a specially equipped canopy or part of the upper floor of your country house.
There are also special awnings that roll up at the touch of a button and instantly transform your covered terrace into an open-air terrace. Relevant for those who like to sunbathe from time to time at their own dacha.
Please note: even if there is a roof over the country terrace, you should use only furniture designed for outdoor use, outside the home. After all, the absence of walls means that the veranda is not protected from excess humidity, temperature changes, or slanting rains
With drapery
An open veranda with a canopy can be complemented with translucent curtains, tulle and other drapery options.
This design looks cozy, airy, additionally protects from side sun rays, and with relatively tight curtains, also from unwanted insects. You can make this textile decor yourself.
By the way, the idea with drapery can be implemented not only on a terrace with a canopy, but also on the territory of a completely open veranda.
Photo: Instagram art_of_home_decor
With fencing
It is also possible to have a terrace adjacent to the house with a canopy, which includes a conditional fence. This could be a hedge, a low fence or other similar structure.
Photo: Instagram interior_delux
What is a terrace and why is it needed?
At its core, a terrace is a continuation of the house, an extension to it. The shape and purpose of the area can be anything. The terrace is usually used as a place to relax. But sometimes it serves as a summer kitchen or garden option, depending on the design.
As a rule, a terrace is an open area with or without a roof - which is why there are many options on how to design it. The terrace is an extension to the house, so before starting installation, you will have to obtain a building permit if the house design did not include it previously. The object will require correct calculation, since it has a base and load-bearing parts. How to do this correctly is described below.
Selection of material for construction
As already mentioned, it was decided to build the frame from wood. You need to choose coniferous timber - it has its own antiseptic properties and is able to preserve the structure on its own. However, this does not relieve owners of the responsibility for regular treatment.
In addition, before purchasing, you should make sure that all the wood is free from damage, knots, and cracks. They can affect the strength of the frame and its load-bearing capacity. Before completion of the work, all material must be stored in a separate place for safety during the entire process. After work, the structure is immediately processed.
Types of verandas
There are 2 types of verandas that deserve attention: closed type (with glazing) and open type. Open verandas are less functional and are used mainly in summer
As for closed verandas, they can be used all year round. There are also combined verandas, some of which are closed and some are open.
You can relax on the covered veranda all year round. It also reduces heat loss through this wall
As a rule, walk-through verandas are built. To get into the house, you have to go through the veranda. If a non-passable veranda is being built, it can only be accessed from the house. You won't be able to go outside from such a veranda. Unfortunately, such verandas are not practical and functional, so few people build them.
The attached veranda can be small and occupy some part of the wall, or it can be large, occupying 2 adjacent walls. Such verandas are called corner verandas.
The perimeter extension gives the house an extravagant look
As for the shapes, they can also be different, but mostly they are built rectangular. Although rare, there are extensions in the form of hexagons, semicircles and other non-standard shapes, and their construction takes much more time and money.
Various building materials are used for the construction of verandas.
Building materials used
The most popular building material is wood, since wooden structures are easy to manufacture, and wood is quite affordable and environmentally friendly. Unfortunately, not in all regions it is possible to use wooden products due to their high cost, so they use metal elements. The frame made of metal can be sheathed with any finishing material. The glazing used is ordinary glass, double-glazed windows, polycarbonate, etc.
Veranda made of a metal frame and special window blocks
For the construction of verandas, building materials such as brick, shell rock, rubble stone, and building blocks are actively used. After the walls are built from similar materials, they are subsequently finished with the same materials as the entire house. You don’t have to build walls, but simply fence off the extension, as shown in the photo above.
If wood as a building material is difficult to obtain, then the veranda frame is made of metal profiles. This is often easier and faster. In this case, it is easier to use double-glazed windows, as well as other structural elements. In addition, the design is more reliable and more durable. Recently, polycarbonate, with varying degrees of transparency, has become very popular. The advantage of this material is that it combines perfectly with metal elements, while being lightweight. When using wood, polycarbonate practically does not look good, disrupting the harmonious combination of materials.
Polycarbonate veranda attached to a brick house. The entire frame is assembled from a profile pipe
Project
You can schematically designate the veranda at the design stage of the entire building. But the thought of adding to the main room usually comes later.
Creating a veranda project is necessary for accurate calculation of materials
Remember that any large-scale construction must be carried out according to a design that takes into account:
- functionality;
- design;
- architecture;
- organic combination of the structure and the house.
In addition, a building permit cannot be obtained without a project. The practical benefit of drawings is the ability to roughly calculate how much material will be needed. By doing the work step by step, the likelihood of errors is reduced.
To make a project, you need to know certain nuances. You can take on the drawing yourself, using the Internet and special programs as an assistant. Or turn to professionals, but it's not free.
The project indicates:
- location of the structure relative to the house;
- entry point;
- dimensions;
- other nuances.
Thanks to the drawings, you can schematically imagine what the building will look like.
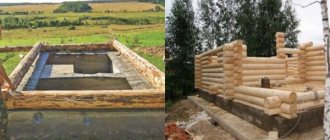
Foundation for a veranda made of timber
We described options for constructing a foundation for an extension to a house in this article. It is also worth adding that if the house was built on a pile foundation, then it is also advisable to build a veranda (terrace) made of timber on such a foundation. In the case of using a pile-screw foundation, the distance between the piles is 2 m.
In other situations, in an effort to save on foundation construction, the pile pitch is increased up to 4 m. But in such cases, there is a risk of deformation of the bottom trim beam, so it is replaced with a steel channel or I-beam. Their connection can be carried out using welding, angles or bolts.
Types of techniques for creating carved pillars
There are three main techniques for creating original patterns on pillars:
- geometric. Creating a pattern on the surface of a tree, made up of simple shapes. Carving is done by hand using special knives and chisels;
- contour. First, a design is applied to a wooden surface, then it is manually cut out with a chisel. The patterns can be any, they turn out to be voluminous, because they are cut on both sides of the drawn line, along the contour;
- lace The pattern is cut out using a jigsaw according to the applied pattern.
Veranda or timber terrace?
Veranda and terrace are interconnected architectural structures. In fact, a veranda is a special case of a terrace, i.e. a platform that is either built into a timber country house or is an extension to it. They come with or without a roof, fenced or not, open or closed.
The main requirements for them are the effective use of natural lighting and ventilation. Both the veranda and the terrace can be attached to any part of the house made of timber. To avoid dissonance, their design should be in harmony with the overall style of the wooden house.
In the case of houses made of timber, a veranda can be built using two technologies:
- using timber with the following section: thickness 100-150 mm and height equal to the height of the timber used in the construction of the log house. Those. the thickness of the material has no practical meaning, because veranda - an unheated room that will be used only in the warm season;
- by constructing a frame from beams, part of which can be finished on both sides with clapboard, block house, imitation timber, etc., and part of which can be glazed or left with empty window openings
In both cases, it is assumed that a separate or common roof will be installed with the house, which will protect the timber veranda from the weather. Terraces are usually made using frame technology, and the frame is used only for the construction of the roof and the installation of floors and fencing.
Care and instructions for use
A wooden veranda requires regular maintenance and careful use. This is justified by the characteristics of the natural material, which is susceptible to dampness, flammable, and attractive to insects.
The recommendations are as follows:
- regularly treat wood with an antiseptic and fire retardant;
- avoid using open fire indoors;
- periodically cover the frame and floor with decorative paint or varnish.
The rules are simple, but following them will save the veranda from destruction and ensure its long service life.
We build the frame
Wooden beams or logs are used as the basis for constructing the frame. They begin to build the foundation for the future veranda from the bottom. It is better to connect the beams with each other using a straight lock.
At the place where the connection
The next log and base are cut, boards and racks equipped with spikes are installed vertically. The entire structure is fastened with staples for strength and reliability. The base for the roof and the top trim is attached to wooden blocks.
Moreover, the frame for the rafters is attached to a beam located horizontally, which runs under the slope of the roof. All structural elements are fixed with anchor bolts. During the process of building it yourself, you need to ensure that the roof of the house and the terrace are well connected to each other.
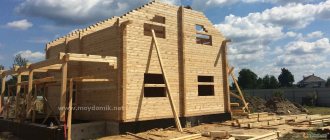
Walling
To assemble the frame, you need to take support pillars from timber, the cross-section of which is 120 * 80 millimeters. The pillars need to be placed at the corners of the veranda, and then between them in half a meter increments. On the lower trim, the supports are secured with steel angles. The supports near the wall of the house must be higher to create a difference in the height of the walls, which will result in a lean-to roof structure. You can increase the rigidity of the structure by connecting the pillars with horizontal beams, which will later serve as a support for the windows.
Which material to choose?
The most popular projects for extensions to a wooden house are, of course, structures made of wood, as well as foam blocks. These are simpler and more economical options. The price of an extension to a wooden house depends entirely on the functional value, weight of the structure, as well as the materials used.
So, for example, a veranda made of timber can cost two hundred to three hundred thousand rubles. An extension to a wooden house made of foam blocks is usually built in cases where the brick version is not financially feasible. This option for additional premises is a profitable solution from a financial point of view, and at the same time speed construction of an additional dwelling is quite high. When using foam blocks, such a reliable foundation is not required, which would be very necessary if an extension was being built from brick. Also, when using this material, there is no need to make a mortar, since the blocks are easily laid on a special construction adhesive.
The disadvantage of a foam block structure is the need to correctly calculate the dew point and the need to protect the outer wall from freezing. Making an extension to a wooden house, although not an easy task, is quite doable. The structure is attached to a wooden house using reinforcement. For these purposes, in the corners, every 3 rows, a cut is made 3 by 3 centimeters, a groove 5 centimeters deep is knocked out, into which the reinforcement is then inserted, after which it is filled with adhesive. In the wall a hole is drilled into which the second end of the reinforcement is inserted and sealed with cement mortar.
Thus, the extension made of foam blocks is rigidly connected to the house itself, which reduces the depth of subsidence. A frame extension to the house will look the most aesthetically pleasing. Before direct work, it is necessary to take measurements and draw up a design for the additional room, as well as calculate the required amount of materials. After preparing the materials, you can start building the foundation. In this case, you can use piles, a shallow or columnar foundation. After the foundation is ready, begin assembling the frame, and you must first treat the frame with antiseptics. Screws, nails, and bolts can serve as fastening materials. At the end of the work, the roof is installed, windows are cut, the frame is sewn up, finishing work is carried out. It should be noted that the addition of a porch to a wooden house is always made from the same material as the house itself, in our case - from wooden beams.
Where can I order ready-made carved pillars
Not everyone can make carved wooden poles themselves. This is a very labor-intensive process that requires patience and certain skills in working with wood. It’s easier to order ready-made columns, which will be made taking into account all the customer’s wishes.
Now in almost every city there are companies that produce such decorative products. They offer clients to realize any ideas. Designers can offer the most interesting options and select a model of a carved pillar that suits the style. If the owner of the house wants to bring his own idea to life, they will meet him halfway by making columns according to an individual project.
The order can be made online - just leave a request on the company’s website, its employees will get in touch.
Price
If the owner can make carved wooden pillars with his own hands, then he will be able to save significantly, because he will only have to pay for the material, tools and finishing products.
When ordering ready-made columns, you will have to prepare a large amount. Simple supports cost about 5 thousand rubles. The average price for the most popular models is from 20 to 30 thousand. If the customer plans to work on an individual project, the amount can be much higher - more than 50 thousand rubles.
When designing a country house and plot, several factors must be taken into account - beauty, safety and functionality. Carved details will undoubtedly become a decoration that will add unique features to the interior and landscape and bring individuality to them.
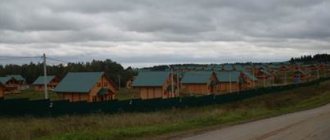
Features of the layout of wooden houses with a terrace
Varieties of house layouts made of timber with a terrace and veranda are based on the convenience and desires of the owners.
The size and content of the terrace is the owner’s choice. Source krov-torg.ru
A filter for selecting timber projects usually includes:
- Houses made of timber with a large or compact terrace.
- Projects of houses made of timber with a terrace-veranda with and without a bay window.
- Decorative and functional variations.
- With large windows and open type.
- Buildings of corner, square and rectangular types.
- Selecting an elite package.
- Economy class projects.
All houses with a timber veranda have an attractive appearance.
Step-by-step construction algorithm
Materials and tools
The easiest way to build a veranda is to buy a Finnish house, where all the materials are numbered, assembly instructions are included and you only need to carry out the installation. Finnish houses are made from laminated veneer lumber. If the choice fell on building from solid timber, it is necessary to calculate the project.
Materials for construction:
- solid timber with a section of 100*100 mm or 100*80 mm;
- a block of 50*50 mm, will be needed for pulling off the material and supports;
- board 100*50 mm, used for joists and as rafters;
- facing material: lining, chipboard;
- door frame with door;
- windows and a frame under them;
- polyethylene or other waterproofing material;
- slate, corrugated sheeting, what will be used as a roof;
- any selected insulation.
When choosing a roofing material, not only quality is important, but also color. It is worth choosing a coating closer to the main shade of the house coating. Ideally, the roof will be identical in color and material.
Required tools:
- screwdriver;
- hammer;
- axe;
- various chisels;
- bubble level;
- drill;
- Boer;
- shovel.
Advantages and disadvantages of building a frame veranda
This prefabricated structure has a number of advantages:
- the possibility of arranging an auxiliary multifunctional site;
- strengthening the heat and sound insulation of the entrance group;
- strengthening the walls of a frame cottage;
- a successful addition to landscape design.
The only disadvantage of the solution is that if you plan to use the veranda all year round, you will have to properly insulate it and install expensive sealed double-glazed windows. But the investment of time and effort will be worth it: this space can be used as a living room, greenhouse, hallway, summer kitchen, workshop and warehouse.
DIY foundation for a veranda
Let's say that after considering all types of foundations, we chose the most acceptable one for our veranda:
- shallow;
- monolithic;
- concrete;
- tape
This is what is most often used as the basis for lightweight residential structures - wooden and frame. This is a concrete “ribbon”, long and monolithic, its cross-section is the same everywhere, it is embedded shallowly (about half a meter) in the ground and protrudes above the surface by the same amount, and the protruding part serves as the base of the veranda.
Now we need to calculate the quantity and cost of the required materials. To do this, we will use any online calculator, which are abundantly available on the Internet.
Calculation of materials
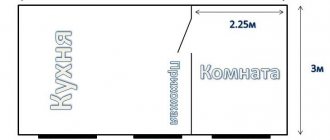
The dimensions of our veranda are 6x8 meters. Enter all the numbers into the calculator.
At the first stage, enter the dimensions of the tape and the grade of concrete required
We click on “calculate” and get a full calculation of the materials, including a reinforcement diagram, which is very convenient.
The second sheet indicates all the technological parameters of the foundation
The final calculation sheet looks like this.
Detailed specification of materials for the manufacture of the foundation
Required Tools
- Construction mixer for mixing concrete (or a trough for mixing by hand).
- Bayonet shovel.
- Shovel
- Hand wheelbarrow.
- Tamping (manual or vibrating).
- Welding machine (if you need to weld reinforcement).
- Hammers of different weights.
- Pliers.
- Grinder for cutting reinforcing bars.
- Nail puller, crowbar.
- Hydro level (or laser level).
- Roulette.
- Circular saw (or hand saw, for cutting lumber for formwork construction).
- Electric drill, screwdriver, sawhorses (for installation of formwork).
Veranda planning and design
In the drawings, the house and the veranda should present a single composition. And, if the building was originally erected without an extension, then you can always do it yourself - in less than one season.
The usual layout of the veranda parallel to the facade should have a doorway from which you can easily enter the room.
A smaller structure will look like a porch and will not serve its main purpose. To build a veranda with your own hands, you need to follow the recommendations:
Selection of building materials. To save money, the best option is a metal frame base with a cold, open terrace.
Correct lining. The structure can be sheathed with thick plywood or clapboard. This option will not require large costs and investments. The main thing is that the shade of the veranda matches the overall color scheme of the house.
The veranda and the house must have a common foundation. This cannot be realized if the construction is carried out after the house has been erected, but it is necessary to ensure that the foundations fit as tightly as possible.
All legal documentation for the veranda is needed. To avoid problems when selling real estate, any changes must be supported by papers from official structures.
When the project and drawings are ready, permission to carry out construction work should be obtained. This requires:
Send design documentation to architects. Specialists will review the drawings and decide whether to approve them or return them for revision.
Submit an application with attached documents confirming ownership of the land plot.
Stylish housing from the manufacturer
Manufacturing companies transport, produce and assemble wooden objects of any level of complexity. The production uses excellent wood, which is obtained mainly from Kostroma forests. Forests from Kostroma are famous for their long service life, which is praised even abroad.
Thanks to professional employees, work in large companies is carried out:
- within the agreed period;
- Full construction;
- with a high level of quality.
Leading manufacturers on the market actively use:
- the best innovative ways to build residential premises;
- new equipment;
- transport for project delivery;
- working technologies.
This creates truly stylish housing. Thanks to these advantages, the designs are not only beautiful and practical, but also durable.
Important: when purchasing a set of timber housing from the manufacturer, people have a guarantee on all materials.
Roof
Construction process
Undoubtedly, the roof of the veranda should be a continuation of the roof of the house. It is recommended that it be made from the same roofing material, but other types can also be used. The roofing material is attached to the wooden sheathing. The sheathing is installed either at intervals or closely (depending on the type of roof).
- The boards are fastened closely when using rolled material. When attaching the flooring to the rafters, the nail heads should be recessed into the wooden surface (they should under no circumstances protrude). The rolled material is secured at the edges with nails, and for additional fixation, slats are nailed to the coating. The protruding edges of the roll should be folded inward and secured with nails.
- If steel roofing material is used for the roof, it is attached to the sheathing with nails and joined with a “seam” seam.
- Asbestos cement sheets are installed with an overlap. In this case, the top sheets overlap the bottom sheets by at least 14 cm. They are fastened into pre-drilled holes with nails or screws.
Attaching the joist to the harness
They can be mounted on top of the harness, or at the same level with its top edge. You need to decide exactly how you will do this at the very beginning of the work: this will determine at what level it will be necessary to attach the support beam to the wall of the house (the height of the joists is taken into account or not). Methods for attaching floor joists are shown in the photo below.
How to attach floor joists to the frame
Veranda foundation
The depth of the base of the building must coincide with the depth of the foundation of the entire house, in this case the veranda will not “move away”. As experienced builders recommend, it is better to make a columnar foundation under the veranda, but there is no need to attach it too rigidly to the house. The pillars need to be laid under the corner post, and if the structure is large enough, then also under the intermediate post. Foundation construction progress:
- Make markings where the foundation columns will be located.
- Dig holes for the posts to a depth of 1 m.
- Pour sand 20 cm thick into the hole. Instead of sand, you need to fill the sandy soil with crushed stone, a 10 cm thick layer.
- Pour hot bitumen into the holes.
- Make a concrete base so that the edge on top is strictly horizontal.
- After the concrete has hardened, lay out the brick pillars. Half of the veranda should be 20 cm lower than the level of the house.
- Treat the pillars with bitumen and fill them with crushed stone.
- Use broken bricks to fill the space in the middle of the pillar. Instead of brick, you can use gravel.
- Make a wooden or brick filling between the supports. Make sure that the outside surface looks uniform.
Possible mistakes
Non-professional builders often make mistakes when constructing the base of the veranda.
An obvious defect of the columnar base is the unevenness of its subsidence. This can occur if the foundation depth calculations are carried out incorrectly.
The base also sags when the load on the platform supports is unequal.
Experts do not recommend making a foundation different from the foundation of the common object. The foundation supports must have the same depth of depth.
Beginners in construction may not take into account the terrain features when working, however, the depth of freezing and the height of groundwater are very important. The monolith must be waterproofed and insulated, and before shrinkage, the height of each column must be carefully measured.
It would be a miscalculation to miss the grillage, because it is this that ensures the stability of the extension. If you immediately make a wooden frame from timber, the supporting beams may break, especially in the case of log options.
Attention ! A columnar foundation is not intended for heavy buildings. If this rule is neglected, the foundation will require repairs or even replacement.
Advantages and disadvantages of concrete blocks
Foam concrete blocks are produced from foamed concrete by molding from a semi-liquid solution or by cutting a hardened foam concrete mass. In addition to traditional cement, water and sand, the composition includes a foaming agent. Thanks to it, the structure of the material acquires porosity and lightness.
Foam concrete blocks are used in private construction for the construction of walls, partitions, and insulation of load-bearing structures.
The material has the following characteristics:
- Density from 300 to 1200 kg/m³. The most porous concrete is used for thermal insulation, the densest - for the construction of load-bearing structures.
- Light weight. Foam concrete is twice as light as brickwork.
- Low thermal conductivity. According to this indicator, it is close to wood.
- Dimensions of standard blocks are 200x200x600 mm or 200x300x600 mm, weight 11-22 kg. With such dimensions and weight, the laying of elements is carried out without the use of additional construction equipment and much faster than with brick.
Disadvantages include:
Foam concrete is quite hydrophobic, i.e. absorbs moisture from the environment. This reduces its thermal insulation properties. Therefore, external walls must be protected with finishing.
An extension to the house is a good reason to update the decoration of the entire house. Source kamtehnopark.ru
Not very high frost resistance of the material - F15-F75. This means that it can withstand 15-75 freeze-thaw cycles without changing strength or destruction. For comparison, highly frost-resistant concrete is graded F300-F1000.
Varieties have been created based on foam concrete - gas silicate, polystyrene concrete, expanded clay concrete, wood concrete (chip concrete), fiber foam concrete. They have a porous structure, high thermal insulation properties, and sufficient mechanical strength. Rooms made from these materials have a favorable microclimate due to vapor permeability and environmental friendliness. They are easy to process with tools - sawing, drilling, attaching brackets.
Choosing material for building a terrace
For the construction of a terrace, hardwoods that are resistant to abrasion and mechanical damage are best suited. These are oak and larch, and among the exotic ones are tatachuba, lapacho, cumaru, and ipe.
The material intended for the outdoor terrace should also be little susceptible to changes in humidity, and in this regard, oak and larch wood are a good choice, and among the exotic ones are teak and bankrai (balau). But the latter contains oils and tannins that can cause discoloration or corrosion of adjacent materials.
But the most inexpensive and easily accessible natural material, which is most often used for terraces, is pine. When choosing pine, remember that this wood is quite sensitive to cycles of moisture absorption and subsequent drying. This impact causes deformation and the formation of longitudinal cracks, therefore, before using pine boards and timber to build a terrace, it is necessary to thoroughly impregnate all elements of the future terrace.
To implement the construction of a large, expensive terrace, you can order a ready-made terrace system for specific dimensions. But if one of your goals is minimal costs, purchase all the elements of the terrace yourself.
Installation of the terrace frame
When work on the foundation is completed, you can proceed directly to the frame. Anchor bolts are used to connect pillars to support posts. A 100x100 mm beam is suitable. When installing racks, be sure to use a building level.
You can add braces to the support posts, which will increase their reliability and prevent changes from the vertical position
It is especially important if there are heavy objects on the terrace that will create a strong load on the structure. Next, the support beams are nailed to the posts
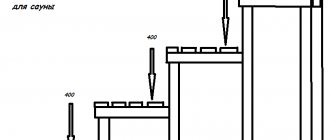
For the stability of the frame terrace, all beams must be positioned exactly horizontally. The beams are connected to the joists at a distance of 400 mm, which must be attached exactly perpendicularly. Next we proceed to the construction of the flooring, that is, the floor of the terrace. Wooden boards with a cross section of 50x100 mm are suitable.
After installing the boards, they need to be sanded, and then varnished and painted so that they do not rot or swell from moisture. Now in stores there are a huge number of different finishing materials: from translucent building materials to acrylic paints with the possibility of tinting. This will help not only protect the wood, but also show off its beauty by highlighting the texture of the material.
After completion of the main construction, you need to install railings and stairs with which you can easily climb to the site.
Railings can be different: turned wooden balusters or even metal structures. The extension must be wide enough, strong and comfortable, but appearance is no less important. During your vacation, nothing should interfere with enjoying the surrounding beauty.
For the floor of a serious, large terrace, they do not use wooden boards, but special tiles with a rough surface. If it is glazed, you can even make a special heated floor, which will create additional heating and comfort.
Buy fencing for a terrace “like wood” or WPC
WPC (wood-polymer composite) is a material specially designed for outdoor construction of terraces, fences, fences and facades. It has the appearance and tactile sensations of wooden fencing, but is completely devoid of its traditional disadvantages. Composite fencing consists of 65% wood flour, 30% polymer binder and 5% functional additives (dyes and stabilizers). More information about what KDP is can be found here.
Price of fencing for WPC terrace
| Average price of a ready-made set of WPC fencing for a terrace | from 3900 r/m.p. |
| Approximate cost of work for installing fences | 1500 r/m.p. |
| Price of WPC fencing for terraces with installation | about 5400 r/m.p. |
Thus, fencing for a terrace made of WPC can be purchased from 5,400 rubles/m.p., which is significantly cheaper (30%) than fencing made of larch.
Advantages of WPC fencing for terraces
- All elements are purchased in one place and assembled as a construction set.
- Warranty from 2 years and service life up to 25 years.
- Cheaper than fencing for a larch terrace.
- Does not require touch-up or impregnation throughout its entire service life.
- Does not fade, does not crack, does not deform, and is not attractive to pests.
- Maintains its original appearance throughout its entire service life
- They'll get bored of you.
Laying the foundation
If you plan to build a wooden or frame terrace, then a foundation with the installation of brick pillars is quite suitable, their number depends on the weight of the future structure. For an easy extension of modest size, a few columns installed in the corners are sufficient. If you plan to build a good-quality extension of impressive size, then the pillars for the base should often be located at intervals of 50 cm.
The first step is to dig trenches, the depth of which is at least one meter. Each depression is filled with sand and gravel, to about a third of the depth. Next, a concrete cushion is formed, 20 cm thick. After the concrete has set, we lay out brick pillars. The part of the pillars that will be above the ground must be no lower in height than the level of the house’s foundation. After construction, each column is coated with heated bitumen. The cracks and holes in the pillars are filled with gravel or small stones. The holes between the soil and the columns are filled with sand. In the photo we see one of the foundation options.
Options for using carved pillars
Carved pillars are used both outdoors and indoors. The choice of wood species depends on where they will be installed. Inside buildings, the influence of the natural environment is small, so you can save money by using cheaper types of wood, such as pine.
For external structures, it is better to choose solid and durable types - for example, oak or ash. In addition to reliability, they have an excellent structure.
For figured columns, columns, balusters, railings, you can only use solid wood; laminated wood will quickly become unusable and lose its appearance - repair or replacement will be needed.
To extend the service life of finished poles, they must be coated with protective compounds and treated with varnish, which will add shine to the wood.
Outdoor structures
In external structures you can see:
- porch supports. Their purpose is to hold the canopy and decorate the entrance area, so reliability and compatibility with other components are relevant. Sometimes a project may include columns and columns of different heights, but made in the same style;
- gazebo pillars. Wood is an ideal material for this building, which creates a natural atmosphere, and if the pillars are carved, then spending time in the gazebo will become even more pleasant;
- pillars standing separately. Such columns can become the main accent on the site, its main “attraction”. The shape and size are not limited, but they must be combined with the design of the entire territory;
- the entire load-bearing support of a gate or fence. A carved fence is very beautiful, but its creation is a costly and labor-intensive process.
Elements inside buildings
Carved supports indoors perform various functions:
- columns as load-bearing elements. They can replace walls, thereby expanding the space. When manufacturing or ordering columns, the load must be calculated;
- staircase supports. They set the general style of the structure; if desired, balusters, railings and additional decor for wooden stairs can be made in the same style.
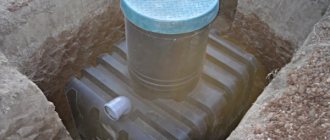
Columnar brick foundation for a summer veranda
The base in the form of monolithic or prefabricated pillars is durable, reliable, economical and easy to install. The advantage of such a foundation is its rapid construction, the possibility of self-construction and low costs for building materials. The key to constructing a high-quality foundation in the form of brick pillars is compliance with construction technology.
Material selection
Brick columnar foundation
High-quality foundation masonry is obtained by using burnt red clay bricks. This material has a high density and low moisture permeability, is characterized by high frost resistance and the ability to withstand sudden changes in temperature.
A set of necessary tools and materials
It is possible to build a high-quality foundation in the form of brick pillars only if you have certain tools and materials. In particular we are talking about the following:
Necessary materials
- Burnt red brick.
- Sand and crushed stone.
- Cement.
- Ruberoid.
- Reinforcing bars or finished mesh made of reinforcement.
- Pick and shovel.
- Building level.
- Cord or regular rope.
- Roulette.
- Wooden or metal pegs.
Marking and excavation work
First of all, large construction debris and tree roots are removed from the working area if the area was not cleared during the construction of the main house. The advantage of a columnar foundation is that there is no need to remove small vegetation over the entire area of the site. The main thing is to clean the places where the supports of the columnar foundation for the summer veranda will be located.
Before marking the foundation for the summer veranda, you need to draw a drawing of it on paper. First, according to this drawing, determine the location of the corners of the attached structure and mark them with pegs. The angles must be strictly right, which can be checked using the “Egyptian triangle” rule. Next, mark the perimeter of the veranda by stretching the construction cord between the pegs. For more information about the features and tricks of site marking, read the article “Marking the foundation for a house with your own hands.”
The next marking step will be to determine the locations for the foundation supports. If the summer veranda is made of lightweight materials, then a distance of 1.5-2 meters between the pillars is sufficient. For heavier buildings, the spacing between supports is reduced. The location of each pillar is marked with an additional peg.
Now you can begin arranging recesses for the supports of the columnar foundation for the summer veranda. You can dig holes by hand or use the services of special construction equipment. The depth of the wells should be about 0.7 meters, the main thing is that the base of the foundation is located below the freezing level of the soil. The width of the hole depends on the size of the pillars and should exceed it by 15-20 cm.
The bottom of each hole is covered with sand, which is well moistened and compacted. Crushed stone is poured over the sand layer and compacted thoroughly. The height of the sand-crushed stone cushion should be approximately 10-15 cm.
To protect brick pillars from exposure to soil moisture, waterproofing material is laid on top of a cushion of sand and crushed stone. Most often in this case, roofing felt is used.
To strengthen the columnar foundation for a summer veranda, a concrete base 20 cm high is built under each pillar. To do this, thin concrete is poured into the hole and left to harden (read more about how to make a concrete footing correctly).
Bricklaying
Most often, brick pillars are erected from four elements in a row, laying half a brick. The result of the work should be a support with a square cross-section and a void in the center. It is recommended to prepare the masonry mortar from high-quality cement grade M400 or M500. Every 3-4 rows the structure is reinforced with a reinforcing mesh made of wire with a diameter of 6 mm.
During the process of laying bricks, it is important to check the verticality of the support, for which a building level is used. The masonry can be completed after the support rises 20 cm above ground level
The finished columns are left for about a week so that the concrete solution gains the necessary strength. After this, the void between the bricks is filled with crushed stone or brick fragments.
Pieces of roofing material are laid on top of the finished support, which will protect the pillars from the destructive effects of atmospheric moisture.
Procedure for making a fence
When creating wooden railings for terraces, it is necessary to follow a technological process consisting of three main stages:
- Design. The design of the fence can be ordered from a professional architect or done independently using 3D modeling programs. Based on the project, calculations of materials are made. As a rule, the support installation step is 120 cm (this figure may be smaller if the balusters place a large load on the racks), the height is from 100 cm.
- Wood processing.
- Assembly of the structure.
Woodworking
The complexity of the process of processing elements for terrace fencing depends on the intricacy of the project. The easiest way is to make railings in the form of simple geometric shapes using ordinary wooden blocks. In this case, processing consists of sawing and grinding. More complex parts of the fence will require the use of a special tool - a jigsaw, lathe, milling cutter.
Tenons are prepared on the racks for fixation, and grooves are prepared on the railings. The same nests are made at the ends of the support beams for attaching decorative elements.
Railing assembly
Installation of a wooden fence occurs as follows:
- The supports are fixed on the terrace.
- Balusters are inserted into the prepared nests, the spikes of which are pre-lubricated with glue.
- Fix the fence railings.
- The structure is varnished or painted.
Even an inexperienced craftsman can make wooden fences for a terrace. If you have enough construction skills, try creating railings from concrete, brick or natural stone.