Have you become the owner of an apartment in a new building? Surely, along with the joy of such an important acquisition, you will be faced with the question: what time of year is best to start repairs. This largely depends on the type of new building and what type of work needs to be done.
Bathroom priority when renovating an apartment in a new building
In a new apartment, it is impractical to renovate rooms one by one, arranging each one from scratch to finish.
Installation of communications is carried out in full, each type - in the current group of rooms. For example, electrical wiring is installed throughout the apartment, there may be no heating in the hallway and on the loggia, and water supply and sewerage are needed only in the bathroom, toilet and kitchen. Before proceeding with the finishing of enclosing structures, all household life support systems must be assembled and tested - dialing, crimping, etc.
In addition, you need to start finishing a room when the dirty work in the apartment is completed or completed to the maximum extent possible. This is the only way that all areas of the apartment will look equally fresh after the renovation is completed.
Thus, it is inappropriate to start renovating an apartment from the bathroom, as well as renovating this room last. Each type of work to prepare premises for finishing must be carried out in the apartment until completed in full. Consequently, some preparatory operations in the bathroom will be part of identical work in other rooms.
Repair from the developer or on your own?
Today, buyers in new buildings can choose one of the options - entrust the developer to carry out all the work, including turnkey renovation of apartments in a new building, or do the repairs themselves. In some cases, you may even be offered furniture and household appliances, i.e. complete situation.
Advantages of ready-made solutions for new buildings:
- you can quickly move into your new home;
- there is no need to study the features of repairs in new buildings;
- the performer is a well-known large company, i.e. the quality will be high.
Disadvantages of renovation from the developer:
- They often offer standard solutions, especially in the case of furnishings. As a result, the interior will be similar to many similar ones in your neighbors, and your dreams will not be realized in every case.
- In the case of an individual approach, the developer’s price will be higher than many offers from small repair teams.
- The contractor will choose the building materials. You won't be able to save money here either.
In general, you can get an apartment suitable for living in a short time, but if you want something special, and not too expensive, it makes sense to deal with the repairs yourself. But it is important to understand that it is an apartment that has not been used. – this is a whole storehouse of surprises for future residents. All this must be taken into account when arranging your individual living space.
Design and calculation of material requirements
If the renovation is carried out by a professional contractor, then the task is minimally simple - the contractor is given his vision of the bathroom after completion of the work, and a day or two after the measurements, the customer is presented with a design project and estimate for approval, for example, this:
If a bathroom in a new building is renovated by a specialized company, then in Moscow and the Moscow region a turnkey renovation will cost from 8 thousand rubles. per 1 m2 of room area (including the cost of materials).
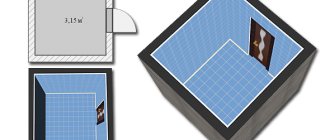
To design communications, you first need to draw up a diagram of the location of plumbing fixtures in the bathroom.
Having a diagram, the store selects the necessary plumbing fixtures - a bathtub, a toilet, a sink, moreover, in relation to the dimensions of the room. Having previously arranged the devices at the design locations, they draw up diagrams of water supply and sewerage systems. Then the electricity supply and heating are designed - on paper and then transferred to the foundations or directly on the enclosing structures. To simplify this stage of work, you can choose a ready-made solution on the Internet, or use special programs that produce results after entering certain room parameters.
As a rule, for a new building these schemes are an integral part of the project of general apartment life support systems. Considering the importance of correct calculations and the volume of design work, to develop schemes, they most often turn to professionals of the relevant profile. You should avoid the services of generalists who offer to design all systems alone.
Using ready-made diagrams, the need for materials for communications is calculated.
Then it is necessary to perform calculations of the consumption of finishing materials. To do this, finishing zones are marked on the ceiling, walls and floor, each of which is measured to determine the area. Based on the results obtained, the need for finishing materials is calculated - with reference to the method of finishing each section.
Layout
Without a plan for the future apartment, it is physically impossible to separate communications. Finishing work at random costs twice or more more than pre-calculated surface areas. It is again pointless to spend time planning at least the arrangement of furniture after moving in - properly thought out furniture and interior design in advance will save a lot of money.
Conscientious developers, WHEN CONCLUSING A CONSTRUCTION AGREEMENT, give (and are required to do so by law) to the shareholder a plan with an explanation of the future apartment. The plan with explication indicates the heights of the ceilings and surface areas, which is intended for drawing up estimates.
If they just offer you a contract, but they fuss and fuss about the plan and explication, think seriously about whether to turn to someone else. In this case, you will most likely receive less living space than you paid for, under plausible pretexts, and the quality of construction work will be low.
Ceiling waterproofing
If the interfloor ceiling is prefabricated, then it is first inspected and, if necessary, cracks and joints are repaired. Then the rough ceiling is treated with an antifungal compound - in conditions of high humidity this will prevent the formation of mold.
Waterproofing is carried out on the dried base - this, like sealing cracks, can be combined with the performance of these works throughout the apartment.
In residential premises, ceiling waterproofing is not always carried out, but in the bathrooms of a new multi-apartment building, if there is a room for the same purpose on the floor above, it must be done.
Conclusion
Repairs can be done in winter, but taking into account some features. Unheated rooms must be heated, ventilation must be provided, and an air dehumidifier must be used for wet work. When renovating in winter, there is an important rule - to avoid strong changes in temperature and humidity.
At FORUMHOUSE you will learn: how to preserve a residential building for the winter: tips for the homeowner before a long departure; how to prepare country engineering systems for winter. Watch the video on how to choose linoleum: answers to 10 questions about flooring.
Installation of communications
Pipelines and installation of electrical wiring in the bathroom are carried out during the execution of these works throughout the entire apartment. The cables are attached to the walls with clamps - later they will be covered with wall finishing, most often plaster with tiles. It is necessary to arrange nests in the walls for installation and distribution boxes. If the distribution boxes are located on the ceiling, then they are mounted on top of the waterproofing and are subsequently hidden by the suspended cladding of the slatted structure.
If electrical installation work is carried out by a contractor, then in Moscow and the Moscow region the prices along with the cost of materials will look something like this:
| Type of work | Unit measurements | Price including material (RUB/unit) |
| Electric installation work | ||
| Cable laying inside the corrugation | linear m. | 60,0 |
| Laying the cable inside the corrugation in the suspended ceiling | linear m. | 270,0 |
| External cable routing without fastening | linear m. | 60,0 |
| Installation of an electrical point in a prepared socket (socket, switch) | PC. | 250,0 |
| Installation of a socket box | PC. | 90,0 |
| Installation of a surface-mounted fan without assembly with connection | PC. | 1000,0 |
| Ventilation grill installation | PC. | 240,0 |
Masters' choice
In winter, most companies are idle. Due to low demand, crews are free most of the time, so finding someone will be easy. In addition, they offer discounts on services to attract customers, sometimes they can reach 20%, which is significant for the family budget.
There is an opinion that finishing work carried out in winter will be of poor quality and will quickly deteriorate. This will not happen if you hire high-quality craftsmen who will do all the work efficiently, in compliance with all requirements.
In winter, it will be easier to hire professionals due to low demand. Such specialists value their reputation and will do everything at the highest level; moreover, they can recommend cheaper materials that are in no way inferior to expensive ones in quality.
In the summer, craftsmen strive to finish the work as soon as possible, since they still have a lot of orders in line, so they save time and do everything in a hurry. In some cases this is unacceptable. Others are in a hurry for the sake of a quick vacation; few people want to work in hot weather, when friends go to recreation centers or just take a walk in the park. In winter, there is no rush and work can be done in compliance with all requirements and sometimes staying at the workplace.
Construction of a platform for a bathtub
Cracks and large potholes in the floor of the room are repaired, after which two layers of waterproofing are installed.
Once the waterproofing coating is ready, it is necessary to arrange a site for the bathtub. It should be taken into account that the remaining floor area must be insulated, after which a screed will be placed on top of the insulation - that is, the floor mark will rise to the height of this “pie”. Therefore, the platform for the bathtub should be made of the same thickness as the “pie”, but it does not need insulation.
The area of the floor under the bathtub is laid out with bricks and the joints are grouted flush with the masonry. Instead of brickwork, you can use concrete - pour it into the formwork to the required height.
While the masonry gains strength and dries, they do other work in the apartment.
After the area has dried, it is finished with tiles. A day later, the tile seams are rubbed down, and after another two, the bathtub is installed in the design location with the siphon connected to the sewer.
If the bathtub is metal, then it is advisable to insulate the bowl from the outside heat and sound - with penofol or polyurethane foam with a low expansion coefficient.
Buy a new front door
Suddenly? Indeed, this step should be one of the first. The doors that the developer installs are standard and not expensive. They do not protect the apartment from temperature changes between the entrance and the living space. They are easy to open even by inexperienced burglars. In the end, one of the keys could easily remain with one of the workers, which increases the risk of entry into the home.
It is especially important to change the door as soon as possible after purchase if you plan to store construction and finishing materials in the apartment. And it will be safer for your repair crew to leave their working tools if the apartment is equipped with a decent door.
Nowadays doors are sold immediately with inner lining. Be sure to take this into account when purchasing, so that later the door does not contrast with the rest of the room’s decoration. Remember, the saying “My home is my castle” does not apply where you have saved on doors.
Preliminary floor arrangement
Around the area with the bathtub, the floor is insulated on top of the waterproofing - penoplex with a thickness of 3 cm is ideal.
In a bathroom, unlike a shower room, it is not necessary to install a floor drain, but if it is provided for by the project, the accessory is installed before the insulation is laid - it is connected to the sewer and temporarily fixed in the design location.
Waterproofing is again performed on top of the thermal protection (two layers of polyethylene), after which a load-bearing screed is installed, which is reinforced with a mesh of steel or fiberglass rods. The screed is covered with film and given time to cure.
On the hardened screed, the visible part of the bathtub is equipped with a screen - a brick partition is laid out, which is later tiled in accordance with the design project.
It is necessary to provide a service hatch in the screen in order to have access to the siphon for maintenance.
Leveling wall plaster
It is advisable to perform rough plastering of walls for laying tiles as part of work on leveling wall surfaces in all rooms. Plastering is a dirty job, and it is better to proceed to the next stage of work after it has been completed in all rooms. This is also justified chronologically - by the end of plastering of the last room, the plaster in the first room will have already gained a significant part of its strength.
By the beginning of rough plastering in the bathroom, the load-bearing screed on its floor should be quite solid. But sheets of old plywood or fiberboard are also laid on the hard surface so that there is no need to scrape off the hardened plaster solution from the screed.
Content:
- Advantages of repairs in winter
- Disadvantages of winter repairs
- What finishing work is recommended to be done indoors in winter?
The traditional statement that repairs need to be done in the summer was born when the materials did not allow work at any other time except the spring-summer period. Nevertheless, let us study the arguments and draw a conclusion.
Laying tiles on walls
If the walls of the bathroom will be tiled, then the tiles can be laid 4-5 days after finishing the plastering - during this time the solution will gain sufficient strength for finishing, but the surface of the plaster coating should not be wet. The moisture remaining in the plaster will continue to participate in the development of strength, and the excess will evaporate through the joints of the tiles and diffuse through the enclosing structures. In practice, when renovating apartments in new buildings, it is possible to give the plaster more than 4-5 days to cure before laying the tiles.
The first row of tiles is laid along the side of the tub, the next rows are laid towards the ceiling, and then the trim is carried down to the floor, but leaving the last strip uninstalled.
Don't neglect the fact of shrinkage at home
Yes, yes, new buildings have one significant disadvantage. The new house is finally settled in a period of one to five years. What does this mean for residents? No, the house will not fall down or even tilt like the Leaning Tower of Pisa. It’s just that the soil under the house will sag, the joints between bricks and tiles (if the house is panel) will become compacted.
What determines the shrinkage time? From the material that was chosen to build the house. Panel houses shrink the most. The heaviness of the wall slabs and the fairly large width of the inter-tile material allows the house to shrink for up to two years.
Brick houses with small cement joints shrink much less than the same panel houses. But in general, a couple of millimeters from each brick can add 10 centimeters or even more. Depending on the soil on which the house stands.
According to experts, monolithic structures have the lowest shrinkage. Such houses usually have open-plan apartments, which reduces the load of the partition walls on the foundation. Therefore, when buying an apartment in a monolithic building, you can ignore this factor.
Shrinkage may be influenced by some other facts that may not be obvious at first glance. When massive renovations begin in a new house, the total weight of all screeds and plasters can speed up the shrinkage process. Conversely, gradual settlement will extend this process over several years.
Ceramic floor finishing and grouting
Having finished installing the ceramics on the walls, they return to arranging the floor and continue laying tiles from the area under the bathroom to the sides - to the plastered walls, leaving a gap of 5 mm with them. A couple of days after finishing the floor, the last row of tiles is placed on the walls, resting the sheets on the floor cladding, and the bath screen is tiled.
After another day, you can start grouting the tile joints - first on the walls, then on the floor. If the grout mixture is white, the task is simplified. When decorating joints in color, when mixing a portion of the composition, you must strictly observe the ratio of the dry mixture and pigment, otherwise the seams will differ in tone.
In Moscow and the Moscow region, finishing work, taking into account the cost of materials, is carried out by contractors at approximately the following prices:
| Type of work | Unit measurements | Price including material (RUB/unit) |
| Finishing work | ||
| Single-layer priming of walls with concrete contact | m2 | 100,0 |
| Cladding smooth walls with ceramic tiles of standard sizes | m2 | 850,0 |
| Cladding plastered walls with non-standard ceramic tiles | m2 | 1450,0 |
| Cladding smooth surfaces with porcelain tiles | m2 | 1100,0 |
| Grouting tile joints with cement | m2 | 100,0 |
| 2-component grouting of tile joints | m2 | 550,0 |
| Rolled floor waterproofing | m2 | 250,0 |
| Waterproofing the floor with bitumen mastic or coating mixtures | m2 | 250,0 |
| Wall covering with PVC panels on the frame | m2 | 480,0 |
| Laying mosaics on a flat floor | m2 | 2150,0 |
| Installation of non-standard decorative panels | PC. | 350,0 |
| Installation of decorative border | linear m. | 350,0 |
| Making a plinth using tiles | linear m. | 300,0 |
BATHROOM WITHOUT TILES. MYTH OR REALITY
“Will I have a bathroom without tiles? Oh no! It’s impractical and inconvenient,” is a question that is at the top of my list of exclamation points when it comes time to discuss bathrooms.
Until now, although it’s 2021 and not 1919, there is a widespread belief that floor-to-ceiling tiles are the salvation of renovations, a guarantee of long service and high-quality maintenance of ideal cleanliness of showers and bathrooms.
So is this a myth? Or reality? Is it really possible to live without tiles on the walls, or is it actually very bad from the point of view of modern design? Let's discuss this topic today, let's talk: is there life without tiles?
When you start renovating a bathroom, in 80% of cases you will start by looking for tiles. An unshakable confidence remained in my mind that the bathroom should have tiles from floor to ceiling, and also necessarily with decoration, with different flowers and birch trees.
designer's worst dream: Ural ceramics with decors
And so you painfully go shopping, choosing the most beautiful “flowers”, trying to use them somewhere, no matter what.
If I start to dissuade the customer from filling the bathroom space 100% with tiles, then I mentally prepare myself to go “into battle.” Of course, this doesn't happen all the time, but it does happen sometimes.
But the history of bathroom decoration does not begin with tiles.
This is my point of view and today I will try to explain to you why I think so, in which cases tiles are needed up to the ceiling, in which they are not needed at all, and is there an alternative.
project: Maria Sofronova
I’ll say it banally, but choosing the decoration of any space in your dream home begins with choosing a style for the entire house as a whole.
Call it style, story, concept, whatever.
Advice: if you are renovating the entire house at once, then all the interior details should be strung like beads on a thread. Everything should flow smoothly into each other, be interconnected, pleasing to the eye and, of course, practical!
Now note to yourself that I emphasized about renovating the entire house. Since a little later we will touch on the issue of cosmetic renovation of just a bathroom without the rest of the apartment.
burlingtonbathrooms.com
Style always dictates finishing. If I choose minimalism in its purest form (and this is a very bold decision for an ordinary person), then I also design the bathrooms in minimalism. If it’s a classic, then it’s a classic with stucco angels and so on.
Finishes can be chosen for bathrooms depending on:
- tasks
- concepts
- desires
You can use tiles in any style, you can abandon them completely or partially. The main thing is to do it wisely. Therefore, let’s not act “off the shoulder”, but sensibly analyze each situation, and they can be very different.
Ashley Darryl
Avoiding tiles in bathrooms means using other materials for the walls, such as paint and wallpaper.
STORY NUMBER 1. YOU COMPLETELY REFUSE TILES IN THE BATHROOM:
OPTION 1. You have a large bathroom with a window.
In such a room you will 100% install a free-standing beautiful bathtub. Maybe you want a fireplace and a complete feeling of relaxation.
Tiles up to the ceiling in such a space will look at least strange, at most strange to the 10th power.
Lyndsy K. Woods
Option 2: You have a super small and very utilitarian bathroom.
It only has a toilet and a sink. Hallelujah, you're in luck again! In such cases, I paint the walls a beautiful color and we forget about the tiles forever.
I foresee a question: around the toilet and sink without tiles it will be terribly impractical.
Friends, excuse me, but do you and your guests “pee” on the walls? Well, if only in a very drunken state this can be done, I haven’t heard about other cases from the lives of normal people.
How can you replace tiles in the bathroom:
For wall decoration you can use: natural stone, wallpaper, paint, wood, metal, glass, plaster, brick, MDF and so on.
There are many materials , each is worthy of choice and it all depends on the idea of the interior. If wood, glass and metal do not raise so many questions, then when it comes to paint or wallpaper, you can hear a million objections why not and not.
What have I heard: it’s impractical, everything will fall off in six months, there will be mold, the paint will peel off and it will look like a public toilet.
horrors in our heads
Let's figure it out. You are afraid of refusing tiles due to ignorance of modern materials - this is 100%. No matter how sad it sounds.
Believe me, today's manufacturers of quality paints have gone very far in technology. And at present, modern paint from the Soviet past has absolutely nothing in common. And a lot has already been written about this, and a lot has been said. But still few people believe and buy tiles because they believe that it is better, more reliable, and more practical.
If you have no other arguments besides mold, then feel free to go to a paint store and they will tell you and show you the best options for the walls. Tested and not once.
I know you want to know what kind of paint I use on projects. Sharing: I love Dulux for bathrooms and CAPAROL.
If option No. 1 (you have a large bathroom with a window) probably makes no sense to discuss within the article (since I’m not sure that those who have such a bathroom with access to the garden read the site), then option No. 2 is worth discussing with examples.
PHOTO- Eric Piasecki for Elle Décor
Option No. 2 (small bathroom) fits all guest bathrooms and toilets in regular apartments. The area is such that only the most necessary plumbing fixtures modestly fit there: a toilet, a sink and a hygienic shower.
I don't like tiles in spaces like this. It turns an already small room into a cold tunnel. I don’t see any point in laying all the walls up to the ceiling with tiles (unless it’s porcelain tiles with an imitation of expensive marble in a certain style or native marble itself).
It is much better and more correct, from my point of view, to make such bathrooms interesting and even unusual. Give them some raisins and play around a little.
Make a gallery of mirrors, paintings or posters.
Image credit- Elements of Style
Or leave everything in a pleasant, laconic design, very minimalistic and stylish. Just painted walls.
www.fantasticfrank.se
ABOUT CHOOSING PAINT
To begin with, I kindly ask you not to confuse: paint for wet rooms with simply “washable paint”. These are two different compositions, both in terms of technical characteristics and conditions of use. All you should be interested in right now is bathroom paint.
Good paint for wet areas will not be cheap. This must be understood.
It is also worth understanding the fact that preparing walls for painting is not at all the same thing as preparing walls for tiles. This is work that is quite expensive. Because the walls must be perfectly smooth for subsequent painting. Especially if you are planning super fashionable glossy paint. It will reveal every unevenness and show in all its glory the plasterer’s shoddy work.
Therefore, when they say that paint is cheaper than tiles, I cannot agree. Everything needs to be counted. But painted walls in bathrooms look many times more comfortable to me.
Tip: an undeniable advantage of paint can be the fact that updating a bathroom with painted walls is much easier than with tiles. Especially if initially the level of preparatory work (rough work) was very high.
All reputable paint manufacturers today have bathroom items in their arsenal. I will not sharpen the conversation now or recommend anyone, but I will say that reading reviews is very useful. Painting is a must. Everyone’s budget preferences are also different.
designworkshome.co
If just paint seems boring, then choose wallpaper. Also special - moisture resistant. This does not mean that water should be poured on them from morning to evening, but occasional droplets will not harm them, plus they can be washed as needed.
Wallpaper in bathrooms is very cool. You immediately feel right at home, and not in the barracks. A customer once told me about the barracks - he saw such a resemblance in the painted walls in the bathroom.
Studio M Interiors
If you are still completely afraid of paint and wallpaper, then consider the option of combining them with wall panels. Usually the ears are mounted at 1/3 of the height of the space.
Or go for cool panels for the entire bathroom. Let me tell you this is a real luxury. But do it at a really high level.
Be sure to read about moisture-resistant MDF panels on the Internet. And if the question interests you very much, let me know, and I will suggest the most authoritative opinions.
Corian® PEACE
So, we’ve dealt with small bathrooms, luxury ones too, but what about the average ones, which are found in most houses and apartments.
What to do if the bathroom has a 100% shower or bathtub, plus sinks, bidets, and toilets. My answer is the same - combine tiles (marble, porcelain tiles) with wallpaper and paint.
I will never recommend 100% avoiding stone-tiles in a wet area. Unless a brave customer himself suggests finding an alternative.
Tip: Leave the tiles only in the wet area: around the bathtub and inside the shower, and paint the rest of the space where buckets of water are not pouring with a beautiful color or wallpaper.
It is not difficult to do this today. And here, of course, you can save a lot on materials if you choose tiles from expensive collections.
Nadezhda and Georgy Ananyev
PRINCIPLES OF COMBINING TILES AND PAINT IN BATHROOMS.
1 PRINCIPLE TILES ONLY IN THE SHOWER-BATH AREA.
Project by Ekaterina Fedorova
Finishing only a small wet area with stone is very modern. Look at the beautiful project of Ekaterina Fedorova, it is very stylish. Laying the tiles does not look trivial, but together with skillfully selected textiles, the bathroom is turned into a real relaxation room.
The first principle of combining materials works great when the bathtub is located in a niche (we talked about the arrangement of niches HERE ).
Because the niche itself implies a mini separate space that can and even needs to be allocated. In a niche it is always convenient to make joints of different coatings through decorative moldings and corner elements (I know for sure that beauty lies in the details and assemblies).
It would be very logical to even decorate the entire niche inside up to the ceiling (and maybe together with the ceiling) with tiles (stones) and it will look complete and beautiful.
project by Oksana Panteleeva 2021
2 PRINCIPLE TILES FOR 1/3 WALLS.
A very good option for combining tiles with wallpaper paint, when the lower part of the walls is covered with tiles along the entire perimeter to 1/3 of the height; in the wet area, the tiles rise to the required height, depending on the shower design.
Anouska Tamony Designs
Today, the mark of the upper border of the tile is often made according to the height of the box in the installation. As a rule, this will be approximately 120-130 cm from the finished floor. Then you can adjust this height depending on the size of the tile, so as not to cut it unsightly, you can adjust the height of the installation box, which is very convenient.
Studio OINK
The second mark of a good height can be the upper border of the tile in the sink area. As a rule, the tiles are raised above the tabletop by 10-30 cm (maybe significantly higher). The calculation depends on the furniture, tabletop (with or without a side), and on the position of the mirror. Remember: all the details are involved in the process of determining such a unit as the height of the tiles on the wall in the bathroom.
project: Ekaterina Fedorova
The third mark of the upper border of the tile is the height of placement in the wet area of the bath or shower. Do not bring the tiles to the ceiling, but stay at a comfortable height, so that the accessories in the bathroom are placed correctly (read about this HERE ) and the beauty is preserved from an aesthetic point of view.
Let's sum up the intermediate result: the upper border of the tile can lie along:
- level of the box for installing the toilet
- sink level (considering practicality of use)
- level of finishing of the wet area of the bath or shower
CG&S Design-Build
3 PRINCIPLE. TILES ARE PARTIALLY INSTALLED IN WET AREAS
In other words, you will only have tiles in the shower area and near the sink. You determine the size of the boundaries here yourself.
It can be done in small pieces, only where water gets in can be laid out in large pieces “from floor to ceiling.”
McElroy Architecture, AIA
This solution can be safely applied in modern interiors. But we must pay tribute to the fact that the work to be done here is serious and thoughtful.
The task is quite complex and requires professional training, to skillfully decorate the walls with “pieces” and achieve a worthwhile result, and not so that it looks like “oh, there weren’t enough tiles.”
www.clarkrichardson.com
We talked today about how we can do without tiles completely or partially in our bathrooms, while still making everything practical, modern and stylish.
Of course, the choice is yours. And I’ll even say more, it also depends a lot on what tile you fell in love with in the salon. Its size, shape, pattern can also dictate the entire style of the bathroom interior, as well as the installation scheme.
Think very carefully about all the nodes and transitions. How will you combine tiles with paint? Calculate the entire budget for preparing the walls for painting and laying tiles. Count all the materials, all the decors, think a hundred times about what you want to get in the end!
And only after that start the “dream bath” project.
Studio Odnushechka
And now, in conclusion, as promised, I want to give advice to everyone who is doing cosmetic repairs only to a separate bathroom, without affecting the rest of the house or apartment.
For your story, all of the above is very, very applicable.
You also think about the overall style of your apartment, if you have one at the moment (for example, the kitchen has already been renovated, and the rooms are being prepared for the next time period). And you also think about saving your budget and calculate everything well.
Many old apartments still have separate baths and toilets. For them, it is especially worth thinking about where it is appropriate to use tiles, and where you should just paint and it will be fine.
For those who don’t have any style and just want something clean and good, my advice is:
- Do not strive to waste money uncontrollably on various decors and acidic shades.
- Try to be sensible when choosing tiles, which you definitely won’t be tearing off the walls in the next 10 years.
- Give preference to laconic solutions. Choose plain light shades for the tiles, combine them with painting the walls, and experiment with color on them at least every year.
Thank you for your attention! Stay with me! AND…
GOOD LUCK WITH THE REPAIR!
Ceiling finishing
A plastic film is laid on the finished floor to protect the ceramics from the abrasive effects of dust generated when drilling the bases.
Then markings are made for the frame of the suspended ceiling: along the walls - for guide profiles, along the ceiling base - for suspensions to which the load-bearing baguettes (tires, “combs”) will be attached.
Using the completed markings, holes are drilled and the frame is mounted. Once the frame is ready, aluminum or plastic slats are installed and secured with “comb” teeth.
Installation of equipment
The main and auxiliary equipment is installed when the finishing work is completed. First, sockets, switches, lamps are installed, then plumbing fixtures. Lastly, mirrors, cabinets, hangers and decorative interior elements are hung.
Installation of equipment (including its cost) by a contractor in Moscow and the Moscow region is carried out at approximately the following prices:
| Type of work | Unit measurements | Price including material (RUB/unit) |
| Plumbing work | ||
| Installation of an acrylic bathtub with piping | PC. | 3500,0 |
| Installation of a cast iron bathtub with piping | PC. | 4200,0 |
| Installation of a steel bathtub with piping | PC. | 3600,0 |
| Making a screen for a bathtub using gypsum boards with installation, base, hatch | PC. | 3640,0 |
| Installation of an assembled floor-standing toilet | PC. | 2200,0 |
| Installation of water supply pipes made of cross-linked polyethylene or metal-plastic | linear m. | 750,0 |
| Installation of polypropylene water supply pipes | dot | 750,0 |
| Installation of sewer pipes of any diameter | dot | 450,0 |
| Plumbing cabinet installation | PC. | 2500,0 |
| Installation of a leakage protection system | set | 8400,0 |
| Installation of a heated towel rail | PC. | 1500,0 |
| Installation of a shower mixer in the bathroom | PC. | 1200,0 |
| Installation of a “tulip” model washbasin without faucet assembly | PC. | 1500,0 |
| Installation of instantaneous water heater | PC. | 2500,0 |