You can make a self-leveling floor yourself without the involvement of specialists, having minimal knowledge about the material, its properties and manufacturing technology. This modern material will not only level the floor in a short time, but will also provide it with high strength, load-bearing capacity and long service life. In addition, it will give it unique decorative properties. When starting a renovation, it is important to pay attention not only to decorative elements, but also to structural ones. Tips and recommendations on technology will make the foundation of the room reliable and beautiful.
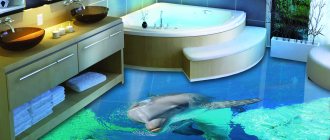
Decorative self-leveling floors, perfectly smooth and reliable, especially relevant for large areas
What is a self-leveling floor: popular types
Self-leveling flooring is a special mixture based on various binders, which is designed to level the base prepared for installation of the floor covering. The base is made by pouring liquid material, which hardens and forms a layer, depending on the functionality of the room: from 1 to 5 mm.
You can use the mixture as a base or as an independent finishing decorative coating. Advantageous features of the composition:
- solidity;
- durable strength;
- lack of joints;
- resistance to conditions: temperature and humidity;
- environmental friendliness;
- high antistatic properties.
There are models designed for different purposes. Their classification is based on additives with astringent properties: Polymer floors intended for finishing coating.
Epoxy, created on the basis of the resin of the same name, have high decorative properties: you can choose any pattern and color shade, make the surface glossy. They are resistant to aggressive influences, but have low impact resistance. This type is used for the manufacture of self-leveling floors in 3D projection.
Polyurethane, thanks to the modern polyurethanes included in its composition, have high resistance and resistance to chemicals. Self-leveling flooring made from this material can have different textures and colors.
A polyurethane floor can withstand any load and pleases its owners with the fact that it has antistatic properties - it does not collect dust.
Cement-based floors, with the addition of a plasticizer, serve as the basis for laying tiles, laminate and linoleum. This type can save the base of the floor from significant defects.
Cement flooring is rarely used as an independent covering; most often it is the basis for facing material
Acrylic-cement, intended for utility rooms, due to its excellent technical properties: waterproofing, withstanding a wide temperature range, several - are also in demand.
Here are the main types of coatings that will allow you to make the right choice if you decide to make your own floors.
Types and choice of composition
It is the mixture itself, which is called self-leveling flooring, that is the main material that will be used to create a smooth and beautiful coating. It is made on the basis of ordinary cement, but of high quality, as well as gypsum, sand or limestone chips and a number of polymer additives that give the base certain properties. Fractions of fillers such as sand and crumbs can vary from 0.5 to 1.2 mm . Also, modifying additives are added to the mixture to achieve certain qualities - they can increase spreadability, plasticity, adhesion, etc. Special microfibers can also be added to the mixture, which will ensure maximum quality of bonds between the individual components of the base. They are also designed to reduce the risk of cracks.
Installation of a self-leveling floor in a garage
On a note! There are a huge variety of color variations for self-leveling floors. The desired shade can be achieved by introducing a certain dye. It is this substance that will determine the main color of the floor.
Colors of self-leveling polymer floors
When choosing a mixture, it is important to pay attention to the substance that is included in its base. For example, cement-based mixtures can be used in rooms where the humidity is quite high. But it is better to pour gypsum-based compositions where the air humidity is normal. If you plan to make the floors warm, then it is recommended to choose a mixture with increased elasticity, since the floors will still have to either shrink or expand under the influence of temperatures. But with high elasticity rates, you don’t have to worry about the appearance of cracks.
Epoxy mixtures for finishing floor filling
Types of self-leveling floors from
On a note! If it is difficult to make a choice due to lack of knowledge, then you can settle on a universal mixture suitable for pouring floors in various rooms.
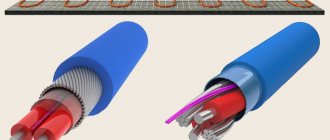
Polyurethane two-component self-leveling floor
In general, the choice of mixture will depend on:
- operating conditions;
- type of subfloor base;
- the presence and type of damage to the base, if any;
- working conditions, including air temperature, humidity, and so on.
Table. Types of mixtures for creating self-leveling floors.
| Type | Short description |
| Epoxy | This is a universal composition with many advantages. A floor created from such a mixture has a number of advantages. It is not afraid of any mechanical influences, and therefore it can be installed in garages, gyms, parking lots, etc. Often such floors are poured in workshops where there are high requirements for cleanliness - for example, in production facilities belonging to the food or pharmaceutical categories . Contains hardener and epoxy resin. These floors are not highly elastic, but they are very durable. Chips and damage to them will appear only under extremely strong mechanical impact. Properties of epoxy bases - excellent evenness, strength, inertness to chemicals; They are also non-slippery. |
| Polyurethane | These mixtures are used when it is necessary to obtain a base that is less brittle than that described above. Polyurethane bases have high elasticity, are not afraid of temperature changes and are suitable for installing heated floors in an apartment or residential building. They are also not afraid of the cold, which means they can be created outdoors. These are also very durable floors that are destroyed by moisture and are not afraid of frequent cleaning, and they look very nice. |
| Polymer-cement or cement-acrylic | Mixtures created on the basis of cement, acrylic with the addition of sand and crushed stone. They are not afraid of exposure to aggressive chemical compounds. Suitable for finishing laboratories and chemical industry workshops. Also used in food industry premises. Durable, high-quality, beautiful, such floors are often used in residential or office spaces. The floors are easy to clean and are not susceptible to moisture. |
| Methyl methacrylate | This mixture makes it possible to create wear-resistant bases that are also not afraid of temperature changes. They are often made outdoors. But the mixtures used to create such floors are highly toxic; you need to work with them only in respirators and with good ventilation. Also, floors are difficult to pour due to the very high speed of hardening - a person without experience will simply ruin the material, since he will not have time to use it up and it will harden. |
Self-leveling floor in the parking lot
Main types of self-leveling floors
Other materials for arranging self-leveling foundations
The technology for pouring such floors is quite simple, but still requires some skill. However, you can even try to cope with this task yourself and not ruin the materials, the list of which, by the way, is supplemented with materials to ensure an even base for pouring, primer and damper tape at a minimum.
Primer screed
On a note! If the self-leveling floor is poured onto a finished screed that is not damaged and looks presentable, then it is enough to simply clean it, apply primer to it and immediately pour the floors. In this case, you won’t have to level it, much less do it again.
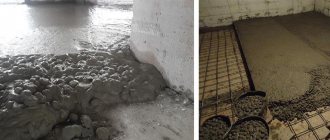
Before pouring floors, you need to make sure that the base underneath is level, without deep cracks or gaps. Such damage can cause high mixture consumption. Therefore they need to be sealed. And the uneven base option should be leveled to the horizon level. The final result after pouring the self-leveling floor should be a coating that is carefully leveled. Therefore, large differences in the rough foundation need to be corrected. To do this you will need to use a cement mortar. With its help you can correct all the shortcomings. In some cases, sealants can also be used to seal small cracks and seams along the walls. If the screed is in poor condition or is missing altogether, then it will need to be completely redone.
The base must be properly prepared
It is also necessary to glue damper tape around the perimeter of the walls. This is a thin porous material that is attached to the wall using an adhesive base, sealant or self-tapping screws and acts as a kind of softening material, which is needed so that the dense materials of the screed or self-leveling floor are not damaged as a result of thermal expansion. The damper tape also acts as an additional soundproofing layer.
Gluing damper tape
In order for the self-leveling floor to hold up well, it is important to cover the rough base with a primer mixture. It increases adhesion and makes the connection of the poured layer with the rough base stronger. Also, the primer additionally performs a sealing function. It is applied in 1-2 layers using a roller or brush and dried within 24 hours.
Needle roller for self-leveling floor
Necessary materials and tools for work
In order to prepare a high-quality solution, you need to take care of tools, equipment and protection. List of the most necessary items:
- Squeegee for leveling the solution.
- A needle roller made of metal or plastic to remove air bubbles.
- A notched trowel is useful for working with a self-leveling base.
- A level at least 2 m long for height control.
- Container for diluting the material.
- Pin beacons performing the function of guides.
- Construction mixer or special attachment for mixing components.
- A grinder that will be needed both at the stage of preparation for work and at the finish.
- A respirator that prevents inhalation of harmful vapors.
- Protective gloves.
- Metal platforms that are attached to shoes and prevent damage to the finished coating.
If you decide to make a self-leveling floor with your own hands, you must purchase the necessary material in advance:
- mesh for reinforcing liquid floors;
- concentrated additives serving as dyes;
- polymer mastic as protection;
- adhesive composition for eliminating minor flaws;
- fillers that reduce the consumption of the finishing mixture;
- varnish for added strength and shine.
Professional tools for leveling the mortar: notched trowel
Care
Very complex maintenance of the presented floor covering is not required. If the floor is gypsum, it is quite unpretentious, so it is easy to care for.
Recommended use:
- Polishes (for cleaning);
- Matte mastic (for restoration and creation of a protective film);
- Cleaners (to remove grease).
Cleaning 3D floors can be done using self-propelled vacuum cleaners. It is not particularly difficult.
Example: self-leveling floor, step-by-step instructions
An example of completed work on self-leveling screeds. The objects for renovation are located in an old panel house. This technology is ideal for such premises.
The floor, in this case, is covered with ceramic tiles laid in industrial conditions, so it was impossible to knock them down even when using an electric tool
The material for the floor will be the product “Vetonit 3100. Finish self-leveling floor”, which is a thin self-leveling floor with a height of 1 to 15 mm. In this case, this is what we need.
Tools
Construction mixer or regular drill. It’s good if the tool has a function for switching to slower speeds. This will allow the composition to be mixed at 400-600 rpm, which will prevent the formation of “bubbles” in the mixture.
- Needle roller.
- An ordinary spatula.
- Large capacity for kneading. An ordinary plastic bucket, for example, with a volume of 60 liters, will do.
- Fur roller and brush for priming the floor.
- Bubble level.
Using a level device, we determine that the field level in the cabin at the zero point is 0.5 cm higher, therefore, the base for laying the floor must be poured as thinly as possible
We find the highest point of the base and we will start from it when filling with a level.
If we used the technology of filling the floor using “beacons,” we would have to raise the floor by a centimeter from the maximum point and install beacons. This type of work requires some experience.
We will use a simple technology, which is as follows:
- no need to place beacons;
- there is no need to purchase special equipment, in particular a laser level.
To make a quality foundation you need:
- Mix the self-leveling floor according to the instructions on the package.
- Calculate the required volume.
After 10-15 minutes, enjoy the result - a finished self-leveling floor, designed for laying tiles and on which you can walk in just 4 hours.
Material calculation
To calculate the amount of level needed for a specific room, you need to find the highest point using a level - this will be 0. In relation to the lowest point, we determine the difference of 10 mm. We conclude that the smallest layer of the level will be 5 millimeters
Please refer to the technical specifications table located on the packaging of the floor mixture.
The mixture consumption is 1.6 kg per square meter for a layer of 1 mm. In our case, the layer will be 5 mm, which means 1.6 x 5 and we get 8 kg per square meter we will need.
The area of the room being repaired is 2.25 m2, which means that 1.5 bags weighing 20 kg are enough for the floor of the bathroom and toilet. A maximum of two packages of mixture for self-leveling floors will be required.
Read the instructions carefully and pay attention to the warning that it is prohibited to use soils containing quartz sand.
The remaining unbroken tiles have a rough surface, which will promote good adhesion. But if there are any doubts, you can make notches using a grinder or a concrete disc
Preparing the base
Preparation procedure:
- We clean up any debris that may be on the floor.
- Dust the surface using a vacuum cleaner.
- We cover the base around the entire perimeter.
- We prime the base with a regular deep penetration primer diluted with water based on the instructions
If there is no threshold in the room, in order to prevent the self-leveler from flowing out of it, it is necessary to make a barrier, for example, place a piece of drywall on polyurethane foam
Mixing self-leveling floor
One bag of dry mixture will require 4.8 liters of water.
First of all, pour water into a container and pour it into the dry mixture. Using a construction mixer, knead until smooth.
Pouring process
We take a container with the prepared mixture and begin to pour the floor, using a metal spatula to help the solution spread. Smooth the polymer mixture evenly
When pouring the floor in a small room, like ours in the cabin, you can use a non-standard solution: place a jackhammer in the center, immersing it in the mixture poured onto the floor, and by creating vibration, allow the floor to be evenly distributed.
Finally, the entire floor space needs to be rolled out using a needle roller.
The entire pouring process should take place within 30 minutes.
Examination
No earlier than after 4 hours, check the evenness of the floor in all planes. Once you are sure that it is even, you can safely lay tiles on it.
Technologies for arranging polyurethane and epoxy floors
Let us briefly consider general recommendations for pouring two types of floors - epoxy and polyurethane. So, a polyurethane coating requires the following conditions for pouring:
- indoor air temperature – +5-25 degrees;
- the temperature of the mixture itself is about 15-20 degrees;
- absence of draft, dust, dirt;
- air humidity – no more than 80%.
Stages of installing a gypsum self-leveling floor
The concrete base must be perfectly level - permissible height differences for every 2 m are no more than 2 mm. The density of concrete must be at least M200.
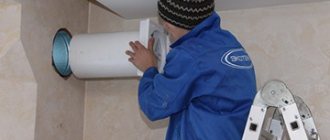
On a note! The humidity of the base should also not be high. You can check whether its level is suitable for pouring the floor by laying polyethylene on the base and securing it with tape. After a day, you need to lift the film and see if condensation has appeared on it. If there is condensation, the base must be dried before the floors are poured.
How to check substrate moisture
Tools - and this is a needle roller, squeegee, spatula, etc. - must be clean. If they have factory grease on them, it needs to be removed. Spatulas should be metal and wide. You will also need to purchase paint shoes - these are special shoes that will allow you to walk on the applied liquid coating if necessary. They have a studded sole. It is also recommended to get a mixer for mixing the mixture and a powerful vacuum cleaner, which will make it possible to collect all the dust and debris from the base before applying the primer.
Paint shoes for self-leveling floors
First, the primer is applied to the prepared base, and after it dries, you can start pouring the floor. When mixing a polyurethane mixture, which is often two-component, it is important to carefully study the instructions and act on them. So, for example, to begin with, the first component is mixed with a mixer, then, without turning off the mixer, the second is added to it, and everything is mixed together again, first in one direction, then in the other. In some cases, polyurethane floors do not need to be infused with subsequent mixing, but can be used immediately.
Pouring self-leveling floor
Important! Be sure to read the instructions for the mixtures and act only on them. The manufacturer of each individual composition knows better than others how to work with the material.
The mixture is applied in an even layer, the approximate consumption of the composition is 400 g/m2 for the underlying layer. Polyurethane floors need to be dried for 24 hours at a temperature of about 10 degrees, or only 8 hours if the room temperature is 25 - after this period they are ready for use. At the end of this stage of work, you need to apply the finishing coat. It hardens quickly, you need to work immediately on a clean surface. After this, the floors need to be thoroughly dried again.
The technology for pouring epoxy floors is practically no different from that described above. But in this case, it is best to pre-sand the base.
Grinding concrete screed
The self-leveling epoxy floor hardens quickly. You need to have time to use up and level the mixture on the floor in just 40 minutes. By the way, you should not scrape off the residue from the walls of the container where the epoxy composition was mixed. Mixing near the walls of the container may be incomplete, which will ultimately affect the quality of the layers. Consumption for the finishing layer is 1.7 kg/m2. Its polymerization rate is 8-24 hours depending on the room temperature.
Features of epoxy self-leveling floor
Blend selection
For a self-leveling structure, you can choose different mixtures. When choosing between them, you need to consider in which room the floor installation will take place.
Cement mixtures, which are distinguished by high technological characteristics and low price, contain:
- cement;
- Sand sifted through fine sieves;
- polymers;
- mineral supplements.
Gypsum mixtures are very popular among those who do their own repairs. A gypsum floor is easier to pour, process and dismantle than, for example, a cement floor. It does not require additional additives to prevent cracking. The only negative is its low moisture resistance, so it is not recommended to fill them in rooms with high humidity.
The final coating of gypsum is an indispensable condition for its effective and safe operation.
Quick-drying compounds will shorten and simplify the installation process of the base. The fillers and additives included in their composition allow you to walk on the surface within 3 hours and cladding 10 hours after pouring.
Rating of manufacturers
Self-leveling floors, the price of which is affordable for the average consumer, have an epoxy or polyurethane composition. Depending on the wishes of the customer, stores offer liquid floors in different versions. Prices depend on the type, design and manufacturer. The most popular are the floors, the prices of which correspond to the quality. You can evaluate manufacturers by reading the information in the table:
| Name | Main characteristics | Consumption |
| Weber 3000 from Weber.vetonit | The composition is based on Portland cement with additives. Has high compressive strength. | 15 kg per 1m2 with a layer of 1 cm. |
| Volma Level Express | Cement-based mixture, suitable for rooms with high humidity levels. The key feature is the absence of shrinkage. | For 1 m2 with a layer thickness of 1 mm, 1.25 kg is required. |
| Prospectors | A quick-hardening mixture of gypsum and cement. Suitable for rooms with normal humidity. | Consumption is slightly increased compared to other manufacturers. |
| Litokol CR300 | A mixture based on Portland cement. Frost resistance - F100. The composition is used for rooms with normal and high humidity. | Mixture consumption per 10 mm layer is 16 kg. per 1m2. |
| Ceresit CN 175 | A mixture based on branded cement. The composition contains Fiber Force microfibers that prevent the formation of cracks. The adhesion of the composition is good. | 1.6 kg per 1 m2 with 1 mm layer. |
Base and finishing levelers
Levelers for roughing (basic) processing and finishing (finishing) differ in composition and characteristics.
Basic ones have a coarser texture, a larger fraction, serve to eliminate significant defects and are applied in a thick layer to ensure strength.
The main component of base levelers is most often cement, which provides strength and the necessary adhesion
Finishing agents, in addition to leveling the base and increasing its stability, result in an even and smooth surface due to a more complex and uniform composition.
When carrying out cosmetic repairs, you can level a floor that has minor defects using a finishing screed
Pros and cons of self-leveling mixtures
Mixtures with self-leveling properties have many advantages:
- Easy to install;
- Dries for a short time;
- Create a durable coating;
- fire resistant;
- environmentally friendly;
- durable.
The technology for applying them is simple - pour the solution and stretch it with a spatula: the mixture will spread on its own, eliminating all flaws
The disadvantages of such mixtures are the high cost of materials and knowledge of technology when using.
Calculation of material consumption
To calculate the mixture consumption per 1 sq.m of floor, it is necessary to take into account the parameters of the layer thickness and the brand of material. The standard consumption rate is 1.5 kg of mixture per 1 sq.m.
Screeds: main differences
Screed is a traditional floor leveling technology, and self-leveling floors are modern. Both technologies have positive and negative properties.
Screeding is a more expensive process in terms of physical effort and time: it requires strict adherence to technology and a waiting time of up to 20 days
general information
The poured floor appeared on the building materials market relatively recently. Before reaching private apartments and houses, self-leveling self-leveling flooring has gone through a difficult journey. Initially, this building material was intended for use under suspended loads. Such floors were poured in shopping centers, laboratories and industrial premises.
Such places are characterized by increased demands on the floor covering in terms of wear resistance. Ultimately, the introduction of new materials and the development of the technological process for producing floor mixtures made it possible to use it in residential premises.
Quite often, people who have little understanding of the issue confuse self-leveling floors and screeds with the self-leveling effect. Meanwhile, leveling the floor with a self-leveling mixture is the final correction of the surface before laying the topcoat. They can be used - laminate, linoleum, tiles, parquet, self-leveling flooring and so on.
Surface preparation
When screeding the floor with a special solution, there is no need to additionally prepare the surface, since the filling is done in a thick layer.
Self-leveling floors require careful preparation and cleaning of the surface.
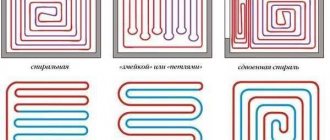
Arrangement of beacons
Fill the screed, focusing on the beacons. Most mixtures have self-leveling properties under their own weight and do not require beacons.
Using rack or pin beacons when pouring
Instructions for pouring the floor
Preparing the base
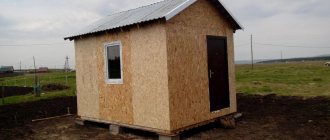
Before making a self-leveling floor, you definitely need to take care of preparing the base for pouring in order to increase adhesion. Preference is given to concrete bases, which, unlike wooden ones, will last longer.
Preparing the wooden base
Before applying the self-leveling mixture to wood, it must be cleaned of old paint, sanded, treated with an antiseptic solution and primed.
Preparing the concrete base
Preparing a concrete base involves preliminary examining the floor for defects and eliminating them by puttying and grinding.
Surface grinding using special equipment will allow you to achieve the best result.
Preparing a ceramic tile surface
The ceramic tiles on which you plan to pour the solution should be washed and degreased. Fill all uneven areas with cement mortar.
Mixing the solution
The kneading procedure is basic and must be approached with full responsibility. Each package of the finished mixture contains detailed preparation instructions; you must follow them exactly, observing some rules:
- Mix the whole package at once.
- Use water at room temperature, avoiding excess.
- Pour the dry mixture into water.
- The mixing process is best done with a mixer at low speed for 3-5 minutes.
- Let the prepared solution sit for 15 minutes and mix again.
The mixture spreads independently over the entire surface and forms an even layer in a short time
What is a self-leveling mortar?
General principles for creating self-leveling floors
To present the picture more clearly, let’s first remember how the floor is leveled with an ordinary cement-sand screed. To do this, the base is prepared, the necessary measurements and calculations are made, and then a system of beacons - guides is created that set the required horizontal plane of the floor.
When leveling the floor with a conventional concrete screed, the creation of a beacon system is required. Any error when setting the guides will affect the quality of the surface.
Then, between the beacons, a plastic concrete solution is laid out with a slight excess, which is leveled by moving the rule along the guides. The result is a surface that repeats the plane defined by the beacons.
It seems that everything is simple, and there is no need to “fence the garden.” Indeed, this scheme has been tested by time, and still remains the most popular in construction. What is attractive about it is its clarity, accessibility, and low costs of raw materials. But it also has certain disadvantages:
- Firstly, it is very difficult to achieve optimal smoothness of the concrete surface with this action. For laying ceramic tiles - just right, but for many other floor coverings the resulting quality is not enough. And we have to, one way or another, modify the surface.
- Secondly, a screed with a thickness of less than 20 mm (and even 30 mm is considered optimal) will not have the necessary strength. And in many cases, such a thick layer for leveling becomes absolutely unnecessary, that is, leading to unnecessary weighting of the structure and unjustified costs.
- Thirdly, when laying a plastic, but still quite dense mortar, if special tools (vibrator or vibrating screed) are not used, small air cavities may remain in the thickness of the screed. And this is a decrease in the strength qualities of the base.
- And fourthly, installing a beacon system correctly can also be a difficult task. And any error in setting the guides or their insufficient fixation will certainly affect the quality of the resulting base.
How to install beacons for pouring concrete screed?
There are many different methods for performing such an operation - you can choose the most convenient for a particular case. Some of the methods are described in detail in the article on our portal “Do-it-yourself concrete floor screed” .
Prices for self-leveling floors
self-leveling floor
Now let's remember the properties of an ordinary liquid. Poured into any vessel, regardless of the complexity of its shape (as an option - poured over the surface of the floor), water under the influence of gravitational forces always “calms down” in such a position that its surface becomes perfectly horizontal. And at the same time it fills the entire volume, that is, it leaves no voids.
It is on this ability of the liquid that the technology of using self-leveling compounds is based.
Self-leveling floor coverings - the ideal horizontality of the resulting surface is achieved due to the action of normal gravitational forces.
Technologists have developed special compositions that are given a liquid consistency when preparing for work. After they are poured onto the base of the floor and distributed over the entire area, the surface of this solution takes on a horizontal plane. Optimally selected components of the mixture ensure its rapid hardening. And the result is a hard layer with a perfectly flat surface, which very often does not require even minimal “finishing”. Moreover, some types of self-leveling floors themselves become the finishing coating.
Advantages and disadvantages of self-leveling floors
Obviously, this technology for creating a smooth and durable floor surface has a number of advantages :
- Self-leveling self-leveling floors allow you to level the base with a thin layer, literally a few millimeters. There is no need for reinforcement, the floor structure is not overweight. Some compositions even make it possible to perform leveling almost “to tear off”, that is, less than a millimeter thick.
However, mixtures are produced that can be applied to very curved substrates, in layers up to 50 and even 100 mm.
The surface can be leveled in a very thin layer, literally a few millimeters. And the strength of the coating does not suffer from this.
- The surface, subject to the technology of preparation and distribution of the composition, acquires a perfectly horizontal plane, and with the filling of all possible irregularities and voids.
- Unlike concrete screed, the completion time for the coating is significantly reduced - on some surfaces you can move on after just a few hours, and after a day or two, you can move on to further finishing operations.
After just a few hours, you can safely move on many self-leveling floors.
- Many self-leveling floors make an excellent waterproofing barrier.
- As a rule, the optimally selected composition of such mixtures is characterized by very slight shrinkage upon drying.
- There is a wide variety of compositions on sale, suitable for different starting substrates and for all possible operating conditions.
- The process of pouring such a floor is not particularly labor-intensive if the operation of preparing the composition is streamlined.
Self-leveling floors may not only not require finishing, but even become the main decorative element of the interior.
- Some self-leveling self-leveling compounds themselves are the final floor covering, that is, they do not require any subsequent lining. Moreover, special technologies make it possible to turn the floor into a completely exclusive interior decoration.
However, self-leveling floors also have their disadvantages :
- It is clear that the smaller the layer, the lower its strength. That is, it is still necessary to observe a certain “line”, in any case - not to make the floors thinner than specified by the manufacturer of the composition.
- If in the future it is necessary to dismantle the self-leveling floor, this will be accompanied by certain difficulties.
- Self-leveling mixtures are of little use if a floor with a certain slope is required.
- Finally, self-leveling floors are always more expensive than regular screed, some even significantly more expensive. That is, using them for the initial leveling of large differences in heights is extremely unprofitable. In this case, it is better to eliminate significant unevenness with a screed, and only then use the leveling qualities of the self-leveling mixture.
Pouring the composition
Base primer
Having removed the loose layer of concrete, sealed all the cracks, and removed dust from the surface with a vacuum cleaner, the base should be primed, thereby reducing the consumption of the base material, creating conditions for its better spreading over the surface and increasing its adhesive properties. An edge strip should be laid along the perimeter of the walls.
Preparation of the solution
Preparation of the solution will take no more than half an hour and must comply with the manufacturer's recommendations.
A ready-to-use solution must be used immediately after preparation, otherwise its properties will deteriorate.
Checking the solution for spreadability
If, when making a self-leveling floor with your own hands, you doubt the amount of liquid per bag of material, it is recommended to check the level of spreadability of the finished mixture. This can be done using a simple technique:
- Cut a ring from a five-liter plastic bottle, the diameter of which is 20 cm;
- Place it on a pre-cleaned glass or ceramic surface;
- Pour the prepared liquid solution into the ring;
- Pick up the ring.
If the solution, after removing the limiter, spreads on a surface with a diameter of about 60 cm, that is, three times the diameter of the bottle ring, you have found the optimal amount of liquid.
The key to good spreadability of the mixture is the correct consistency of the solution, which is obtained by strictly observing the proportions recommended by the manufacturer
DIY decorative self-leveling floor
3D floors
The 3D format can be created not only on the screen, but also under your feet, in any room of your apartment or house. If you want to make an exclusive and unique self-leveling floor with your own hands, you should arm yourself with time, inspiration and take our advice into action.
The decorative floor consists of three mandatory layers:
- basic;
- decorative;
- finishing
The composition of the base and finishing layers is a polymer mixture consisting of a transparent base with the addition of a hardener. The decorative layer can be varied:
- Pictures on fabric for banners of a wide variety of subjects;
- Images on self-adhesive film;
- Decorative little things - coins, shells, pebbles, beads, etc., for fixing which you will need polymer clay or plaster.
Original ideas for 3D self-leveling floors: installation work in 3-4 days
Instructions:
- Prepare the surface: clean, level, prime.
- Prepare the mixture for the base layer using a construction mixer.
- Distribute the liquid polymer solution with a needle roller over the entire surface.
- Prepare the adhesive composition by diluting the polymer composition with a solvent.
- Apply a thin layer of glue over the entire area.
- Place the canvas with the image, straightening it.
- Prepare the finishing composition in the same proportions as the base one.
- Pour the mixture and spread with a roller.
- Cover with protective varnish after 30 minutes.
- The waiting time for the result may take several weeks until it dries completely.
Differences in drying speed
The drying speed of self-leveling surfaces varies. A special table will clearly tell you about this.
| Mixture type | Drying speed | Description |
| Quick drying | 2-8 hours | Polymer compositions, mixtures containing gypsum |
| Very quick drying | up to 60 minutes | MMA varieties |
| Having an average drying speed | day | Polymer mixtures |
| Long-drying | 2 days or more | Cement |
How to varnish a self-leveling floor
Varnish allows you to protect the coating from mechanical influences, moisture and abrasion. The most commonly used varnishes for this purpose are polyurethane and epoxy.
Epoxy varnish is used to make artistic coatings. Apply it in a thin layer of 2 mm. The type of finishing materials, such as epoxy varnish, has excellent technical characteristics and an important advantage in the form of an affordable price
Polyurethane varnish has a simple application technology: applied in one layer and dries within a day
High-quality polyurethane varnish applied correctly will not only improve the aesthetics of the floor covering, but also increase its service life
For a creative person, there are no barriers to realizing their ideas. This also applies to the manufacturing technology of self-leveling floors, from simple rough to unique in 3D format.
Finish floor
The finishing floor is the last layer in self-leveling floor technology. The thickness of this leveling layer is 2-2 mm. It is applied to a surface with appropriate adhesion properties, otherwise chipping is possible. It is applied manually with a special spatula. When mixing the solution, it is necessary to maintain the consistency of thick sour cream. It can be adjusted with water. If the mixture is too liquid, the dried floor will crack.
The finishing layer is poured only after the screed layer has completely dried. Before applying the finishing coat, the base must be primed twice.
Such floors are used indoors; they harden quickly and do not require further processing.