What could be simpler than a room thermostat? But no - it’s very easy to buy a thermostat that is not suitable for a specific task.
Therefore, before buying a thermostat, you need to understand how the seemingly identical models differ.
Household thermostats differ:
- execution;
- purpose;
- connection diagrams;
- food;
- integration;
- electronic or mechanical;
- sensors used;
- method of signal transmission.
Types of thermostats by design.
- In the building.
- For installation box.
- Without a normal body.
- In the form of a socket.
1. In a wall-mounted housing.
2. For installation in a regular installation box.
3. Without a normal body.
The first and second versions can be used normally in the room.
The third type of design cannot be normally installed in a residential area without additional costs, only in a garage or chicken coop.
Such thermostats are discussed in detail in this review of thermostats.
4. In the form of a socket.
The thermostat looks like a tee, but with one socket.
There are three possible operation options for the thermostat:
In one housing there is a switching device and controls.
The socket does not contain controls and is controlled via a radio channel by an external thermostat.
In one case there is a switching device and controls with the ability to configure via Wi-Fi.
| Wireless WiFi Thermostat RF Plug Remote Control Smart Home | Nashone LCD Digital Programmable RC Wireles Thermostat for underfloor heating |
| Pymeter Digital Thermostat PID Temperature Controller | Nashone Thermostat Temperature Controller |
Blitz tips
- It is necessary to have a normal cross-section of the thermostat cable. If there is wiring from the old days, it is much safer to install a separate line that will come from a specially designated machine.
- When using a thermostat to heat several rooms at the same time , you should remember that temperature control will only be possible in the room where the sensor is located. For this reason, problems with temperature changes are possible.
- It is strictly not recommended to use one regulator in rooms with opposite operating conditions (or with a large temperature difference). It will become impossible to achieve the desired heating in all rooms.
- The best option would be to use a separate thermostat for each room with heated floors.
Types of thermostats by purpose.
- For boiler control.
- For electric heated floors.
- For convectors, electric boilers and panels.
- For water heated floors.
- For cooling.
1. Temperature regulators for boiler control.
Heating boilers are controlled using a low-current normally open dry contact.
Normally open is when the contact is open at rest. Although, of course, what a normal boiler mode is is a debatable issue.
The boiler is usually supplied with control contacts closed by a jumper: pull out the jumper and the boiler stops.
Therefore, the thermostat for controlling the boiler must contain a relay contact that opens when the heating is turned on.
Any low current contact will do.
It is desirable that the contact be a changeover contact - what if the boiler is controlled by a normally closed contact.
Typically this contact is marked with a load capacity of 3A.
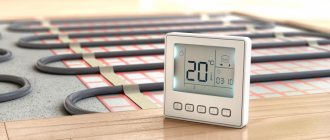
2. For electric heated floors.
The main feature of controlling electric floors is the need to switch a powerful load.
Therefore, thermostats for electric heated floors will be marked 16A.
Another feature of thermostats for heated floors is the absence of dry relay contacts. The relay contacts are not dry, that is, there is voltage on them.
This solution simplifies the connection: two wires come, two wires go, and there is a terminal for each. It’s very good that for heavy loads you don’t need to make an additional jumper.
The jumpers are already made inside the thermostat housing.
Here is a classic connection diagram for thermostats for underfloor heating with voltage output:
As you can see, it is impossible to use such a thermostat to control a device that requires a dry contact without an intermediate relay.
Another feature of the thermostat for electric heated floors is the presence of a remote temperature sensor. There may or may not be an internal sensor - but a floor temperature sensor is a must to protect the floor from overheating.
3. For convectors and panels.
The thermostat needed is the same as for electric heated floors, but without a remote sensor.
There is no need to control or limit the floor temperature.
In addition, convectors and heating panels most likely have a plug for plugging into an outlet.
Therefore, it makes sense to use a thermostat in the form of a tee.
4. For water heated floors.
The heated floor is controlled either by turning on the mixing unit pump or by opening the electronic manifold head.
Any thermostat is suitable for direct control of a water heated floor.
Often the thermostat for a water floor is also made without dry relay contacts, but with a voltage output to which the head is directly connected.
Only, unlike controlling an electric heated floor, power switching is not required and the thermostat output is marked 3A.
The 3A output is enough to power either the pump or the head.
It is clear that a thermostat with a 16A output is also suitable.
A thermostat with a dry contact is also suitable for controlling the head - you only need to supply the phase through this contact.
There are thermostats with two outputs: simultaneously for controlling the boiler and for controlling the head.
There are also thermostats with two phase output contacts: one contact has voltage when the thermostat turns on the heating, and the other when it turns off.
This can be useful when the NO head is normally open (usually NC heads are closed if power is not supplied).
It is also possible that the control is carried out by a motorized crane and power is required both for movement in the opening direction and for movement in the closing direction.
Actually, there are three ways to control heating zones with water heated floors.
But it is rare that a thermostat is used independently to control the head of a heated floor collector.
The reason for this is that when the heating is turned off in all zones and all heads on the manifold are closed, it would be advisable to turn off the pump and turn off the boiler.
Therefore, a very simple intermediate device is used, but with a formidable name - the central controller of water heated floors.
And here is the most interesting thing - not all zone controllers are suitable for thermostats with voltage output.
In the review of central blocks for zone control of water heated floors, you can find both controllers that require relay contacts and controllers that require voltage.
You can always make a voltage from a relay contact; on the contrary, it is very difficult.
5. For cooling.
It is clear that a regular air conditioner does not need a thermostat - the air conditioner already has a thermostat.
And you probably need a thermostat for the central air conditioning system.
The thermostat should open the coolant tap and turn on the fan to cool the room.
Although many thermostats with changeover relay contacts have an option: for cooling/heating.
Probably some cooling devices can be controlled simply by dry contacts.
Some thermostats have multiple outputs for cooling and heating.
Support pillars
Massive fences are installed on a foundation, but for wooden pallets ordinary posts will be sufficient. They must be leveled strictly so that there are no distortions, otherwise the fence will collapse. The part that is in the ground is wrapped in roofing felt or painted with bitumen mastic.
For installation, holes are dug, the distance between which is equal to the length of one section.
Support posts can be installed in several ways:
- just drive it into the ground;
- fill and compact with crushed stone;
- partially or completely concreted.
The last option is the most reliable. If, according to the plan, a fence made of wooden pallets looks like a picket fence, then the posts are driven into a previously prepared hole. The immersion depth is about 50 cm, and the width of the hole should be greater than the corresponding size of the post. On clayey and loamy heavy soil, it is better to cover the supports with crushed stone and compact them.
If partial concreting is planned, then you need to dig a hole, install a pillar in the center, sprinkle it with crushed stone, and pour cement mortar on top. To prepare the solution, take three buckets of sand per bucket of cement and dilute with water. After pouring concrete, check once again that the installation is vertical and level, and allow at least 3 days to harden.
Metal pipes, fittings, and protruding parts of various buildings can act as supports. To secure the wooden elements in this case, you can weld brackets to the metal parts or drill holes for bolts.
Connection diagrams for thermostats.
A clear idea of the purpose of the thermostat is given by its connection diagram.
Connection diagrams were discussed a bit in the articles “Which Wi-Fi thermostat to buy on AliExpress?” and “Review of thermostat models with WiFi and cloud service.”
Let's look at several thermostats of the same model with different designs.
Connection diagrams for thermostat MOES BHT-002.
AliExpress.com Product – Smart WiFi Thermostat Temperature Controller Water and Gas Boiler Works with Alexa Echo Google Home Tuya
Data sheet for thermostat MOES BHT-002.
In the thermostat data sheet we will find connection diagrams.
From the connection diagrams it is clear that there are several versions of this thermostat model: GA, GB, GC.
GA - for water heated floors.
GB - for water heated floors.
GC - for the boiler.
Connection diagrams using the example of POER PTC10 thermostats.
Operating instructions in Russian POER PTC10.
AliExpress.com Product – Wireless Boiler Room Controller 868MHz Heating Thermostat Weekly Programmable With Large LCD, App Remotely Control
Connection diagrams using the example of POER PTC20 thermostats.
AliExpress.com Product – WiFi Smart Thermostat Temperature Controller for gas boiler electric underfloor heating humidity display works with Alexa
Several additions to one model:
Cheap thermostats.
These are thermostats without a normal housing, costing up to 200 rubles.
W3001 Digital Control Temperature Microcomputer Thermostat Switch Thermometer New
It is worth keeping in mind that they come in two types: with output dry relay contacts and with a 220V output.
Here are diagrams of some seemingly similar thermostats.
The difference is visible only when studying the diagram from the documentation.
Holding the thermostat itself in your hands, it is difficult to understand what type of design it is.
Before use, you must make sure that the thermostat has exactly the design that is intended.
Thermostats with two control outputs.
Thermostats are available with two outputs to control two different devices, which can control both the boiler using a dry contact and the actuator using a low-current high-voltage output.
The second control channel appears to the detriment of the remote sensor terminals.
And a remote sensor is not needed when controlling a water heated floor.
| AliExpress.com Product – BEOK Programmable Gas Boiler Heating Temperature Regulator APP Controls WIFI Thermostat & Hand Control Thermostat with Kid Lock | HESSWAY 3A TUYA refrigerator temperature controller wifi thermostat for 2 in 1 Linkage Gas Boiler&Dry contact NC/NO |
Thermostats with unusual connection diagrams.
Models with 4-7 channel control.
Designed to control centralized air conditioning. To do this, you need to control the split system fan and the coolant supply valve.
| AliExpress.com Product – 95~240VAC Two Pipe LCD Weekly Programmable Central Air Conditioning Room Fan Coil Thermostat | AliExpress.com Product – HESSWAY 2P4P cool heat wifi touch screen room thermostat Google Home,Amazon Echo,Tmall Genie, IFTTT for fan valve control |
The connection diagrams for these thermostats are also worthy of adding to the collection of connection diagrams. You can choose a model with the ability to control two or three devices.
What wire can be used to connect room thermostats?
Another important point in connecting the thermostat is the choice of wire. Typically, the cross-section and number of cores are indicated in the instructions for a specific product. In addition, you need to remember the distance from the thermostat to the boiler or hub to which the thermostat is connected - if the output on the thermostat is potential, then the length of the wire can have a significant impact on the operation of the automation. This is due to the voltage drop on the wire. To reduce it, you should take a wire with the largest possible cross-section.
Most often, to connect mechanical thermostats, a two-core wire with a cross-section of 0.5 or 0.75 “squares” is used. For electronic ones, as I described above, it is important to consider the length of the wire. The longer the wire, the larger the cross-section should be (usually the cross-section does not exceed 1.5 “square”)
. But manufacturers do not recommend exceeding the wire length of 100 meters, although this is not specified in the data sheets and instructions for the products.
Thermostats without buttons and display.
Such thermostats can be mechanical or electronic.
There may be confusion because both are called mechanical.
But in one case, only mechanical control. The work still happens under electronic control.
In the second case, the control element is a bimetallic plate, as in an iron.
They can be distinguished by the number of contacts: completely mechanical ones do not have input power contacts.
Electronic thermostat with mechanical control.
Setting the temperature with mechanical thermostats is more convenient, but there is no display indicating the current temperature. electronic mechanical thermostats have the same hysteresis and accuracy as electronic ones with a display.
AliExpress.com Product – AC200~240V Electric Heating Temperature Regulator Knob Thermoregulator
Electronic thermostat with display and mechanical control.
AliExpress.com Product – LCD Display Wall-hung Gas Boiler Thermostat Weekly Programmable Room Heating Thermostat Digital Temperature Controller
Mechanical thermostat.
Fully mechanical thermostats have a large hysteresis and what is established is that the on or off temperature depends on the direction of movement of the handle to the set value.
AliExpress.com Product – 220V AC Mechanical Room Air Thermostat Regulator Floor Heating Temperature Controller With on/off switch and LED indicator
Thermostatic control valves
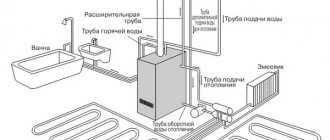
The thermostatic valve is a simple solution to the problem of obtaining a coolant at a given temperature by mixing colder water with warmer water. The three-way valve is shown below:
Three-way valve
Scheme for connecting a three-way valve to the heating system:
Scheme for connecting a three-way valve to a heating system
Piping diagram for a solid fuel boiler using a thermostatic three-way valve:
Piping diagram for a solid fuel boiler using a thermostatic three-way valve
Piping diagram for a gas boiler using a thermostatic three-way valve:
Piping diagram for a gas boiler using a thermostatic three-way valve
The thermostatic radiator valve allows you to control the temperature in the room by varying the flow of hot water through the radiator. They regulate the flow of hot water through the radiator, but do not control the boiler. Such devices must be installed to adjust the temperature needed in each individual room.
This idea should be considered as an addition to the thermal control installation. Also, such devices require periodic readjustment and regular performance checks (every six months when changing operating modes).
By temperature sensors.
- With internal sensor.
- With external sensor
- With both sensors.
Thermostats with an internal sensor measure the temperature at their installation location with their internal sensor. Not suitable for electric underfloor heating.
Thermostats with one remote sensor are designed to control the floor temperature.
If the thermostat has an internal sensor and there are terminals for an external sensor, then most likely this thermostat can still only control the temperature of the internal sensor.
An external sensor is used for emergency control of the floor temperature to prevent overheating.
Limiting the floor temperature is relevant for electric heated floors.
There were strange thermostats in which the built-in sensor served to protect the thermostat itself from overheating.
Thermoregulators that can optionally regulate either an internal or an external sensor are rare - I have only met two of these with a price of about 5,000 rubles. I would venture to suggest that thermostats costing more than 5000 rubles can all be controlled using any of the sensors.
Basic device
It is used in cases where it is necessary to carry out normal starting of an electric motor. But we know that the starting current of the engine is much higher than the operating current, which means that an ordinary household machine with a current of 3A will operate immediately when such an engine is started. The wires in the wiring diagram also need to be routed correctly. Switching on a three-phase electric motor with a thermal relay through a push-button post looks like this: In the end, it looks something like this, in the picture: If you want to connect a three-phase motor through a magnetic starter with a volt coil, you need to perform the switching according to the following wiring diagram: Using three buttons on The control panel can organize reverse rotation of the electric motor.
If this does not happen, you should check the position of the contacts at the STOP button, which should be in a closed state. An electromagnet in the form of a coil with a large number of turns is designed for a voltage of 24 V.
Connecting the trigger mechanism to the electrical network at volts, fig. Copper wires must be tinned before connection.
Typically the circuit is used with an asynchronous motor.
The operation of an MF is based on the effect of the appearance of a magnetic field when current penetrates through an induction load, that is, through a coil. This is an extremely simple scheme. Magnetic starter connection diagram.
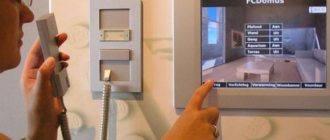
Thermostats with integration with external systems.
The thermostat can be a regular device, or it can be integrated into smart home systems or available for control remotely and from other systems.
The following methods of external communication with the thermostat can be distinguished:
- Wi-Fi;
- WEB;
- Cloud service;
- MOD Bus;
- Radio channel;
Wi-Fi.
The article “What is a thermostat with Wi-Fi” discussed ways to control thermostats via Wi-Fi. The easiest way is to directly connect to the thermostat as an access point.
WEB.
More convenient connection to the Wi-Fi thermostat via a Wi-Fi router.
But such a thermostat is a WEB device and can be connected to it via the Internet.
Cloud service.
In order to access the thermostat without an IP address, a third-party server is used - a cloud service with a mobile application or WEB interface.
Such thermostats were discussed in detail in the article “Review of thermostat models with WiFi and cloud service.”
MOD Bus.
I've seen discussions about such thermostats. Most likely it makes sense to control cooling with a central air conditioner and with a central air conditioning controller.
Probably it can somehow be used in zone heating systems with a central controller.
Model SML-1000 version GB,GD,GC.
16A Touchscreen Black Color Programmable Modbus Thermostat for Electric Heating (with Modbus function)
Remote.
Thermostat with the ability to be remotely controlled using a remote control, like a TV.
Perhaps it makes sense when controlling an air conditioner or an infrared heating panel.
| Wireless Remote Room Digital Thermostat | Eco Art Outdoor Infrared Heater, 2400W Outdoor Patio Heater wall mounted heater with Smart thermostat |
Screens for heating convectors
The screen for a heating convector is a special overlay on the device that improves its aesthetic appeal. Decorative screens are made from different materials: plastic, glass, wood, metal. This panel must have holes for air circulation. They provide efficient heat exchange. If the number of holes is insufficient or their size is small, the heating efficiency is reduced by a maximum of 50%.
When choosing a screen, pay attention to the following important points:
The material from which the element is made. Wooden linings are not recommended for use in rooms with high humidity, and glass screens transmit thermal energy worse. When choosing a plastic cover, give preference to elements made of heat-resistant plastic that do not deform when heated. Metal panels are the most reliable and durable, but they must have a protective powder coating. Depending on the mounting method, screens can be hinged, sliding or attached. The easiest way is to install a hinged or attached structure. The hinged screen has special fastenings that allow it to be hung on the radiator from above. Attachment panels are attached to the niche in which the heating device is installed. Both types can be easily dismantled if necessary. A sliding screen is much more difficult to install because it has doors. But this model provides quick access to the heating device. There are many color options and screen configurations available
It is important that the dimensions of the panel match the dimensions of the heating unit or niche. Most often, white overlays are produced, but there are also models with interesting decor and different color options on sale.
If necessary, the white screen can be painted in the desired color.
When choosing a suitable radiator cover, consider how easy it is to maintain. Please note that in the kitchen, a fine grate will quickly become dirty, and it is not easy to clean it from grease and soot. Plastic covers are simple and easy to use. They are inexpensive and come in a variety of colors.
Heating/cooling.
The easiest way to turn a heating thermostat into a cooling thermostat is a changeover contact.
Some thermostats have an option in the settings that clearly indicates that cooling work is required.
There are thermostats with separate control channels for the heater and air conditioner.
Multi-output cooling thermostats are designed for central air conditioning systems where it is necessary to control the air conditioner fan and the coolant valve of a split system.
Preparatory work
Before you begin connecting the regulator, it is necessary to carry out a number of preparatory steps. First, determine where it will be located, taking into account a number of nuances:
- The device should not be installed where it may be exposed to direct sunlight; installation in drafts is not recommended. This is especially true for models with a built-in sensor, which will regulate the temperature according to the air flow of the room.
- It is also undesirable to install the regulator on external walls in contact with the street, as this may lead to incorrect readings.
- The installation height of the device is an equally important point. Installation at a height of at least 400 mm is prescribed.
- It is prohibited to install temperature control devices in rooms with high humidity, since almost no model is equipped with a moisture-proof housing. Therefore, if the heated floor is located in a bathroom, shower or bathhouse, then the regulator itself must be moved to the next room, where it will not be exposed to excess moisture.
- The temperature sensor must be located no closer than 500 mm from the wall, in the case of a cable floor model - between the turns in the center. If the film version is used, then the thermometer head is located in the center of the carbon heating strip.
For more convenient and comfortable installation, it is recommended to use an extended 60 mm socket box. This will allow you to freely position all the wires connected to the device.
For heated floors, it is recommended to install a separate dedicated power line with a copper cable with a wire cross-section of 2.5 mm, which can easily withstand a load of up to 3.5 kilowatts. Moreover, the line must be equipped with a separate 16 ampere circuit breaker.
Before you start connecting, you need to make a groove from the installation site of the device to the floor. It should fit two corrugated pipes with a diameter of 10 mm. In one of them there will be wires to the “cold ends”, in the other - the temperature sensor line. It is especially useful to place the sensor in a corrugated tube, since they can often fail, and in order not to open the coating every time, it will be enough to simply pull out the old one and just as easily insert a new one.
If the screed is designed to be quite thick (35–50 mm), then the corrugated tubes do not need to be immersed in the groove on the floor. Otherwise, you will have to prepare a corresponding groove here too. The ends of the corrugation should be plugged so that the solution does not get there during the process.
When connecting a thermostat to a film-type heated floor, corrugated tubes are not used, since here the principle of measuring temperature will be different.