Modern technologies make human life easier, make it comfortable, simplify access to any information, and also allow you to increase your own safety.
There are many alarms and access control devices, but if we are talking about your own safety in an apartment or house, then the very first point of “protection” is the intercom.
It is the connection of a video intercom that will allow you to be more confident about who will open the door; audio systems are inferior in reliability.
The essence of how video intercoms work is as follows:
- The communication system starts when you press the bell button, which is located on the calling panel; below is its version of the Arsenal video intercom.
- A sound alert is triggered inside the room, followed by a monitor that displays the person who made the call.
- The owner of the apartment can talk to the caller through the intercom in the video intercom, be it a handset or a built-in microphone.
- The result of the system’s operation will be the opening of the door, which is done by pressing the button with the image of a key or the word “open”.
- Then the video intercom system switches back to standby mode, the monitor turns off until the next call from the calling panel.
Video intercom equipment
Installation of a video intercom in an apartment will be successful if the following basic elements are present:
- Call panel;
- Call reception monitor;
- Cable for connecting to a video intercom;
- The door lock itself;
- Power unit.
Video intercom kit
Modern access control devices are divided according to the main parameters:
| Image | Black and white | Colored |
| Video recording capability | Yes | No |
| Camera | Open | Closed |
| Image transmission technology | CRT | LCD |
| Door closing mechanism | With electromagnetic lock | With electromechanical |
| Connection method | Wired | Wireless |
Video intercoms are presented on the market with a huge number of models that will allow you to choose the best and most suitable combination of parameters for each subscriber. The video intercom connection diagram may differ depending on the device model and the number of cameras.
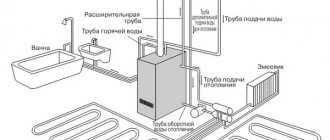
Connection diagram
In the video intercom diagram above, there is a power supply that is connected to all devices in the system; there are modifications where each element is supplied with its own power source.
The scheme is not particularly complicated, but it has its own characteristics; if you study everything correctly, you can install a video intercom with your own hands. To do this, you will need an intercom kit, a door lock, which is purchased separately depending on the wishes of the owner of the premises, and a working tool. If you follow the correct sequence of actions, connecting a video intercom yourself will not be difficult.
If the access control system has the ability to record data, then an information storage device is added to the circuit, which can be represented by a built-in memory card in the intercom monitor or an external device (receiver, server).
DIY video peephole installation
The construction of such devices is carried out in several stages:
- dismantle the old peephole and install a new one in the same place;
- drill special holes in the doors with the required diameter;
- insert a video peephole into the hole made, which is secured with a special nut or several bolts;
- if necessary, connect power.
Most of these devices are used for installation on door leaves with a thickness of at least 3 cm and no more than 70 cm.
For non-standard sizes, special extensions are used to make the body longer. Then connect directly to a TV or computer monitor.
For power, you need a regular unit that converts alternating current into direct current. Minimum power.
Start installing a video intercom
Installing a video intercom in an apartment begins with choosing the location of the calling panel. An important point is the installation height. The person making the call must be comfortable doing this in order to avoid strong downward bends or upward pulls; the average installation height of the calling panel is 1.5 meters. This value can be absolutely anything, but this indicator is the most common in modern practice.
When starting the installation of a video intercom, it is important to take into account the conditions for using the call panel; it can be located on the wall, as well as in a special niche, which will protect the device from natural influences and vandalism, which will extend its service life.
In appearance, the panels are radically different from each other; the following elements can be installed in the housing:
- Built-in video camera;
- Illumination (IR), allowing image transmission with a weak light source;
- Element that controls the lock;
- Negotiation elements: Speaker;
- Microphone.
Additional devices
In order to increase the level of security for the apartment, you can install an additional video camera to the one built into the video intercom calling panel. This will allow you to see not only the person standing opposite the call panel, but also, if you additionally install a camera under the ceiling, the entire area of the room directly in front of the door.
Note: if the installation of a video intercom is carried out in a private house, therefore, the installation of the calling panel will be carried out on the street, you need to think about protecting it against moisture, snow and other possible weather conditions. If you cannot integrate the equipment into the fence wall, then the best option would be to create a hinged canopy. The calling panel circuit has a fairly simple structure, which does not require additional special work to protect it from various types of influences.
When choosing a lock, you should take into account the + and – of one type or another. For example: you can install a video intercom in an apartment with an electromechanical mechanism, which can be opened with a regular key in the event of a power outage, but the electromagnetic one will simply turn off and the security of the room will decrease.
The next step is to select the wires with which you can connect the calling panel to the monitor. When the distance between the components of the system is less than 35 meters, the ShSM wire is suitable, combining cores for broadcasting video, sound and 12 V power. In cases where it is necessary to lay a longer line, it is better to use a coaxial cable; it will also connect additional cameras when they availability. The wires running from the video intercom calling panel to the lock must be of the ShVVP type.
ShSM, coaxial and ShVVP cables
Cable laying rules recommend avoiding being in the immediate vicinity of power lines and electrical wires. It is better to conduct all wiring in a plinth or cable channel to avoid accidental damage.
Wireless video intercom
A wireless video intercom with a connection diagram is shown in the figure below. A distinctive feature of this model is the absence of wires between the monitor and the calling panel.
The next important element of the entire system is the monitor. How well it will be located indoors will depend on the convenience of using it and the speed of answering an incoming call.
The dom ds-10s video intercom offers the following monitor option:
Modern design, great functionality, device configuration is carried out on a convenient and understandable interface.
TV as a monitor
There are situations when you don’t really want to go to the monitor to answer the call signal (if it is located at the front door), but there is a solution. Below we will describe how to connect a video intercom to a TV, which can easily replace a monitor. Modern TV equipment manufacturers include this function in their products. The implementation of this scheme when connecting a video intercom with your own hands or with the help of specialists is possible thanks to the use of a special module.
With its help, when there is an incoming call, you can switch the TV to a specific channel assigned to the video signal from the intercom camera and see who made the call. It is also possible to connect several cameras, with expanded functionality of the module used.
Installing a video intercom with your own hands should not take much time if you understand all the schemes and have the skill to work with the tool. To install an intercom with your own hands in a private house, it will take a little more time, which will be spent on laying the cable from the fence of the house, where the call panel will be installed, to the interior. In this case, it will be necessary to take into account which route the wire will go through: through the air or in the ground, which will affect its integrity and accessibility, and will also help to avoid unexpected damage.
How to install an intercom with your own hands in an apartment will become clear after reading the material above. In this case, the wire footage will be minimal, and therefore, the main work will be carried out with the installation of the calling panel and monitor.
Installing an intercom is quite a serious procedure, as it may not seem at first glance. The safety of the premises and people will literally depend on the successful completion of installation. Those inside. Therefore, a possible option is to install a video intercom in the apartment by professionals.
Basic requirements for cables for connecting an intercom
When installing an intercom, the cable is often located not only directly indoors, but also outdoors. This leads to the fact that there are certain requirements for insulation and conductors. Typically, the conductive line uses copper wire of varying diameters, but companies that provide low-quality cables usually use steel wire models that are coated with a thin layer of copper.
A similar option is used in coaxial models and twisted “twisted pair” conductors, which are used when connecting digital-class intercoms. If you want to achieve high image quality without various defects, then using such a cable is not recommended.
Installation Specialists
As technology and equipment develop, companies that install and maintain modern equipment are also improving.
No one can install an electronic access control system better than the people whose job it is to install video surveillance and intercoms.
In order to avoid becoming a victim of poor-quality work, you will still have to spend some time studying reviews about the proposed contractor. If you have the opportunity to look at photographs of completed objects, you can call and ask about prices for a video intercom with installation. After hearing the consultation, try to evaluate the professionalism of the employees; do not hesitate to ask various questions, since it concerns your own safety.
If you have acquaintances or friends who already use this system, then you can ask how much it costs to install a video intercom and compare the price with the offers of different companies. The estimated cost of the work is as follows:
- Installation of a calling panel at an apartment door – 7,000 rubles and more;
- For private houses – 10,000 rubles and above;
- For offices – 18,000 rubles and above.
Having decided on a contractor, an agreement is concluded that precisely specifies the responsibilities of the customer and the contractor, with deadlines for completing the work and the warranty period, and responsibility for the equipment in the event of its breakdown or damage during the installation process.
It is also important to inquire about the specialists’ vision of how to install a video intercom more compactly and correctly, and where to place the main and additional components of the system. And only then compare the information received and create the best option that will be convenient for the subscriber and practical from the point of view of professionals. During the installation process, it will be better to familiarize yourself with the route along which the cable for connecting the video intercom is laid, so that during possible repairs or other work on the walls, you do not damage it and disrupt the signal.
When all components are connected to each other, it is necessary to check the functionality of the entire system by applying power to it. The video intercom calling panel must send a signal to the monitor after pressing the bell button. The sound will notify the owner of the apartment, the monitor will become active and the image from the camera will be displayed on it. If there are additional connections in the form of another camera, you should immediately check it by switching the viewing mode on the monitor. The next step of checking will be the audio signal; it is worth checking with the person at the door how good the sound quality and its volume are, and in response, independently evaluate the same parameters, but from the monitor side.
The specialist who installed the video intercom is required to demonstrate the full operation of the entire system with all additional components, if any. In case of any malfunction or poor image quality, the defect must be corrected.
Additional recommendations
Before purchasing cables, you need to decide on the video intercom model. Wires intended to connect video system elements must be of good quality. Combined cables (KVK) of Russian brands meet the requirements for such products. Therefore, such wires can be used when organizing any video systems. Among coaxial cables, products from the brands Belden, CommScope and Cavel stand out. To organize video systems, it is recommended to purchase RG-6 or RG-59, which have a long service life.
Before purchasing a twisted pair cable, you need to pay attention to the material from which the conductors are made. Cables with steel cores coated with a layer of copper should not be purchased. It is also not recommended to purchase cheap (especially Chinese) products. Moreover, for the installation of video systems, cables of short length are usually used.
A short summary
Intercom systems in an apartment or private house will increase security, protect the owner from unwanted and strangers, allow you to monitor what is happening at the door, conduct video and audio recording if the intercom system has this function, and be calm that no one will be able to get inside the house without consent of the residents. The money spent on purchasing a video intercom, a special lock and installation of everything by professional workers will pay off due to peace of mind and confidence in the safety of yourself and your family.
Reader's tip
The easiest and most correct way to do this is to invite a specialist, and then a company specializing in “turnkey” security systems with a guarantee and service will carry out high-quality and quick installation.
To work you will need:
- intercom installation kit;
- knife;
- screwdriver;
- screwdriver;
- perforator;
- pliers (pliers);
- wire stripper;
- drill;
- wire cutters;
- level;
- corrugated tube for wiring.
It is better to place the wiring in the wall secretly, not yet at the stage of finishing the walls of the room, or externally, if it is not possible to conceal the wiring. We attach the video intercom unit itself with a screen and handset to the wall at a level. First, the mounting plate is attached, and then the block itself is attached to the plate.
We connect the video peephole to the wires strictly according to the diagram included with this video intercom. On the back of the block there are terminal connectors with screws.
We clamp the stripped wires under the screws. Next, we install a corrugated hose to the door, which will have a video peephole and, most likely, an electric lock. The hose is put on the wire and secured with a plastic cover and two self-cuts.
Next, we make markings on the door itself under the video - a peephole. The wire must be routed inside the door trim; to do this, you will have to remove the inner door trim. Inside the door there is usually insulation, combustible foam. Therefore, we insulate wires and twists efficiently. It is better to use terminal blocks. We also install an electric lock if necessary.
Peculiarities
This technique combines the functions of an ordinary intercom with the possibility of video surveillance. A video intercom is a system consisting of the following nodes:
- monitor;
- locking device;
- intercom calling panel;
- power unit.
In order to connect these devices, various cables are used. You should focus on the manufacturer’s requirements, technical tasks and climatic conditions. Correct calculation, high-quality installation, high quality materials are the key to long-term operation of the intercom system without failures.
Important device characteristics
The megapixel resolution of the camera is of greatest importance for video eyes. The higher it is, the clearer and brighter the picture will be. In principle, 0.3 mpx is enough for minimum quality, but in this case it is necessary that there is bright lighting in the entrance, otherwise the visitor’s face simply cannot be distinguished.
As for the focal length, here it is required to be as small as possible to ensure coverage of the maximum field of view. The zoom in and out functions are optional; there is no particular need for them for door peepholes. A bonus is the presence of a night mode. Unfortunately, the latter is difficult to implement for web and telephone cameras - you need to separately display the LED backlight from the device by eye. Some officially manufactured devices equipped with a similar function are good here.
What materials are the cables made from?
The conductors can be copper or steel. Wires made of alloys and steel wires coated with copper are available for sale. All of them will differ in their characteristics. Cables should be purchased from trusted suppliers.
Conductors made of copper have lower resistivity per linear meter and are more resistant to wave interference. Copper strands are durable and flexible, making installation easy. Less susceptible to corrosion and oxidation.
Steel conductors are used in inexpensive products; such cables are not recommended. They have a lot of resistance and weight. Steel is a less efficient conductor than copper. As the signal passes through it, it loses power. It is not very convenient to work with such material due to the greater rigidity of the wire.
The insulating material of the shell plays an important role. The durability of the system depends on its material. If the line is laid outside the room, materials that are resistant to temperature changes and ultraviolet rays are preferred.
It is important to choose insulation that will not crack in the sun. A cable with damaged insulation is unsuitable for use. Through cracks in the insulation, water can enter the electrical line, and then the line can become unusable.
Shielded cables are available. Shielding protects the signal from electromagnetic fields created by current-carrying power lines. Typically the screen is made in the form of a mesh of copper or steel wire. Foil tape is used as a protective layer. Such a power line can be grounded.
Wires should be selected for specific tasks:
- transmission of video signal to the subscriber device and additional monitors;
- supplying electrical power to the electromechanical lock and surveillance cameras.
For the system to work correctly, it is important to correctly calculate the line length, core cross-section, line attenuation and power supply power.
Eyepieces and focal length
The basis of 90% of homemade observation devices is the eyepiece. In the simplest version, it is a converging lens and a tube equal in length to the focal length. For use in structures assembled by yourself, spare parts from a regular, analog peephole are well suited. It is dismountable and only the part that is installed on the outer surface of the door is needed.
If you don’t have a ready-made one, you can assemble the eyepiece yourself, using a small lens from an office magnifier or other optical device as a basis. The connecting tube for the structure will be any piece of plastic or metal tube, or even a sheet of paper folded many times. The main thing is that the diameter of the light transmission channel is equal to or slightly larger than the dimensions of the lens itself. By gluing with hot-melt adhesive or silicate sealant, it is itself placed inside the body of the future optical device.
It is recommended to make two channels themselves, so that one fits into the other with little effort. The camera itself is attached to the second. This design is carried out for the purpose of subsequent fine-tuning of the optical system. By slightly changing the distance between the lens and the capture device, you can achieve more precise convergence of light rays at the receiver, which will have a beneficial effect on the sharpness and quality of the final image.
In essence, the entire eyepiece is made with a length equal to the focal length of the lens. This is the interval in which the rays passing through it are collected into a point. And to use a camera with an eyepiece, its receiving hole must be located at the point where the light flux converges. Determining the focal length itself for each lens is quite simple - light through it, from a bright source, is directed onto a sheet of paper. And by moving the optics itself, they achieve reduction of the beam to a minimum point size. The measured distance between the lens and the result of the ray path will be the focal length for a particular optic.
Small inaccuracies in the interval will be smoothed out by the camera itself, which is basically a rather complex device capable of adjusting sharpness and sensitivity.
Crazy! How I made a thermometer from a tablet
Today the market is oversaturated not only with electronics, but also with almost any goods from a wide variety of fields. In such a situation, there are always two options: buy a finished product and “don’t waste your brains,” or try to do something with your own hands, having at your disposal basic components and old “unnecessary junk that is a shame to throw away.”
Despite all my love for gadgets, I discovered that in the kitchen, where I spend most of my time (no, no, not in the refrigerator:), there are simply no wall clocks. And, it would seem, any normal person would go to the nearest store, buying inexpensive “walkers” with any color, shape, size and type of fastening, but my soul also wanted to get a weather station.
And the desire to buy a watch with a weather station function passed as quickly as it was born. Why? Yes, because an old Pocketbook IQ 701 , which was written off on the very first day after purchasing the iPad, has been collecting dust in the closet for several years now.
To sell is better to throw it off the mountain (they will offer three rubles on market day), to give as a gift is like offending. Use it? Sorry, but the six-year-old tablet feels very uncomfortable in 2021.
It’s decided - we’ll make a clock and a weather station out of it.
Step 1. Small modification
In 2010, we had not yet heard of a universal mini port and, especially, microUSB for charging. Classic plug like in Nokia mobile phone chargers. The voltage is 12 Volts, which you won’t find in modern smartphones and tablets.
The problem is that the power cable coming from the charger is too short. For wall installation, connecting an extension cord is not an option.
The simplest solution is to cut the plug approximately 4–5 centimeters from the end and solder a long piece of two-core copper wire with the same cross-section.
For structural strength, we put on heat shrink tubing. There was no white one at hand and I had to take what I had.
We check - everything works: there is power, the reader is charging. You can move on to the next stage.
Step 2. Rejuvenate archaic Android
We open the settings item with information about the tablet and sadly discover that it is Android 1.6. Yes, yes, that archaic, buggy and half-finished Android, which iOS looked at as a sad bunch... well, you get the idea.
I don’t know, maybe six years ago the PocketBook IQ 701 seemed like a productive device, but 2 GB of internal memory, a resistive (!) 7-inch screen that reacts only to rough poking with a finger or a sharp object, 256 MB of RAM and terrible brakes every time you open it menu.
I find the required firmware, which is promised to operate as smoothly as possible [Download Android 2.1.2 for PocketBook IQ 701], put it in the root of the memory card and carry out the installation. I think there is no point in describing all the installation steps sequentially - everything is on the relevant forums on the Internet.
The firmware update process went without problems and the reader really came to life. Animation has accelerated, and the speed of loading applications has increased noticeably. But, of course, it’s still the same old reader with reduced performance.
We connect to our home Wi-Fi and move on.
Step 3. Looking for the desired application
The “fresh” Android version 2.1.2 is installed, but it’s too early to rejoice. Finding suitable software for such an archaic version of the system is another challenge. In addition, the reader does not have a Google Play store - everything must be installed via APK.
That is why it was decided to download a dozen different alarm clocks with weather and applications that theoretically support working on Android 2.1.2, and then install them one by one and look at the result.
Out of a good dozen, only three applications worked. GreenLog company was ideal . A universal watch with a fully customizable interface and, most importantly, the weather!
Tablet Clock app is available for download on Google Play Store [Download Tablet Clock]
I launched it and realized that this is what I need! The ability to indicate the city in which you are interested in the current weather, changing the color of the numbers and the color theme in general, large numbers and a nice font that evokes nostalgia for the first electronic watches. I settled on light green (light green) and proceeded to the final stage.
Step 4. Installation or a little tape
There are few options for mounting it on a kitchen cabinet: self-tapping screws and mockery of the old man’s body are too cruel. The choice fell on double-sided tape. Initially I was worried that the thin strips of tape would not withstand the considerable weight of the reader (540 grams), but my fears were not confirmed.
It is enough to stick two strips of tape on the back side, having previously degreased the surface of the tablet and the door on which we will mount it.
Five minutes and everything is in place. The reader is installed and ready for long-term operation. In the application settings, we disable automatic screen shutdown and, voila!
What's the result?
The old PocketBook got a second life. It has again become a functional gadget, which I now use, although not for its intended purpose, but with obvious benefit.
I was not particularly worried about the life of the battery and did not open the tight-fitting plastic cover to disconnect it. It didn’t last more than two hours anyway, and since it will be connected to the network all the time, I’m not interested in autonomy.
What can the old reader do now?
- Show current temperature for the day and week
- Display a complete summary of precipitation, wind speed, etc.
- Show a clock that is visible at any time of the day or night
- If desired, play videos from and acts as a weak multimedia server
- He can be seen at any time of the day or night, and he never sits down
- It is not afraid of voltage surges - the built-in battery will maintain the current time in case of power outages
And the best part is the price. This modification cost me exactly zero rubles. Sometimes it’s nice to do something with your own hands, breathing new life into a forgotten technique.
post:
(5.00 out of 5, rated: 2)
How to make video surveillance from old gadgets
Translated by SaorY for mozgochiny.ru
to all brain friends ! Today we give new life to unused gadgets and PC accessories, namely, we create with our own hands .
If your webcam, PC speakers, monitor, smartphone have begun to gather dust uselessly in the pantry, then it’s time to revive them and make a video surveillance system connected to the cloud, that is, with a wide range of “Internet” capabilities: IP stream, storage of photos and videos in cloud, automatic emails, etc. And also a sound notification about movement and automatic activation when an object approaches, that is, brain trick .
Step 1: Required Parts
• Smartphone (Raspberry Pi)• Power supply for a smartphone• Speakers for a PC• TV monitor with a composite input and powered by a power supply• RCA audio/video cable with 3.5 mm plugs• webcam compatible with a smartphone• three adapters « mom mom"
• 1 channel relay 5V relay for microcontroller (PIC ARM AVR DSP)
The webcam is directly connected to the USB port of the smartphone through a drilled hole in the wall, and to reduce costs, the entire homemade product is connected to the local network.
Step 2: Action algorithm
When the motion sensor is triggered, the brain maker performs the following actions:
• the monitor turns on • a sound alert is sent • a message with a photo is sent to my public IP
• a message is sent with an IP stream, which can be played using the application (for iOS on AcePlayer
The chronology of pictures and videos is saved in Gmail, and if the public IP changes, the system sends a letter with the updated IP.
Step 3: Settings
First, create two Gmail accounts: one for jpeg files, the second for mpeg files. On the smartphone (RasPI) we enable access to the graphical interface: $ sudo raspi-config
and enable the option, set the monitor as the main graphical interface, and reboot the smartphone.
We configure message sending - download the tar file: $ wget https://caspian.dotconf.net/menu/Software/SendEmail/sendEmail-v1.56.tar.gz Unpack: $ tar -zxvf sendEmail-v1.56.tar.gz Copy the corrected one patch: $ sudo cp -a sendEmail-v1.56/sendEmail /usr/local/bin Make it executable:
$ chmod +x /usr/local/bin/sendEmail
Install TLS support for Gmail:$ sudo apt-get install libnet-ssleay-perl libio-socket-ssl-perlAfter installation, change as follows:$ sudo nano /usr/share/perl5/IO/Socket/SSL.pmUsing Ctrl-W find a line with the following fragment:m{(!?)(?:(SSL(?:v2|v3|v23|v2/3))|(TLSv1[12]?))$}iand replace it with:m{( !?)(?:(SSL(?:v2|v3|v23|v2/3))|(TLSv1[12]?))}i
save and exit.
We try to send an email with the command line: $ sendEmail -ftu “OBJECT” -m “MESSAGE TEXT” -xuxp YOURPASSWORD -o tls=yes -s smtp.gmail.com:587
Install the Chromium browser: $ sudo apt-get install chromium-browser We switch the browser autostart to full screen mode: $ sudo nano /etc/xdg/lxsession/LXDE-pi/autostart If you don’t have NOOBS, then: sudo nano /etc/xdg/lxsession/ LXDE/autostart#@lxpanel —profile LXDE#@pcmanfm —desktop —profile LXDE#@xscreensaver -no-splash# auto run the [email protected] s [email protected] [email protected] s [email protected] —kiosk —enable -kiosk-mode —enabled —touch-events —touch-events-ui —disable-ipv6 —allow-file-access-from-files —disable-java —disable-restore-session-state —disable-sync —disable-translate --disk-cache-size=1 --media-cache-size=1 https://localhost:YOURWEBCAMPORT
Let's reboot.
Installing MP3 player: $ sudo apt-get install mpg123
Installing the motion detector:$ sudo apt-get install motionChanging the configuration file:$ sudo nano /etc/motion/motion.
conf I changed the following parameters:#start asdaemondaemon on# Rotate imagerotate 90 (my webcam is 270° rotated)# Image widthwidth 640 (check your webcam resolution)# Image heightheight 480 (check your webcam resolution)# Maximum number of framesframerate 2# Thresholdthreshold 15000 # Picture frames must contain motionminimum_motion_frames 2# Specifies the number of pre-capturedpre_capture 5# Codec to used by ffmpeg for the video compressionffmpeg_video_codec mpeg4# The mini-http server listenswebcam_port 8080 (selected your preferred port)# TCP/IP port for the http server to listen oncontrol_port 8081 (select different port by webcam port)# Restrict webcam connections to localhost onlywebcam_localhost off# Command to be executed when an event starts.on_event_start mpg123 -m —gain 70 /home/pi/testsound.mp3 ;# Command to be executed when a picture (.ppm|.jpg) is saved (default: none)on_picture_save sendEmail -ft [email protected] -u “Motion detected!” -m "https://"`curl -s checkip.dyndns.org|sed -e 's/.*Current IP Address: //' -e 's/ /sys/class/gpio/gpio22/directionsudo echo " 1" > /sys/class/gpio/gpio22/value
Save and exit.
In the home directory, create the following script: $ nano monitor.sh And add: #!/bin/bashsudo echo “0” > /sys/class/gpio/gpio22/valuesleep 40sudo echo “1” > /sys/class/gpio/gpio22/ value
Save and exit.
Using this brainscript, after changing the motion configuration as shown below, when the motion sensor is triggered, the monitor turns on for 40 seconds, then it turns off. You can change the "sleep" value as you wish.
Changing the motion configuration: $ sudo nano /etc/motion/motion.conf And the lines: # Command to be executed when an event starts.on_event_start mpg123 -m —gain 30 /home/pi/testsound.mp3 ;Changes like this: on_event_start bash / home/pi/monitor.sh & mpg123 -m —gain 70 /home/pi/testsound.
mp3 ;Change “—gain” to a higher value.
We save and exit.
Step 6:
I connected computer speakers to my smartphone, which when I’m at home notify me if someone has come with the sound of a “Geiger counter”, and scare away uninvited guests with the “barking of a Neapolitan mastiff” when I’m not at home.
Save your audio tracks in your home directory under the name testsound.mp3
Step 7: Browser
from your homemade can be viewed in the browser by simply entering the URL: https://RASPBERRYPI_IP_ADDRESS:YOURWEBCAMPORT
To view on a tablet, you need to do the same steps.
If you want to view the video stream not through your local network, then you need to open the port on your modem. I cannot say exactly how this is done, since it depends on the modification of your modem, everything is individual. But by opening the port on your modem, the stream can be viewed through a browser by entering: https://YOUR_PUBLIC_IP:YOURWEBCAMPORT
My modem supports the NOIP DNS service, and as soon as I registered it, I was immediately able to access my DIY via the Internet by simply typing the domain name that was given when registering NOIP:
https://YOURNOIPDOMAIN:YOURWEBCAMPORT
Step 8: Intercom on Android
Opening the modem port allows you to view the camera feed via your smartphones. For this feature on iOS, I can use two apps available on the App Store for free.
The first is Cu4GE, the settings of which are shown in the first photo, and the second is Monitor Bee, the settings of which are shown in the second photo. And for Android there is a simple Mjpeviewer application. In all applications you just need to enter URL:PORT and viewing will be available.
Step 9: Finally
By following the steps of this brain guide , I think you are convinced that everything is not so difficult.
Now good luck with your homemade projects !
Where should I install the intercom elements?
Before you begin installing all the components of the intercom, you should determine where they will be located, especially attention should be paid to where the handset for conversation or the terminal with a monitor will be located; an excellent option for the location of these elements could be the kitchen or hallway, in other words, those places where people visit most often.
The next step will be laying the wires, both power and signal, only after that the installation of the intercom itself begins.
At the end of the work, the electrical parts are connected and the overall functionality of the device is checked.
Using a cell phone or tablet
For ease of use, in order to avoid attaching the intermediary device itself to the surface of the door, where it will be subject to constant vibrations and shocks, it is very desirable to lengthen the camera itself, separating it from the phone or tablet. The procedure is performed by disassembling them, disconnecting the camera cable, along with itself, from the main device. Afterwards, the cable connecting the device to the receiver is extended with thin conductors, which in turn are connected to the contacts where the camera was previously located. You can use officially produced extension cords instead of soldering yourself.