When considering this method of leveling surfaces, such as plastering walls, one cannot ignore the issue of compatibility of plaster and various painting compositions. Many novice builders and people who have nothing to do with painting work face such problems. Can plaster be applied over paint? This topic is associated with a lot of controversy.
That is why in this article we have tried to highlight for you universal methods of applying plaster to painted load-bearing structures.
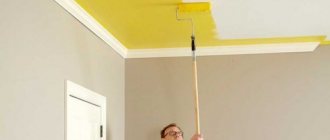
How to paint a wall with a roller without streaks? Video.
Paint the walls without smudges or streaks. Check out the three most important tips.
A roller is the most convenient and versatile tool for painting walls. The final effect of painting the walls depends on the quality of the chosen paint, and the procedure itself is quite simple, but it is worth paying attention to several factors that have a great influence on the uniform distribution of color and the final result.
1) In order to apply the paint evenly, it is necessary to prepare the wall surface in advance. Uniform coverage depends on the wall surface. Proper preparation includes repairing defects and covering the surface with primer. Thanks to this, I level, which ensures correct application of the paint.
The primer contains special additives that eliminate any differences in texture and color when painting. This is especially important when repairing damage to wall surfaces. The primer is applied in a thick layer to the wall surface using a roller. The primer, thanks to special components, penetrates the substrate in such a way that it becomes homogeneous, improves the surface and reduces paint consumption, which reduces the cost of repairs.
2) The cause of scratches during painting may be an unsuitable roller. Rollers are divided into three categories, based on the length of the pile - and the choice depends on the type of surface that is to be painted. Short pile roller (6-10mm) – painting smooth walls – for example: on plaster. A roller with a medium length of pile (13-15mm) is intended for traditional painting, putty and structural wallpaper. A roller with long bristles (19-30mm) is best used for painting rough surfaces such as brick walls, concrete or structural plaster walls.
Also important factors when choosing a roller are the size and material from which it is made. Let's consider rollers made of plastic or metal, with fur or foam lining. The choice should be tailored to the type of paint you plan to use on the walls. For water-based paints, it is better to choose a microfiber roller; for latex and oil-based paints, a roller with a sponge is perfect. Wool and velor rollers are typically used for solvent-based paints. Paint manufacturers know the properties of their products and offer tools that will help paint the best on the surface. Read the information contained on the packaging. Roller size – selected depending on the size of the area we want to paint. When painting large surfaces, it is better to choose a roller that is wide and has thick bristles.
3) A new roller may leave streaks and lint on the wall. To avoid this, before starting work, soak the roller in water and roll it out well on a flat surface. Sometimes the dry method is used - a lint roller is wrapped with adhesive tape. The idea is to thoroughly remove all loose lint. When painting, immersing the roller completely in the paint is a big mistake, you need to pour a small amount of paint into a special or regular box and make an impression on the bottom of the box with movement in both directions. When painting, we roll carefully, without pressing the tool too tightly to the surface.
Each time we add the same amount of paint and apply it using long up and down strokes. Too little paint and chaotic movements of the roller are one of the most common causes of veins (stripes) on the surface of the wall.
Considering the paint, rollers and these tips, we guarantee that you will paint your walls perfectly and everyone will be delighted with your professionalism and perfectly painted walls and flawless structure. Good luck!
How to paint a wall professionally
APARTMENT RENOVATION – PAINTING THE WALLS
Roller selection
The roller is a cylindrical roller rotating around an axis, which is fixed to the handle. A special material is wound onto the cylinder, which is removable. Rollers of different sizes and with different materials can be attached to one handle-holder - woolen fabric, polymer material, artificial or natural fur.
The following types of rollers are distinguished:
- With short artificial pile;
- With fur covering;
- Universal fur rollers;
- Foam-coated;
- With relief patterns and designs.
Any type of roller must be of high quality, since it has a direct impact on the surfaces being painted. If there is a need to increase the working area, you can additionally purchase a rod with a screw handle and a high-quality replacement nozzle. A well-chosen nozzle allows you to reduce paint consumption. If you plan to paint smooth surfaces, then use a roller with a pile half an inch long, and for rougher surfaces (for example, putty walls, wallpaper for painting, textured plaster, textured ceilings, etc.) I use a roller with a length of ? inches. For semi-gloss paints, rollers with any pile can be used.
As for the paint container, it is recommended to use not a paint tray, but a large bucket with a hanging grid to drain excess paint. This container is more convenient because it is more stable and can hold more paint. Small paint trays can come in handy if you need to do some minor painting, such as contouring.
In addition to the roller itself, you will also need to stock up on brushes, since a roller is not very convenient for painting the joints of walls with the ceiling and floor, as well as corners and places near radiators. Brushes must be of different sizes and of good quality, otherwise their bristles will fall out and remain on the paint.
How to get rid of streaks after painting walls
Good day everyone. The masters have set up a guard, help save the situation. They glued wallpaper onto the leveled wall, went over it with a coat of paint (to make a completely smooth surface), then primed it (I hope), and painted it with Tikkurilov chalkboard paint (on which you can write with chalk). The paint is very dark. The result is stripes from the roller every 20-30 cm, visible not only in the light but also simply when you look straight. The stripes differ from the rest of the wall in color and texture; there is a clearly noticeable roughness. Looks like he's going to shoot himself. Question: what to do? We've already applied three layers, and it's only gotten worse. The paint is as expensive as a dog. Is it possible to somehow save the walls, with some sandpaper or something else? Or just rip off the wallpaper and do it all over again? Thanks in advance.
Why is there wallpaper in this “pie”? From the beginning the wall is plastered. If the thickness of the plaster is large, and the plaster itself is of average quality, then a cobweb is walled up in it so that the plaster does not crack when shrinking. Then the wall is puttied with finishing putty, sanded and primed with a deep penetration primer. And only then they paint it. Wallpaper has nothing to do with it.
Are the stripes from the roller straight and vertical? or chaotic?
Can. The most important thing is to send painters away without pay, and hire them with a paint sprayer
Alexey_B_1335426 wrote: Why is there wallpaper in this “pie”?
The stripes from the roller are vertical. The wallpaper just acts as a grid. How exactly can you save the situation, please tell me? Other guys suggested sanding the whole thing with fine sandpaper and rolling another layer on top. Do you really need a spray gun? The roller won't roll? Attached a photo. I took the photo at night, so it's not very visible. In daylight everything is much sadder.
robkuz wrote: Other guys suggested sanding the whole thing with fine sandpaper and rolling another layer on top.
Yes, that's how it should be done. Just prime well and a lot. And roll the paint not from top to bottom, but in all directions. In principle, if the master is experienced, he doesn’t care which way he rolls – there will be no stripes. And if you are inexperienced, then let him skate in different directions. So, at least, the painting will resemble “decorative” and ideally, of course, with an electric spray gun, only this paint is filled with emery, and this emery will ruin its (the spray gun’s) nozzles.
Alexey_B_1335426 wrote: Why is there wallpaper in this “pie”? From the beginning the wall is plastered. If the thickness of the plaster is large, and the plaster itself is of average quality, then a cobweb is walled up in it so that the plaster does not crack when shrinking. Then the wall is puttied with finishing putty, sanded and primed with a deep penetration primer. And only then they paint it. Wallpaper has nothing to do with it.
Are the stripes from the roller straight and vertical? or chaotic?
Alexey_B_1335426 , Hello, Alexey! I would like to do without a mesh; the thickness of the plaster on the walls will be from 5mm to 20mm (in some places), and on the ceiling up to 8mm. What mixture is good so that it does not crack during shrinkage? Thank you.
Kochevan, Look at Semin products - for example Super Glatt. and for finishing ETS-2
robkuz wrote: The stripes from the roller are vertical. The wallpaper just acts as a grid. How exactly can you save the situation, please tell me? Other guys suggested sanding the whole thing with fine sandpaper and rolling another layer on top. Do you really need a spray gun? The roller won't roll? Attached a photo. I took the photo at night, so it's not very visible. In daylight everything is much sadder.
robkuz, hello, did you manage to solve the problem with the streaks from the roller? the same problem arose!
maxim23, Yes, the problem can be solved by repainting - just don’t need to roll the roller from the ceiling to the floor in one stripe. Paint in a W-shape with a constant flow. On Youtube, look for videos for the query “how to paint walls with a roller quickly and professionally”
Alexey_B_1335426 wrote: Paint with W-shaped movements with a constant flow.
It turned out even worse for me. Must be spray painted. The problem IMHO is manual labor, its result is always appropriate.
Stains and stains on the ceiling after painting: what is the reason and how to fix it?
dated December 7, 2014
Probably everyone who has had to do their own repairs has at least once encountered the problem of uneven painting. It seems that he tried hard, selected paint and tools, prepared the base, and the result was stains and stains, clearly visible in bright daylight. The “saving” thought immediately comes to apply a second layer. However, this, as a rule, does not solve the problem, but, on the contrary, aggravates it. Make at least five layers - it won't do any good. Stains and stains will become even more noticeable. What is the reason for the failure? How to fix the situation? What rules for painting the ceiling will allow you to avoid streaks and stains?
On a note
- With gloss and semi-gloss paints the result is more unpredictable. With them, more often than with matte paint, obvious stains remain.
- On a snow-white ceiling, any nuances are much more noticeable than on a cream or beige one. If you doubt your capabilities, lightly tint the paint.
- Know that the larger the surface, the higher the likelihood of getting a questionable result. Therefore, do not be surprised if in a small bedroom the ceiling turns out like in the picture, but in a large living room you cannot look at it without tears.
- Paint quality matters! You can save money on wall paint, but you need to buy the best for the ceiling! After all, he is much more picky.
- Don't strive for absolute perfection. Painted surfaces are almost never flawless. The main thing is that in bright light, stripes, stains, smudges and stains are not noticeable.
Stains and stains after painting the ceiling: possible causes
There are a lot of nuances. A negative result can be the result of one mistake or several at once. Having found out the main reasons for stains on the ceiling, you will certainly understand what your mistake was.
1. Thick paint. It is much more difficult to distribute viscous paint evenly than liquid paint. It is especially important to dilute it when applying the first, base coat.
Paint manufacturers recommend diluting them by no more than 10%. Often they even write on the cans that the paint is completely ready for use. The buyer believes what is written and... gets streaks on the ceiling.
So, be sure to dilute the paint with water! Moreover, the amount of water may be higher than ten percent recommended by the manufacturer, but not more than twenty. You need to look at the consistency: the paint should flow gently from the roller, and not flop around viscously. For the first layer it can be more liquid, for the second - a little thicker.
2. Slow work. If the painted areas dry out too quickly, you simply do not have time to roll the boundaries between them. As a result, stripes appear in these places. They are clearly visible after complete drying. It is necessary to work quickly and continuously in order to have time to evenly roll out the paint while the ceiling is wet.
3. Long pile roller. On smooth surfaces, only use a short-haired roller! Otherwise, it will be difficult to avoid unevenness, smudges and other troubles.
4. Banal “not painted”. Didn't take care of good lighting? Do you have poor eyesight, but don’t wear glasses or contacts? If so, then you may simply not have noticed that you left unpainted areas. This happens quite often.
5. Incorrect application. It is not advisable to paint the ceiling in continuous stripes. At the border of these stripes there may remain lines that will not disappear anywhere. Read below to learn how to properly apply paint to the ceiling.
6. Poorly prepared base. This is one of the most common reasons.
Keep in mind that paint does not hide surface defects, but, on the contrary, emphasizes them! If you want a smooth painted ceiling, get it to perfection.
Stains and stains on the ceiling after painting: how to fix?
So, we figured out the reasons. In the future, this will help us not repeat mistakes. But what to do now, when the ceiling is already painted, and there are terrible stripes, stains, and smudges on it? How to bring it to mind?
The only sure way is to sand (sand) the entire ceiling until the surface becomes uniform and rough. Don’t worry, there won’t be a lot of dust and dirt, because only a layer of paint is removed. The skin should be relatively fine. You need to work quite carefully so as not to touch the putty layer.
Then you need to wipe the ceiling with a damp cloth and inspect the surface in bright daylight. If the ceiling has become smooth and uniform, you can start priming. If the surface does not inspire confidence, you should use finishing putty, applying it in a thin layer. After drying, light sanding again.
The next stage is priming. It is important to buy a quality primer for painting. It is better to prime several times - at least twice. Each time you need to let the surface dry completely.
When the ceiling looks perfectly even and smooth, like a mirror, you can begin painting.
Remember: if the base has streaks, spots and unevenness, all this will be noticeable even after painting! Therefore, before you take up the roller and paint, make sure that the ceiling is in perfect order. If in doubt, prime again.
How to deal with stains from old leaks on the ceiling? These areas require special treatment. First you need to thoroughly clean and wash them, wait until dry. Then treat with a biocidal solution (for example, Fongimur). Do not wash off the product! After this, use a universal blocking primer. It blocks stains from appearing through putty and paint.
Mold
It manifests itself in the appearance of brown, gray or black spots on the painted surface.
What causes mold?
- Due to high indoor humidity;
- Due to the use of low-quality water-based, alkyd or oil-based paint;
- Due to the lack of treatment and priming of the wooden surface before coating;
- Due to the painting of the surface affected by mold without cleaning.
How to eliminate mold?
Treat the surface with special means to remove such a defect. After this, we recommend using wear-resistant water-based paint - it can easily withstand cleaning with detergents and bleaches. Good ventilation of the room is also of great importance.
How to paint a ceiling without streaks?
1. Create optimal lighting. It is better to paint in daylight. All “unpainted” areas should be clearly visible.
2. To successfully paint the ceiling without streaks, it is necessary that the room has normal or high humidity. Take care of this. Experience shows that successfully painting a ceiling in summer is much easier than in winter when humidity levels are low. The drier the air, the faster the paint dries, which makes it impossible to roll it out efficiently over the entire surface.
3. It is necessary to prepare well. Remove everything from the floor so as not to maneuver between the rubble. After all, it takes time, and you have to work quickly. For the same reason, craftsmen prefer to paint the ceiling with a roller with an extension rather than using a stepladder.
How to paint a ceiling without streaks? Work quickly and energetically!
4. The paint must be diluted with clean water to a very liquid consistency.
5. Don’t squeeze the roller too hard. The ribbed surface in the ditch is not for squeezing, but for even distribution of paint over the coat. The roller should always be saturated, so dip it in paint often.
6. Do not forcefully press the roller when starting to paint the ceiling. The roller should be rolled over the surface, and not rubbed or pressed.
7. Paint is applied not in stripes, but in squares, especially if the room is large. Work in W-shaped (zigzag) movements, evenly distributing the paint over the sector. You should not dwell on one square for a long time. We made a few movements, made sure that the entire surface of the area was processed, and moved on to the next square. Roll out the border of the squares while they are wet. Therefore, the work must be dynamic and continuous!
We start with a zigzag, then distribute the paint over the square using diagonal movements.
We start the second square with a zigzag and immediately roll up the border between the squares with the same diagonal movements. Fill in the second square, move on to the next, etc.
8. Immediately after applying the first layer, you should carefully inspect the ceiling in bright light. If there are unpainted areas, you need to quickly roll them while the surface is wet. After drying, you need to inspect the result again. If the paint doesn't adhere well, you can try applying a second coat. But if there are problems after the second one, you will have to start the work all over again, that is, sand and prime several times.
Paint stains on the wall: causes and solutions
When you apply paint to walls yourself, the coating often ends up in spots. However, it is not clear why they form. After all, the tool was used correctly and the preparation was carried out in compliance with all technologies. The spots are especially visible during the daytime in sunlight. Of course, you can apply a second layer of coating, but it is not a fact that the stains will disappear. Most likely, the situation will worsen, and the walls will become even more uneven in color. What to do if the painting of the walls is uneven and spots appear after drying? Let's tell you in more detail.
General characteristics of the work ahead
We all know that the best way to correct a mistake is to prevent it from happening. Therefore, the answer to the question of what to do with an uneven ceiling in a room can be simple and unambiguous - level it.
Modern technologies allow you to level the ceiling in various ways. You can resort to using suspended ceilings, you can install a glass suspended ceiling, or you can choose plasterboard. This is a broad topic that deserves its own article, so we won’t cover it in detail now.
But, nevertheless, if you decide to resort to painting, then most likely you will use ceiling plasterboard for leveling. The fact is that leveling a ceiling, which is initially uneven, without the use of drywall (or other technology) is a difficult task, requiring enormous labor costs on your part.
Yes, the floor and walls are leveled using beacons - this is normal, this is correct. But with the ceiling, things are somewhat different: gravity simply interferes with the alignment process. Therefore, using technology that is used to adjust floors/walls is an impractical solution.
However, it is not so important what is on your ceiling. Our current topic is painting an uneven ceiling. Of course, maybe yours is even
But there are general rules that everyone who decides to pick up a roller or brush needs to know
Of course, maybe yours is even. But there are general rules that everyone who decides to pick up a roller or brush needs to know.
In addition, after poor-quality painting of even a smooth ceiling, unevenness, bumps, craters, spots may remain on it - there really are a lot of options. How to hide uneven ceilings after painting? That's what we'll talk about now.
Possible mistakes
There are many reasons why stains appear after painting. Perhaps you did not take the technology seriously enough and did the finishing incorrectly. Among the most common causes of stains are the following:
- The composition used for application was old and too thick. Paint that is too thick will never lay down in an even layer; the composition must first be diluted. Water-based is diluted with water, oil-based with a special solvent. It is important that the first base layer lays down as evenly as possible, then the finishing paint will not appear in spots on the wall. Manufacturers recommend diluting the composition with water or solvent no more than 10% of the total volume, but 20% is allowed. It all depends on the initial viscosity of the composition.
- Work is not completed quickly enough. One stroke from the roller has time to dry before the second is applied. Therefore, the boundary between the two layers will be visible and a thicker spot will form in this place. There is only one way out of the problem - to complete the work as quickly as possible.
- The roller for the job is selected incorrectly. If you use a long-haired roller to create a perfectly smooth surface, the paint will come out in spots. The problem can only be solved by replacing the tool.
- Human factor. When working for the first time, you may simply not paint some areas of the wall. There is only one solution - it is better to do the work during the daytime, when there is enough lighting to see where the paint has already applied and where it is being picked up.
- Failure to comply with technology. It is not recommended to apply the composition to walls in stripes; stains will form at the borders.
- Incorrect preparation. If the walls have small irregularities or transitions, the paint will highlight them. The work will have to be completely redone.
Beginners make one or more mistakes at the same time. As a result, the walls have an untidy appearance and work has to be started from the very beginning.
Photos are enlarged, click!
What not to do
It is not recommended to use the following products to remove paint:
- the thermal method using open fire is too fire hazardous;
- chemical remover - not used in unventilated areas.
Regardless of the method you choose to remove paint from walls, do not forget to use personal protective equipment. In any process you will be exposed to the following negative factors:
- dust;
- toxic substances;
- small particles of flying coating.
The most important thing to protect is the respiratory and visual organs.
How to save the situation
If no errors were noticed during the work, then after drying the entire finish will have to be redone. Don't be afraid.
For work you will need sandpaper of the smallest caliber. The walls will have to be sanded completely. To do this, roll the paper onto a small block and get to work.
You need to sand the walls as carefully as possible, since you only need to remove a layer of paint. If a small amount of coating remains on the wall, there is no need to worry. You can cover these places with a thin layer of plaster and level them.
Next, dust from dry paint is removed from the walls. To do this, you can wipe them with a damp sponge or simply vacuum them. Then inspect the surface during the day. If the stains have disappeared, then you can proceed to further work:
- A primer is applied to the surface. In places where stains appear after a leak, you can use an antiseptic composition. The walls need to be primed twice, then they must dry.
- A new coat of paint is applied. If the walls are painted with a roller in a large room, then the movements are made in the form of the English letter W. You should not apply the composition in strokes or stripes, the borders will dry faster and the stains will appear again.
- It is better to apply the first coat of paint with a slightly liquid composition. Let the coating be translucent, the main thing is that it is even.
- Before applying the second layer, you need to wait until the first one dries. If the first layer again has stains, then we start from the very beginning.
Before applying paint to the walls, move all furniture away from them. If you do this while working, the paint will have time to dry, and the finish will turn out uneven. All work is carried out only during the day on a sunny day, when there is enough lighting to see flaws.
Video material:
In the video below, a pro explains how to apply the coating so that the paint doesn’t end up in spots on the wall.
Preparation is one of the most important stages of work.
Even before you start painting, you will need to perform some actions on the surface to be painted. You have to perform the following manipulations:
- Clean the floor from all peeling or crumbling fragments of the old finish. This is the most important stage, after which it will be possible to move on to further actions.
- Next, you just need to clean the entire ceiling plane from dirt and dust. If there are other contaminants, they should also be removed.
- After cleaning, unevenness and other defects may form that must be repaired with plaster or putty. However, before this you need to carefully prime the entire surface of the floor.
- When the putty dries, it is leveled with a grater and the surface is again cleaned of any dust that has formed. This moment cannot be skipped, since subsequently dust particles will negatively affect the coloring result.
- Next, apply a second layer of primer, which will allow you to apply the paint more evenly and reduce its consumption.
Stripes and spots
The appearance of streaks after painting is not such a rare problem. And, by the way, this defect is not always caused by a lack of experience working with a roller and sometimes occurs even where stripes themselves are excluded - when painting with a spray gun.
The most common causes of "disaster" are as follows.
A ceiling made of a porous, highly absorbent material is the most “inconspicuous” reason for the formation of streaks. A painted surface looks especially untidy when the porosity is also uneven. In this case, a primer made according to all the rules does not help, since more effective measures must be taken: areas with increased porosity are primed additionally and in several layers.
Painting is done only after the sanded, primed surface looks completely smooth under oblique light.
Excessively thick composition - paint that is too “heavy” will not be able to be evenly distributed by a fleecy roller, let alone a brush. Of course, the recommended degree of dilution is indicated on the product packaging, but sometimes special methods are required to get rid of streaks and stains. Therefore, before painting the entire surface, it is recommended to conduct a test to observe the behavior of the paint.
The most common scheme is the following: first, the ceiling is painted with a 50:50 solution - primer, and then twice with a solution with the consistency of thick sour cream. If overlaps are noticeable in oblique light, the paint will have to be diluted more. It is better to apply two additional coats than one coat that is too thick.
Painting must be done perpendicular to the previous direction. This way you can get rid of stripes caused by overlaps. A good result is obtained by collecting excess paint by rolling a semi-dry roller, always in the direction away from the window.
The cause of defects on the ceiling can even be an unsuccessful tool - the pile is too long or too sparse. And even incorrect lighting, since light can both emphasize irregularities and hide them. The photo shows a defect on the ceiling after painting.
How to get rid of streaks
If defects already exist after painting, then it’s too late to lament the lack of compliance with technology. However, it is quite possible to achieve a decent appearance.
If the problem was simply insufficient lighting, then most likely the imperfections will disappear with another coat of paint in the correct lighting. It is recommended to start from the wall opposite the window and always in the direction perpendicular to the last layer.
If the difference between the stripes that appear after painting is only in color, that is, the defect is insignificant, then again, reapplying the paint, but in a very thin layer, gives a good result. The consistency should be liquid.
With unevenness and differences in texture, cosmetic techniques are no longer enough. In this case, to get rid of defects, you will have to sand the ceiling, preferably before priming, prime the surface again and repaint, following all the necessary recommendations: dilute the paint in a suitable proportion, paint in a direction perpendicular to the previous one, and remove some of the paint with a second roller.
If the cause of the stains turned out to be unremoved traces of leaks or rusty water, then neither re-priming nor painting will help. Until the damaged material is removed, a smooth, evenly colored ceiling cannot be obtained.
When repeating work, you should make sure that the reason does not lie in poor-quality primer or paint, for which a fragment of the surface is primed and painted.
The video demonstrates professional, correct painting of the ceiling.
Painting defects: streaks and apples-to-apples
We continue the section on paint defects and today we are looking at one of the most common defects - stripes and “apples” (or “clouds”) on metallic paints.
This defect consists of stripes and spots (resembling clouds in appearance) with alternating dark and light shades on a freshly applied metallic coating. It is especially pronounced when painting large surfaces with light silver colors.
How do “clouds” appear...
As is known, the color characteristics of metallic paints directly depend on the orientation of aluminum particles and the depth of their occurrence in the paint layer. The deeper the grain has sunk into the paint layer, the darker the layer will look. And vice versa. The higher the grain remains, the lighter the shade of the coating. It is not difficult to understand that the “legs” of today’s defect grow from here.
For one reason or another, the grains in the paint layer are located unevenly - somewhere higher, somewhere lower, and, as a result, the painted element has an uneven optical effect - we see stripes and “clouds”.
Most often, this defect is due to spraying errors. For example, an uneven (incorrectly adjusted) paint spray or insufficient coverage of the spray during application.
So it turns out that in some places the enamel is applied more wetly (thicker), and in others it is drier (thinner). And we know that the thicker the metallic layer is applied, the more solvent it contains. This means it will take longer to evaporate, the aluminum grains will have time to sink deeper and the coating in this part of the layer will look darker. Nearby, where the layer turned out to be drier, the situation is the opposite. There is less solvent here, it evaporates faster and the grains remain in the layer above, reflecting more light, and the shade in this place looks lighter.
The same thing happens if the painter tilts the gun or describes an arc during the application process. Again, in one part of the paint torch the distance to the surface is greater (the enamel is applied thinner), in the other - less (the enamel is applied thicker). As a result, the grains are oriented unevenly and an imbalance in light reflection occurs.
Incorrect application technique leads to uneven orientation of aluminum particles in the paint layer and the appearance of streaks and “clouds”
Therefore, spray technique is critical when working with metallics. If she suffers, streaks and “apples” cannot be avoided.
At the same time, errors in application technique are far from the only reason for the appearance of “clouds”. An equally important factor is the choice of thinner for the base and the temperature conditions during its application.
It is clear that if we paint with silver metallic at +30 °C, and even using a standard or fast (God forbid) thinner, then no matter how hard we try, it is unlikely that we will be able to avoid “clouds”. The solvent will evaporate too quickly, and the aluminum particles, deprived of the ability to “float,” will be distributed unevenly over the surface.
If a thinner is used that is too slow, areas of uneven grain placement may also occur. As well as when replacing branded thinners with liquids from other companies. You need to understand that the original thinners for metallic paints are specially selected so that during their evaporation the grains sink to the required depth. Therefore, savings and experiments are inappropriate here.
The reason for “apple-coloring” can also be insufficient exposure between layers of base enamel or before applying clear varnish. This is most often observed at low painting temperatures, when, when applying varnish to a still damp base, metallic grains gather together and reflect light unevenly.
These and other reasons, as well as methods for preventing this defect, are presented below in table form.
Causes and Methods to Prevent Streaks and Apples
| Causes | How to prevent |
| Replacing the original thinner with liquids from other companies or using a thinner that is too “fast” or too “slow”. | To dilute the base, use only “native” thinners. The thinner should be selected depending on the air temperature at which painting work is carried out, as well as the size of the area to be painted. |
| The diameter of the spray gun nozzle is too large. | For base enamels, use nozzles with a diameter of 1.3-1.4 mm. |
| Incorrect adjustment of the spray gun. Uneven paint pattern. | Adjust the spray gun and check the uniformity of the spray pattern. |
| Incorrect proportions for preparing base enamel. The paint is too thin or too thick. Poorly mixed paint. | Thin base enamel according to manufacturer's recommendations. The viscosity of the base should be within 16-17 seconds. |
| Spray pressure too high. Using a conventional sprayer. | Do not set the inlet pressure higher than specified according to the instructions for the gun, otherwise a large amount of solvent will be “knocked out” of the material and the enamel will lie on the surface too dry. Instead of high-pressure (conventional) sprayers, use low-pressure system sprayers - HVLP and LVLP. |
| Incorrect spray technique. | When spraying, hold the spray gun at a 90° angle. Do not tilt it or make an arc. Each pass must overlap the previous one by at least 2/3. If you are painting a large area, make sure you have equal access to all parts of the part. |
| Insufficient interlayer exposure. | Do not apply the next base coat if the previous one is not dry enough. At 20°C, the dwell time between coats is usually 5-10 minutes. Make sure each layer dries to a matte finish. Only after this can the next layer be applied. |
| Insufficient drying of the base before applying varnish. | Let the base sit for at least 15-20 minutes before applying the varnish. The base coat should be completely matte before applying the varnish. |
| The last coat of base was applied too wet or too dry. | For uniform decomposition of the grain, the last layer of the base should be “semi-wet” - not dry, but not greasy. |
As you can see, with careful attention, it is quite easy to reduce the likelihood of apples to a minimum.
To do this, first of all, you should follow the manufacturer's recommendations for the use of materials (preparation proportions, choice of thinner, application modes).
Don't forget to make sure the spray gun is adjusted correctly and the spray pattern is even. Select a nozzle of the recommended diameter and do not exceed the operating pressure of the spray gun.
When applying, observe the correct position and trajectory of the spray gun, pay attention to the degree of overlap of the torch, as well as the delay between base layers and before applying varnish. Pay special attention when spraying the last “showy” base layer.
Types of water-based paints
Water-based paint compositions are used for painting ceilings much more often than acrylic or oil paints. They are not so toxic and smelly and do not need to be diluted with special solvents - white spirit or acetone. You can achieve the desired paint consistency by adding plain water. The water-based coating is resistant to water and steam and is easy to maintain - dirt can be easily removed with any detergent.
Types of ceiling paints
There are different types of water-based paints.
- Silicate based on the so-called. liquid glass. They are not suitable for rooms with high humidity, but are quite acceptable for painting the ceiling in living rooms.
- Mineral based on cement or lime. Most often used for facade work.
- Latex (acrylic-latex). In addition to water and coloring pigment, they contain low-toxic resins that give the coating a spectacular matte or glossy finish (depending on the type of paint).
Table. Main characteristics of different types of paint.
| Paint type | Consumption, l/m3 | Layers | Drying time of one layer, hours |
| Water-based | 8-10 | 2 | 2-3 |
| Acrylic | 10-15 | 1-2 | 2-3 |
| Texture | 2-3 | 1 | 24 |
Elimination
If applesiness occurs during the application of the base, analyze the reasons and try to eliminate it by applying a “showy” layer. To do this, it is recommended to slightly reduce the pressure at the inlet to the gun (to 1-1.5 atm) and smoothly spray a semi-wet layer of base from a slightly increased distance. This technique promotes uniform decomposition of the grain.
If the “apple-colored” appearance manifests itself after applying the varnish, the only option for eliminating the defect is repainting. Dry the varnish, sand it (P400-P500 abrasive for dry sanding and P800-P1000 for wet sanding) and reapply the base and varnish using the correct technology.
Bad paint
“Bad” materials include not only the cheapest ones, but also those with expired shelf life. Yes, paints have a shelf life, albeit a long one. But it decreases after opening and can be up to a year. If the expiration date has expired, the paint may either not harden or, as in our case, streaks may appear.
Important! After the expiration date, many paints emit toxic fumes.
Solution: do not use old materials and carefully inspect the jars before purchasing them for opening.