How to properly cut tiles in a doorway?
On which side of the doorway and in what place should you finish laying the tiles and join them with other floor coverings?
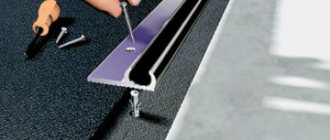
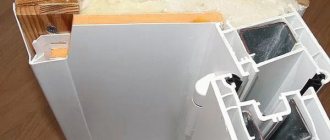
Typically, the joint between floor tiles and other floor coverings is covered with a floor profile (plastic, aluminum, metal). But sometimes you can get by with a thin cork insert.
To prevent the floor profile from peeking out from under the door (on one side or the other), the joint of different floor coverings should always be made strictly under the door.
To do this, we need to know exactly which way the door will open - inside or outside.
In this case, our door opens to the outside of the bathroom.
The thickness of a standard interior door is 25-40mm, so the middle of the door will be 12-20mm deep into the opening from the edge of the wall.
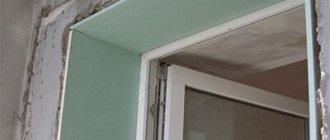
If the wall is made of plasterboard, then most often we make a tile cutting line between the plaster and the profile (or between two sheets of plaster if the wall is covered with a double layer of it).
Grouting joints
A day after laying the last ceramic tiles on the floor, you need to grout the joints yourself. Mix the fugu with water and use a rubber spatula.
This will be easy to do, but there are some recommendations:
- Use gloves, since the fugue with which you will rub the seams will easily corrode the skin on your fingers;
- Before grouting, you need to clean all seams from excess glue and dirt;
- Use a simple sponge to wipe away excess fugue from the seam - it will be very smooth;
- Wipe the fugu off the tiles, because if it dries, it will be difficult to wash it later.
After 3-4 days, the grout and tiles can be washed with some detergent, which will mark the end of your work.
How to properly lay floor tiles in a doorway?
We draw a line in the doorway along which we will cut the tiles.
We lay the tiles that will need to be cut (without gluing) through the crosses in the doorway. We transfer the line to the tile.
We lay the rest of the tiles and transfer the same line to it.
We begin to cut the tiles and put them back in place through the crosses.
Let's check if everything works out correctly.
We cut all the tiles and make the last “trying” layout.
Checking the accuracy of the cutting line.
Everything is fine, you can glue it. That's what we do.
More examples of laying floor tiles in a door portal/opening:
Source of the article: https://profipol.dp.ua/obrezka-kafelya-v-dvernom-proeme/
Marking
The first step is to mark a line passing through the center of the ladder and coinciding with the crease line on the screed, or just the center line if you plan to remove the slopes with tile adhesive. When laying with an envelope, it will be a diagonal line, a cross - parallel to the walls. For convenience, you can pull a thread instead of a line. It is worth noting that when facing with a “cross”, the markings can be shifted from the axis of the ladder to the edge, as in the first photo of this publication.
The next step is to mark and cut out four tiles that form planes around the drain - this is the base. The previously marked line should clearly follow one of the lines of the cross formed by the joints of the tiles. Sawed joints on porcelain tiles should be immediately leveled with an abrasive disc on the stone (sawed with a diamond, trimmed with an abrasive).
The sawn tiles should be tried on the ladder, how they will lie, taking into account the thickness of the glue. You need to make sure that the drain fits well, the sawn edges fit together well, without steps. If everything is in order, you can begin installation.
What is needed for this
To lay out the tiles as a mat, you will need the following:
- tile;
- mastic;
- mixed mortar for laying tiles;
- putty;
- putty gun;
- putty knife;
- respirator;
- protective glasses;
- gloves;
- thin notched spatula;
- sponge;
- bucket;
- water;
- Grinder;
- permanent marker;
- tile spacer;
- measuring tape;
- hammer;
- insulating tape.
Tools
To prepare the surface for laying and further work, you should choose a convenient tool with a long handle. Such devices can be purchased at a hardware store or you can lengthen the handle of a brush or roller yourself. In addition, you will need clean sheets of thick paper, a pencil or thin marker, scissors and the necessary tools for installing and cutting tiles.
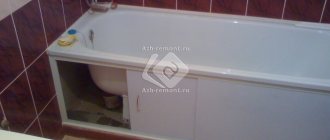
Installation and lining of boxes
Most often, two plasterboard boxes have to be installed in the bathroom: to cover the pipe distribution and installed metering devices; for forced ventilation (the ventilation duct is installed at a height of about two meters).
In order to install the box yourself, you need to take into account several parameters. When arranging boxes, the lower edge corresponds to the length of the tile; the height is selected in such a way that the lamps located on the lower edge can be freely placed in accordance with their sizes. There should be enough space in the ventilation duct to accommodate a corrugated exhaust hose. Particular attention should be paid to the strength of the frame and the reliability of its fastening. The final sealing of the boxes should be carried out after checking that the electrical wiring is connected correctly.
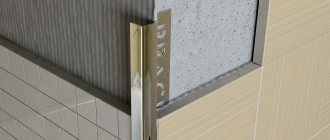
Next, we continue laying the tiles above the doorway, decorate the niche, and line the lower and vertical planes of the boxes. To make the outer corner of the boxes look aesthetically pleasing, you can use several methods:
- use a plastic outer corner;
- carefully sand the edges of the tiles at 45° (this is only possible for tiles with a smooth surface, otherwise the seam will look ugly);
- apply an overlay corner.
It is important to choose the corners correctly - they should be 1 size larger than the thickness of the tile (for example, with a tile thickness of 7, choose corner 8). It is advisable to process the edge of the tile to the size of the corner. We attach the corner with glue, fixing the gluing area with paper tape. After the glue has dried, remove the tape.
After grouting the joints on the tiles, we install inspection hatches on the boxes, designed to take meter readings and inspect pipelines if necessary. It often happens that doors are purchased last, so it is advisable that the doorway be made with a reserve: if the door frame is smaller, the gap between the opening and the frame can be sealed with plasterboard.
Quality or price
Decide on the size and type of coverage in advance. If the tile is intended for the bathroom, its surface should be rough.
Choose the design for yourself, but know that white tiles with white grout are a lot of money for chemicals and wasted hours with a brush on your lap.
When purchasing tiles, you should choose only a high-quality product and, preferably, from one batch. Different batches may vary greatly in shade. As for quality, you can only check its geometry.
Don’t be afraid to ask to check every box, because the tiles may have defects, and no one will take them back. Taking two tiles, attach one to the other. There should be no gap between them, and the length of the sides should be the same.
Materials for finishing the doorway
Plaster
Plaster, which is gradually losing popularity, is used as a budget option when you need to decorate a doorway for painting or wallpapering. The disadvantage of this method is the complexity of the work and the large amount of dirt. If the technology is violated, cracks may form and even fall off. In stores, plaster is sold in the form of a mixture. The composition is different. The method of preparation and application to the wall depends on the type of plaster.
In general terms, finishing work consists of the following steps:
- Mix the solution in a container. The quantity of one batch is calculated for half an hour of work.
- The solution is poured onto the surface of the wall, spreading with a rule and a spatula.
- When applying a thick layer of plaster, beacons are used. The guides will help you perfectly level the surface.
- To prevent a thick layer of plaster from cracking, after applying a 1 cm thick mortar, a reinforcing mesh is laid.
Features of choice
- The color must contain at least two shades. The uniformity of color neutralizes the naturalness of the decorative stone. It is immediately clear that this is just an imitation, and not the most successful one.
- Edges. The front surface is free of large fractions, dye clots, stains and stains. On the back side, the base should not be perfectly smooth - this will reduce the quality of adhesion of the decorative stone to the door jamb; or rough, or with notches (grooves).
- Sample edges. You need to decide on the type of seam between the stones. If it is chosen to be even along its entire length, then chips of up to 2 mm are allowed. Some owners prefer to lay masonry with a visible seam; in this case, edge defects can be more significant - up to 6 mm.
- Surface treatment level. First of all, this relates to the moisture resistance of decorative stone. If there is no protective layer, it is better not to purchase; independent application, and high-quality one, is a complex process that requires practical experience.
Using tiles at the front door
An indisputable fact is that the most used room is the hallway. Its exploitation occurs daily, and with the greatest intensity. Exposure to dirt, dust and moisture, various types of shoes that destroy the surface, and a host of other impacts. That is why the selection of flooring for this room should be carried out as carefully as possible, taking into account all the nuances. Note that the coating itself should not only be strong and durable, but also beautiful, which can be the tiles at the front door. And it’s worth saying right away that this is one of the best options, and then we will look at why this is so.
Advantages and disadvantages of tiles in the corridor
To begin with, it’s worth considering accordingly all the advantages and disadvantages of this type of coating, let’s start with the advantages of the material:
- First of all, tiles in front of the door will help create the most practical and durable coating, one might even say the most durable of all possible (not taking into account stone or marble finishing, for example).
- The material has many varieties; in addition, thanks to its unique coating, it allows you to create a unique interior solution. The flight of fancy in its creation becomes almost limitless.
- Among the most popular materials for flooring, tiles near the front door will be able to withstand the effects of an aggressive environment much better, and will also last longer.
- When arranging a tile floor, it is possible to focus attention on individual zones, and also to hide some of the shortcomings of the room (low ceiling, small square footage, etc.).
- Decorating a door with tiles will become the most durable coating that can last for decades, even with the most aggressive impact and type of use.
- The material itself is durable and wear-resistant, so the coating can easily withstand mechanical stress, and at the same time will not lose its attractive appearance for many years.
- The tiles near the door in the hallway usually get very dirty, and among its advantages in this case it should be noted that they are easy to clean and protect against the effects of household chemicals, which is important.
- Due to the possibility of simulating coatings from other materials, tiles can be selected in the form of marble or wood, thereby giving a certain static and elegance to the coating.
- The covering can be combined from various materials, in addition, the tiles themselves can be laid out in different shades and patterns to diversify the room.
- Use different tile sizes when choosing.
Now it is worth noting the disadvantages of this type of coating:
- The first thing to say is the use of tiles in large rooms. In particular, the use of tiles in fairly large hallways can turn them into an overly formal room, more reminiscent of a hall or lobby of a government agency. Therefore, here it is necessary to combine tiles with other materials or decorative items.
- Also, do not forget that tile material is slippery. Therefore, the slip coefficient becomes an important factor. For the hallway you need to select a covering with a minimum value, since otherwise there is a high risk of slipping and falling. In addition, it is necessary to select tiles with a matte finish, especially if there are children, elderly people and animals in the house.
- You should not choose textured tiles, since in this case dirt and dust will accumulate in the grooves, which will consequently lead to a loss of attractiveness of the coating. If the goal is to lay tiles near the door, then you should choose dark colors, while the main space of the hallway should be done in light colors.
Among the shortcomings there is nothing special to add. And it should be said that with the right approach they can be completely eliminated. And a number of advantages at this time almost indisputably and without hesitation lead to the conclusion that tiles are the best choice.
Combining tiles with laminate
We have sorted out the advantages and disadvantages of the material, now the important issue is the ability to combine tiles near the front door in the hallway with other materials. As mentioned earlier, this can be done, in some cases it is even necessary if we are talking about a large hallway.
Advantages of artificial stone
- A variety of shapes, shades, textures of decorative slab products.
- Easy to attach. The imitation of natural material is characterized by correct geometry, low weight and is easy to cut, which makes it easier to fit fragments when finishing door jambs.
- Increased sample strength and resistance to abrasion.
- Inertness to climatic factors and aggressive chemical compounds. Consequently, finishing doors with decorative stone can be done in any room, regardless of its specifics. Even in those where there are sharp changes in humidity/temperature and their high/low values.
- Convenience of choice. All artificial stones differ in standard sizes and thickness. In addition, they have smooth edges, and this makes it easier to calculate the required number of products for finishing a specific area.
- Consistency of color over time. The dye introduced at the stage of preparing the mixture is evenly distributed throughout the entire structure of the material.
- Decorative stone does not burn and does not block the base; it “breathes”, which has a beneficial effect on the microclimate of the room.
- Good maintainability of the jamb lining.
How to lay tiles at the front door?
Finishing the front door with tiles is a practical and effective solution that allows you to simultaneously achieve several goals that are important for the owner of the room:
the ability to easily clean surfaces from contamination,
obtaining decor that is not afraid of temperature changes and high humidity.
Finishing the entrance door slopes with tiles can be done:
directly onto the surface after installation of the structure,
onto a pre-created plasterboard “frame”.
In the second case, it is possible to provide additional insulation of the installation joints by placing insulating material between the wall and the drywall.
The entrance structure and its design, together with additional elements - a porch and railings, a canopy and even a sign with the street name and house number - is the so-called facade group. Design rules require that it be made in the same style, and its elements organically combine with each other.
pressed boards with vinyl leather,
veneered MDF panels or natural solid wood overlays.
Many manufactured products have a durable powder coating on the outside. Therefore, if the “Jaguar 2”, “Jaguar 5” or other models are installed that have nothing in common with ceramics in appearance, it is necessary that the tiling of the front door be supported by something else.
It is possible that the slopes of nearby fabric will also be processed.
The corresponding decorative elements on the porch will look quite original.
Selection of material and tools
When choosing tiles for finishing the slopes of the front door, the following do not matter:
its dimensions (it is almost impossible that the parameters of the tile will perfectly match the width of the slope, so you will have to cut it, although you can select the material so that a minimum amount of waste remains),
presence of gloss on the surface.
There is also a limitation - you cannot choose varieties with a textured pattern. It is virtually impossible to accurately mark, cut and join such elements at home, so the seams and edges will be uneven and unsightly.
To complete the work you will also need:
measuring instruments (angle, ruler),
tile cutter or its equivalent (the higher the quality of such a manual or electric device, the greater the likelihood of success),
supports (to support the tiles when finishing the slopes of the entrance door on a horizontal plane),
cement or other glue suitable for this work,
special profiles for decorating edges (optional).
Features of the work
Finishing the slopes of the front door with tiles is not as simple as it might seem at first glance, so if you lack experience, it is better to entrust all operations to a professional. To do it yourself, you should remember: on horizontal surfaces should be laid one by one, each subsequent tile only after fixing the previous one. For convenience, supports are used while the glue hardens.
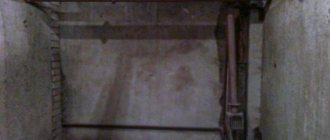
Which pipes don't need to be hidden?
Communications can be part of the bathroom interior. Decorative elements will be models made of metal-plastic or galvanized steel. The material does not need painting and can be combined with loft, minimalist or hi-tech designs. Copper sewer elements are suitable for classic or baroque styles. Properly selected furniture and tiles will also help create the desired style.
There is no need to mask the sewer or water riser with various materials. Vertical communications can be decorated under a column using small tiles. The riser is lined with a heat-insulating shell, the thickness of which is no more than 2 cm. The outer shell is made of a plastic pipe of the required diameter, cut in half. The space between the inner and outer cladding is filled with polyurethane foam.
The finished structure must be tightened with special nylon clamps. This is required so that when the foam expands it does not lead to peeling of the outer shell. The clamps are left on the riser for a day.
After 4-5 days, a primer is applied to the column, which increases adhesion. Then they begin to line the riser with mosaics. It must be laid on a polyurethane base or cement adhesive mixture. If the tiles are planned to be laid on a reactive compound, there is no need to prime the column. After 1-2 days you can start grouting.
Other publications in the “Question – Master’s Answer” section
Cladding the facades of a building is an important question, the answer to which determines not only the future appearance of the house, but can also solve many practical problems. By separating the functions of cladding, insulation and load-bearing structures of the building facade, it is possible to achieve good protection of the house from destructive air.
The final step in installing the flooring is installing the baseboard. The plinth is not just an element of the interior; in addition, it is assigned both functional and aesthetic tasks. First of all, the main functional purpose of the plinth is to close the compensation gap, etc.
No matter how much chimney protection is installed, some small amount of moisture will still get into the pipe. It all depends on what cross-section the chimney has and what dimensions the “skirt” of the umbrella or deflector installed above it has. It should be noted that the use of a deflector is additional.
Decorative plaster
A variation of point No. 2. “Decorative” is applied to a previously plastered surface. If the decorative plaster is textured, then the rough layer does not need to be laid out perfectly evenly. You can choose plaster with colored stone chips - it is very durable.
The disadvantages are the high cost of materials, labor-intensive and “dirty” work.
Frame from youtube.com
The adjacent wall can be wallpapered, painted or decorative plaster applied to it.
Frame from youtube.com