SHARE ON SOCIAL NETWORKS
FacebookTwitterOkGoogle+PinterestVk
A mandatory accessory of any comfortable home is a cistern and the toilet flush mechanism included in its kit. The latter most often fails, which leads to the creation of uncomfortable conditions when visiting the bathroom. In order to encounter this problem less often, you should correctly select, install and configure the drainage mechanism. This article will help you deal with this issue.
In order for the drain mechanism to perform its functions efficiently, it must be installed and configured correctly.
Connecting a wall-hung toilet
In order for the mounted product to withstand its own weight and the weight of a person sitting on it, installation to the wall is carried out using a special durable mounting frame
In order for the mounted product to withstand its own weight and the weight of a person sitting on it, installation to the wall is carried out using a special durable mounting frame. In this case, the water is drained through a horizontal pipe going into the wall.
The sequence of actions is as follows:
- After installing the frame, which has a special hole for the sewer outlet, the device is hung on steel studs. They help securely fix and hold the bowl.
- Using a cuff, the toilet outlet and a section of pipe coming from the riser are connected. The connection is sealed with silicone.
Why do you need an elastic cuff ↑
All pipes are equipped with an elastic cuff that fits over the toilet outlet. It ensures tightness, tightly enveloping the ceramics and allows, if necessary, to shift the axis of the pipe by a small angle. Separate additional cuffs are also produced, used in conjunction with the pipe. They allow you to further increase the inclination of the input and output axes.
Another type of cuff makes it possible to do without a pipe altogether; they replace it. They are used in cases where the axes and angles of inclination of the toilet and sewer outlets coincide, and the holes are close. Mainly, it is a horizontal and vertical scheme.
Elastic cuff with eccentric
Preparatory work for installation
Regardless of what will cover the floor (tiles or regular screed), you need to wait time for the mixture to dry on the floor surface. This will take about a week. This is due to the fact that the toilet is fixed using fasteners and dowels, which require a reliable and solid base. In this situation, the hardened solution will act as a similar base.
Next, you should prepare those participating in the communication installation process. The area where the drain will be connected must be cleared of various contaminants and salt deposits in advance. Otherwise, it will not be possible to connect the toilet to the sewer riser as needed. That is, the corner or corrugation in the outlet cup will not fit tightly, and a leak will definitely appear.
A tap should also be installed at the connection point of the drain tank so that it is possible to carry out repair and cleaning work without completely turning off the water.
Installation of a shower with a floor drain
Anyone considering a shower with a floor drain should first check to see if there is enough space in the floor to allow the drain to be recessed. Home craftsmen who decide to install such a shower themselves should remember that all joints between the wall, floor and drain must be waterproof.
Installation of a shower with a floor drain
The job can be done quickly and cleanly using a special fiberglass waterproofing sheet laid over a layer of regular tile adhesive. Then the floor and walls can be tiled on top. But here each manufacturer has its own installation instructions.
| 1. Part of the drain embedded in the floor rises above the base, since a plate of rigid foam about 4 cm thick will need to be laid on the floor. It will be covered with a concrete screed (the ready-mix is sold). | 2. The drain must be sealed. Therefore, the junction of the drain neck with the monolithic floor is carefully sealed. |
3. The slope is already provided in the cover plate, which is installed with a small amount of installation adhesive applied to the underside. | 4. The fiberglass seal between the shower element and the screed floor is sealed with regular tile adhesive. |
| 5. The fold in the corner provides a watertight connection to the wall. You can't cut the canvas here. The fold is carefully glued to the wall. | 6. Temperature expansions are compensated by means of a tile joint strip installed between the shower element and the monolithic floor. This prevents the seam from cracking. |
Advantages of siphon-type toilets
- Pleasant appearance, since the pipes are hidden in the floor.
- The bowl of an American-style toilet is almost half full. This prevents inconvenience caused by unnecessary bursts. Also, during each flush, the water covers the entire area of the bowl, and this allows it to remain clean.
- Quiet operation.
- Compact size. A toilet with a vertical outlet is more compact and is great for saving space.
- Variety of models. You can choose a toilet with decorative elements that match the design of the bathroom.
- Keeping the bowl clean. American toilets have what is called dual flush, which means they can flush with different levels of water depending on the type of waste, both liquid and solid. This function is great for saving water, since the maximum amount of water per flush is 11-22 liters.
- Often instead of a regular lever there is a button. This makes the appearance more attractive
American standard toilets undoubtedly have many advantages. Unfortunately, they are very difficult to find in Russia and Europe, since these countries have a slightly different pipe system. However, it is still possible to install such a toilet, but it will cost a lot of money.
Siphon toilets in Russia
However, European toilets often have a horizontal or "oblique" release due to European regulations and do not have the "siphon" effect of sucking the contents out of the toilet bowls. Until recently, it was believed that siphoning toilets were only suitable for rooms in which the sewer system “goes to the floor.” But developments and products have already appeared on sale, proving that under certain conditions it is possible to make a siphon-type toilet with a horizontal outlet.
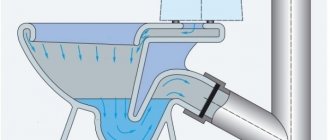
By European compact toilets we mean toilets that are structurally adapted to the installation of a sewer network above interfloor ceilings, in contrast to American toilets adapted to the installation of a sewer network under ceilings. Thanks to the latter, in American toilets, to ensure high-quality flushing of the bowl’s contents into the sewer network, the so-called “siphon” effect is used, which, at the time of flushing, easily sucks out all the contents from the toilet bowl and unhinderedly sends it into the sewer. American siphon toilets were the first toilets with relatively good flushing quality.
In European funnel-type toilets, in order to transport the contents of the toilet bowl into the sewer, the main flow of water flowing from the flush tank is usually formed in such a way that it pushes the contents of the bowl into the outlet channel and further into the sewer.
European toilets have S-shaped outlets, which are mistakenly called "siphons". However, the height of the end of the outlet pipe in such a toilet is approximately at the level of the water in the toilet bowl or slightly higher. Therefore, the siphon effect does not appear in such a toilet when flushing water.
It was “reset to zero” during the transition to the European sewerage distribution system over interfloor ceilings, and the outlet channel only serves as a water seal, preventing the penetration of gases from the sewer network into the living space. It should be noted that, once indoors, these gases can be fatal.
True, sellers of American toilets with a siphon flushing effect, when selling a toilet in Russia, can, for a fee, raise the floor by 150–200 mm in the toilet room and solve the problem of installing American toilets in rooms with a European sewer pipe distribution system.
Specialists from the South Korean company SensPa managed to create a line of Serim siphon toilets with horizontal outlet. The toilet outlet is directed not to the floor, but to the wall, and is located at a height of 100 mm from the floor surface.
Source
What are the drainage mechanisms?
All you need to do to flush the toilet after visiting the toilet is to press the button on the tank. Then the entire mechanism works independently: the water drain valve opens via the drain valve. After this, the contents of the tank flow into the bowl, washing away all feces and sewage with its flow.
The toilet flush mechanism can be activated in several ways:
- By pressing a button.
- Focus on the lever.
- We pull the chain.
The configuration and design of the cistern varies. Typical containers have a standard volume of 6 and 4 liters, equipped with holes for water inlet of standard diameters. Siphon mechanisms for toilet cisterns are available in several varieties. They are installed quite simply, so if the indoor unit breaks down, it can be replaced without any problems.
Installation on different editions of toilets
A siphon toilet is installed depending on the type of location of the drain pipe. It happens:
- Horizontal. The toilet drain is placed parallel to the floor. Distance from the floor 180 mm. Used in cases where the sewer inlet is located horizontally in the wall. This type is typical for European countries.
- Vertical. The drain is located parallel to the wall. The entrance to the sewer is located in the floor. Used in the USA and Canada. And also in our pre-war buildings, which have not yet undergone major repairs.
- Obliquely. This type is most widely used in domestic buildings. The inlet is located at an angle of 15° - 30° to the floor. Imported toilets rarely have a similar release.
- Universal. The horizontal type is taken as a basis, but the edge of the outlet is slightly distant from the rear edge of the toilet. This makes it possible to use any of the existing types of pipes in free space: straight into the wall or L-shaped, which goes into the floor. You can also use a curved siphon for an oblique release. Most of the toilets on the market have this type of design, which allows them to be combined with all sewerage layouts.
The toilet in the bathroom of the house is selected according to the location of the existing entrance to the sewer. For example, when installing a device with a horizontal outlet into a sewer hole in the floor, it will move far away from the wall. Thus, the overall appearance of the room will deteriorate. If you have an inclined entrance, it is better to use a toilet with an oblique or universal outlet.
Depending on the type of toilet, different types of siphons are used:
Rigid non-bending pipe. Used when the toilet flush coincides with the entrance to the sewer. Deviation from the axis should not exceed 10° degrees. They have the form of a straight pipe for horizontal connection or an L-shaped pipe for vertical connection to the sewer.
A rigid siphon is designed to connect plumbing equipment with a horizontal outlet and an oblique inlet to the sewer. Assembly and installation of the siphon requires a certain angle of inclination and height of the sewer inlet.
- Non-bending siphon with offset center. Used when there is insignificant difference between the outlet of the device and the input to the system.
- Articulating and rotating pipe. It has a fairly high cost. Used for rotation angles up to 15°. In some cases, a bend in the pipe is noticeable.
- Corrugated tube. Makes it possible to install the device when the axis of its drainage and the entrance to the sewer system do not coincide. The disadvantage is the ribbed inner surface, which leads to the accumulation of fat and other deposits.
How to choose the right toilet parts
If elements of the drain system fail, it is important to choose the correct option that will correspond to the factory configuration. The units may differ in the material they are made of. Products made of bronze and brass are considered the highest quality and most durable. However, they are characterized by high cost.
The repair kit for the toilet is selected based on the model of the tank. Important parameters are the location of the inlet, its size, the diameter of the drain opening and the overall dimensions of the device, which must fit freely into the tank. The flush mechanism for a toilet can be represented by a single design or consist of separate (drain and fill) devices. The second option significantly facilitates and simplifies the process of replacing products.
If elements of the drain mechanism break down, the repair kit is selected based on the model of the tank
When choosing a valve, you should pay attention to the quality of the product. The mechanism must operate under its own weight. It is necessary that all its components are movable, move smoothly and unhindered. There should be no jamming of any kind.
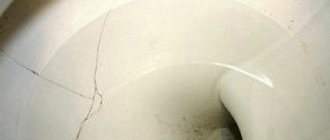
When choosing a drain mechanism, you should carefully inspect the elements. They must have a solid body, free from chips and cracks, and the correct geometric shape, which will contribute to efficient and uninterrupted operation. Spare parts for toilets made from high-quality material have a high cost.
Seals and gaskets should be purchased from silicone. Such products, unlike rubber ones, are characterized by strength, reliability and durability. Elements are checked for compression and bending. They should not be deformed or cracked.
Helpful advice! The best performance and strength properties are provided by sealing elements, in the manufacture of which rubber is added to enhance elasticity.
New mechanism parts must be of high quality, without chips or cracks.
Operating principle
Despite the wide variety of new plumbing products offered for purchase by manufacturers in different countries, the mechanism for flushing with a button in each of them has an almost identical design. This makes servicing easier. And if a malfunction occurs, a damaged drain mechanism can be found in almost any store.
The flush mechanism using a button is a structure consisting of a number of parts. Visible elements of this drain system include:
- drain tank with a capacity of up to 8 l;
- a drain tank cover located on the top of the tank (a push-button drain mechanism is built into it);
- buttons (their number depends on the type of drain button mechanism, which usually includes either one or two of these elements).
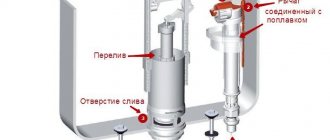
In addition to external parts, the compact toilet cistern flush mechanism is equipped with the following internal parts:
- filling (inlet) valve;
- outlet fittings (exhaust rod valve);
- float bulb (or simply float);
- overflow tube.
The mechanism of operation of the push-button drain system is that water initially flows into the tank using the valve responsible for filling. The float inside the tank is at the bottom at this time. When the water level in the tank begins to rise, the float will also rise.
When the water level reaches a certain level, the float, using a special lever on the clamp, will close the filling valve and the water supply will stop.
To bring the drain mechanism into working condition, you must press the button located on the lid of the drain tank. At the same time, the drain valve opens and liquid enters the toilet bowl, performing the flushing function. The float mechanism moves down, slightly opening the valve designed to admit water. This is how the one-button mechanism for draining water works.
The operation scheme of the two-button mechanism looks somewhat different. The tank with this design has not one, but two drain holes. When you press the smaller button (key), the seal of the first drain channel rises. When this circuit operates, the liquid from the tank is only drained by half. When the second button, usually larger than the first, is pressed, the valve on the second drain hole opens.
Types of toilet flush valve as a system overflow control mechanism
The toilet cistern flush valve can be a float or membrane shut-off device. Models of the first option may differ in structure and principle of operation. Old tanks were equipped with Croydon valves, which consisted of a body, piston, axle, seat and float lever. When the float lever was acted upon, the mechanism began to function. In this case, the piston moved vertically.
Most modern drain mechanisms are equipped with a piston valve, which moves horizontally when the lever is pressed. The water supply is regulated by the contact of the piston and the seat. When the container is filled, the inlet hole is closed using a gasket located at the end of the piston.
The diaphragm valve is not equipped with a piston gasket, but with a rubber or silicone membrane. When a lever acts on it, the plastic piston begins to displace the membrane, which closes the water supply.
The drain valve can be equipped with a membrane or float mechanism
Important! The diaphragm valve facilitates quick and silent filling of the tank.
The disadvantage of this element is the greater sensitivity of the product to dirt and the presence of impurities in water. The diaphragm valve will quickly lose its operational properties due to poor quality water in the system. A mechanical cleaning filter will help avoid problems.
There are floatless options for the drain system. The water supply to them is stopped due to the presence of a special chamber shaped like an inverted glass.
Material for making toilet flush valves
Expensive models of toilet flush systems are made of bronze or brass. These materials are characterized by strength, reliability, corrosion resistance, and the ability to withstand mechanical and chemical loads. The design can be either simple or complex. Metal filling is found in expensive collectible models, which are produced with a certain stylization.
Most drain valves are made from polymers
In other cases, bronze and brass can be used in the manufacture of only the fill valve, which makes the shut-off and drain system universal, easy to install, configure, repair, and allows you to replace each unit individually.
Many valve models are made from polymers. The quality of plastic and precision of production affect the cost of the product. The more expensive the fittings, the more reliable and durable the drainage system will be. However, there are high-quality models that have an affordable price.
Price
According to consumer reviews and expert opinion, the following bidet siphons have proven themselves to be the best:
- plastic white Viega model – 360-365 rubles;
- Czech chrome model Alсаlast – 600-650 rubles;
- Swedish model Geberit – 650-700 rubles;
- German chrome model Kludi – 900-950 rubles;
- brass model Viega – 930-950 rubles;
- German chrome model Hansgrohe (Axor) – 1500 rubles;
- Italian model Migliore Riсambi – about 3 thousand rubles;
- Italian chrome model Vandini - about 2800-2900 rubles;
- Italian model Bugnatese - about 4 thousand rubles;
- German Grohe - about 1700-1800 rubles.
Turkish models are very well adapted for working in Russian conditions, which are represented by a drain pipe and rigid pipes, are chrome-plated with an anti-corrosion layer and are suitable for height adjustment within 140 mm.
Malfunctions during operation of drain tanks
If water does not flow into the tank or its supply is not shut off, then the cause of the malfunction lies either in the float or in the liquid supply valve. Floats are made in the shape of a hollow cylinder or an inverted glass. In the first case, the damaged product cannot be repaired, and the problem can be eliminated by replacing it or purchasing the entire valve.
With a float in the shape of an inverted glass, if trouble happens, it can become overgrown with various deposits and dirt. As a result, this element does not work well. Deficiencies can be eliminated by cleaning it.
When the float is in perfect order, but water does not stop flowing into the tank, then the cause of the malfunction is a worn valve membrane.
Usually a spare product is included with the float. The membrane can be purchased separately. The protective cap is removed from the valve, the old membrane is removed and replaced with a new product. The small hole in the valve must be cleaned, otherwise water will stop flowing through it. The toilet flushing device cannot be called complex, so it can be easily installed or, if necessary, repaired.
Advantages and disadvantages
The advantages of toilet models with horizontal (parallel to the floor) outlet include the following features and factors:
- fits even where previously there was a toilet with an oblique type outlet (that is, there is versatility);
- it is possible to connect not only to a horizontal sewer pipe, but also directly to a vertical riser using adapters;
- mounted close to the wall without taking up extra space;
- low cost;
- wide model range.
There are also many disadvantages:
- attachment of the installation site to one of the walls of the room - the one where the sewer pipeline passes;
- relative complexity of installation, especially in terms of connecting the outlet to the sewer;
- careful sealing of the connection points between the outlet and the sewer main, the need to monitor for leaks during the first time after installation;
- Possibility of clogging of the outlet channel.
Base
In most cases, a reasonable solution would be to pour in two stages: forming a main layer with the installation of a drain and communications, and pouring a thinner one, with slopes towards the drain. In this description, the base refers to the base layer without slopes. Let's look at practical examples:
Shower tray.
When making a tiled tray, the height of the drain connection to the sewer plays a decisive role. Often there is a structural need to form a pallet with a height of more than 20 cm from the floor level. Therefore, to lighten such a massive layer, red brick or expanded clay concrete is used to form the base.
Drainage in technical room, garage.
This means pouring a concrete base onto the ground; with ready-made concrete floors, you need to consider expanded clay concrete or the possibility of “burying” the sewer drain. An ordinary concrete slab of 10-20 cm is poured onto the ground, taking into account the addition of layers with slopes. For screeds with slopes, it is necessary to provide 1-2 cm near the drain, and then add a centimeter with each meter of distance from the drain.
As a result, it is necessary to achieve a relatively flat base (differences of 0.5-1 cm are quite acceptable) with an already installed ladder.
Advantages and disadvantages
Like all toilets, wall-mounted models have their pros and cons.
The disadvantages include the following:
- high cost of the product itself, especially in comparison with conventional toilets;
- not budget installation;
- if communications and the tank are hidden, then if they break down, repairs are labor-intensive and expensive;
- lack of free space under the toilet itself, which makes more thorough wet cleaning impossible.
All of the listed disadvantages are easily compensated by the undoubted advantages of attached toilets.
- Hidden communications. This allows you to use the attached toilet in any interior, without disturbing the harmony of the room and the intended design.
- It takes up significantly less space than a regular toilet, which is especially important for saving useful space.
- Attached toilets with a cistern hidden in the wall are almost silent, since the sounds of water are muffled due to the finishing.
- Ergonomic design.
- Durability and reliability. Reliable components are supplied to the attached models.
A wall-mounted toilet is a modern solution for those who value quality and impeccable appearance. Despite the relatively high cost, especially with conventional models, it fully justifies the money spent on its purchase and installation.
Types of drainage devices
There are many different pump models on the market now. They differ in their characteristics and capabilities, which must be taken into account when choosing a device for your home.
- Sanitary pump. This type of device was one of the first to appear. These are the simplest devices designed to drain cold water with temperatures up to 40°C. There are no knives to chop up leftover food.
- The stationary pump has slightly greater capabilities. It is capable of creating high pressure, due to which water is pushed over considerable distances.
- A forced sewerage station is the most common type of pump and can perform many functions. The temperature regime is practically unlimited (up to 90°C), which allows the device to be used with dishwashers and washing machines. Chopper knives are installed in the tanks, which do an excellent job of removing organic residues. In this case, the pump can lift water to a height of up to 10 m, and push it to a distance of up to 100 m.
In addition, there are stationary and mobile pumps. The first ones are fixed in one place, the second ones can be rearranged. Types of pipe connections can be as follows:
- vertical connection;
- horizontal;
- mixed.
There are different engine cooling systems. If large volumes of work are envisaged, then this is a necessary condition for the normal functioning of the device.
Types of toilets
Toilets can be classified according to different parameters, for example, by the type of water discharge from the floor-mounted toilet.
- With horizontal outlet. They are located parallel to the floor at a height of 18 centimeters. A slight tilt cannot be ruled out, but only in the direction of increasing as it drains. This is the most common wiring scheme in Europe and the CIS countries.
- With vertical outlet. This option is located perpendicular to the floor. In this case, the sewer pipe must be strictly vertical. This wiring scheme is used mainly in the USA and Canada. In Russia, such releases are common in Stalin-built houses, which have not yet received their turn for major repairs.
With oblique release. This option involves tilting the sewer pipe to which the connection will be made at an angle relative to the floor of 15-30 degrees. This is the most common option for Russia. It is very rare to find imported plumbing fixtures with such parameters.
With the release of vario. It is also called universal
We can say that this is a type of toilet with a horizontal outlet, only with an important feature. It is much shorter, so you can use any type of siphons (pipes)
This is one of the most popular variations of toilet release.
A vertical outlet cannot be combined with a horizontal or oblique connection; in turn, for an oblique entrance it is better to choose a toilet with a similar or universal outlet.
How to raise the bathroom floor to install a drain
The smallest floor-mounted drain ladder has a height of 6-7 cm. At the same time, in order for water to flow normally into it, it is necessary to ensure a slope towards the drain hole of at least 1 cm per meter. This means that when making a floor with a drain, the height of the floor towards the walls is increased. The zero point in this case is the upper part of the installed ladder. How accurately the floor rises depends on the size of the shower stall or the entire bathtub, if you plan to collect water from the entire area of the bathroom.
Floor drain layout diagram
There are several ways to raise your bathroom or shower floor. When choosing a method, it is necessary to take into account the load-bearing capacity of the floor, otherwise you can cause damage to the entire structure.
Screed of different types
The most obvious way to make a floor drain slope in the floor is to pour a screed. But the option is not always the best. Firstly, an ordinary cement-sand mixture has a lot of weight, and secondly, it “matures” for a long time. But there are several good options.
- DSP. Conventional cement-sand screed. The option is understandable, but very heavy - 15-16 kg per 1 sq. meter with a layer thickness of 1 cm. Not every ceiling can withstand such a load. You need to be especially careful in old houses.
- First pour a layer of expanded clay, pour a cement-sand mixture on top (thickness at least 3 cm). Not a bad option, but you have to consider the load-bearing capacity of the floor - whether it will hold up or not.
Guides for pouring screed have been prepared
- Make an insulated floating screed. Plates of extruded polystyrene foam are laid down (not polystyrene foam, it will crumple under the weight of the screed), and DSP is poured on top (the minimum thickness is also at least 3 cm). A good option - the floor will not be so cold, and the total mass is relatively small. This option easily integrates a floor heating system. More rational - electric, with water, there is a lot of hassle during installation.
- Polystyrene concrete or other types of lightweight concrete. The option is very good; at the same time, the problem of “cold floors” is also solved - since these materials have good thermal insulation properties. Here it will be necessary to look for a compromise solution - between the mass of the screed and the strength characteristics.
The most common way to create a floor with a drain is using a screed. It’s just that the screed can be different, especially since the thickness of the “pie” is usually significant - rarely less than 12 cm - which makes it possible to make it a combination. This allows you to provide the required reliability, but reduce weight. Most often, the floor with a drain is insulated. But the maximum thickness of the insulation and screed is 10 cm, which is clearly not enough to install most drains. The remaining centimeters are “gained” by laying a rough screed, but it makes sense to make it from lightweight concrete to reduce the load on the floor.
On the logs
In order not to overload the floors, you can make a podium in the shower or bathtub on joists. The option is controversial, since high humidity and wood do not go well together, but sometimes this is the only option. When choosing such a floor drain device, you must use well-dried wood. Before use, it is treated with protective compounds (according to the instructions, but at least twice). It is advisable to choose from those impregnations that are intended for outdoor use or for direct contact with the ground - they have a higher degree of protection. After the composition has dried, you can begin to work.
Make it full of wooden joists. The logs are installed in an “envelope” with the center at the location of the drain. In general terms, the technology is as follows: holes are drilled in the floor screed for installing studs (M14-M16), the installation step is about 30 cm. Logs are attached to the studs (40*60 mm or 45*90 cm - depending on the size of the podium being built). The logs are laid (can be trimmed) taking into account the creation of the required slope. On them - moisture-resistant plywood 12 mm or thicker, then gypsum fiber board, waterproofing, and tiles on it.
Approximate layout of the lag "envelope"
Make a flat wooden floor on joists, and lay the tiles on a slope using different thicknesses of glue. This option is good for small areas - if you drain only in a small shower stall.
You can make the floor straight, and set the slope with the thickness of the glue
The advantages of these methods are minimal weight, the disadvantages are the complexity of execution, since attention to detail and high quality waterproofing are required. As you can see, the floor with a drain in a bathtub or shower can be done in different ways
Choose the option that best suits your conditions
As you can see, a floor with a drain in a bathtub or shower can be done in different ways. Choose the option that best suits your conditions.
What is the difference between toilets in Russia and the USA?
America is not just another country, but another world. Everything here is not arranged our way. Distances are measured in miles, lengths are measured in feet, weights are measured in pounds, and gasoline is measured in gallons. Moreover, in the USA even toilets are designed differently!
Anyone who has ever been to America and visited toilets in public places has probably noticed a number of differences. So in the USA, toilets are constantly filled with water, and there is almost never a brush next to them!
I remember that in one of the episodes of the “Inspector General” program, Olga Freimut gave the cafe staff a rout for not having a brush in the toilet. So why do American catering owners neglect this hygiene item?
The fact is that siphon-type toilets are widely used in the United States. As mentioned above, there is always water in their bowl, so excrement falling down practically does not stain the walls. In addition, overseas toilets have a much more powerful flush!
Yes, yes, toilets in the USA have a completely different design than in the countries of the former USSR or other European countries. It so happens that a different sewer network layout has historically been used overseas.
In our country, the drain pipes are laid above the interfloor ceilings, and in American houses - below them. Due to the large difference between the level of the toilet bowl and the drain pipe, American designers managed to achieve a siphon effect: at the moment of flushing, the entire contents of the toilet bowl are literally sucked out and sent into the sewer.
In European toilets, the drain pipe is almost at the same level with the bowl, and the water in it only serves to create a plug that prevents sewer gases from entering the room. During flushing, the contents of the toilet are simply pushed into the pipe without any additional pressure.
Of course, the vast majority of Americans have brushes in their homes. After all, sometimes the flush alone cannot clean the toilet until it shines; moreover, limescale deposits periodically appear on the walls. And in public institutions, brushes are hidden from the eyes of visitors and are located in the cleaning lady’s closet along with other equipment. Regular drainage is sufficient in 99% of cases.
And finally, a little humor. Slovenian philosopher Slavoj Zizek is confident that different toilet systems are directly related to the worldview of a nation. So, in France the drain is located at the back, and this means that the French are too romantic and do not want to see their waste.
In German toilets, the drain is located in the front. The stool is not immediately washed away to be examined for infection. This characterizes the extreme meticulousness of the German people and their desire to analyze everything.
But in the USA, toilets are designed in such a way that a lot of water initially accumulates in them, so the feces float. If necessary, you can examine it, and then noisily flush it down the drain. This suggests that the inhabitants of the New World adopted both the Germans' desire for order and the French's love of visual effects.
Of course, Slavoj Zizek's thoughts are just a joke. But, as you know, there is some truth in every joke.
Be that as it may, it is stupid to deny that we have different mentalities. Therefore, it is not surprising that emigrants from the former USSR, having arrived in the United States, often change the plumbing in their home. Still, it is very difficult to overcome your habits!
Floor layout and basic requirements
The main thing in organizing a wooden floor with a drain is, oddly enough, not the technology for making the finished floor layer, but the proper preparation of the underground space. It is errors in the organization of the underground that become the most common reason that the tree begins to rot ahead of time.
Particular attention should also be paid to ventilation of the space under the floorboards; there must be either special holes for ventilation, or the possibility of raising the boards in order to dry them faster
In addition to the fact that a wooden floor is not as cold to the touch as a tiled floor, it is also noticeably cheaper and easier to organize than a tiled floor, which requires the obligatory arrangement of a layer of concrete screed at least 5-7 cm thick. If necessary, construction the most budget-friendly construction, it is wooden floors that are laid most often, and a small drainage hole is installed directly under the bathhouse as a space for water drainage.
The bathhouse floor is the structural element that experiences the most noticeable load. In addition to the usual temperature effects, it is constantly in contact with water, which places special demands on manufacturing technology. It is necessary to take into account the properties of the materials used, the type of floor structure, and foundation. It is also necessary to ensure safe movement, a comfortable feeling, and create conditions for high-quality drying after using the bath. Improper flooring will cause the formation of mold, mildew, and wood rot. A competent choice of technology and materials that are most suitable under given conditions will help to avoid undesirable phenomena.
Corrugated toilet flush
To connect a corrugated pipe for a toilet, you need to know what types of this product there are.
Such a plumbing pipe can be not only soft, but also hard. A rigid product is characterized by:
- Reliability;
- Durability;
- Durability.
There are different types of corrugation for toilet bowls, which you can familiarize yourself with on the Internet or in specialized stores.
However, despite this, soft corrugation is in great demand, since it is much easier and faster to install, looks quite good and is suitable for absolutely any type of toilet. In addition, it is considered a big plus that such a connecting pipe can easily bend in any direction. In addition, the corrugated drain pipe can be reinforced or unreinforced. The reinforced version is much more durable, since the rigidity of the product is ensured by the presence of small diameter wire inside the pipe.
Cast iron siphon as a piece from the past
Needless to say, previously there was no assortment of plumbing parts at all, and the functionality was often lame. In the modern world, the plumbing market is developing and expanding at lightning speed. This applies to both flushing devices and bathtubs, sinks, and toilets.
The principle of the cast iron siphon
In the distant 80s, every Soviet apartment had a cast iron siphon, and in the amount of three pieces. One was under the kitchen sink. The second is under the sink in the bathroom and the third is under the toilet. Cast iron products were everywhere back then. Just look at the cast iron batteries, which were simply impossible to lift. So, a cast iron siphon was the only option for installation. They weighed impressively, but, to be honest, they coped with their task perfectly. It is worth noting the disadvantages of such a product. First of all - weight. Installing a cast iron siphon took not only a colossal amount of time, but also physical effort. It took a lot of work to install the valve in such a way that it would not allow water to pass through the butt seams.
Another disadvantage is some fragility. An ordinary blow to the floor could disrupt the integrity of the structure, which could lead to a leak. Of course, the impact of time cannot be discounted either. After 2-3 years, the cast iron part may become weak and require replacement.
Peculiarities
An attached toilet is a symbiosis of a regular and wall-hung toilet.
As in the latter, all underwater structures are hidden inside the product:
- siphon;
- a drain pipe;
- water supply and sewerage system;
- drain tank (in some models).
And what it has in common with a standard toilet is the similarity of the installation, which even a non-professional can handle. This model can be easily used in combined baths and toilets, as well as in restrooms that are modest in size, since the design can save useful space in the room. The support for this toilet is the stand, which forms one whole with it.
For wall-hung toilets, a supporting structure is always installed, the cost of which is quite high. The attached toilet does not need to be strengthened, so its installation does not incur additional financial costs other than the purchase of the product itself and the necessary materials and components.
If the tank is hidden, then it is covered with a false wall. This allows you to achieve high levels of decorativeness. Sewer pipes and water supply are supplied separately. Many wall-mounted toilets are equipped with a seat with a micro-lift, which allows the toilet lid to be lowered smoothly, making handling more comfortable.
Why is the drain leaking?
People often wonder what to do if the toilet leaks after flushing. One of the reasons for drain leakage is dirt getting inside the drain valve. As a result, solid particles accumulate between the rubber pad and the seat. This could be corrosion of metal pipes or sludge. In this case, you can do without replacement. The problem is resolved by simply removing the tank cap and cleaning the space under the rubber cuff. To do this, use a rag or sponge. The only exception is when the rubber element has become old or worn out, which requires its replacement.
Before installing the valve inside the tank, it is fixed to the bowl. The specific design of the plumbing for the toilet and drain does not make it possible to get the coupling bolts after installing the internal filling. Therefore, the first step is to install the flush cistern on the toilet bowl. And only after this can you proceed to installing internal mechanisms for supplying and draining water.
Types of fan products
Fan pipes are classified according to the construction material used in the manufacture of the product.
The classification divides fan pipes into 2 types:
- metal;
- plastic.
The metal (cast iron) version can be installed in a sewer system made of a similar material. Plastic products can be installed in both plastic and cast iron pipelines.
When repairing fan pipes, it is recommended to replace cast iron elements with plastic analogues. This material is much more durable than cast iron
When installing a plastic element, you get a flexible sewer pipe, a monolithic elbow or a compact adapter. Cast iron products are not flexible and do not have a variety of shapes.
How to insert a new pipe into an old pipe ↑
Plastic pipes are perfectly installed in modern polymer sewer pipes with a diameter of 110 mm. When installed in an old cast-iron pipe, the pipe will have to be tightly caulked with a caulk - a tarred rope made of flax or other fibrous material. It is allowed to use silicone sealant after first cleaning the surface. The outlet into the cuff and the pipe into the sewer should be inserted until it stops.
If the axes and inclination angles of the outlet and inlet exactly match, choosing a pipe (siphon) for the toilet is quite simple. It is not difficult to install it yourself in a PVC sewer. But if there is no skill in plumbing work, the wiring is made of cast iron, and the choice of drain is not obvious, it makes sense to entrust the connection and installation to experienced specialists.
Step-by-step instructions for carrying out work
This operation is not that complicated, although it does cause some concern, which can be dispelled, like an unpleasant smell, if you know some of the subtleties of the process.
The first thing you need to do before starting work is to turn off the water in your home. Below we offer step-by-step instructions.
Dismantling the old toilet
Stage one. Replacing an old toilet with a new model is much easier than initially installing a toilet in a new house or apartment. Therefore, when replacing an old toilet model, you should take a closer look at the type of attachment to the sewer network (depending on the type of toilet drain pipe) and purchase a toilet of the same type that will not require adjustment or, even worse, alteration of the sewer wiring.
Stage two. If in your house, some time after installing the toilet, the floors were redone (their level was raised, floor tiles were laid), then when connecting the toilet to the pipe, you should use corrugated or eccentric cuffs.
We connect with corrugation
Stage three. If your home has cast iron pipes, there may be problems with the tightness of the connection, which can be solved with the help of sealant. It is applied to the joints only after connecting the toilet to the sewer pipe. Plastic pipes can be hermetically connected to the toilet using eccentric cuffs, when rotated their rubber seals can successfully ensure a reliable connection.
Stage four. If you have not achieved the desired result of tightness, then a corrugated cuff, which is easily deformed, bends and stretches, will provide you with a 100% guarantee of this.
It is important to know that:
- The toilet should not be fixed to the floor before it is connected to the pipe using corrugation, as it may need to be moved 10–15 cm in one direction or another;
- Corrugations may differ in quality (flexibility, etc.). It is better to use reinforced corrugation with a stainless steel coating.
Attaching the toilet to the floor
Stage five. Attaching the toilet to the floor. There are three ways:
- using epoxy glue;
- on taffeta (varnished ash or oak board) attached to the floor;
- with screws to cement floors or ceramic tiles.
Epoxy glue (or resin) is used on a degreased and dust-free floor surface, applying a layer of 4-5 cm. The smooth floor surface should be roughened with corundum stone for better adhesion to the toilet. The fixed toilet is left alone for 12 hours until the materials are completely dry.
For strong adhesion to the floor, anchors (or nails) are installed in the taffeta. To do this, recesses are created in the floor, filled with cement, onto which taffeta is installed with the nails facing down.
The toilet must be stable after installation. Otherwise, it is dismantled and the surface is corrected with a cement solution.
The toilet is fixed to the floor tiles using a drill and drill bits with Pobedit tips. The so-called “new settlers” are driven into the resulting holes. Nylon seals are placed under the screws on the toilet.
Connecting the drain tank
Stage six. Installing a cistern
It is important to know that the water drainage area is lubricated with silicone to ensure a tight seal. The toilet bowl and cistern are connected with bolts. Water is supplied to the tank using a flexible hose with union nuts at the ends
The water level in the tank should be 1 cm below the level of the drain mechanism
Water is supplied to the tank using a flexible hose with union nuts at the ends. The water level in the tank should be 1 cm below the level of the drain mechanism.
An adjusted cistern flush will complete your job of installing the toilet and connecting it to the sewer pipe.
We recommend reading:
- the toilet is clogged, what to do at home;
- how to solder polypropylene pipes for heating.
Dismantling and installation of the flush mechanism for the toilet cistern
If the drain mechanism fails, you can replace it with a new repair kit yourself. Replacing the flush mechanism in the toilet cistern is carried out according to the following algorithm.
Related article:
How to choose a toilet: main criteria and features of various models
Review of the 5 most popular manufacturers and models. Common breakdowns and ways to fix them.
The first step is to turn off the water supply. Next, press the drain button to empty the tank. It is carefully removed, which makes it possible to remove the tank lid. Then the water supply hose is disconnected. The nut that secures the filler pipe is unscrewed. You need to remove the part itself from the hole.
Helpful advice! Before changing the flush mechanism in a toilet cistern with bottom water supply, it is recommended to install a small container under the plumbing fixture into which the water that does not go down the drain will drain.
The internal fittings are removed from the tank and unscrewed from the fasteners. Next, unscrew the bolts securing the tank to the toilet bowl. The container is removed. After this, the lower part of the drain system is dismantled and the sealing gaskets are removed. After disassembly is completed, it is necessary to clean the inner surface of the tank and all its openings, remove plaque, debris and lime deposits.
After removing the internal fittings, it is necessary to unscrew the bolts securing the tank and toilet
Installation of the drain mechanism involves the reverse sequence of work. The lower part of the drain system is inserted into the hole, and sealing gaskets are attached. Next, install the flush cistern on the toilet and secure it with fastening bolts.
Important! If corrosion has formed on the old bolts, the elements should be replaced with new ones.
The internal part of the flush mechanism is installed in the toilet siphon. The fill valve should be inserted into the gap in the bottom or side wall of the tank, securing it with a nut and sealing gaskets. A water supply hose must be connected to the outlet pipe. The water is turned on and the system is checked for functionality.
If all elements are installed correctly and the joints are securely sealed, then there will be no leaks.
The filling valve is inserted into the side wall of the tank or into the bottom
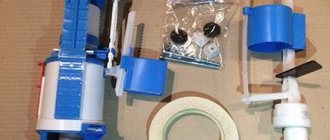
Materials required for connection
A modern scheme for connecting a toilet to a sewer system assumes that cuffs (eccentric or corrugated), drain pipes and plastic outlets will be involved in the work process. The plumbing fixture fits well with the drain pipe, resulting in the toilet looking like a complete product.
But when using this product, several requirements must be taken into account:
- it cannot be trimmed;
- It is prohibited to change the geometric shape.
In the photo you can see components designed to connect the toilet. When connecting the toilet to the sewer, you should remember that corrugation is easy to work with - such cuffs can be bent at different angles, as well as extended in length. But the eccentric cuffs are rotated relative to their axis.
When connections are made in hard-to-reach places, it is preferable to use a corrugated cuff. It is also preferred if they are solving the problem of how to connect a toilet to a sewer system equipped with various inlet sockets.
Presence of overflow and its purpose
An overflow is often included with a shower siphon; it can also be installed separately as part of a sewer drain. A special corrugated or plastic outlet is made for it, which is connected using an adapter to the main part of the floor drain.
To ensure that all installation work and work to ensure the operation of the shower drain is completed as simply as possible, we recommend listening to the following advice from construction market specialists:
- immediately check all outlets for leaks, and not after the installation is completed and when the drain is walled into the floor;
- if the pipe leading from the drain to the common sewer pipe is very long, then additional fasteners must be installed in order to prevent kinks and blockages of the pipe;
- When using a floor drain for a bath or shower, it is advisable to install special grates to trap all kinds of debris and dirt. It will be much easier to remove and wash it than to completely disassemble the drain and clean it thoroughly and deeply.
Which exit is better: straight or oblique?
It should be noted that toilets with oblique or horizontal outlets are in most cases interchangeable, so the difference between them is small. But if converting a straight model into an oblique one is absolutely not difficult, then doing it the other way around is much more difficult. To do this, you will have to organize an additional bend, which complicates the design of the outlet, as well as the already complex process of sealing the joints (there is a high probability of residual standing water in the additional bend).
In addition, it will not be possible to change the installation location of the toilet if the distance from the wall of the previously installed toilet with a horizontal outlet was minimal. You will have to prepare a new platform for attaching the bowl to the floor. In modern technology for the construction of residential buildings, sewers are installed mainly under toilets with an oblique outlet. Although another arrangement of sewage systems is gaining popularity - for horizontal toilets.
And if we compare models with each other, without taking into account their interchangeability, then a toilet with an oblique type of outlet is considered a more universal system, since such a bowl can be connected to a sewer pipeline located at an angle from 0 to 35 degrees relative to it. That is, some errors in the location of the sewer line are acceptable, which is quite possible during the construction of high-rise buildings, when not everything turns out strictly according to the design as a result of previously unplanned circumstances
In addition, the process of installing a plumbing fixture with an oblique outlet is simpler, which is explained by the absence of a strict point for its installation and connection to the sewer. This cannot be said about the analogue with a horizontal outlet - here the outlet pipe must be located with the connecting pipe on the sewer strictly opposite each other.
What do you need to know when installing corrugation?
Whatever type of product you prefer, be it a corrugated toilet bowl with an outlet, straight or angular, its installation is carried out taking into account the same recommendations.
Preparing the place
It’s easier when new plumbing is installed after replacing communications. The task of preparation comes down to marking the space under the toilet and purchasing a corrugated hose of the appropriate model and length. Modern polymer sewerage, which allows free rotation of corner bends or tees on socket joints, allows you to give the drain riser pipe a convenient angular position. This also makes it easier to prepare for installing a flexible adapter and expands the choice of their varieties (angular or straight type).
In addition, if the sewer system is old, then it is also important to carefully remove the remnants of the previous drainage fittings (sealant, sealant, other contaminants). In addition to mechanical cleaning, it is also advisable to degrease the outlet socket of the fan riser for reliable adhesion of the sealant. The outlet of the plumbing fixture is also degreased.
Important! If the drain is connected to cast iron pipes (Ø 123 mm), then you will need a rubber cuff for the toilet, which is placed in advance on the sealant in the sewer socket. Without such an additional insert, it will be difficult to achieve tightness of subsequent joints of the drain fittings, since the standard diameter of cast iron elements is larger than plastic ones analogues.
Installation
Further installation operations are performed quite simply and do not require high qualifications from the performer. Any corrugation for a toilet bowl, reinforced or regular, not reinforced, is easier to install if it is first put on the outlet of the plumbing fixture, and then its other part is inserted into the outlet of the drain riser. This fit is especially convenient when the equipment is not yet secured to the floor with anchor screws. The following sequence of actions results:
- we put the end of the corrugated adapter with an elastic cuff on the outlet of the ceramic bowl, about 5 cm;
- we move the entire structure to the installation site;
- insert the free end of the adapter into the sewer socket until it stops;
- we finally level the toilet and fix it with anchors;
- If the toilet corrugation has a drain, we attach the washbasin siphon to it.
Despite the fact that the ends of the corrugated adapter have elastic fins designed for a tight fit of the drainage fittings, sometimes it is not possible to achieve absolute tightness of the connections.
In the process of joining all elements, it is recommended to immediately apply consistent sealants to the joints.
It is necessary to choose sanitary silicone compounds that, in accordance with GOST requirements, retain elasticity after polymerization, are resistant to waste liquids, and also block the development of microorganisms.