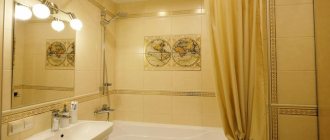
The bathroom is one of those places in the apartment that simply needs high-quality ventilation. With its help, excess moisture that appears after taking a shower and specific aromas of cosmetics or detergents go into the shaft. Maintaining an optimal microclimate prevents the formation of fungus or mold, condensation on the faucet, mirrors or pipes, the gradual destruction of finishing materials and damage to furniture.
But natural ventilation of rooms is not always effective, is it? Therefore, installing a forced exhaust system is sometimes the only way to eliminate steam and unwanted odors from the bathroom. However, long-term operation of the fan will inevitably lead to contamination of its components and a gradual decrease in performance. To improve the performance of the device, you need to know how to disassemble the hood fan, properly clean its parts and reinstall it.
In this material we will look at the structure of the hood, its step-by-step analysis, we will tell you how to quickly wash the device, mentioning why the draft in the bathroom can decrease even with a properly functioning hood.
Typical causes of device malfunctions
To understand the causes of possible malfunctions with the hood, you need to know the principle of operation of the device. It is based on two-stroke indoor air purification:
- All large molecular particles of the intake air volume are cleaned.
- Filters all macro- and microelements of incoming oxygen.
Metal filter
The further cleaning process depends on the type of device design (combined, circulation, evacuating) and filtration elements.
What malfunctions may occur:
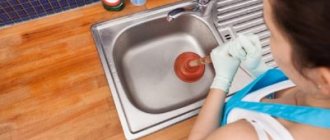
- There is a problem with ventilation in the apartment - a duct is needed before installing the hood. If it becomes clogged, then all the circulated air, filled with unpleasant odors, will return back to the apartment or to the neighbors, and condensation will settle on the windows. Checking the draft force is very simple: you need to bring a lit lighter to the ventilation grille. If the flame deviates towards the air flow, this means that everything is in order with ventilation;
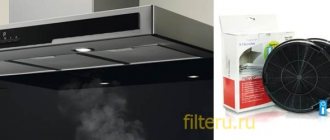
- contamination of the grease trap or filter in the hood - instructions for carrying out preventive work against contamination of the filters or for cleaning the grease traps yourself are included with the hood;
- malfunction of the lighting element - if the hood itself functions well, but the lighting does not work, most likely the light bulb has burned out. It is necessary to unscrew the grille and replace the lighting element; any housewife can easily cope with this task;
- lack of electrical power - this may be due to mechanical damage to the cord. A specific smell and soft insulation in small areas of the cord may indicate that it has burned out;
- problem with the switches - to eliminate this problem, you need to disassemble the hood and replace the broken buttons.
Switch board and button replacement
Also, the reasons for poor operation of the device may be a breakdown of the electronic interface, poor contact in the plug or socket, or loose terminals in the hood body.
In order to protect the device from power surges, it is worth purchasing a special voltage relay
Repairing a hood with your own hands is not difficult. It is enough to carefully study the mechanism of operation of the device, and the troubleshooting process will not be difficult.
Who should clean the ventilation in an apartment building?
18.04.
2018
- scheduled inspections and elimination of all identified system faults;
- replacement of broken exhaust grilles and their fastening;
- eliminating leaks in ventilation ducts and shafts;
- eliminating blockages in channels;
- troubleshooting dampers and throttle valves in exhaust shafts, umbrellas over shafts and deflectors.
5.7.1. Design temperatures, rates and air exchange rates for various rooms of residential buildings must comply with established requirements. Natural exhaust ventilation should ensure the removal of the required volume of air from all premises provided for by the project at current outdoor temperatures of 5 degrees. From and below….
How to clean ventilation in apartment buildings
Judging by the even flame, which does not deviate towards the decorative grille covering the ventilation hole, we can conclude that the shaft is clogged and needs urgent cleaning.
With normal air circulation in houses, the flame leans towards the shaft, and in some cases simply goes out.
With this behavior, cleaning the ventilation is not necessary, but if it was last cleaned at least six months ago, it is still advisable to do a little work.
Cleaning ventilation in apartment buildings and in production
Cleaning the ventilation in an apartment building should be done regularly and much more often than many owners believe. Specific deadlines are set by specialists after analyzing the condition of the air ducts. The recommended frequency of cleaning is 2 times a year (summer and winter), preventive inspection is quarterly.
Ventilation: what, how, why, when and who
At the dawn of mass housing development, each apartment had an individual ventilation duct, which eventually connected to the exhaust shaft. Over time, when houses became higher and higher, horizontal channels began to be installed between floors, and from them they directed air upward to the ventilation shaft.
Ventilation cleaning: cleaning ventilation ducts in an apartment building
The decrease in ventilation efficiency in old houses is, in principle, a fairly predictable process. The main reason is a simple blockage of the ventilation duct, which over time accumulates debris, dirt, dust and other waste coming from the premises. As a result, the outlet narrows and becomes unable to fully process the dirty air taken in.
Periodic inspection of smoke and ventilation ducts
c) during operation of smoke and ventilation ducts (periodic checks) - at least 3 times a year (no later than 7 calendar days before the start of the heating season, in the middle of the heating season and no later than 7 days after the end of the heating season) ;
Ventilation system maintenance
- Carry out maintenance at strictly approved intervals. You must not violate the terms of technical inspection of equipment and the manufacturer’s recommendations;
- start and stop the operation of the ventilation system in a certain sequence (such measures ensure the complete release of accumulated harmful substances from the air ducts);
- check fan units once a month;
- Check the duct heater for leaks once every 2 weeks;
- control timely oil changes when servicing oil filters;
- check ventilation grids and grilles for blockages once every 3 months;
- monitor the integrity of the sound-absorbing material.
Cleaning the ventilation in the apartment
Ventilation can be called the lungs of a living space. The benefits of an efficiently operating air exchange system are obvious to any person living in an apartment or private house.
It directly affects the well-being, health and safety of residents.
Regular cleaning of the ventilation in the apartment will ensure a comfortable stay in the house, and will also reduce the possibility of dangerous situations associated with ventilation shafts.
We recommend reading: How to rent land from the administration
Installation of ventilation and shafts in multi-storey apartment buildings
If an apartment building is not equipped with a ventilation system, all waste products of people remain in the premises. Conditions are created that are dangerous to people’s health and the safety of their property. Mold eats away walls and furniture, and residents suffer from allergies and asthma. Children and the elderly feel the worst in such apartments.
Who should clean the ventilation in an apartment building Link to main publication
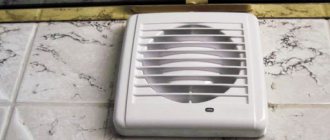
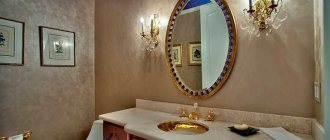
Bathroom ventilation
In this room, ventilation is necessary to remove large amounts of moisture that constantly accumulates here. Thanks to the presence of a hood, it is easy to breathe in the room, plumbing fixtures and household items do not deteriorate, and mold and mildew do not appear.
Recommendations from engineers when choosing bathroom ventilation
Engineers recommend not purchasing expensive, large equipment. The main thing is to correctly calculate the required power
Experts advise paying attention to the power of the wiring in the room. Since the hood has considerable power and pressure, the cable may be damaged due to power overload
When purchasing, quality, productivity, and dimensions are taken into account.
How to install a fan in the bathroom
When installing, you must follow the rules:
- remove the cover;
- Lubricate the places that will be adjacent to the wall surface with liquid nails or reliable glue;
- place the product in the hole in the wall (the working part is hidden);
- press the body well;
- install an anti-moxin mesh;
- Place the cover, securing it with dowels or self-tapping screws.
At the end of the work, the wires are laid, and the structure is connected to the electrical network.
The principle of connecting to the electrical network
The ventilation duct is separately wired for automatic activation by programming the device or a motion sensor. If the model has a cord, then you can turn on the system mechanically.
Control by turning the lighting on/off
Often electrical equipment is turned on at the moment when the lights in the room come on. But since an exhaust hood is usually necessary during bathing, this option is not very convenient - electricity is wasted, for example, during washing. Therefore, it is better to automate the system in order to save energy and provide additional convenience.
Why do you need a timer for a bathroom fan?
Equipped with a timer, the hood will turn on when the light is turned on, and turn off a few minutes after the person who took the shower has left the bathroom. During this time, the device extracts moist air. If the stay in the room was short, the structure will not turn on, since there is no need for its operation.
Connecting a bathroom timer
The timer is a compact device. It should be connected using 6 pins. To connect correctly, you need to use the diagram.
Bathroom timer connection diagram
Connection via switch
Before you start connecting the power wires, you need to turn off the switches on the switchboard. Then the front panel of the device is removed and wires are inserted into it through the channels.
How to connect an exhaust fan to a switch
The wires are connected to the terminals of the device located under the cover. In the absence of grounding, 2 wires are enough: phase and zero. The wires are connected to the terminals, secured with bolts, and a protective cover is installed.
Preparatory work before installing fans
- Remember that the exhaust fan will work perfectly only if fresh air flows freely through the gap between the door and the pogrom or door slots (grill).
- Installing a fan will be useless if the ventilation shaft is clogged. Read how to check its functionality here.
- Installation should begin only after connecting the fan to the wiring. Often, all this requires laying a separate electronic cable from the nearest junction box. Read how to do this correctly on this page.
- Sometimes it is necessary to expand the ventilation duct if the fan does not fit into it without effort. If the hole opposite is even larger in diameter than necessary, then you need to pick up and insert into the hole a plastic pipe that fits the diameter of the exhaust fan. Then fill the voids between the pipe and the wall of the bathroom or toilet with foam. After the foam has hardened, cut off any excess foam with a knife.
- Be sure to remove and check that the fan grille completely covers the unfinished area in the bathroom or toilet. How to remove the cover from the dospel fan, urgently otherwise I will break it. If necessary, putty and touch up the areas around the grille that it will not cover.
About the design of the most non-separable fans
This drawing shows a cross-section of the bearing assembly of a non-separable fan.
The impeller axle retainer, made of hard plastic, has three trap-type latches that securely hold the axle.
At the end of the axle there is a mushroom-shaped heel, which is pressed against the fluoroplastic gasket by the magnetic field of the engine. These two parts form a support bearing that prevents axial runout of the rotor. Small fans may not have a gasket.
The sleeve bearing is fixed with two or three latches on the engine frame.
To disassemble the fan, we will need to drill one or two technological holes. Through one of them you can cut off the latches holding the bearing bushing, and through the other you can knock out the axle or axle along with the retainer and bushing.
Installation and fastening of fans with glue in the bathroom, toilet
The exhaust fan can simply be attached to special polymer glue or watery nails, but I recommend using this method only if it is not possible to attach the fan to screws or dowel-nails. Keep in mind that it can only be firmly glued onto a clean, hard and primed base.
- Remove the cover from the fan.
- We connect the electronic wires and check the functionality.
- We apply glue, silicone, and watery nails to the junction of the fan and the wall.
- Press it against the wall of the bathroom (toilet) and hold it with force for a couple of minutes.
- We release the fan and give it several hours to securely adhere to the wall.
- Reinstall the top grille.
READ Floor fan spins but does not blow
We recommend cleaning the fan from dust and dirt from time to time to extend its service life.
This video and article are devoted to disassembling non-separable fans. But, not those in which the axle is fixed with a flat nylon clamp, but those that are destroyed when trying to use brute force during the disassembly process.
The proposed technology allows you to remove the rotor axis lock and thereby provide easy access for lubrication and repair of the bearing.
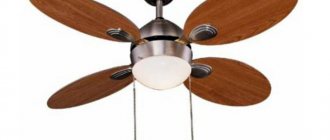
Standard diagram of a kitchen hood
Equipment of any modification of the hood (Krona, Bosch, Asko, Elikor) contains standard components:
- four-speed motor – provides regulation of the air flow power of the exhaust fan. Thanks to this, air masses pass through the filters, in which heavy fat particles are retained;
- filters – today there are many different filters for circulation modules: ceramic, carbon, hydrogen, carbon-plastic, fiber optic, absorption. They all work on the principle of rough cleaning of all types of material;
- lighting lamps. The cooking surface is illuminated with LED lamps, halogen, ultrasonic and other light sources;
- speed switching circuit - in various modifications of kitchen hoods, it is carried out using elements such as a switch, voltage regulator, dimmer, portable devices (switches, buttons, toggle switches).
Hood diagram
By installing a special application on your mobile phone, you can set the operating mode of the kitchen hood.
Types of ventilation devices for premises
There are two types of devices used in bathrooms - products of axial and centrifugal design. The latest fans are also called radial fans. Axial mechanisms look like a shaft on which an impeller with blades bent at a certain angle is pressed. When the engine speeds up, the air flow through these blades is drawn into the pipe.
Centrifugal fans operate on a different principle. In them, a stream of air is first drawn into the center, and then enters the housing with the impeller. Due to the rotation of the blades, the air flow rushes to the sides and then moves through the exhaust passage into the ventilation shaft.
In everyday life, users find the greatest use of overhead devices, since they work more efficiently and with less noise. Centrifugal type devices are divided into basic and with built-in operations. The latest devices operate in an automatic cycle.
Disassembling the device: step-by-step instructions
Dismantling external ventilation parts
To remove the engine, it is necessary to disassemble the external parts of the kitchen ventilation. In this case, you can gain access to the engine system.
To do this you need to take the necessary tools and materials.
Attention You need to prepare a screwdriver of suitable diameter. In this case, there should be several screwdrivers, since some parts can be voluminous and engaged with large screws, and some elements are microscopic in size and can only be dismantled with special tools designed for careful removal of parts.. When the engine is removed from the device, check its resistance windings
To do this, prepare in advance a bundle of wires that go from the board to the electric motor. In this case, you can simultaneously diagnose faults in the motor and try to repair it without removing it from the hood. The method is less convenient, since a complex of additional work will first be required. It is better to dismantle the engine itself and not touch other parts in the ventilation housing
When the motor is removed from the device, the resistance of its windings is checked. To do this, prepare in advance a bundle of wires that go from the board to the electric motor. In this case, you can simultaneously diagnose faults in the motor and try to repair it without removing it from the hood. The method is less convenient, since a complex of additional work will first be required. It is better to dismantle the engine itself and not touch other parts in the ventilation housing.
Cleaning and checking
- Whatever caused the ventilation motor to break down, remove the dirt and lubricate the bearing with oil.
- The dismantled motor is placed on a horizontal surface and the starting condensate is checked.
- If there is no short circuit, it is returned to its place.
- If the condenser is broken, it is replaced with a similar one in capacity and operating voltage.
After cleaning all the grooves, dry the small parts well. Cleaning can be done with a soft cloth that does not leave streaks or scratch the surface. After cleaning, the serviceability of the engine is checked. The problem of its failure to work could be due to clogging of parts. After cleaning, the structure can become serviceable.
When the motor is installed in place, its performance is checked. If the problem also persists, the ventilation works very poorly, which means the engine needs to be replaced or some of its components are broken. The device is again removed from the fan and its performance is checked in detail.
Testing and assembly
- If a broken electric motor cannot be replaced, then you can try to short-circuit its wires. This testing will help determine the performance of the motor with shorter wires. Repairs to faulty wiring are rarely carried out. Branded hoods are designed in such a way that the motors in them rarely burn out. This means that the operation of the motor cannot be disrupted due to electrical problems. But this only applies to modern technology.
- If we talk about a simple hood with a simple motor, then everything is much more complicated.
You will have to test and assemble such a part in the ventilation several times in a row. It is necessary to apply mains voltage to the working and starting windings. There are situations when the motor hums (this means the electrical network is working properly), but refuses to work. The engine may gain speed when turned on when cranking it manually. This situation indicates a fault in the starting winding. It needs to be removed from the electric motor and replaced. - The hood motor is checked by ringing the windings according to the diagram specified in the operating instructions. If at least one winding does not ring, then the engine must be repaired or sent to a service center. And in the most difficult cases, completely replace it with a working one, which not everyone can do on their own at home.
- Incandescent or halogen lamps are simply replaced. They are simply turned out of the hood and checked for functionality. In this case, the procedure can be performed in any suitable cartridge or base.
- Repairing LED systems will require additional steps.
You will need to remove the lamps and connect them to a low voltage DC source. An adapter-converter is connected to the system, which will help obtain the 3 V voltage required for the LED. The converter adapter is also checked with a tester to ensure it matches the voltage required for operation. When using a standard 220 V LED lamp in the system, repairs only involve cleaning the contacts in the lamp base.
Cleaning methods
After you have prepared all the elements of the hood for cleaning, you need to think about how the process itself will go. In order to cope with stains, you can use both special cleaning products and traditional methods.
Here are some of the most effective detergents:
- Baking soda, which everyone has in their household, works great for dried greasy stains.
- Laundry soap also copes well with stains.
- Dish detergent will be useful in this matter.
- Professional detergents are ideal for removing grease.
- In stores you can find special compounds designed for cleaning stoves and ovens.
How else can you clean the hood over a gas stove?
- A remedy for clogged sewer pipes.
- 9% acetic acid solution.
- Citric acid.
- Alkali-based grease removers - for particularly difficult cases.
You can find out the details and nuances of cleaning procedures by watching a video on how to clean a hood.
How to Remove the Cover From a Vents Fan
Cleaning the exhaust fan. extend the life of the exhaust fan
Installing a fan in the bathroom is a very good idea. Thanks to this, you can ventilate the room in a matter of minutes. Thanks to the fan installed in the exhaust pipe, the draft itself increases, which is useful for increasing the humidity in the bathroom or after a smoke break.
However, over time, especially if you go to the bathroom or smoke in the toilet, the hood becomes very dirty. As a result, traction weakens. In addition, over time, the lubricant in the motor bearings runs out, and the fan begins to work poorly and may even burn out. Therefore, it should be prevented periodically.
If your fan starts squeaking and changing speed through the wedge, don't rush to throw it away, it can still extend its life. First remove the fan. Usually secured with four screws. It is connected to the power supply using a regular two-wire terminal. It is convenient to connect the fan to a switch so that it can be turned on and off if necessary.
So the fan is very dirty, the motor jams and overheats, so it needs to be lubricated and cleaned.
Figure 1.
Disassembling the fan begins with removing the impeller. It is attached to the motor shaft using a collet clamp with a conical thread; the nut must be unscrewed clockwise.
Figure 2.
After unscrewing the nut, the fan impeller is easily removed from the shaft.
Vents hood repair. Replacing the wire.
The rupture wire came off. Get wet and get off. The hood had to be opened to replace it.
Rice. 3.
Turn the front of the fan and disconnect the motor wires from the terminals. Otherwise, the takeoff engine will fail.
And to remove the engine, it is secured with two screws.
Figure 4
The motor is installed in the fan housing using two screws. To remove the engine they must be rejected. When removing the engine, it must be supported. If you are disassembling a fan that has recently been running, wear gloves because the motor is hot. Or let the engine cool down before disassembling.
Here is the engine fan itself.
Figure 5
To lubricate the fan, apply a few drops of oil to the front and rear bearings. It is convenient to use a medical syringe with a needle. It is necessary to drip oil when the shaft enters the engine housing on one side and the other.
Let's be cool. Then clean and oil it. For lubrication, the fan requires literally two drops of machine oil, not a lot of pouring. One drop is needed for the front bearing, the other for the rear. Then turn the engine rotor (shaft) by hand to distribute the oil. You can immediately feel that the rotation has become much better. Now the engine will not jam and overheat.
We then remove all parts under running water.
Rice. 6
All plastic parts are washed with water and detergents. All parts must be thoroughly dried before assembly.
Now we assemble his fan and install it.
Rice. 7
Fan assembly. First the motor is installed, then the clamp is connected, and then the impeller is attached. The assembled fan is installed in place and connected to the power source.
We looked at how easy it is to bring an old fan back to life. In most cases, fan failure occurs due to contamination and lack of oil in the motor bearings. By cleaning and lubricating the motor regularly, you can extend the life of your fan. The whole job takes no more than 10-15 minutes and saves time and money that could be spent on a new fan for the bathroom or kitchen.
Household chemicals for cleaning hoods
Professional products are used for old stains. If the hood has not been treated for more than six months, home methods cannot cope with the problem. The following products are needed: Fairy, Shumanit, Green&Clean Professional, AmWay, Sano Forte Plus, Topperr, Mister Muscle, Silit Banks, Mole. They certainly have their advantages: they are narrowly targeted (they act on a specific type of pollution), require virtually no effort, and are used economically. But at the same time, these solutions can be aggressive towards metal and other materials from which the hood is made.
The method of processing components does not require more than 10 minutes and consists of soaking the hood parts in professionally prepared solutions. If there are no contraindications in the instructions, you can wash the grill and accessories in the dishwasher.
The mole cleaning method is considered the most radical. It can be used a maximum of a couple of times during the entire service life of the hood. It involves immersing the parts in Mole's solution (be sure to wear gloves while doing this). The reaction begins immediately. After treatment, you need to rinse the hood parts under running water for a long time. The alkali contained in the product should not remain on the components; it “eats” the metal.
We disassemble the kitchen hood
The need to remove the hood may arise not only due to operational problems. Periodically you need to clean the filter and wash the unit. For the average consumer, disassembling and dismantling the hood will not take much time. Manufacturers have done everything to make this process as simple as possible.
- Before dismantling the hood, it should be disconnected from the power supply.
- When disassembling the hood in the kitchen, re-read the instructions, since each model may have its own characteristics.
- Remove the filter grids located on the bottom panel by moving the latches (clips).
- Disconnect the light bulb connectors.
- Remove the fan: unscrew the impeller from the stopper and release it from the motor. Sometimes the design includes a spring clip or other fastening.
- The last thing to remove is the control board and the motor (there may be two of them).
Image taken from https://www.youtube.com/watch?v=tiDU69oE6mg
This is what dismantling the hood looks like. There are models that are even easier to disassemble, since they consist of blocks independent of each other. For example, to remove the motor, it is not at all necessary to remove the backlight unit.
Preparing the hood for cleaning
How to clean grease from a hood? Every housewife knows how quickly this type of equipment gets clogged and how difficult it can be to deal with a thick layer of fat.
Before you begin cleaning procedures, you should read the user instructions, since the hood will have to be disassembled.
Here are some tips we recommend you take into account:
- Under no circumstances should you disassemble the device without unplugging it from the mains.
- Next, you need to remove the hood cover. Using the instructions and a detailed diagram for assembling/disassembling the device, find its latches.
- Keep in mind that the pipe that is the ductwork also needs regular cleaning. Some owners simply replace the corrugation with a new one, but this method does not work with all models of ventilation systems.
- Then it is necessary to thoroughly clean the filter and the unit body itself from grease deposits.
Types of exhaust fans
All devices for forced exhaust in the bathroom are divided into several types:
- By launch method. Without control and with control via sensors and remote control.
- At the installation site. Wall-mounted fans are often used for exhaust hoods; they can be easily removed if necessary, for preventive maintenance or replacement.
But there are also ceiling ventilation devices; they have many advantages:
- high productivity;
- easy installation;
- the ability to hide the fan housing behind a false ceiling;
- nice design.
Ventilating devices for exhaust hoods are also divided according to installation depth. There are overhead fans and those built into the wall at one level.
- By type of construction.
In order to understand which fan is best suited for bathroom and toilet hoods, you need to understand their structure.
There are four of them in total, but only two types are used in everyday life:
- Axial. The most popular model for use in bathrooms, since its installation is the easiest. The device is a cylinder, inside of which there is a motor with blades on a shaft. You just need to insert it into the ventilation shaft and secure it.
- Radial (centrifugal). It received this name because of the principle of its operation when air masses rush outward due to centrifugal force.
There are also channel devices. These ventilation devices are used for exhaust in hospitals, schools, kindergartens and other institutions.
Industrial installations are also used. As the name suggests, such fans are used in production workshops and factories.
Pay attention to related topics!
They also discuss other methods of prevention and repair of fans. In particular, the process of disassembling non-separable fans with nylon clamps and the technology for restoring broken plain bearings are described.
How to Remove Dospel Fan Cover
Installing a fan in the bathroom or toilet
to install an exhaust fan in a bathroom, toilet or kitchen with your own hands, without the help of third parties. The whole process takes from 15 to 20 minutes. You will learn further how to do the installation correctly from this annotation. Answers@ how to remove the cover from a dospel fan. Before you begin installation, you need to connect the fan according to our instructions, and also choose the right one for the kitchen, bathroom and toilet.
Before installing the fan, I recommend that you read the instructions in the kit, which should carefully outline the installation procedure and features for your model in Russian. If there is no annotation or description, this most likely indicates the cheapness or low quality of the product you received.
AutoNews / Reviews / Tests
Sources:
https://autobryansk.info/ventiljator-dospel-kak-snjat-kryshku.html
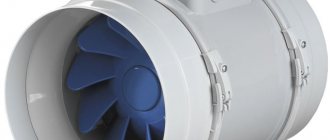
Duct fan
Today, the most popular type of fan is the duct fan. The reason is that its operating principle is similar to that of an air conditioner. It not only cleans the air, but also maintains it at a certain temperature. With all this, the channel type, by its structure, is the most difficult to repair. Therefore, few are able to independently identify the cause of its malfunction.
By the way, there may also be several reasons. From simple pollution to overheating of the electric motor. The reason, characteristic only for the channel type, may be the need to change the direction of the channel. In any case, the mechanism requires disassembly and careful inspection.
The duct fan itself is only part of the air filtration system, but it is its most important part. It directs air to the filtration and purification system.
Fan disassembly depends on many factors. First of all, this is the way it is assembled at the factory. The parts can be connected with bolts, screws, etc., or they can be welded. In addition, duct fans are assembled specifically for the filtration system. Depending on it, designs and assembly patterns may be different. Therefore, disassembly of the most popular type of duct fan – square – will be described.
For disassembly you will need a screwdriver and pliers.
Incision
Disassembly algorithm for a square-type duct fan:
1. Turn off the power supply.
2. Disconnect the working unit from the filtration system. The fan is the edge link of the system, so separating it will not be a difficult task. The pipeline is connected to one of the walls of the mechanism. As a rule, the pipe is not welded, but bolted. Therefore, it can be easily separated with a screwdriver.
3. Remove the machine from the wall. As in the case of a bathroom fixture, the duct cannot be disassembled without removing it from the wall.
Once dismantled, the entire mechanism is essentially a fan inside a large square box. Using its walls, the direction of the collected air is regulated. Therefore, if a change in direction is required, the box will be the main element of disassembly. The device itself, in this case, does not require disassembly. If checking the engine or assessing the integrity of the blades is required, dismantling and disassembling the fan itself is required.
4. Remove the blades. They are attached to the electric motor with a nut along the main working axis. The nut can be easily unscrewed with pliers. The electric motor itself is in most cases welded to the box, so it is most often not dismantled.
5. After removing the blades, access to the engine opens. On the back side, as in cases with other types of fans, it is attached with bolts
When removing and inspecting the motor, be careful not to damage the cables.
Backside. Motor housing
In addition to square ones, other duct-type devices are also widely used in ventilation systems. Their shape depends on their purpose and location. However, the difference between these machines is only in the shape of their “boxes”. The fans themselves operate according to an identical scheme, and, therefore, are disassembled in the same way.
To summarize, it is safe to say that fans are not such a complex system. They are quite simple to assemble and disassemble, but require accuracy and literacy. And if their disassembly and maintenance in proper condition is done systematically, then over time disassembly will become a familiar and simple process, and the mechanism will last much longer.
Cleaning the filter
So, it's time to solve the question: how to clean the hood filter? It is the filter that is the place of increased accumulation of dirt, dust and grease, as it protects the inside of the hood from contamination.
The filter looks like a multilayer grille with small cells, which are almost impossible to wash with bare hands. If the filter element is not very dirty, then cleaning it will not require much effort.
Just place it in a container of hot water and after a while treat it with detergent. Next, rinse the grille with running water and leave until completely dry.
If ordinary cleaning does not produce results, then you will have to use a more effective method - digestion. Select a suitable container, place filters in it and fill it with water.
The process can be repeated or the procedure time can be increased until the desired result is achieved. You should not often use alkaline preparations to combat pollution, as they can destroy the structure of the metal.
Selecting a ventilation device
When installing a hood in the bathroom, you will need to choose a suitable fan.
Let's look at the parameters you should pay attention to:
First you need to find out its power, that is, how much air it can move through the system. Basically, this value depends on the diameter of the product. Fan diameter. This indicator will be discussed in more detail below. An important factor is the design of the device. Some manufacturers produce fans with a replaceable outer panel. Models Elicent, Electrolux, Ballu are available in different shades of color. A beautiful and fashionable device can be placed so that it will be the center of attention when entering the bathroom. Or, on the contrary, you can hide it behind the panel and it won’t be visible
The only condition that must be observed is to prevent it from coming into contact with external electrical wiring, because the device will have to be located in an area of high humidity. When choosing, pay attention to the noise level of the fan, since excess noise in the bathroom is annoying. The noise level that does not affect hearing should not exceed 25-27 dB.
You also need to pay attention to the warranty provided by the manufacturer. If its duration is less than 12 months, then it is better to refrain from purchasing this model
Let's look at some of the fan's characteristics in more detail.
Power calculation
- First you need to calculate the volume of the room.
V= a × b × h, where:
a is the length of the room;
in – width;
h – height;
V is the volume of the room.
A. For example, a bathroom has dimensions: 1.5 – length; 1.5 – width; 2.8 – height. Find out the volume of the room by multiplying. It is equal to 1.5 × 1.5 × 2.8 = 6.3 m³. Round up to 6 m³.
- To calculate productivity, you need to multiply the volume of the room by the air exchange rate (this value is determined from the SNiP reference book). The number of air changes in a bathroom is 6-8 times, for a toilet this figure is 8-10 times. The specific number is selected depending on the number of family members who have benefited from the treatments in these rooms.
- Accordingly, from the table we select the required air exchange rate, for example, take the indicator 8 for the bathroom. Multiply 6 m³ × 8 = 48 m³/h. In other words, 48 m³ of air must be replaced in one hour.
Based on the calculations obtained, you need to select the appropriate fan for the bathroom. This usually adds up to 30% of the total performance of the device.
Device diameter
Nowadays on the ventilation equipment market you can find products with different air duct cross-sections. Classic sizes include: 100, 105, 125, 160 mm and others. The diameter of such devices must be selected, first of all, based on the size of the ventilation shaft opening.
Secondly, on the required parameters of the product. For example, the power of the exhaust device will significantly depend on the diameter of the blades. Obviously, the larger the diameter, the greater the productivity of the device.
In houses built in the 60s and 70s, the apartments are relatively small, and the best option there would be a diameter of 105 mm. In new buildings of recent decades, apartments are rented with a larger area; in this case, it is recommended to choose 125 or 160 mm.
What is an exhaust fan and its purpose?
This device looks like a small device that, using blades on a shaft, moves air through the pipes of the ventilation system. At the same time, it does not affect the natural exhaust into the bathroom, provided that a check valve is installed in the supply pipe.
Purpose
An extractor hood product will be in demand in places where dampness, smoke or a specific odor accumulate. Because unfavorable aspects lead to rotting and the formation of fungus or the appearance of dark spots on the walls and ceiling. And in order to solve these problems in a timely manner, it is necessary to restore the purity of the air to a state in accordance with sanitary standards. It is in these situations that a ventilation device can solve the problem.
The backlight does not turn on and/or the fan speed does not switch
Usually the lack of light in the hood is due to two reasons. The light bulb is burnt out or the switch is faulty. Poor contact on the switch often results in no backlight. On hoods with a mechanical control type, the button often gets stuck due to dirt getting inside. The problem can be resolved by disassembling and cleaning the switch. If the contacts are oxidized, then they are cleaned and everything is reassembled in the reverse order.
The inability to change speeds is also caused by faulty buttons. The speed is switched by several buttons located in one block. After removing the protective screen, check the integrity of the contacts and tracks on the board. If there is no visible damage, the circuit is checked by a tester. If the circuit is in order, the cause of the malfunction may be in the starting capacitor, which has burned out.
DIY hood installation
Before making a hood in the bathroom, you need to make the appropriate preparatory measures:
- First, you need to check the draft in the ventilation shaft by holding a lit candle or match near the hole. If the flame deviates towards the well, this means that the hood is working naturally. If the flame deviates back, it will be necessary to clean the vent. channel. If you suspect that the channel is tightly clogged, you need to call specialists. They will check the entire well from the roof of the house and fix the problem.
- Try on the purchased device. If the device does not fit into the ventilation hole, you can expand it, or exchange it in the store for another more suitable model.
- Remove the outer mesh and grid from the device.
It is also important to check the air flow into the room with the doors to the bathroom closed. You may have to install a special grille at the bottom of the door leaf or trim the door by removing it from its hinges to leave a larger gap at the bottom. These options will make the flow from the living room to the bathroom constant.
Hole preparation
If the hole does not match, and it was not possible to change the fan, then this can be corrected as follows. When the hole in the channel is larger than the cross-section of the device, then you need to insert a plastic or corrugated pipe into the hole and seal it with foam around the gap. And after it has cooled, cut off the protruding fragments of the filler with a sharp knife.
If the hole in the exhaust shaft is smaller than the diameter of the exhaust product, it must be expanded using a hammer drill and a bolt. To do this, you need to drill holes along the intended circumference, and then use a jumper to chop off the jumpers.
Selecting the optimal connection scheme
There are several methods for connecting ventilation to the power line. The fan can be turned on by configured sensors, or by turning on a light bulb in the bathroom. In the first case, it turns on after the humidity in the room reaches the maximum value.
The end of operation of the device can also occur in two ways: by a timer after a certain time or by a switch located in the bathroom.
Connecting the hood to the light bulb ensures that it starts working the moment the light is turned on. However, the device needs an individual switch so that these two chains can be disconnected: the hood and the lighting. It is usually installed on the wall, if it is not intended to be placed on the product body itself.
In the latter case, the fan is turned off by pulling the chain. If possible, choose a model with a long cord so that it is accessible to small family members.
Timer shutdown has its pros and cons. When leaving the bathroom, you don't have to worry about turning off the device. But if the fan does not completely remove dampness, and it is necessary to increase the time, then inconvenience arises. Therefore, it is better to purchase a product with a switch so that its operation can be controlled.
The procedure for carrying out installation work
Before installing the fan, you should carefully read the instructions. Remove all accessories from the box: fasteners in the form of four dowels and screws. If you don’t have the opportunity or desire to drill, you can glue the device’s mounting location to the wall. But if you have to change it, it will be difficult to remove the fan.
Let's take a closer look at the entire algorithm for installing a fan on an exhaust hood in a bathroom using self-tapping screws:
- remove the facing grille from the device by unscrewing the bolt or removing the latch (depending on the model);
- insert the product body into the hole in the exhaust well;
- make markings for the mounting holes, taking into account the location of the cable entry;
- remove the device from the hole;
- drill holes for dowels in the marked places (if you have to do this on tiles, you need to drill with care so as not to split them);
- insert plastic rods into the drilled holes;
- insert the wire into the technological window, align the holes with the dowels and secure the fan;
- open the terminal box and install the wires according to the diagram;
- lay the wires in special channels, close the box;
- check the operation of the device, turning on the light or from your switch.
Thus, the forced ventilation in the bathroom is set up and ready to remove damp air from the bathroom.