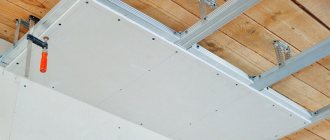
Installations - a modern method of installing toilets is increasingly used when renovating a bathroom. The installation system for wall-hung toilets consists of a metal frame from which the bowl is suspended, and all supply communications and systems that ensure the functionality of the device are hidden behind decorative cladding. Most often, the box for installing a toilet is lined with plasterboard and lined with ceramic tiles. Let's look at the general principle and step-by-step instructions on how to properly sheathe an installation.
How to work with drywall
Working with drywall means, first of all, creating a frame and then covering it.
Typically, plasterboard structures are used to create lighting, level walls, and construct partitions, arches and niches. Installing drywall with your own hands is as follows.
- Step back from the wall at least 3 cm (profile width), and make marks: using a plumb line or laser level, draw a line on which the plasterboard wall will be located.
- Attach the main guide UD profiles to the floor and ceiling. Their edge should follow your line.
- After this, you need to install vertical racks from CD profiles. To do this, they are inserted into the guides and screwed to each other with self-tapping screws.
- To give rigidity to the CD profiles, they are attached to the wall every 50 cm using hangers, which are fastened to the wall with two dowel nails. The hangers are screwed to the profiles with self-tapping screws, and their corners are bent.
The width of a standard sheet of plasterboard is 120 cm, so the distance between the centers of the CD profiles is 60 cm. After mounting the frame, insulation, electrical wiring, water pipes or heating pipes are placed in it. When installing plasterboard sheets on the ceiling, not only direct hangers are used, but also wire ties and “butterflies”, which have special steel “wings” that fix the ties at the required distance from the ceiling.
Types of fasteners for creating a frame Installing drywall on the ceiling assumes that you use special fasteners for this - anchors. Self-tapping screws for installing drywall are screwed in in increments of 25-30 centimeters.
We recommend watching this video, which shows the installation of drywall:
How to seal sheet joints
After installation is completed, it is necessary to seal the joints and screw heads in the drywall. When joining entire sheets, the edges must form the required shape, and when installing cut pieces, a chamfer is cut to ensure a triangular seam.
Use putty to fill the installation joint. The joint is reinforced with a painting mesh (serpyanka). Serpyanka is used after filling the seam with putty, then it is puttied clean. To strengthen the corners, you can use reinforcing perforated corners.
Nowadays, not a single apartment renovation can be done without such a practical material as drywall. If you learn how to work with it correctly, you will be able to create amazing designs for hiding communications, creating partitions and zoning rooms.
Finishing
The created surfaces will have to be prepared for further finishing. Especially if you plan to use tiles on plasterboard as cladding.
- First of all, the joints between the plasterboard sheets are sealed. To do this, a putty mixture is prepared, which is used to coat the gaps, and a sickle mesh is glued on top. Then such areas are once again covered with a thin layer of plaster (1-2 mm);
The process of sealing joints between sheets of drywall - When the joints are dry, they are rubbed down. The entire surface of the drywall is primed and puttied with a layer of gypsum mixture 1-2 mm thick;
- After drying, the surfaces are rubbed with a float.
The process of finishing a toilet installation If the installation was enclosed in a plasterboard box, then its edges are additionally reinforced with plaster corners. And the process of finishing such a structure is the same as the walls. Such a scheme can be changed depending on the conditions in which the installation is installed, but it is advisable to plan all the nuances. So that the installation of plumbing fixtures and its finishing do not create problems during the work process.
Working with profiles
As a rule, today no one uses wooden bars to mount the frame; instead, U-shaped metal profiles are used.
Working with drywall occurs using 4 types of profiles.
- Guide profiles for creating a frame, also often called PN or UW. They have a standard depth of 40 mm, and the width can be 50, 75 or 100 mm. Guide profiles are used to create the basis for fastening rack and ceiling profiles.
- Ceiling guides (PNP or UD) have the same functions as the previous profiles, but are used for installing suspended ceilings.
- Ceiling profiles (PP or CD) are designed to create a frame and lintels. They are inserted into guides and secured to the ceiling with hangers, crabs, and anchor clamps.
- Rack profiles (PS or CW) are used when it is necessary to install plasterboard partitions or to create walls. They are fixed into guides.
The main fastening elements for the frame profile are self-tapping screws, the length of which ranges from 9 to 12 mm. There are also rivets and assembly pliers (cutter) for connecting several profiles. The frame is attached to the wall or ceiling using anchors or dowels and nails.
Do not be intimidated by the large set of parts used when installing drywall. This is not a complete list of what professional builders use. In addition, do not forget that one-time work only implies the presence of direct hangers, CD and UD, dowel-nails or anchors.
Particular attention should be paid to the tools for installing drywall on walls. Since you will have to drill holes in profiles, walls and other materials, buy or rent a hammer drill, the impact force of which is 3-5 J. Using a hammer drill, making a hole in concrete is much easier than impact drill
She just can't handle that many holes. In addition, the hammer drill is perfect for mixing various mixtures for putty and installation. For this you need a special mixer attachment.
Equally important is a cordless screwdriver with a set of special attachments for screwing screws with different types of heads.
In addition to power tools, hand tools are also used:
- hammer;
- metal scissors;
- screwdriver;
- stationery knife;
- markers;
- laser level or hydraulic level;
- planer for drywall;
- pliers.
To attach one frame post with a height of 2.5 m to the wall, use five direct hangers, that is, 1 hanger every 50 cm.
To secure each, two anchors are used; a total of 10 holes need to be drilled. The distance between the posts is 60 cm, so for a wall 6 m long and 2.5 m high you will need 7 frame posts and 70 holes.
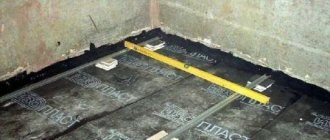
Performing markup
When all the preparatory work has been completed and the structure for concealed mounting of the toilet has been installed, markings are made for attaching the frame:
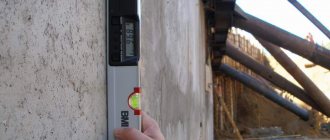
- In the example under consideration, the top sheathing is done to a minimum, so the mark is placed flush with the metal frame. If there is no laser level to align in one plane as indicated, the line is transferred using a square or a building level.
- Then the plane of the front frame post is transferred to the walls.
What material to cover the toilet installation with?
The installation box can be covered with plasterboard or gypsum fiber sheet. Builders prefer finishing installations with plasterboard because this building material is in an affordable price category and is universal in use. Its characteristics:
- Environmental friendliness
- Plastic
- Fire resistance
Therefore, plasterboard sheets are used in many areas of construction for repairs in a country house or apartment.
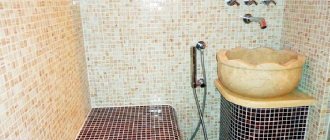
It is recommended to cover plasterboard sheathing with ceramic tiles to further reduce the level of humidity in the room. Install an electric fan in the bathroom to extract moist air from the room, which will prevent the wall from deforming.
Designing a drawing
In order to carry out all installation work correctly, you should draw a preliminary drawing of the plasterboard structure, separately for the box, ceiling and walls. It is also needed if a partition is installed between the toilet and the bathroom. In any situation, to create a drawing you must:
- draw the perimeter of the wall/ceiling;
- Apply the dimensions of the structure, be it a partition, box or sheathing of walls and ceilings.
Device diagram
If there is additional lighting in the ceiling, we also indicate the placement of the lamps on the diagram. Do not forget that when installing the box, you should think in advance about quick access to the pipes. To do this, you can make part of the structure removable or construct a door.
How to cover a toilet installation with plasterboard
Before you start covering the installation, you should check its serviceability: install the toilet, then open the valve and fill the tank with water. If you managed to drain the water, then the installation is ready for use.
Tools and building materials for flashing
In the process of fixing plasterboard sheets, the base for the frame will be used - plasterboard sheets and the installation system itself. You will also need the following equipment:
- Tape measure with marker
- adjustable wrench
- Screwdriver
- Bolts and dowels
- Self-tapping screws
- Hammer
- Silicone
- Level
- Pliers
- Drill with drills
This list is based on the main tools for working with the installation; in some cases, you may need other equipment for repairs. It is recommended to purchase bolts, screws or dowels with a reserve in order to add the missing part if necessary.
Creating a framework for the installation system
When all the necessary parts are available, you can create and fix the frame for the bathroom. Builders recommend following a few tips that will tell you how to properly cover an installation with plasterboard:
- Install the frame base in the same plane where the installation is located
- To form a frame, select a guide profile 27 by 28
- Sew the profile to the installation using metal-to-metal screws
- The profile groove must be directed towards the wall and ceiling, so it must be installed on top and on the sides of the installation
- Using a level, mark the limits where the frame ends
- The profile must be installed on the wall so that the groove is directed inward
When the base for the frame is created, you need to install the cut profiles 27 by 60 into the finished base. From profile scraps you can cut fasteners that will help install the profile to the wall.
How to finish an installation with plasterboard
Next is attaching the drywall to the installation. It is necessary to sew up the installation with plasterboard sheets in 6 stages, after which you can begin to operate the installed plumbing fixtures. Let's look at the main steps that will tell you how to cover an installation with plasterboard:
- Mark the building material according to the hanging plumbing instructions;
- Attach the first sheet of drywall to the front of the installation system;
- Before starting lining, secure the protective cover in the front cutout of the tank;
- All free sides of the installation must be covered with plasterboard sheets;
- Drill holes in the base frame that will connect the plasterboard flashing;
- Connect the steel frame to the system and secure the gypsum board with screws.
After you have covered the installation with plasterboard, install a profile to the wall and gypsum board to fix the top and side fragments.
Thanks to information on how to cover an installation with plasterboard, what materials to choose for covering, whether the installation can be attached to plasterboard, and how to create a frame, you have the opportunity to prepare for a bathroom renovation. If you follow the instructions correctly, the result will be a spacious bathroom with properly functioning plumbing.
Direct cladding: recommendations
Before you start covering, you need to cut out blanks and templates from the material; they must match the dimensions of the frame. From a sheet of material you need to form three strips with the parameters for the frame.
The first stripe is marked on the sheet. On the front side, a groove is cut along the markings using a wallpaper cutting knife. The sheet is placed vertically and broken along the cut part. The cut piece is held suspended and the layer of material is cut from below, so the first piece is separated. The second and third are done in the same way, after which these parts are applied to the frame and fixed.
Scheme of covering pipes with plasterboard.
The most reliable fastening is ordinary metal screws.
After work on fixing the frame and covering it with material, finishing work follows. It is necessary to take into account that the pipe must be accessible at any time for repairs or checking its serviceability, therefore, opposite the removable fitting part, you need to make a window through which you can get to this area if something happens.
As you can see, the work is not at all difficult. The main steps are:
- preparation of the surface of pipes and materials;
- frame work; where the profile connects to the working surface, it must be glued with shock-absorbing tape;
- covering it with plasterboard, the sheets are easy to cut, their edges must be processed and cleaned;
- if batteries and similar structures are lined, make several holes for heat exchange;
- box processing.
The corners are reinforced with metal corners, the joints are sealed with putty. Next, the structure is sanded and primed. Good luck!
«>
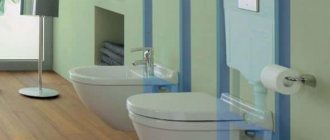
How does the installation for a wall-hung toilet work?
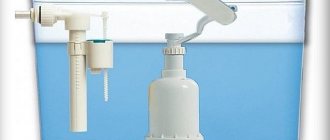
The main advantage of covering a plasterboard structure is the ability to leave only the toilet and flush button outside the frame. The installation system for a wall-hung toilet consists of 5 main elements: a metal frame, a tank, mounting holes, a valve and a drain outlet.
The metal frame is equipped with retractable rods that serve to adjust the height. The studs on the frame are designed for attaching the installation to the bathroom wall. There is a panel with threaded sockets into which you need to screw bolts to secure the toilet bowl.
The difference between wall-hung toilets and regular ones is the flat flush cistern. The base of the tank is made of plastic and placed in styrofoam insulation. This procedure helps protect plumbing from condensation. The water drainage system is installed in the front of the tank and is responsible for the functioning of the toilet.
The installation system is connected to the water supply through the hole for mounting the adapter. It is located on the side or on top of the cistern.
The main task of the valve is to shut off the water if necessary, dose the drain and prevent overflow.
The flush outlet is attached to the tank and allows water to flush when the toilet button is pressed.
Design Features
Before proceeding directly with installation, you should understand the design. Installing a wall-hung toilet will become much easier when you know its structure and operating principle. It will immediately become clear how to act correctly and what is necessary.
The main feature of the product is that only the bowl remains visible.
The basis of the entire structure is a durable metal frame. The visible part is directly attached to it. It is from this element that all installation work starts. The frame must be firmly attached to the wall and firmly placed on the floor. As a result, it should be able to support an adult without any problems. Based on this, we can say that it will not be possible to fix the frame to a weak wall.
The frame has an element that allows you to change the height of the bowl, which is secured using special pins. They are the main fasteners when installing a toilet installation.
A common option is to attach two installations at once - a toilet and a bidet.
The second element is a plastic drain tank. He is also hiding in the wall. It has a specific shape, because must fit in limited space. The tank is also installed in a metal frame and insulated with a special material that prevents the formation of condensation. There is a cutout on the front wall of the tank for mounting a drain button. Modern models, including floor-mounted ones, have a dosed water discharge - 3 or 6 liters.
The next element is the toilet bowl. The only part that is visible and in active use. It has a traditional shape, but some designer models have original configurations.
The delivery set contains all the necessary parts and accessories. The attached instructions can also show the entire installation sequence of the toilet installation.
What you will need for installation
- Guide profiles KNAUF (or Gyproc) PN 28×27 mm
- Ceiling profiles KNAUF (or Gyproc) PP 60×27 mm
- Sealing tape Dichtungsband
- Separator tape
- “Dowel-nails” (another name for “Quick installation”) 6×40 mm
- Cord release device
- Laser level or bubble level
- Aluminum rule 2.5 m
- Gyproc plasterboard sheets 3000x1200x12.5
- Seam putty (we work with Danogips Superfinish)
- Reinforcing tape for seams KNAUF Kurt
- Roulette
- Hammer
- Stationery knife (or special knife for cutting HA)
- Hammer + drill
- Screwdriver
- Metal screws 3.5×25-35 mm (black, frequent pitch)
- Self-tapping screws with press washer 4.2x13mm or shorter
- Deep penetration primer (Knauf Tiefengrund, Feidal Tiefgrund LF)
- Direct hangers
- Metal scissors or grinder
- ISOVER or KNAUF Insulation mineral wool 50 mm thick (if noise insulation is required), Penoplex boards (if thermal insulation is required)
- Narrow and wide spatulas
Universal traverse
The KNAUF company suggests using a universal traverse in its technological maps. Essentially, this is a wooden panel that is mounted inside the partition to secure built-in washbasins and flush barrels, as well as wall-mounted faucets. Not to be confused with installation!
The universal traverse is sold ready-made (see photo) made of high-quality moisture-resistant plywood. Galvanized profiles are fixed along the edges of the plywood.
Advantages and disadvantages
Installation toilets have the following advantages:
- Attractiveness and aesthetics;
- Minimum dimensions allowing maximum free space to be used in small rooms;
- The missing legs and support simplifies the cleaning process;
- Versatility of design, providing a choice according to taste and budget;
- Failures rarely occur, and if they do occur, repairs are not complicated.
The disadvantages include high cost. Taking into account the installation features with the need for additional work, the installation price can exceed up to 2 times the price of placing a floor-standing analogue.
But given the growing popularity, manufacturers have organized the release of relatively inexpensive models that are becoming available to a wider range of consumers.
Another disadvantage is the presence of hidden elements that are not very accessible for maintenance and repair.
Hanging sinks
A universal traverse, or simply an embedded wooden panel, allows you to easily attach a washbasin, wall-mounted mixer, or flush barrel to it (the traverse).
The crossbar is attached between the partition posts with four screws on each side. To strengthen the fastening, you can insert wooden blocks into the profiles, as when installing a door.
If there is no traverse, it can be replaced with a piece of plywood or board, which must be secured to the partition posts at the corners.
Niche preparation
Installing a wall-hung toilet involves using a niche to place the frame. As already mentioned, a certain strength of the walls is required for fastening. The installation design can withstand a weight of up to 400 kg, part of the load from which is transferred to the wall. This issue must be approached with special care.
In order to place the installation, you need to prepare a niche. It should be as follows:
- Height – 1 m;
- Width – 0.6 m;
- Depth - up to 0.2 m.
In some cases, creating such depth is problematic. In such cases, it is necessary to go deeper into the possible value, and hide the remaining elements with plasterboard panels.
By hiding the main part of the device, certain opportunities for decorating and improving the interior open up. It’s not worth just placing the installation near the wall and sheathing it with plasterboard, because... placing a toilet with a conventional layout will be cheaper and easier. In addition, it will take up less space.