- environmentally friendly material;
- strength;
- beautiful, aesthetic and expensive look;
- resistant to temperature changes and loads;
- good thermal insulation properties.
Some types of wood are sensitive to moisture.
Plastic
Finishing slopes and window sills with plastic is the simplest and most affordable method.
Recently it has gained great popularity (see Finishing window slopes with sandwich panels).
Preparatory work for finishing window sills and slopes with plastic:
- We measure the window opening.
- We calculate the quantitative composition of the required material.
- Carrying out an analysis of the placement of radiators and their distance from the walls.
Advice. Be careful: according to regulatory documents, the required distance for the protrusion of the structure along the wall from the outside of the battery. You can purchase high-quality plastic windows on the website www.okna-etalon.ru/windows/.
If you decide to save time and do the preparatory work yourself,
Watching the video may help you.
Materials for finishing slopes and window sills:
- A sealant having a soluble base.
- Polyurethane-based construction adhesive with primer.
- Foam for installation (two-component).
Don't forget to look at the instructions for their use, which are reflected on the packaging.
Stages of work
Next, work is carried out on the installation and plastic finishing of the window sill.
To do this, you should prepare wooden supports on which the window sill is supposed to be placed. The window sill is installed in specially designed grooves that are located at the bottom of the window.
Advice. One of the important points is to install the surface of the window sill at a level, so that it will have good rigidity during operation.
This completes the installation. Small installation work remains, which is carried out in the following order:
- To prevent cold from entering the apartment, the joints of the staging profile are closed first.
- Processing of wooden supports.
- Foaming the joint between the window sill and the wall.
- Placing a uniform load over the entire surface of the window sill.
Carrying out final work with silicone sealant. The finishing of the plastic window sill is completed, the finishing of the slopes is carried out in the same way.
Window sill tiling
- Special glue.
- Deep penetration primer. Tile.
- Plastic parts for installation work on the corners of the window sill.
- Tile grout.
- Glass cutter.
- Level.
- Putty knife.
- Pliers.
- Hacksaw (preferably small).
The basic materials have been prepared, you can begin to finish the window sill itself. You should choose a place so that the tiles lie on the windowsill in whole tiles.
Carrying out work
Installation instructions
Next, using a glass cutter, the places for cutting the tiles are determined and preparatory work is carried out on the entire tile for laying the pattern on the surface of the window sill.
- Next, the mortar is evenly applied to the tile using a special spatula, and the tile is laid on the surface of the window sill.
Advice. Before this procedure, a pre-cut decorative corner is installed in the future location of the outer corner.
Thus, the remaining tiles are laid, taking into account the required gaps between them.
- When laying tiles, be sure to use a level to avoid uneven surfaces. To prevent condensation from accumulating on the window sill, make an inconspicuous slope from the outer corner.
- After finishing the tile laying work, it takes about an hour to dry it. To give the window sill a beautiful aesthetic appearance, work is carried out to clean the cable from excess solution.
- Then the grout of the desired color is selected and placed between the tiles with careful movements.
Finally, you need to wipe the window sill with a damp cloth. The surface is ready and can be successfully used.
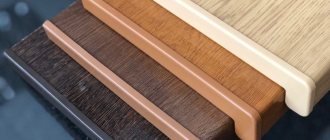
Window sill trim with wood
Wood always gives an apartment coziness and comfort.
It is completely compatible with the overall interior. The main wood species for finishing window sills with wood are:
- Oak.
- Chestnut.
- Beech.
- Red tree.
Preparatory work involves cleaning the area and upholstering it with shingles or felt to insulate the structure. Installation is carried out using lime-gypsum mortar, which is poured between pre-installed wooden wedges.
Photos of the design of window sills and slopes
Carrying out installation work
After pouring, the boards are laid. Its sorting begins from the bottom of the window opening:
- From the edges of each board you need to add 4 cm, which will go into the slopes.
- The boards are fastened with dowels.
- If the wall is made of stone, it is necessary to accurately calculate all the grooves and adjust the boards to fit them. To insulate the structure, cover the bottom and ends with felt.
- Using a level, make sure the surface is horizontal.
- After completing the work, fill all gaps and cracks with gypsum material. Carefully plaster the surface of the damaged walls and decorate according to the finish.
Window sill and slope - what to do with them
Finishing the window sill and slopes is a point that interests many
When glazing balconies, they usually cannot do without finishing the slopes; work on the window sill is also done.
Here you need to comply with some requirements and remember a number of nuances, because only in this case the finishing of the window sill and slopes will be done correctly and the result will be excellent.
The opening of the slopes, the finishing of which has already been completed, as well as the window sill - these elements should not be deformed or destroyed, which is facilitated by periodic getting wet and freezing.
When the work on facing the slopes is done efficiently, the window sill is installed correctly - this is a guarantee that the slopes will not crack or delaminate. Condensation will also not appear here - you don’t even have to be afraid in this regard. With all this, the thermal insulation properties of the structure will only increase.
- Craftsmen today identify three ways to finish window openings;
- We are talking about procedures that are easy to do with your own hands;
- A popular option is cladding sandwich panels made of plastic (PVC), hollow panels, wall panels;
- Finishing with plasterboard of increased moisture resistance - this method of cladding should also not be written off prematurely.
Window sill-tabletop made of plastic
This window sill clearly needs repairs, and the slopes need finishing
No matter how beautiful and high-quality the window is, it is the window sill that gives the window opening a finished look.
Excess polyurethane foam must be carefully removed
The hole between the window sill and the supporting wall is usually filled with polyurethane foam; all excess of this substance is easily cut off when it dries. Next, putty is performed.
Durable and high-quality finishing of window sills and slopes is quite possible, especially if you use plastic products.
Covering a window sill with plastic is a very simple operation that even a beginner in the world of construction and renovation can handle.
Here it all happens like this:
- First comes the preparatory stage. As part of this process, the window opening is carefully measured, it is found out how much materials are required for the work, what the consumption of ingredients will be;
- When the window is large (that is, its length is more than 300 cm), additional details cannot be avoided.
Such parts are needed so that all plastic surfaces can be easily connected to each other.
- The technician must take into account where the heating battery is located, how far it retreats from the window and wall surface;
- The window sill on the wall should be at least 500 mm away from the outer part of the radiator - these are the current standards.
Necessary materials and installation work
Plastic is exactly the material that is actively used today in the finishing of window sills and slopes
High-quality plastic finishing of window sills, regardless of the type of product, is an achievable result. You can achieve what you want by selecting the right consumables. Also, you need to choose the underlying structure.
- It is worth paying attention to assembly adhesive or silicone sealant. It is important that the base of the substance is soluble - this cannot be avoided;
- You can choose a construction adhesive that has a polyurethane base. It requires a primer;
- Specially designed adhesive is popular;
- Polyurethane two-component foam.
On the packaging you can always find information about how to use a specific product, what are the features of its use. A general requirement for all manufacturers is that the temperature in the room where the window sill and slopes are finished must be 18 degrees (no less, this is important).
To prepare a wooden support of the required thickness on which the window sill will be placed, proceed as follows:
- The plastic panel of the window sill must be attached so that it is parallel to the bottom of the window;
- The distance from the base to the bottom of the canvas is carefully measured;
- The surface of the plastic strip is an ideal place to mark all dimensions;
- Next, using an electric jigsaw, the master simply cuts out the product, which in the future will be a window sill;
- To install a plastic window sill, use a groove at the bottom of the window - you need to get into it;
- The surface under which wooden supports, prepared in advance, are installed, is set to a level - this requirement cannot be ignored. In this case, a certain step is maintained;
- Supports are needed so that the window sill has the appropriate rigidity, which is very important during operation - any specialist will confirm this;
- Now we can say with confidence that the installation of the window sill is almost complete.
The lower part is traditionally foamed, as can be seen in the photo
The lower part is foamed with polyurethane foam in a certain order. You need to act like this:
- First, you need to close the joint of the staging profile - to avoid the appearance of a “cold bridge”;
- Each of the wooden supports is carefully processed so that the fixation is optimal, as is the fastening;
- The last thing to foam is the outer joint, where the window sill connects to the wall;
- The load is placed here evenly - the window sill should stand there and dry for twenty-four hours;
- When the day is up, the structure will be completely ready for final finishing work. Typically, white silicone sealant is used at this stage.
Unusual solutions
New Year is a time of winter magic and fulfillment of desires. It is during this period that people pause, look back at the past twelve months, analyze what happened, draw conclusions and dream about the future.
That's when the inspiration for festive decoration of the surrounding space comes. Suddenly, the original decor of the window sill for the New Year will attract the attention of passers-by. There a whole picture opens up, similar to the setting of a fairy tale.
Around a small decorative Christmas tree there are figures of miniature animals, as if gathered in a round dance.
Under the most important winter tree there is a smiling Grandfather Frost with his granddaughter Snow Maiden. And fluffy snow is scattered in drifts on the windowsill itself.
Advantages and disadvantages
The advantages of plastic linings, compared to replacing an entire window slab, are as follows:
- Low cost.
- Quick and easy installation.
- Choice of colors to suit the interior.
- Possibility to make changes to the shape and size of the window sill.
- Long period of use and interchangeability if necessary.
The disadvantages include the same properties that are inherent in plastic window sills: fragility of the coating and instability to mechanical damage.
How to install a window sill to a plastic window yourself - supporting elements
In principle, hardened polyurethane foam has the necessary load-bearing capacity. But building codes stipulate that the window sill must rest not only on its layer. Professional installers use mounting wedges as support elements. For narrow window sills (up to 30 cm), they are installed in one row along the edge of the window sill farthest from the window. For wide ones, place a second row along the window frame. Along the length of the window sill, supporting elements are placed every 50-60 cm.
But both masters and home craftsmen do not always use special wedges. They are successfully replaced with improvised means, scraps of building materials. It is better to use elements not made of wood, but of plastic - they are durable, not afraid of moisture, and do not change dimensions during operation.
The use of support elements is convenient for another reason. – Many craftsmen make the grooves in the slopes wider so that during installation the window sill can be slightly raised. In this case, it is easier to fill the part of the space closest to the window with foam. This is especially important if there is no gun with interchangeable long nozzles. Then, in our case, we raise the window sill, blow foam into the part of the free space closest to the window, and then lower it tightly onto the supporting elements.
Slopes are done quickly and correctly
Long window service is ensured by compliance with three basic conditions:
- Making windows from quality materials.
- Compliance with window installation technology and technically competent installation.
- Finishing of slopes, taking into account local weather conditions and temperature changes.
A plastic window, replacing a wooden one, goes to a maximum depth of 70 mm, and although its characteristics are superior to wooden ones, it is necessary to comply with the required conditions when finishing the slopes, which not everyone knows, but can fulfill, so as not to get rid of mold and dampness later. The outer slope is sealed first. It reliably protects polyurethane foam, steam and waterproofing materials from atmospheric influences. The most common is plastering, with the only drawback being the duration of the work. The slopes will be ready in 2-3 days and this is the minimum period subject to strict adherence to technology. The plaster is applied in several layers, the first ones are made from heat-insulating mixtures and each layer requires complete drying. The last layer, the final one, is made from a regular plaster mixture. The finished surface is sanded and painted. Plastic slopes belong to the second finishing option and are a little more expensive than plaster ones. Plastic strips are available in a variety of shapes, differ in composition and colors, their installation takes a minimum of time and you can choose the material to your liking.
The interior decoration of window sills and slopes has a more varied choice, but we immediately dismiss the option with plaster as dirty, time-consuming, wet and cold, although its price is “budgetary”. The finishing with plastic slopes looks very nice. The material is in harmony with the window, has sufficient strength, is relatively inexpensive, light in weight, and the panels do not cause problems in operation.
Attention: To avoid damage, keep the protective films on the window and sill until installation is complete.
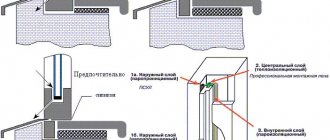
Installation of plastic slopes is facilitated by auxiliary materials and is carried out in several stages; the photo shows the finished work. So:
- The surface of the slopes is being prepared. Excess foam is removed, the surface is cleaned of unnecessary objects.
- The window profile is measured along the inner perimeter, the starting profile is measured and cut. The starting profile is being installed. A U-shaped strip along the edge of the window profile is secured to semi-cylindrical self-tapping screws with a drill every 20 cm.
- A 20x40 mm wooden strip is attached along the perimeter of the slopes for installation of the sheathing. The outer edge of the strip (slat) should coincide with the edge of the wall adjacent to the window opening. Fastening is done with dowels and nails every 40 cm. The strip is used to stiffen the plastic slope and serves as the basis for the plastic strip. It is possible not to achieve a tight fit of the wooden planks when connecting. The slopes will look ideal if the slats are fixed strictly vertically in level. The required verticality can be achieved by using wooden blocks for lining.
- The top panel of the slope is mounted, previously cut and inserted at one end into the groove of the starting profile and attached with self-tapping screws to the sheathing at the other edge.
- The side panels are installed similarly to the top panel and are also attached to the sheathing.
- The installation of the platband completes the work. It is cut from PVC F-profile according to the external dimensions of the window. At the points of contact with the screws, cuts are made and unnecessary pieces of plastic are removed. The F-profile is installed tightly into the panel.
- The seams are treated with white sealant to prevent the ingress of dust and moisture. Excess is carefully removed.
Attention: The F-shaped strip must be fastened only to the inner part.
The window is completely ready, it’s a pity that the window sills are a bit narrow. However, amateur designers and craftsmen worked on this problem and solved it with the help of an extension of the window sill, smoothly turning into a countertop or table. More on this in another article.
By trusting professionals, you get the best
If you want to buy a wooden window sill inexpensively in Moscow, please contact us by phone. Many years of experience, professionalism of employees, well-established relationships with reliable suppliers, the lowest prices in the region are the key advantages of the TBM Market company.
We work in the interests of the consumer. We provide competent free consultations regarding issues of purchase, delivery and technical characteristics of the product, convenient payment methods. We listen carefully to the requests and wishes of our clients. We consider their feedback and trust to be strong evidence of our competence, responsibility and integrity.
Preparation
Cladding work should begin with preparing the base. Old enamel, putty, etc. should be removed from the window sill. Don't forget to clean the surface from dust and dirt particles. Afterwards the window sill should be primed. Use a deep penetration composition for this.
Particular attention is paid to the choice of tiles. It is important to consider the size of the slabs. If the dimensions of the base are small, the recommended size of the finishing material is 15x15 or 10x10 centimeters. The compact finish minimizes the need for trimming and also plays an important role from an aesthetic point of view.
For larger bases, it is worth choosing larger tiles. You can choose varieties with dimensions of 30x30 or 40x20 centimeters.
Considering the rich assortment of modern stores, finding the appropriate size of finishing material will not be difficult. It is also important to take into account the aesthetic component.
Tabletop shapes
The choice of form depends on the intended project. First, the owners need to decide on the module itself, since the tabletop needs to be made one for the entire area. There are 3 main forms:
- Straight – suitable for a bar counter.
- L-shaped - you can intelligently play around with a small space and even place a refrigerator.
- U-shaped.
Which one to choose, everyone decides for himself. Experts recommend making a U-shaped design for those who have a large but very narrow room.
If the window does not correspond to the standard dimensions of the kitchen unit, the window opening is adapted to its height so that the ergonomics of the furniture are not affected.
DIY porcelain stoneware window sill
When covering a window sill in the kitchen, porcelain stoneware is suitable. Experienced builders highlight its strength, which is considered the highest among alternative materials. If the technological part of the work is done correctly, the porcelain stoneware will be wear-resistant and resistant to high temperatures.
The advantages include:
- life time;
- ease of cleaning;
- the ability to place hot dishes;
- integrity.
Cladding a porcelain stoneware window sill begins with preparing an adhesive solution. It is important to pay sufficient attention to this point, otherwise the glue will not perform its direct function and will not hold the tile.
The prepared solution is gently and without strong accumulation added to the work surface where the back side will be. It is recommended to apply the glue with a spatula in order to do it evenly.
When applying the solution to the work surface, make sure that the pattern and elements completely match.
The main thing is to maintain the gap between the dies. This will allow you to maintain symmetry in the installation of materials at the same distance from the previous one. Plastic crosses are suitable for this. They also differ in size. A sales assistant in a store can help you with a more detailed selection of crosses.
You will need to allocate space for an inclination for the base of the structure; the angle is kept small. The slope comes from the side of the glass unit and towards the street. This action allows you to avoid the accumulation of concentrate on the structure area. The created slope directs the resulting concentrate from the base of the frame to the edge so that it flows out.
Upon completion of the laying of horizontal dies, the laying of the end elements begins. After laying the tiles on the surface, they proceed to preparing and applying sealing materials.
Putties in dark colors are popular. Dark tile options will look good. Running options:
- Blue color (preferably dark shades).
- Beige.
- Brown.
- Burgundy.
When choosing an option, you should base your choice on the color of the selected tile.
It is better to give the solution as much time as possible to harden. Afterwards the work area is cleaned and washed.
When facing work, make sure that horizontal and vertical elements are joined in the right places. Otherwise it will ruin the whole design picture.
After cleaning the window sill, the surface is renewed and ready for use.
Selecting masonry type
In most cases, the master has to choose from two options:
- Along the area around the window.
- Perpendicular to it.
The dimensions of the base should be taken as the basis for choosing the type. It is necessary to minimize unnecessary trimming of materials. To adjust the die to the dimensions, use a regular type of glass cutter.
After determining the location of the incision, the area is marked with markers. Cladding should only be carried out on a smooth surface that is firmly fixed. Otherwise, you will not be able to trim the marked marks.
You should not be afraid to press hard on the laid material. If you press weakly, then there is a chance that the tile will not press through.
To do the job carefully, a rubber hammer will help, which should be used to slowly tap ceramic products in places where there is a potential cut. As an alternative to a hammer, you can use the handle of a spatula. But you should wrap it in something soft (for example, a towel) in advance, otherwise there is a risk of damaging the product.
Advantages and disadvantages
Advantages of plastic finishing:
- environmental friendliness;
- durability;
- giving a neat appearance;
- variety of choice;
- reliable adhesion to the window frame;
- perfectly flat surface;
- heat and sound insulating properties;
- reasonable price;
- high installation speed;
- possibility of self-installation;
- no additional steps are required to level the surface of the opening after dismantling the old windows;
- moisture resistance;
- ease of use;
- Possibility of use on arched structures;
- preventing fogging and freezing of windows;
- a small amount of dust, dirt after installation.
Among the shortcomings are noted:
- tendency to mechanical damage;
- poor quality of additional elements;
- inability to replace part of the panel if damaged.
Plastic instead of plaster: beautiful Slopes in 1 day
Plastering slopes is gradually becoming a thing of the past. Indeed, why endure dirt and strangers in the house for a whole week (plastering + painting) until everything is ready, if with the help of plastic panels everything is done quickly - in just 1 day! And by the way, plastic slopes, unlike plastered ones, will not crack either in a year or in 10 years, but will always look like new!
Window sill with increased functional load
When performing designer renovations in a small kitchen area, it is advisable to install a window sill, which will significantly increase the working surface. This technology is conventionally called “tongue”, when the window sill is significantly extended into the room and serves as a table.
Window sill “tongue” allows you to increase the working surface in the kitchen
Note! In order to significantly save money, you can finish the slopes and window sills with PVC materials with your own hands. In this case, you need to take into account that you will need to use a set of power tools, and you also need to have at least minimal practical knowledge of all repair processes.
Used as a dining area
If we consider this part of the window as a dining area, we can highlight several important nuances.
- If the kitchen is small, it is better to make a folding table.
- If there are several levels, then the hostess can complete several tasks at once. The first part, when folded, will be like a work area; when unfolded, it will be a dining area.
The big advantage of this solution will be the excellent illumination of the work area during the day and the absence of the need to use backlighting.
This option can also be combined if the balcony was designated as a living room. In this case, you can leave a mini-sofa or a furniture corner to spend time eating with the whole family.
If the window sill is located at a small height from the floor, place soft pillows with a blanket or a mattress on it, so you will have a cozy and bright reading corner.
Window sills made of artificial stone
In appearance, it is impossible to distinguish them from natural ones, but they are still lighter and cheaper, while being strong, durable, resistant to damage and high temperatures. Composites today are not inferior to natural materials either in appearance or in characteristics, which explains their growing popularity. Unlike marble, artificial stone cannot be damaged by spilling coffee or dropping something heavy. And the artificial surface does not need regular polishing and renewal of the protective coating; wet cleaning is sufficient. But it is not recommended to clean such window sills with an abrasive, like all others, this is the only thing that can damage them. Another undoubted advantage of such window sills is the ability to decorate all windows in the same style with identical boards; with natural stone this is unrealistic not only because of the price, but also because of the uniqueness of the textures.
When choosing a window sill, special attention is paid to the material from which it is made, the color scheme, which should be combined with the rest of the interior, and the mode of operation. But another important factor is the thickness of the board - the more intensive the intended use, the thicker the window sill should be. Especially if its width allows you to place a large number of flower pots, arrange a seat/bed or a play area for children on it.
The market has a large selection of not only window sills, but also countertops for work areas, as well as coffee tables. And the craftsmen of our portal have learned to cast furniture from concrete, including console window sills. The video is about homemade furniture.
Article rating:
How to decorate a window sill in an apartment Link to main publication
Related publications
- How to make a window sill on a balcony with your own hands
In the bedroom
In a small bedroom there is also a practical use for a window sill. It will make a wonderful dressing table, in favor of which you can put forward a strong argument: applying makeup is much more convenient in natural light.
We recommend reading:
Layout of a 3-room Khrushchev house: diagram, dimensions, height in a 5-story buildingThe combination of colors in the interior in a table with photos and examples
IKEA catalog 2021: modern new designs and 130 photos of the best branded furniture from manufacturers
Of course, you can’t do without lamps, since you often have to take care of your face in the evening. Sometimes they are built into the side window slopes, and sometimes a table lamp with a rotating shade is used.
To create a dressing table, you need to replace the existing window sill with a wider one. A problem may arise with the installation of the mirror.
To prevent it from obscuring the window glass, it is mounted on one of the slopes using a mirror holder with a rotating mechanism.
Since regular fabric curtains can get in the way when applying makeup, roller blinds or Roman blinds are used instead.
Advice from experienced masons
The cladding process will not be difficult if you pay attention to the following factors:
- Surface condition. The base must be complete. If during preparation you find cracks, large scratches, chips, empty spaces, etc., then the problem should be corrected. If you ignore these nuances, the finish will not be of high quality. The tile can simply crack.
- Choosing a base. A concrete base will ensure the durability of the structure and high quality of finishing in general. It will lie on any surface (wooden or plastic) without any problems.
- Surface condition. After checking the area of work, you need to make sure that it is firmly fixed in the opening and will not “ride” during installation.
- Choosing the tile itself. The most important aspect. The type of masonry and the complexity of the work depend on the size of the tile. The diagonal of the tile is selected based on the size of the base. If it is not large, then it is recommended to go with 10x10 or 15x15 tiles. This will eliminate the need for cutting and will give the surface a more attractive appearance. If the dimensions of the base allow you to choose a larger tile, then you can think between 30x30 or 40x20 centimeters. Any store has a wide range of products, so choosing a model is not difficult.
Installation begins only after a new double-glazed window has been installed and the external type of drip has been correctly installed.
Installation instructions
Fixation is performed using 2 methods. Let's consider the most popular option when you need to use sealant and wooden spacers. This is the most reliable way to install a plastic window sill at home with your own hands.
The operating procedure is as follows:
- We insert the plate into the prepared place. For fitting we use wooden beacons and a building level. We arrange the elements in increments of no more than 80cm.
- We place wooden support blocks at the front end. The distance between them is no higher than 50cm, and from the side slopes to the blocks - 10cm.
- Checks the angle of inclination a second time with a level. If there are discrepancies, then we adjust the thickness of the bars.
- We fill the hole between the slab and the concrete base with sealant. There is no need to completely seal the opening; we simply fix the aligned product.
- We place the load evenly on the window sill board so that the foam does not lift the window sill. Enough for 3-4 tanks of 5 liters each.
- Blow out the free space with foam. We use a construction gun to do the job neatly.
Advice! The slab should fit tightly with the window, and the gap between the wall and the window sill should not be higher than 4mm. - We give the structure 2-3 days for the foam to dry. Remove excess with a utility knife.
- If you find any cracks, seal them with acrylic sealant.
- We close the ends of the plate with plugs. For fastening you will need regular PVA glue.
All that remains is to remove the protective film from the product.
Types of jobs
Plastic finish
The most popular technology is when the installation of slopes and window sills on plastic windows is made from the same PVC material. There are plenty of advantages in this decor: lightness, practicality, low cost and ease of care. The advantages of plastic have made it the most popular construction consumable material for renovations in old housing stock and new buildings.
Most often, PVC panels are used for finishing slopes and installing window sills.
Plaster
The second method of decorating a window sill is carried out through plaster, further putty and painting. It is worth noting that although this method has the right to be implemented, it is actually used extremely rarely due to significant labor costs. However, this technology is very often used when installing slopes. Sometimes the final decor is completed by pasting with special moisture-resistant wallpaper. At the same time, slopes and window sills with such finishing have increased reliability; it is even theoretically impossible to damage them .
Plastering window openings is the most labor-intensive finishing method
Tile or mosaic
The third common option is tiling or mosaic. Window sills and the appearance of slopes with this finish look very original and unusual. Often this type of decor is used in a private house or cottage.
A mosaic window sill, in addition to its main function, serves as a decorative element
Tree
Another popular method of decoration is when the windows are decorated with wood. Cabinetmakers make very worthy models to order. Manufacturing window sills does not take much time, and the parts are installed using a technology similar to the simplest assembly of parts using the “constructor” principle. First, the window profile is installed, then the window sills are installed, and only then comes the turn of the right, left and top “extensions”.
Fans of natural materials choose wood for window decoration
Drywall
The combination of plasterboard slopes and plastic window sills is very common. This combination allows you to save on the purchase of plastic, but at the same time requires a lot of labor, since you have to install material of different types and properties.