A modern approach to wooden construction is the use of rounded logs. The material has precise dimensions and a cleanly rounded shape, which allows the construction of a log house without a large amount of waste that appears in the process of fitting logs to each other. But regardless of this, it is necessary to carry out a number of works related to the protection of wood, where grinding of rounded logs occupies a special place.
Sanding a log house
Choosing a grinder
If you can’t find a sandblaster, you’ll have to work with an angle grinder, preferably two in turn, so that the tool does not overheat. In addition, on one sander you can set the “grain” from 30 to 60 (remove the top rough layer of darkened wood), on the other - “grain” 80-120 (smooth and remove the raised pile of the log after the first treatment).
This wonderful device does an excellent job of sanding flat surfaces, but this handy thing may not be able to handle the task of cleanly sanding a rounded log. We will have to again consider the option with two grinders and special grinding attachments. But a good belt sander will do an excellent job of sanding walls made of timber!
Before buying a tool, look at where the machine takes air from. The correct air intake will be at the back rather than on the side to reduce clogging of the sander. The length of the cord is also important - it gives you freedom of action when working.
Which nozzle to choose for the job? Nozzle to nozzle – different! Some say flap discs are ideal, others prefer a wire brush. There is one rule for any attachment: it should be smaller in diameter than the area of the grinding machine. Otherwise, you may be seriously injured if the accessory becomes stuck in a crack or groove.
Having decided what to grind, try the weight of the tool on your hand - you will have to work for a long time and if the tool is heavy, then “your hand will fall off”, and you will have to grind large areas and this must be done quickly so that dirt does not have time to settle on the sanded surface before it is treated with a waterproof fire-resistant antiseptic.
Another factor in choosing a tool is its power. It should be at least 200-300 W, and the number of revolutions per minute should be 10,000-12,000. All that remains is to arm yourself with a respirator or a thick mask to protect against dust and sawdust and goggles for the same purpose.
Selection of tools for processing logs
Flap attachment for grinder Multifunctional tool
- grinder (angle grinder);
- belt sander or eccentric;
- grinding attachments (discs);
- bars with an emery base;
- chisel for processing hard-to-reach places;
- industrial vacuum cleaner;
- glasses;
- respirator;
- gloves;
- protective substances - fire retardants, antiseptics, acrylates, etc.;
- brushes or spray gun for applying products intended for wood processing;
- sealant for wood, warm seam (if there are cracks or such ideas);
- decorating paint or special oil impregnations (if desired).
What mistakes are made when working independently?
The grinder is the main tool used for processing logs made from chopped logs, the surface of which contains bark residues, knots, cracks and other defects.
- For primary rough processing use:
- special grinding and polishing wheels;
- wire brushes;
- universal bases to which replaceable sanding attachments with coarse grain No. 30-60 are attached.
- For stripping logs with old paintwork, bowl-shaped stripping attachments with twisted wires are best suited.
- The next stage after roughing is fine grinding, the purpose of which is to completely level the base and prepare the surface for painting or varnishing. It is performed using grinding wheels with fine-grained nozzles No. 80-120.
- If polishing of logs is planned, this operation is best done using fabric attachments.
It is not recommended to sand the entire area at once. It is advisable to treat the surface in parts, dividing the wall into certain zones. In this case, grinding productivity will be higher than when processing large areas.
A grinder is the most convenient and affordable tool for grinding, but in unprofessional hands it turns into a rather dangerous device, which can cause a lot of problems if handled improperly. Home craftsmen who do not have the skills to use an angle grinder very often make mistakes, which are the main reason for poor-quality grinding.
A typical mistake is working with an angle grinder at high speeds. Inexperienced craftsmen often find it difficult to choose the optimal disk rotation speed. As a result, the tool literally “burns” the wood at high speed, damaging its outer layer. In addition, high speeds contribute to the rapid clogging of the abrasive with wood dust, which shortens the service life of the nozzle.
- When working with tools, you should not allow high speeds. This will leave unevenness and grooves on the walls.
- When sanding coniferous timber, you must first remove any remaining resin. If this is not done, grinding will spread the resin over the surface in a thin layer and it will be almost impossible to remove it.
- Defects in the timber that are not coated with adhesive will become disheveled after sanding and will look more unsightly.
- After coating with varnishes or water-based paints, the pile rises. For complete leveling, after the first coating, re-grind with a wheel No. 120. You can use chemical-based compounds; they do not affect the pile.
- Sanding is carried out before the main finishing and installation of windows, doors, and ceilings. This will make it easier to remove wood dust, of which there will be a lot.
The faster sanding is completed, the easier the work will be. Over time, the wood hardens and performance will decline. Try to sand immediately after or during construction.
Why is sanding a wooden house necessary?
Most developers do not realize the importance of this operation, although professional builders insist on its necessity. Sanding a log frame with your own hands is a labor-intensive and difficult task.
During the grinding process, defects that arose during the previous processing of logs are removed from the surface of the logs, the appearance of the wood is significantly improved, and its structure is emphasized. In addition, grinding allows you to reduce the consumption of paints and varnishes.
If the surface of the log is well sanded, it is less susceptible to fungus and mold, which cause rot and damage to the wood. The rough surface provides an excellent environment for the reproduction and growth of harmful microflora. Despite the labor-intensive grinding work, it is still recommended to do it yourself, since, firstly, there is nothing complicated here, and secondly, no one can do this work better than the owner.
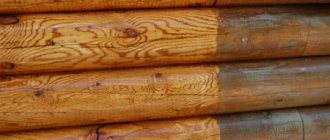
A fresh, newly built wooden log house has a pleasant warm golden color. After the logs dry out, the bast layer begins to peel off.
During the grinding process, the peeling is removed, as a result of which the walls of the log house look more attractive and neat.
If logs for a log house were processed with a plane, traces of the tool will certainly remain on their surface. The log turns out to be slightly faceted, since using a plane you can remove up to 3 centimeters of the wood layer. Sanding can completely remove plane marks and give the log its natural rounded shape.
When a log has recently been stripped of its bark, its surface remains smooth and even for some time. As the log dries, it becomes rough and fluff rises, which is also removed by sanding.
When is the best time to start sanding a log frame?
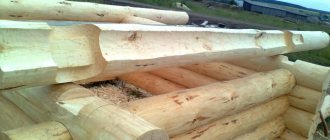
Before starting the grinding process, the frame must be completely assembled, including the roof. This condition must be observed so that sanding the log house with your own hands is not in vain. You cannot sand a newly assembled log house, since the logs are still quite damp (the grinding wheel will become very clogged). If the log house was assembled in the warm season, grinding can begin no earlier than a month after its complete assembly and installation.
Sometimes during the process of assembling a building, the logs manage to darken or turn blue.
In this case, they are pre-treated with a special bleaching antiseptic composition. Only after the surface has dried well can sanding begin. You should not try to sand a large area at once; it is better to roughly break it up into small sections. Each sanded area should be impregnated with an antiseptic composition as soon as possible.
If the sanded frame is not treated with antiseptic paint or varnish within a week, the material will begin to darken again. In such a situation, the processing process will need to be completely repeated. In order for the log house to be of the same shade, painting or other surface treatment must be carried out no later than four days after the completion of sanding work.
Step-by-step execution of grinding work
Grinding the timber
Let's start sanding the building:
We put on goggles, a respirator, and gloves to protect ourselves from dust; We do the work from top to bottom; we divide the surface into areas so that the work is done more efficiently; inspect the walls; we remove the pieces that have begun to peel off, otherwise we will damage the instrument; we treat the areas with peeled pieces with an adhesive composition and take a technical break so that the substance dries; we check the caulk, if there are gaps or cracks, fill them with a special sealant for wood; We begin to grind the surface with large nozzles to remove unevenness and roughness; we use fine-grained nozzles to remove lint; We carry out the work carefully: we do not press too hard on the surface of the walls with the tool, otherwise we will “burn” the wood, we do not make large turns so that furrows and unevenness do not appear; We pay special attention to polishing the ends of the log house, because they are most susceptible to the destructive effects of climatic and biological factors; We begin to process the ends using nozzles - from No. 35 to No. 120; We treat corners and hard-to-reach places with a chisel; thoroughly clean the surface from wood dust with a vacuum cleaner; we apply protective agents to the walls - antiseptics - help prevent the development of fungus and mold, glazing substances - make the wood more beautiful, fire retardants - increase resistance to fire, acrylates - protect against the harmful effects of climatic factors; We paint the frame after sanding (if desired). In principle, sanding a log house with your own hands is a simple but painstaking process, so if you are not confident in your abilities, use the services of masters of construction art
In principle, sanding a log frame with your own hands is a simple but painstaking process, so if you are not confident in your abilities, use the services of masters of construction art.
By the way, watch the video below. Conventional sandblasting is used here. I used this method to make drawings on mirrors 10 years ago. One friend and I used this method to clean the old sides of his GAZ car and clean the rusty metal garage doors. The result is good, you just need a powerful compressor and a large amount of fine, clean quartz sand.
Sanding, done meticulously, will allow your home, bathhouse or any other structure to look flawless, causing incredible delight among guests, indescribable joy among household members and the greenest envy of neighbors!
That's all. I would like to believe that someone found the article useful. Bye! Bye!
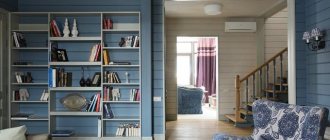
Features of working inside the house
Indoors, the workflow will be two different. Firstly, since external influences on the surface of the log house inside are less aggressive, grinding will initially require a tool with fine wheels or discs. In general, the emphasis should be on finishing cleaning with a polishing effect and with a view to decorative finishing, which is demanding on the condition of the surface. Secondly, any mechanized grinding of a log house is accompanied by abundant emissions of fine wood dust. Indoors, such waste not only pollutes the space, but also harms health. Therefore, two measures should be taken:
- Arm yourself with personal protective equipment, including a filter mask (or respirator), goggles and leather gloves.
- If it is structurally possible, then connect a pipe for a construction vacuum cleaner to the grinder. With this equipment, the tool will direct waste directly into the dust extraction bag.
What to look for when choosing a tool
A job such as polishing a log house or a bathhouse cannot be done without modern power tools. With its help, the work will be completed not only quickly but also efficiently. You will find many different options on sale, we will look at them below.
• Belt sanders
https://www.youtube.com/video/o-5D4aSjrvY
• Orbital sanders
• Delta sander
• Random sander
Belt sanders are used for aggressive and rough surface treatment. This tool can be used not only for processing wooden surfaces, it can easily cope with plastic and metal.
The machine can quickly remove a thick layer of surface; for example, you can sand an unplaned board, timber, or log.
The working mechanism is an abrasive belt closed in a ring. There are a wide variety of such belts available on the market with different grains.
Please note that the larger the grain, the rougher the surface is processed and the thicker the layer removed
When purchasing such a tool, you should pay attention to the width and length of the abrasive belt used in the tool; its rotation speed is also important. Standard dimensions are: 76x457 mm, 76x533 mm, 76x610 mm, speed should be in the range from 150 to 500 meters per minute
Depending on the volume of work that lies ahead of this tool, you need to select the power, generally it ranges from 400 to 120 W.
Abrasive belts for such tools come in two types - a surface made on the basis of aluminum oxide or zirconium oxide. For wood, zirconium tape is used; it makes a more aggressive treatment. But aluminum oxide is used for fine metal processing; such a tape can even sharpen tools.
Orbital sanders
With this tool you can process any flat surfaces, it can be wood, metal, plastic and even plaster or putty.
The grinding process is carried out thanks to the circular and oscillatory movements of this tool. The amplitude can reach 5–6 mm and even more. Using it, you can do fine processing, the degree of which will depend on the amplitude of vibrations, which can be smoothly adjusted by the tool.
Sanding wood with a grinder is the most common and affordable way to sand a wooden house. Typically, an angle grinder is used for grinding a frame made of planed logs. Using a grinder is also convenient for sanding grooves and ends of logs. Actually, with this tool, if you have the skills, you can process any lumber.
Model selection
There are both household and professional models that differ in power and performance. You shouldn’t buy the cheapest grinder; its power is unlikely to be enough to polish the entire frame. Expensive professional models are also not the best choice for home use. They operate at high speeds and are distinguished by considerable weight and power. A non-specialist, without the knowledge of working with such a tool, can simply ruin the surface being sanded, leaving dents on it.
It is best to opt for:
semi-professional models with power from 800 to 1000 W
This will be quite enough to polish the frame. It is advisable to buy a tool with a rear air intake rather than a side one, so it will become less clogged with dust. You should also pay attention to the cable length. A cord that is too short is inconvenient to use.
Nozzles for an angle grinder
To work, you will have to stock up on attachments on which the abrasive is fixed. There are two types of nozzles:
- Rubber
- Plastic.
Abrasive wheels
For grinding use regular
or flap grinding wheels. Sanding a log frame is a very dusty job. A lot of dust is released, which, together with tree resin, gets clogged into the disc, the abrasive quickly wears off, so the grinding wheels quickly become unusable.
During rough processing, one disk is enough for about 3-5 meters of log, then it has to be changed. Consumption depends on the condition of the wood and the type of surface. How many fine grinding discs are needed depends on how thoroughly the initial processing was carried out.
The alpha disk, which is a metal disk with pobedite chips soldered onto its body, has a longer service life. Grinding timber with an alpha disc allows you to significantly save on consumables. A disk clogged with sawdust can simply be cleaned with a wire brush and you can continue to work calmly.
How to sand logs
To grind logs and beams, you can use two types of tools: eccentric sanders or grinders with appropriate attachments.
Sanding planed logs from the outside
It has long been known: how many people, so many opinions. And choosing a tool for grinding a log frame is no exception. Some people work exclusively with grinders, and others only with grinders. For some it is more convenient and faster to work with petal discs, while others do not accept them at all and work with wire nozzles. The choice is yours. We only tell you how to do it. Choosing a grinder To grind a frame made of planed logs (from under a planer), angle grinders are used, which are usually called grinders. Choose not the most expensive, but not the cheapest models. Cheap ones usually break down very quickly: they belong to the household class and have a short working life. Sanding of a log house is necessary both inside and outside; the area is considerable, so the resource of household tools is barely enough for one or two walls. Therefore, when choosing, it is advisable for you to find either an inexpensive professional or semi-professional model. They are usually in the mid-price range.
The power of the grinder is approximately 700-1000 W. If you wish, you can take a more powerful one, but for woodworking this is more than enough. More powerful ones are harder to work with: they themselves weigh a lot, and it will be more difficult to control them. And every awkward movement is a hole in the log, which will then have to be leveled.
125 mm discs are the most convenient to use, so choose a model for them. But these are only recommendations. You can work both larger and smaller. Who's used to it?
Idle speed - 10,000-12,000 rpm. Moreover, it is very desirable that the tool has speed control, and preferably a smooth one.
Pay attention to where the air intake comes from. In order for the grinder to clog less during operation and work longer, the fence should be at the back (not on the sides)
It is also important that the handles are comfortable and that the machine itself is not heavy. So try each one on and hold it in your hands.
Pay attention to the length of the cord - the longer, the more freedom of action it gives.
There is one more subtlety: for work it is better to use not a rubber, but a plastic attachment (on which the abrasive is attached). Plastic, although thinner, lasts longer. If you accidentally touch the surface of the wood with the rubber tip, it will leave a black mark on the wood. This won't happen with plastic. Grinding discs For initial rough grinding, use flap discs with a grain size of 40-60. You can simply use an abrasive with the same grain. It's convenient for anyone. The disc consumption is high: one per 3-5 meters of log. It may be more or less: it depends on what layer you need to remove and how smooth the log was before processing. If it was rounded, the consumption was less, if it came from under a plane, it was more. But it’s better not to skimp on these discs; as soon as they get dirty, change them: the work will go faster, and the grinder will work with less load.
The consumption of fine grinding discs depends on how thoroughly you treated the surface the first time. It is better to take this fine abrasive with Velcro - it changes faster. Here the grain size is 100-120.
In addition to the discs, you will need to buy cushions for the attachments. On one side they are covered with a sticky compound, to which abrasive discs are then attached. These pillows wear off on the sides, and the adhesive side also stops working. So this consumable will also come in handy.
Sanding rounded logs
Since the surface in such a log house is already flat, using a grinder with a lack of experience will only lead to the appearance of furrows and holes - traces of too much pressure. Then they will have to be compared for a long time with smaller grains. Therefore, eccentric sanders are often used to process rounded logs. They are less productive, but if the pressure is too strong, the sanding disc is blocked. This allows you to make the surface even and smooth even without experience.
The power of these machines is more modest - 200-300 W, the speed is approximately the same 10,000 - 12,000 rpm. Many models have a dust collector. This is a big plus when working indoors, but this plus is also reflected in the price. The selection principle is the same: good quality, semi-professional or professional model that fits comfortably in the hand. To sand a log frame, it is also advisable to have two machines: on one, put discs with a grain of 30-60 to remove the darkened layer, on the second, set a fine grain of 100-120 to smooth the surface and remove raised wood fluff.
How to sand timber walls
The tools used are the same as for processing logs. A specific choice can only be made by assessing how deeply you need to remove the top layer of wood.
If the bathhouse is made of profiled or laminated timber, most likely you do not need to level anything. Just remove the top darkened layer, if there is one. In this case, if you have a sufficient level of proficiency with an angle grinder, you can work with it. If you don't have enough experience, use an eccentric sander. It will take longer, but the result will be guaranteed to be at least good.
If the walls are made of ordinary timber, then you will have to do a lot of leveling. You can’t do without a grinder here. Moreover, in some places it will be necessary to remove a couple of millimeters of excess - non-ideal geometry and errors in cutting bowls lead to the fact that the difference can be quite significant.
I found a video fragment about a very interesting Pobedit grinding disk, which, it seems, can easily cope with rough grinding and easily remove excess thickness.
If the walls are made of ordinary timber, then you will have to do a lot of leveling. You can’t do without a grinder here. Moreover, in some places it will be necessary to remove a couple of millimeters of excess - non-ideal geometry and errors in cutting bowls lead to the fact that the difference can be quite significant.
Unlike hand-cut logs, rounded logs and beams have a smooth surface, which causes certain difficulties when processing them with a grinder. One awkward movement - and deep grooves and depressions will appear on the surface of a beam or rounded log that will remain there forever.
Working with an angle grinder is not for beginners; it requires certain skills. An angle grinder is a high-speed machine and, if handled improperly, can damage the surface. Do not press the tool too hard onto the area being treated. Sanding should be done with smooth circular movements, holding the grinder at an angle of 45 degrees. Grinding and polishing of timber should be done at low speeds. High speeds can lead to thermal destruction of the top layer of wood.
Before starting grinding work, the walls need to be inspected. If there are pieces of the “Radial Structure”, in other words, peeling off, then during grinding they will become shaggy and damage the tool. Such places are treated with an adhesive composition, after which the walls are allowed to dry for about a day. This technology has proven itself not only for timber with natural moisture, but also for chamber drying.
After sanding, you should not wait, but it is better to immediately treat the walls with special compounds.
When grinding, special attention should be paid to the ends
Sanding the ends
Our grandfathers used a blowtorch or a hammer to save the ends. Roasting is an old and proven method that really increases the life of wood. But at the same time, the appearance of the timber changes to unattractive, as in the photo. The ends were tapped with a hammer to completely connect the fibers and plug the channels. This makes the surface hard and smooth.
Modern methods and numerous attachments allow processing until the ends are completely smooth. To do this, first use nozzle No. 35 and gradually reach 120. With proper sanding, the ends will not absorb paint as forcefully and are less likely to crack. They need to be treated with special compounds for the ends. You can use liquid glass.
After sanding, all dust from the walls must be carefully removed.
Particular attention is paid to connecting locks. Indoors, dust can be removed using a simple vacuum cleaner and a long-bristled brush. It is blown out from the outside and cleaned with the same brush
It is blown out from the outside and cleaned with the same brush.
Corner processing
For grinding corners, it is recommended to use the same grinding attachments, but having previously upgraded them. The rubber part of the nozzle is cut to 6-7 cm in diameter. This makes it easy to treat hard-to-reach places.
If there are completely inaccessible areas, then you can use a chisel or a block with sanding paper.
The rounded log needs to be sanded dry, after shrinkage at home. Before sanding, check the caulk and reapply if cracks appear.
It is important to caulk before sanding, as it can be damaged while working.
There is no need to process a rounded log with coarse attachments. They use a grinder for grinding; it is more difficult to work with a machine on rounded surfaces. At the first stage, the rounded log is sanded with a grinder with nozzle No. 100. It will raise the hairiness. Then No. 125 which will level the surface. Corners and connecting parts are processed manually.
If you sand without errors, the surface will look smooth as in the photo and pleasant to the touch.
Log grinding technology
You can start sanding the frame only after it has dried thoroughly. If you try to sand immediately after assembly, the wet wood will scuff and you won’t be able to get a beautiful smooth surface. For sanding, you will need a supply of attachments with different grain sizes. For the initial processing of logs with bark residues and various types of unevenness, you will need sandpaper with a coarser grain (40), and for the finishing pass - with a fine grain (80-100).
Below is the correspondence between the numbers of imported and domestic sandpaper:
| FEPA grain size | GOST grain size | Average grain size, microns | Recommended Application |
| P12 | №160 | 1815 | Rough processing. Ripping off |
| P16 | №125 | 1324 | |
| P20 | №100 | 1000 | |
| P22 | №80 | 800 | |
| P24 | №63 | 764 | |
| P30 | — | 642 | |
| P36 | №50 | 538 | |
| P40 | №40 | 425 | |
| P50 | №32 | 336 | |
| P60 | №25 | 269 | |
| P80 | №20 | 201 | Medium processing. Smoothing the surface, removing small irregularities. |
| P100 | №16 | 162 | |
| P120 | №12 | 125 | |
| P150 | №10 | 100 | Fine processing. Final sanding. |
| P180 | №8 | 82 | |
| P220 | №6 | 68 | Very fine processing. Sanding before painting. |
| P240 | No. M63 | 58,2 |
Keep in mind that you will have to change the attachments often, since the abrasive wears off and becomes clogged with wood dust and resin. To slightly extend the life of one attachment, you can clean it with a wire brush and white spirit. But the work productivity after such resuscitation will still be significantly lower than the initial one. The grinding speed depends on the availability of the appropriate skill, the power of the tool and the amount of resin in the wood. On average, a linear meter of log with a diameter of 30 cm is sanded in 2 minutes/When sanding wood, a very large amount of wood dust is released, which gets into the eyes, mouth and nose. Therefore, all grinding work should be performed using protective equipment - a respirator, goggles or a special mask.
How grinding is performed is shown in the video below (click triangle to view):
Advantages of the technique
Non-contact grinding of log frames ensures very high quality processing. The main advantage of the technology is the uniform removal of the top layer of wood, which is almost impossible to do manually.
After sanding, there are no traces left on the logs in the form of scratches, dents and irregularities, which very often appear on wood after processing it with a grinder, especially in cases where people who do not have professional skills take on the work.
If we summarize all the advantages of the sandblasting technique, then in addition to the above, they look like this:
- High processing speed, which is four times higher than grinding with a grinder. Abrasive jet grinding allows processing up to 100 sq.m. wooden surface in one working day. But it should be borne in mind that these terms are relevant for new buildings; when sanding an old house, the time doubles.
- The impeccable quality of log polishing, provided that it is performed by qualified specialists, does not raise any complaints even among the most demanding customers.
- The technology allows you to process any areas of the log house to perfect condition: corner joints, chamfers, joints, inter-crown seams.
- As a result of processing, the wood is compacted by removing the soft layers of wood. This ensures better absorption of protective agents and longer service life of the paintwork.
- Possibility of treating darkened and fungus-affected surfaces without prior bleaching with special products.
Some nuances at work
The technology for polishing a log frame is not as scary as it is made out to be. The main thing is to stock up on quality tools, materials and patience. In addition, you should pay attention to some nuances. That is, the work is performed after:
- installing the roof to prevent rain from soaking the walls;
- drying the wood, otherwise the abrasive grinding wheel (wheel) will clog and the wood will become “ruffled” (the nominal drying period is about 12 months from the date of construction of the structure);
- treating the material with a bleaching antiseptic, since the log house darkens during the drying process.
In addition, if the frame is not treated with paint or antiseptic within 7 days after sanding, the surface will darken and the entire work will have to be done again. Here is an article about how to paint a log bathhouse.
It is also not recommended to delay the finishing, otherwise you can forget about a uniform, attractive shade. And yet, the work is done before installing windows, ceiling and floor coverings. I think you understand why: there will be dust - “mother, don’t worry.” So, let's go.
Wood polishing
Polishing wood products and wooden structures is used to prevent natural hairiness and cracking of wood; polishing enhances the attractiveness of the texture and protects it from external factors. Most often, polishing timber is used for finishing furniture and interior decoration. Technology includes:
- Grinding for polishing. Preparing wood for polishing differs from ordinary sanding; at the final stage of processing, fine-grained abrasive material No. P150-P180 is used.
- Primer. The operation is performed to seal microcracks and pores, strengthen the top layer and prevent the formation of fibers. Transparent impregnating mixtures are used for priming; the layer is applied with a swab or a flute brush. The most common compositions have a casein-rosin and nitrocellulose base. All types of primer are applied in 2-3 layers, the next layer is applied after 1-2 hours.
- Polishing. Apply 2-3 layers of colorless rosin varnish to the primer; after drying, each layer of varnish is treated with sandpaper with a fraction of up to 100 microns (grade P400-P600 according to GOST).
- Polishing. The surface is treated with a felt wheel using polishing or wax paste until a uniform shiny surface is obtained.
Treating the log house with an antiseptic and fire retardants
After the log house has been sanded, it should be treated with special compounds. As a rule, these are antiseptics to protect against putrefactive phenomena, a glazing antiseptic to give the log house a beautiful appearance, and fire retardants to increase the fire resistance of the wood. First, a layer of priming antiseptic is applied, after which a composition that shades the texture of the wood - bleach or tinting antiseptic, and lastly coated with fire retardants .Each composition can be applied with a brush or an electric spray gun. For primer, you can use Valtti Pohjuste antiseptic from Tikkurila. This antiseptic costs 2500-3000 rubles for 9 liters.
The domestic antiseptic Neomid 440 also has good protection indicators, penetrating deeply into the wood texture and protecting the wood from biological processes.
You can emphasize the beautiful wood texture with the help of high-quality Valtti Color antiseptics from the same Tikkurila.
The consumption of glazing antiseptic is 4-5 square meters per liter for planed surfaces and up to 10 square meters per liter for sanded wood. It is available in forty different shades. There is also a colorless one. The cost of Valtti glazing antiseptic is approximately 280 rubles per liter. As an alternative, you can choose the domestic water-based Neomid Bio Color.
All compositions are easily dissolved with white spirit, which should be used to rinse brushes or a spray bottle after applying protective compounds to the walls of the log house.
- < Finishing a timber bathhouse outside
- Bath interior decoration >
Procedure and organization of work
Since a minimum of time should pass between grinding logs or beams and processing, processing must be done along the crown. You can start from the top or the bottom - it makes no difference, but they sand one wall completely, then move on to the other. You can coat with impregnations and primers immediately after completing the treatment of one wall, having first removed the dust.
Questions often arise about what to do if there are blue spots or other dark spots on the wood. These are traces of fungal activity. They do not affect the quality and safety in any way, but they spoil the appearance considerably.
The blueness of the wood spoils the appearance
If you want to use light transparent paints for finishing, you will have to fight with the color. For this purpose, there are special compositions for bleaching wood. In this case, the procedure is as follows:
- bleach wood;
- carry out rough grinding;
- if traces of blackness remain, bleach again;
- final polishing.
Then comes the treatment with fire retardants, primers and finishing compounds.
This video presents the experience of a man who polished a log frame himself. He goes into some interesting detail, so don't waste 20 minutes.
Tools and materials
Sanding a log frame is a costly process, as it must be done correctly
Close attention should be paid to purchasing high-quality tools, the list of which is considerable. The first and main tool for creating an aesthetically pleasing wood look is a grinder with a sanding disc.
It is worth noting that the price range is wide, because both non-branded and professional equipment are presented on the market. Experts advise choosing the golden mean and, if possible, purchasing two tools at once. This solution will prevent loss of time when changing attachments from coarse to fine. In addition, such tools rarely lie idle in your home, so purchasing a good grinder is a profitable investment.
The power of the grinder should be from 700 to 1000 W. More powerful models can cause a lot of discomfort due to their significant weight. A lightweight model with comfortable handles and a long cord is best suited for home processing.
It is important to remember that the work will be done mainly by weight. Another argument in favor of an inexpensive tool is the fact that the working life of an angle grinder may end after all finishing work is completed
The optimal disc is 125 mm. To reduce clogging, air intake should occur from the rear. A side fence when sanding a house can damage any grinder.
Speaking of attachments, you should choose a plastic one rather than a more reliable rubber model. The nuance lies in the fact that the rubber, if accidentally touched, will leave a black mark, which will certainly spoil the appearance of the log house. Choosing wheels for an angle grinder is another step towards the fabulous home of your dreams.
Since grinding will take place in two stages, during the work you will need the following flap discs:
- with grain 40–60;
- with grain 100–120.
On average, one coarse-grain disc is required to grind a surface equal to 4 m². In this process, rounded timber uses disks more economically than chopped wood. The consumption of fine-grain discs will directly depend on the quality of work performed with large grains, so it is not easy to predict expenses in this case. Nevertheless, when starting such a long procedure, you should stock up on the required amount of consumables, avoiding the subsequent painful search for the necessary tools.
The next important, although less powerful, equipment is an eccentric machine with a power of 200–300 W. It is perfect for rounded, flat logs
The advantage of the model is the dust collector, which can significantly improve the surrounding atmosphere. Various circles are used. So, for rough grinding you will need models with a grain of 40–60, for more thorough grinding – 80–100.
When carrying out work, special attention is paid to grooves and corners. To grind them, an old but effective tool is used - a chisel.
The optimal width is considered to be a knife with parameters of 20–25 mm. An angle grinder can also be used, but with attachments smaller than the disk. Otherwise, the device will jam, which may subsequently lead to its failure. The ends are sanded using a grinding wheel with 40-grit sandpaper. You can polish them using an angle grinder.
An alternative method of sanding is sandblasting and abrasive blasting, which allows you to achieve an aged and natural look of wood.
It is performed using special and expensive equipment, such as:
- Cooper slag;
- soda;
- garnet;
- specialized types of sand.
The essence of this treatment procedure is to bombard wood with sand particles with a powerful air flow. The result is a clean surface of the log house without fungi and mold, even in small cracks. It is worth noting that it is almost impossible to sand such parts of the log by hand. And also, you should not carry out brushing yourself with ordinary sandblasting, as it can break and ruin the appearance of the surface.
Preparatory stage
During planing, a so-called radial structure can form on the timber, which threatens the wood to peel off. Therefore, the first task is to carefully inspect the tree.
The solution must dry completely, for this you need to wait a day. As a result, small particles will stop “ruffling”. This will help prevent failure of the grinding wheels and protect normal areas of the timber from defects.
You can deal with this problem at the ends using a blowtorch. With its help, the pile is burned and removed. In addition, it makes the wood stronger and more durable. Since the ends are the weakest link of the structure, this approach provides better subsequent grinding and additional polishing with fine sandpaper.
Correctly carried out preparation and grinding of the ends will lead to the following:
- the wood will dry quite slowly, due to which the shrinkage will be uniform;
- painting and varnishing the timber will require much less material, which will make their consumption more economical.
Useful recommendations also cover other important points.
- It makes sense to start sanding work only after the roof has been erected. After this, new irregularities and defects may appear.
- It happens that the timber turns blue. Then, before sanding, you must first clean the walls with sandpaper and then polish.
- The beams may darken 6-7 days after treatment if they were not previously coated with protective agents.
Coat and close correctly - as an additional or next treatment
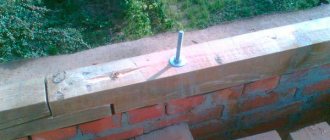
The long-term preservation of the lower crowns of the log house is not only ensured by the correct protective coating, but also by preventive additional treatment of them during operation, as well as the creation of a metal canopy over them. The effectiveness of their protection also largely depends on the reliable waterproofing of the crowns from the foundation.
To ensure that the impregnation with protective agents is preserved for a long time, it is recommended to cover the lower logs with a galvanized steel canopy, which will divert streams of rainwater from them. The width of the canopy should ensure that the basement foundation projections are covered. Some builders recommend closing the gaps between the crown and the foundation with foamed macroflex. After it hardens, the excess is cut off, and the foamed joints are covered with wooden blocks - slats. Additionally, they will be protected by a metal visor attached above the lower crown.
MK timber replacement
Our website presents a number of log house projects, for example: Or you can see all prices for log houses. You can calculate the house or bathhouse you need with maximum accuracy using our log house cost calculator. To order and buy a log house, call:
- Vologda
- Moscow,
Wood processing after sanding
After completing all work related to grinding the material, it must be coated with appropriate products. This stage of work should not be postponed until later; it is better to apply special compounds immediately after cleaning the wood, since after sanding it is unprotected from bacteria, dirt and other “enemies”. External treatment is carried out using different products, which are applied in several layers.
It is important to understand that wooden houses also need to be treated inside, for which water-based or combined products are used. Although the conditions inside the house are not as harsh as those outside, wood can still be susceptible to the development of mold and mildew.
Before using the product you choose, be sure to check whether the manufacturer provides for its use for interior work.
The base layer is antiseptic substances. Next comes the treatment of the material with fire retardants. They provide increased wood resistance to fire. Salt and non-salt flame retardants are available for sale. During contact with fire, salt products release gases, which minimizes the risk of fire, and non-salt fire retardants form foam on the surface of the wood, which also protects the natural material from fire.
Biopyrenes, which combine the characteristics of fire retardants and antiseptics, are also very popular today. They are suitable for internal and external processing. You can paint a wooden house after priming the coating, during which water-soluble products are used.
For painting, you can use façade paint or special glazing compounds that perfectly reveal the beauty of the natural material. This is discussed in more detail in the next article. There is a wide variety of such compositions on sale, available in different shades. The use of facade paint allows you to save money, but this solution hides the sophistication of the wood.
From our article you learned: why you need to sand a log house, how to choose the right tool, choose the right abrasive, and also not make mistakes in order to get a beautiful and modern house facade. But in any case, this type of work requires excellent knowledge, experience and skills developed over several years of constant work, so it is better to turn to professionals. The Plotnitskaya Artel company performs a full range of works on finishing the walls of a house made of logs or timber.
In addition to sanding the frame, our craftsmen can perform caulking or warm seam, paint your house with various paints and oils, install casing, install floors and ceilings, and much more...
More articles about construction and renovation:
- External and internal finishing of the bath
- Wood sealant, which one to choose?
- Painting a wooden house. Applied materials and technologies
- We protect a wooden house: antiseptic, oil, wax
- How and how to properly caulk a log house: materials and technologies
- Tips: how to properly make a bathhouse, stages of construction
- Hand-cut log house
- Exterior finishing of a frame house
- Attic in a wooden house
- Wooden houses. Advantages and disadvantages of materials for construction.
- Technology and stages of construction of a frame house
- Types of foundation piles, classification, how they are made
- Concrete septic tank made of rings in the house, types, installation technology
- Roofing types, classification, materials
- Prefabricated houses: types, advantages, disadvantages, construction features
- Arrangement of a country house site, practical advice
Services of professional craftsmen
Proper sanding provides a beautiful and durable finish and ensures the long life of your home. Our specialists have extensive experience, have the necessary work skills, and know the nuances and subtleties of grinding work. We will polish your wooden house strictly according to technology, taking into account the individual characteristics of the structure and within the strictly agreed time frame. When inspecting your home, the craftsmen will select the optimal grinding method and the necessary tools for surface treatment. You can call a specialist and contact us using the coordinates in the “Contacts” section.
Calculate the cost of painting and insulating your home right now
Do you have accurate measurements of the house?
I measured it myself. I have a house design. Measurers came. I want to call a measurer.
By clicking on the button, you consent to the processing of personal data
Features of preparing the opening for installation of casing and double-glazed windows
How to install an underfloor water heating system in a wooden house
Everything you need to know about Teknos oil before painting your home
Legal - a reliable business partner