31.08.2017
How should a person feel when waking up in the morning? If you went to bed no later than 23 hours, did not take alcohol or heavy food before bed and are relatively healthy, then the normal state after sleep is lightness, vigor and a surge of strength. If this sounds like you, then we should congratulate you - you are one of the lucky few who know the most important condition for healthy sleep.
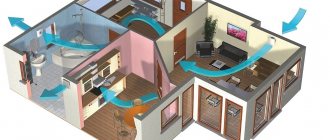
This condition is fresh air in the apartment during sleep , ensuring proper rest.
The quality of the air you breathe at night determines your condition and mood for the whole day.
If the air is stale, with an excess of carbon dioxide, then you will wake up already tired, as if in a dope. Your only desire will be to return to bed and not stay there until lunch. Fresh air filled with oxygen has the opposite effect - you usually wake up on your own, without an alarm clock, full of energy and ready to work. One can say about the state of healthy sleep “like in a country house”
Does natural ventilation provide fresh air into the apartment?
Here the question arises - how to make the air in the apartment fresh and clean if, for example, it’s winter outside and you catch a cold easily? In the summer, you can’t really open the windows either - dust, noise, tobacco smoke, and those who like drunken nighttime gatherings simply won’t let you sleep. What happens if you close the windows at night? Even with a large area of the room, after 2-3 hours the air in the room will be oversaturated with breath products, and in the morning you will wake up exhausted and with a headache.
Should I ventilate more often? Useless. You will have to open the windows every 20-30 minutes because there is no constant flow of fresh air. It turns out to be a vicious circle: when you open the windows, drafts and colds begin, fluff and dust flies, it’s noisy and dirty. If you keep the windows closed, it’s stuffy, the humidity increases, and an unhealthy microclimate is created. As a result, the question of how to provide fresh air in an apartment without drafts, noise and dust remains open .
Why is that? The fact is that in almost 99% of apartment buildings the design does not provide for forced ventilation. Internal ventilation in old houses most often simply transfers “odors” from kitchens and toilets from one apartment to another, and in new buildings built strictly according to SNiP, all extraneous odors are removed to the outside of the building. And it's all. It turns out that the task of providing apartments with fresh air falls on the residents themselves - although you won’t read about this in developer brochures.
Fortunately, you don't have to invent ways to solve this problem - it has already been solved with the advent of new compact forced ventilation systems on the market that are designed to take into account today's levels of air pollution. An example of a supply and exhaust unit that can provide fresh air to an apartment in winter and summer without opening windows is Breezer Tion o2 - a compact, high-performance device with electronic control.
It must be said that other means can now be used to solve the problems described above. Let's try to evaluate how effectively they do this.
How to check the draft level in a room?
Before installing ventilation systems, it is necessary to know the level of sediment, for which a strip of paper 2 cm wide is sufficient. It is exposed to wind on both sides. However, it is not recommended to test air circulation using flammable devices due to the risk of explosion. A sheet of paper is applied to the ventilation grille, in the kitchen or bathroom. Then you have a few minutes to observe his behavior.
The more the paper oscillates, the better the ventilation works. If it remains stationary, it needs to be upgraded. If one person lives in a room without windows, about 60 watts of heat is generated. If there is a natural ventilation system, holes are made in the lower part of the wall. If there is access from the outside, then a ventilation hole is installed.
Modern ventilation in closed spaces can work very effectively if it is properly designed taking into account all the features.
An arsenal of modern ventilation products: from air purifiers to air conditioners
Air conditioner . Strictly speaking, it is not a ventilation system: its main function is to maintain a given temperature in the room. However, here we must take into account the existing stereotype - most consumers believe that the street (outdoor) unit of a split-system air conditioner “drives” fresh air into the apartment. Actually this is not true. An external unit is needed to evaporate moisture and reduce noise during system operation, as well as mainly to release the heat that the air conditioner produces in exchange for cooling the apartment.
The reader may have doubts about this, because air-conditioned air feels fresh. This feeling is deceptive - this air may have a high content of carbon dioxide, but due to the lower temperature and low humidity it seems clean and fresh.
So, the conclusion is this : the air conditioner has nothing to do with ventilation, its task is to cool the air.
How to organize
There is one universal rule in solving the problem of ventilation in a room without windows. Rooms with heavily polluted air must be equipped with an exhaust device. These include: bathrooms, kitchens.
For potentially clean rooms, it is sufficient to ensure good air flow through ventilation grilles or small gaps under internal doors.
The first thing that can bring air into a windowless room is a small gap under the door. Special overflow grilles built into the door are another option.
They can also be installed at the bottom of the wall. If there is insufficient air exchange, you can also use exhaust fans.
In the dressing room
Cabinets are usually installed in small rooms without windows. In this case, you cannot count on air flow through the gaps:
- the gap between the bottom edge of the door and the floor;
- special design of cabinet doors (with slots or plug-in ventilation grilles);
- holes in the walls that are located no further than 20-30 cm from the floor (you can go down, just above the baseboard);
- technological gaps arising from the construction of partitions;
- in private houses - through a ventilation hole in the floor (from the lower floor or from the basement, if there is normal humidity).
The dimensions of the air intakes depend on the cubic capacity of the room and the speed of the air masses. Standards for storage cabinets require one air change. For example, if your closet measures 1.5*2.0*2.8 (width, length, height), then its volume (obtained by multiplying all numbers) is 8.4 cubic meters. Within one hour, 8.4 cubic meters of air must be “pumped” to maintain a normal atmosphere. Thus, ventilation of the dressing room will prevent the formation of foreign odors.
With proper ventilation of the apartment, an air intake of 100*100 mm is sufficient for this. The cross section - round, square, rectangular - does not matter. The main thing is that its area remains the same or larger. And, as a rule, this parameter is calculated or found in accordance with the table. However, the tables show much larger volumes.
But closet ventilation will work well as long as there is an exhaust duct. It could be a similar grate in the wall. It should be placed on the wall opposite the air intake, closer to the ceiling. You should aim to keep these holes as far apart as possible so that the air flow covers as much of an area as possible.
If the air intake is made in the door, and the door is located in the middle of the width of the room, then it is worth installing two exhaust grilles - on the right and on the left, at a distance of 15-25 cm from the corners.
Where should the vents be placed? At best, to the ventilation duct. A possible option is outside, if one or more wardrobe walls face the outside. In this case, the air supply can be vented outside and the exhaust into the ventilation system or into adjacent rooms.
Closet
A common option both in an apartment and in a house is instead of installing regular wardrobes and/or chests of drawers.
The location of the air exchange depends on the number of walls (partitions) in the cabinet and the size of the cabinet. Typically, such cabinets are not huge: most of them are “simple” cabinets with shelves and drawers, simply not free-standing, but “attached” to the wall.
Let's consider how it can be ventilated in accordance with various schemes:
- If there is only one partition in the closet - the front one, and on the other 3 sides there are walls of the apartment bordering the living rooms. Simply cut inlet holes at the bottom and top of the baffle.
- If the wardrobe has only a partition, then on the other 3 sides there are living walls, one of which borders the bathroom/kitchen. In this case, a perimeter grille can be cut in the lower partition (through which air from the room will be sucked into the cabinet). To remove air, you can drill a hole in the wall between the cabinet and the kitchen/bathroom and cover it with a grill. This option is not the most convenient: in the future, you may want to change the layout and move the cabinet, but the hole in the wall will remain in the same place.
- If the cabinet has 2 or more compartments. In this case, a bypass grille is cut into the partition located closer to the window from below. The second bypass grille is cut from above (closer to the ceiling) in the partition, which is closer to the door.
Generally speaking, venting in cabinets is not necessary—in most cases, simply cutting overflow holes in the doors will do the trick.
Separate room with window
The simplest option is to do nothing: all conditions have already been met.
In this case, air flow can be ensured in the following ways:
- Leave the window cracked. Suitable if the window sash can be fixed in several positions and if there is no source of loud noises or odors under the window.
- Install the window comb and keep the window tilted. Suitable when the window sash does not have its own methods of fastening. As for the cost: the simplest comb can cost up to 1000 rubles.
- Install windows in micro ventilation mode (if the apartment is under renovation, or it’s time to replace the windows). This option is so much better than the previous ones that the window does not need to be opened all the time. This means that sounds and smells from the street, insects, rain or snow will not penetrate it.
- Install the window valve. Suitable in cases where it is impossible to leave the window open (for example, due to noise) and there is no ventilation mode. The disadvantage is that not everyone can install the valve themselves. The product itself will cost about 3-5 thousand (depending on the model), installation by professionals can cost about the same.
- Install a window fan. If you have a large closet or will store expensive items in it, then this option is worth considering. Natural ventilation (all of the above methods indicate it) has an unstable power, while a fan can maintain constant air exchange.
There should be a break under the cabinet door to allow air to flow in and out of the cabinet. If this is not possible, a bypass grille (or valve, for example Domvent) can be installed in the door leaf.
A more expensive and somewhat unknown option: you can install a miniature Aeromat unit in the window. Inside the rectangular housing there are fans that supply both supply and exhaust air. This means that they can freshen the air even in a sealed room. The disadvantage is that such products cost tens of thousands of rubles, and only a specialist can install them.
Separate room without window, street through the wall
Organizing a ventilation system in such a room will itself be more difficult than if the room had a window. However, there are many possibilities for implementation.
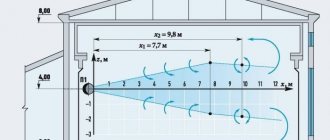
An example of a ventilation system for this layout: 1 – air intake through the gap under the door; 2 – connection point for the exhaust fan
In the previous paragraph, we looked at a scheme in which air enters the dressing room only from the outside - after all, in a room with a window this is the simplest option. If you don't have a window, you'll still need to make a hole in the wall for ventilation. Can be used for both inputs and outputs.
First let's look at how air is supplied through the wall. To do this, drill a hole in it and insert a wall valve. This option is the simplest and cheapest (the valve itself can be bought for 3-5 thousand, installation will cost the same).
There is another option, but it is not feasible: a power supply is placed instead of the valve. This device is more expensive: such equipment will cost more than 10 thousand rubles. The main thing: the units have a large air capacity - which is not needed for a small room, for example, a dressing room.
As mentioned above, you can arrange for the exhaust pipe to be removed from the cabinet rather than brought in from it. In this case, drill a hole in the wall and insert an exhaust fan (which will not blow into the room, but from outside). This is a good solution if the dressing room is located far from the kitchen/toilet.
The general rule for both methods is that there must be airflow between the closet and the hallway (or room). This requires either a gap under the door or a bypass grille in the door leaf.
Separate room, surrounded by other rooms
The most inconvenient and difficult option to implement. Such layouts are common: owners often create their dressing rooms in closets that are located “inside” the apartments. Additionally, when houses are built with walk-in closets, they are typically built to this type of plan.
In this case, it will be more difficult to complete the task, especially on your own (without specialists). There are several solution schemes:
- A hole is made in the wall bordering the living room with a window - if the room is further from the kitchen/bathroom than the dressing room - and covered with bars. Air will pass through it. The air is exhausted through the gap under the door into the hallway and then into the nearest ventilation pipe or eaves. If there is no gap, a bypass grille is installed in the door.
- If there is a kitchen or bathroom opposite a closet or room with a hood, a hole is made in this wall and covered with a grill. The air will be exhaled through this hole. Fresh air will enter through the gap under the door grille/overflow grille.
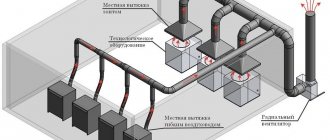
- If the house/apartment is undergoing renovation and suspended ceilings are installed, you can organize a system of air ducts through which air will be taken from each room. In this case, a separate line is drawn to the cabinet. The influx of fresh air will pass through the gap under the door. The exhaust duct can go either to the nearest hood (as in the photo above), or through the wall to the outside (in this case, an exhaust fan is placed in the duct).
Kitchen
It is important that the ventilation system is equipped with a ventilation duct. This will act as an exhaust system and the used air will be removed through it. Another option is to exhaust air through a kitchen hood (which can be directed into a ventilation shaft or directly outside through a wall or duct).
Air will come from other rooms either through the cracks under the door or through the overflow grilles (if there are no cracks).
In this case, it is necessary to check the draft of the ventilation shaft. To do this, take a strip of thin paper and apply it to the ventilation grill.
If the paper is attracted, the air roller is working properly. If it doesn't work or has very little pull, it means the air roller is either not working at all or not working well (it may be clogged and needs to be cleaned). If for some reason cleaning is impossible now, it makes sense to install an exhaust fan in the wall with access directly to the street.
The fan's performance must be capable of completely extracting an amount of air equal to the number of people living in the apartment, multiplied by 30. For example, if 3 people live in an apartment, then the fan must exhaust at least 90 cubic meters of air per hour.
Ventilation in a blind bedroom without a window
If there were no windows when the bedroom was built, there is one reliable way to ensure proper air exchange.
For this purpose, a mandatory type system will be installed, which will consist of:
- several fans;
- air heating device;
- supply air filters;
- ventilation grates;
- air channels.
Installing a ventilation system in a bedroom without a window is done by creating several holes in opposite walls where the above equipment is installed.
The completed system must pass incoming air through filters, heat it, and release it through vents.
In a room that borders the street
There is an effective option, which is possible if the room bordering the street through the wall is not dirty (kitchen or bathroom).
In this case, it is recommended to create an air flow in one of three ways:
- using a power supply;
- use of wall dampers for air supply;
- from a fan installed in the fan.
To ventilate the air, it is necessary to create an inlet inside the living space through grates in the wall or doorway so that air can freely flow into the room in which the hood is installed.
If the room borders the street through at least one wall, then a specially designed hole with a fan is sufficient for normal air exchange.
In this case, air is removed outside while air is brought in from other rooms.
In a room that does not border the street
The first option is to lay a separate ventilation duct. This is possible if the building has at least one air exchange system that supplies or extracts air masses.
In addition to the existing system, a ventilation system must be installed (if there is an input, sort the output and vice versa).
If the room is located between the supply room and a room equipped with an exhaust hood, then the air flow will pass through several openings with special grilles (which can be supplemented with fans).
This option is suitable in cases where intensive air exchange is not required. Usually the rooms are small in size. A necessary condition is the filtration of incoming air.
In large rooms or rooms that are very far from the ventilation shaft, it is necessary to install separate air ducts to provide supply and exhaust air for the exhaust. In this case, a fan must be installed for each of them.
Air purifiers, ionizers and humidifiers
This is a fairly large class of devices that can be presented as unitary devices or as devices with combined functions, for example, “purifier-humidifier-ionizer”. Purifiers, or as they are also called “air washers,” absorb dusty, dry air, clean it and moisten it. Ionizers saturate the indoor air with negative ions, making it more beneficial for breathing. Humidifiers increase air humidity, compensating for the work of radiators.
All this is wonderful, but none of these devices solve the main problem - the removal of breath products and the flow of fresh air. What is the point of humidifying, ionizing and “washing” stale air full of carbon dioxide? And if you decide to ventilate the room, then the work of the purifiers essentially starts from scratch.
Aroma candles
Stores sell scented candles with different scents, from the smell of chocolate to the aroma of washed clothes.
Unfortunately, artificial fragrance can irritate the respiratory tract. It is better to buy candles made from natural wax. More expensive, but much more useful.
Anyone who knows how to make candles can make it themselves using:
- Essential oils;
- Coffee and cardamom beans;
- Cinnamon;
- Carnation;
- Vanilla.
Ventilators: ventilation valves, supply systems and breathers
Compared to the devices described above, ventilators look much more optimistic. With the help of such devices you can provide fresh air in the apartment without opening the windows. To install ventilators, a through hole is made in the wall; in the case of a valve, we are talking about natural ventilation due to pressure or temperature differences, and supply systems and breathers “drive” air from the street into the room forcibly.
Ventilation valves, for example, KIV 125, are a silent, simple device without a fan, with one basic level filter (G3). In order to provide fresh air in the apartment in the required volume, you need 2-3, or even more valves. Regarding supply systems, most do not have filters or heating, but provide forced ventilation.
Let's compare - the breather has a three-stage filtration system, air heating, provides high performance and an electronic autonomous control system.
If we objectively evaluate the capabilities of these types of devices, it becomes obvious: valves and conventional supply systems have their pros and cons. Breezers, in turn, are devoid of all their shortcomings and take into account all the needs of consumers. One of the most famous brands of breathers is Tion o2 - a product of the Russian company TION.
Useful tips for choosing a ventilator
- Select a ventilator depending on the characteristics of the apartment, the number of residents, climatic and environmental conditions.
- A supply valve or a simple ventilator/breather without heating and filters is suitable only for those who have a small family and a good environment. It is also desirable that the temperature outside the window does not often drop below -15°C.
- If the family is more than two people, the valve will no longer be enough. Choose a mechanical room ventilator with a capacity of 90-120 m3/h.
- In winter, a heated ventilator outperforms other devices.
- Assess the air quality around your home. If you live in an industrial area or a busy city center, we recommend ordering a breather.
- Outside the city, one or two filters are enough. Exception: families with allergies. For them, the air in the suburbs is just as dangerous as in the center. Therefore, for an allergy sufferer, the default choice is a breather with a highly efficient HEPA filter.
Types of apartment ventilation systems
| Type of supply ventilation | Performance | Filtration | Extra options | Price with installation |
| Supply valve | from 0 to 54 m3/h per room | No | No | RUB 5,900 |
| Ventilator | from 10 to 160 m3/h per room | either a carbon filter or a G3 coarse filter | no air heating, low noise level, 7 speeds | RUB 22,490 |
| Breezer | from 30 to 130 m3/h per room | three filters: fine filter F7, HEPA filter H11, carbon filter | heating from -40°С to +25°С with climate control, average noise level, 4 speeds | RUB 28,900 |
| Central supply ventilation | about 300-500 m3/h for the whole apartment | additional filters for an additional fee: coarse filters G3-G4, fine filters F5-F7, carbon filters | water or electric air heating, low noise level, for an additional fee you can install cooling and humidification modules | about 100,000 rubles + costs for additional modules + repair costs |
Calculations of technical parameters of the inlet
Before you begin selecting air supply equipment, you need to understand on what parameters of the apartment the quality of air supply depends. There are few of them:
- The construction volume of the premises, room, apartment or house, the needs of which will be met;
- Number of people living;
- Purpose of the room. In the kitchen and bathroom, i.e. where there are exhaust devices, the inlet is not equipped. The generally accepted operating scheme for household air handling units involves their installation in sleeping areas.
The performance of the supply equipment must be calculated. Existing Russian standards for the influx of residential premises provide for an air supply of at least 3 cubic meters/hour per 1 square meter. meter of your house or apartment. Those. living area multiplied by three will indicate the amount of air required per hour. For example, an apartment with an area of 50 meters requires an inflow of 150 cubic meters per hour. The hood is calculated in the same way, but the standards for calculating the kitchen, toilet and bathroom depend on the technical features of the premises. For example, the standard for a separate bathroom is 50 cubic meters per hour, a bathroom combined with a toilet is also 50 cubic meters per hour, for an isolated toilet 25 cubic meters per hour is enough. Kitchen hoods depend on the type of cooking equipment installed. If the kitchen has a gas stove, it needs 90 cubic meters per hour; for a kitchen with an electric stove, 50 cubic meters per hour is enough. The amount of air supply should not be less than the volume of air required for exhaust, therefore, in calculations, the larger value is always taken. After calculating the amount of air required for your apartment per hour, you can choose supply equipment. The performance of the devices can be checked with the seller.
Breezer TION o2: new generation of supply ventilation systems
How does Breezer make the air in the apartment fresh and clean?
Breezer is a compact air supply ventilation device equipped with a filter system and air flow heating. For installation, a through hole is made in the wall, after which the device itself is installed on the wall. The principle of its operation is quite simple - an electric fan provides air flow from the street, and a filter system deeply cleans it from dust, pollen, fluff, odors, microorganisms and car exhaust. In winter, the air flow is heated to a comfortable temperature, which eliminates drafts . The result of the work of the Tion o2 breather is fresh air in a heated apartment.
Equipment selection
After you have created a project for a future supply-type ventilation system and have decided on its type, you need to start selecting equipment for ventilation in the apartment. It is necessary to pay increased attention to this stage, since the quality of the future structure will depend on this. When choosing a particular fan model, you must take into account the following parameters:
- number of fan revolutions;
- maximum fan power;
- installation performance level;
- the maximum working area that the selected fan can handle, etc.
Smart ventilation Tion MagicAir - fresh air while you sleep!
MagicAir is a new level of comfort in creating an ideal microclimate. We are talking about a high-tech device that evaluates the current air parameters in your apartment and provides autonomous control of climate control equipment.
This problem can be solved in three simple steps:
The first is the installation of a compact and “smart” supply ventilation breather Tion O2 MAC, which will provide a constant supply of fresh air, its thorough cleaning and heating.
The second is connecting and placing a MagicAir station, which will establish a wireless connection with the breather via the Internet. Now you can receive air quality data on your smartphone and remotely control the microclimate in your apartment.
Third , set your parameters for the CO2 content in the air and the breather will automatically maintain the optimal level of ventilation for you.
Installation
In order to install a simplified type of supply ventilation it will take approximately three to four days, installation of a full-fledged structure can take up to two weeks. The main fastening element of the structure is the steel frame. It is secured with special screws. Installing fresh air ventilation can be compared to assembling a construction kit, the parts of which are:
- fans;
- valves;
- air duct;
- heating and cooling elements, etc.
When installing each element, it is necessary to take into account the most optimal location for its location, as well as the features of its installation. Following exactly the created project, having minimal theoretical knowledge and basic skills in working with tools, installing a supply air ventilation system yourself is quite simple.
Budget options for restoring air exchange
Wall and window valves do not have a fan. The air flow occurs due to the difference between street and “home” pressure. A prerequisite for the operation of overhead inlets is proper exhaust ventilation.
Features of different types of window valves
The design of all window climate control devices is very simple. A typical valve consists of an air intake, a telescopic duct and an indoor unit.
The air intake is installed outside the frame. The external unit is equipped with a visor and a grille that prevents insects from getting inside. The telescopic channel cuts into the frame, forming a through gap for the unhindered flow of air.
The indoor unit is mounted on the side of the room. Some models of inlet units are equipped with a filter and a valve that regulates the throughput of the device
Based on the design features and installation method, the following climate control devices are distinguished:
- slotted;
- folded;
- invoices.
Slot models. The throughput capacity of the unit reaches 20 cubic meters per hour - the influx of air masses is carried out through a micro-hole up to 1.6 cm high and up to 4 cm wide. The device consists of two blocks, which complicates its installation - milling of the window frame is required .
Rebated valves. This is the most affordable and easiest way to ventilate a room. The air flow is carried out through slits in the vestibule. The main advantage of the models is the ability to install them on a window in use without milling a groove.
Additional advantages of rebated models include: low cost, preservation of the sound-absorbing and heat-retaining properties of PVC double-glazed windows and the possibility of automation.
The valve capacity does not exceed 5 cubic meters/hour. To ensure a larger volume of air supply, it is permissible to install several valves on one window
Overhead climate products. This option is rarely implemented in domestic conditions due to the complexity of installation - the valve is inserted at the stage of assembling the double-glazed window. In addition, the product worsens the heat and sound insulation of the window.
Overhead modifications have found their application in production and warehouse premises. The productivity of climate control devices is about 100 cubic meters per hour.
In the simplest models of window inlets, the size of the gap, and, consequently, the intensity of the air flow, is selected manually - the position of the valve is adjusted. High-tech devices are equipped with humidity and atmospheric fluctuations sensors.
Wall model: device and installation
Externally, the wall valve resembles a cylindrical flask or a wide pipe, with a diameter of about 10-16 cm.
The plastic air duct is equipped with the following elements:
- thermal insulation layer - a “sleeve” passes through the entire flask, preventing freezing of the wall and reducing the noise effect from the street;
- filter – located at the outlet of the air duct, provides rough air cleaning.
In some models, an O-ring (silicone) with flaps is placed in front of the filter. The purpose of the part is to equalize the air flow in windy weather.
On the street side, the wall air duct is closed with a metal grille and an anti-mosquito insert, and on the inside - with a decorative cover with an adjustable handle
When choosing an air supply device, the power and “operating” temperature of the unit are first assessed. On average, the productivity of a wall climate product is 40 cubic meters/hour. This value is enough to ventilate a room of 13 sq.m.
The operating temperature range is indicated by the manufacturer on the packaging or in the instructions for the device. For harsh climatic conditions, special models have been developed to prevent the formation of condensation and the appearance of an ice plug in the channel.
The following photo selection will clearly introduce the technology of installing a wall valve:
Image galleryPhoto from At a height of approximately 2 - 2.2 m from the floor plane, we drill a hole in the wall. We select the drill bit in accordance with the size of the future ventilation duct. We rework the hole with a drill of a smaller diameter, trying to give it a slight slope towards the street. In the hole drilled and cleared of dust, we first install insulation, made in the form of a pipe, then a plastic air duct. We cut the insulation flush with the surface, the air duct should protrude by 1 cm. We apply the lower part of the housing to the installation site and mark the fixation points of the device through the holes in it. We fix the lower part of the housing to the wall by drilling holes at the marked points. We place the included filter in the housing. We snap onto the upper part of the housing, equipped with a device for adjusting the air flow. We check the functionality of the system and the ability to regulate the volume of air flow entering the room. On the outside of the wall, we install a grille with inclined lamellas, it will protect against insects and birds. Step 1: Drilling holes for installing the valveStep 2: Refinishing the hole with a drillStep 3: Arranging the drilled holeStep 4: Marking for attaching the valve bodyStep 5: Installing the filter into the fixed bodyStep 7: Installing the supply valve coverStep 7: Checking the functionality of the systemStep 8: Installing the grille from the facade
Stage 1. Determining the location. When choosing a wall, you should consider some nuances:
- It is better to install it on a supporting structure;
- optimally – the valve “exit” to the insulated loggia;
- It is better to avoid installation from the side of the roadway.
Valve manufacturers have designated recommended and undesirable areas for installing the device. When installing, it is important to consider the air flow vector.
In the first option, fresh air entering the apartment warms up at the top and falls down. The second option is that the air masses are heated by the heating radiator
Stage 2. Preparation and drilling of the wall. On the inner wall, mark the place for the through hole and draw the diameter of the valve.
Channel drilling procedure:
- Perform initial drilling with a diamond core bit to a depth of 10 cm.
- Remove debris and use a chisel to knock out a small notch for stable placement of the drill.
- When drilling, keep the slope outward - this position of the air duct will prevent rainwater from getting inside the device.
It is better to carry out the work with an assistant who will periodically wet the drilling area. Humidification will reduce dust levels and protect the instrument from overheating.
Stage 3. Installation of valve components. Clean the groove from dust and place a heat-insulating “sleeve” in the channel. Using screwing movements, install the cylindrical body of the device, and secure the fine-mesh grid on it.
A panel, a ring with dampers and a filter are fixed from inside the wall. The final stage of assembly is installation of the lid with the adjusting handle
Features of shut-off valves for pipelines
Shut-off valves are actively used when equipping systems designed for transporting various substances. According to their purpose, by the way, all fittings are not only shut-off, but also drainage, for protection, adjustment, etc. In addition, these products are indispensable when carrying out highway repairs.
Typically, the fittings can be installed on pipelines with both high and low pressure. In any case, the main quality that any shut-off valve must have is the ability to completely close/open the passage in the pipe. Adjusting the flow rate of the transported substance is not possible with all types of such devices.