The armored belt in the house under the floor slabs is made to strengthen the building structure of the building frame, thereby increasing the strength parameters of the load-bearing walls.
This happens because the monolithic belt distributes the total load from the roof through the walls to the foundation.
What is especially important, it helps to prevent negative consequences from soil movement, the influence of external deforming stresses from wind, temperature fluctuations and atmospheric moisture.
The reinforced structure is made monolithic from reinforced concrete or in the form of masonry from ordinary bricks and combines the boxes of the house into a single load contour.
The degree of strength of such a structure and its actual ability to resist loads are determined by the thickness and height of the protective belt, the composition of the concrete, the characteristics of the reinforcement frame, the accuracy of the work technology, in compliance with all relevant norms and standards.
What is it needed for?
A reinforced belt is one of the important protective elements of a construction project for any purpose. It is created at different heights from the “0” ground level, depending on its number of floors and the interfloor distance chosen by the developer. The absence of such a protective structure reduces the strength and durability characteristics of the construction project.
In the design of a house, the armored belt performs the following important tasks :
formation of a strictly horizontal, level base for floor slabs and mauerlat;- uniform distribution of all types of loads created by the roofing system, interfloor ceilings and higher walls;
- protection against box deformation and wall cracking;
- uniform dispersion of stresses acting on the end surface of the walls of new structures;
- creating a stable building in areas with sloping terrain; maintaining the unity of the structure of the facility, built in a seismically active place;
- protecting the house from frost heaving of the soil.
The reinforced protective structure is made in the form of a monolithic concrete or brick closed strip installed along the load-bearing walls of the house.
Existing urban planning norms and rules require mandatory installation of such protection in the following cases :
- when used for the construction of load-bearing walls of buildings made of porous building materials;
- excessive weight of interfloor slabs;
- building block materials of varying strengths are used;
- during construction work in a seismically active area or on moving soils;
- installation of a truss roofing system using studs and anchors is planned;
- the floor beams are laid unevenly, which creates a point load on the weak porous wall material;
- the project provides for the construction of a prefabricated foundation or it will be shallow;
- the house box requires additional rigidity;
- for objects over one floor.
Is it possible to do without it?
The decision to erect such protective structures is made at the design stage of the house . If the calculated local wall stresses and forces cannot lead to cracks, it is allowed not to install the reinforced belt.
In addition, it is also possible not to install monolithic protection when constructing thick main walls made of brick or a foundation that is planned to be deepened below the ground frost level.
An armored belt is not required when creating monolithic wall structures or those made of timber and logs.
Sliding type mount
The movable joint is used for houses made of timber, logs and other materials that shrink. If in such a house you make a rigid joint between the rafter legs and the mauerlat, over time the entire structure may collapse. When there are errors in construction, deformation begins from the walls of houses and is transmitted further.
For a sliding connection, it is a good idea to purchase a special fastener called a “sled” from any hardware store. You can also purchase corners with unusual holes for connection (oblong shape). The rafters are attached to all roof elements using clamps and brackets.
Materials for construction
The main building materials for their manufacture are :
Reinforced concrete .
A reinforced concrete structure requires the preparation of wooden formwork and a frame made of reinforcement, which are connected together by pouring concrete mortar of the design grade. It is allowed to add additives to increase the strength and other characteristics of concrete.- Red brick .
For brick protective tape, such formwork is not required; the reinforcement is installed directly on the brick, the mesh thickness is over 5 mm. Such a structure can hardly be called a monolith, but its characteristics are quite sufficient to ensure the reliability of small one-story objects. - U-blocks .
Recently, armored belts have begun to be quite widely erected from universal formwork U-blocks, which have additional thermal protection. The use of U-blocks significantly increases the speed of creating a protective structure, due to the ease of installation, the preliminary installation of a support cushion is also not required, and the low weight of the structures does not require the use of additional equipment and lifting mechanisms.
The heaviest and most reliable option is the first, the cheapest, the second, the warmest and most expensive is the third.
Most often, designers choose to install a monolithic reinforced concrete belt. For its use, concrete and reinforcement are used, which have special requirements :
- Concrete mixtures must comply with design documentation for strength characteristics, frost, water and wear resistance and cavitation resistance, and mixtures must be selected in accordance with workability requirements.
- Pouring the structure is allowed only with marked concrete with a quality certificate; it must indicate the brand, manufacturer, and quality characteristics.
- It is not permitted to use concrete purchased in separate batches from different suppliers for pouring concrete.
- The design age of concrete must be at least 28 days.
- For reinforced concrete structures with a high percentage of reinforcement
- above 1.5%, self-compacting concrete solutions are used.
- It is not allowed to lay concrete mortar in the cold season and at temperatures above +40 C.
- Additives to concrete mortar can only be carried out according to the design and do not cause corrosion of the reinforcement structure and embedded parts.
- Sewage and swampy waters cannot be used to prepare concrete mortar; the total salt content of water in terms of Na+ and K+ should not exceed 1500 mg/l.
To reduce the volume of cement when preparing the solution, it is allowed to use large gravel or crushed stone, but there are volume restrictions :
- for gravel, the sand content in the mixture is not higher than 45%, coarse aggregate -55%;
- for crushed stone, the content of sand in the mixture is not higher than 50%, coarse aggregate - 50%.
Main elements of the rafter system
The wooden roof frame is assembled from the following parts:
- Mauerlat - a kind of base for roofing elements, attached along the entire perimeter of the building to the upper edge of the outer walls in order to disperse the pressure of the roofing pie;
The Mauerlat serves as the basis for the roof frame
The ridge girder is located exactly in the middle of the building
Tightening and struts are necessary for proper distribution of the load on the Mauerlat
Racks can support not only the roof ridge, but also the rafters
The bench is located on the inner wall parallel to the mauerlat beam
The ridge is formed in the highest zone of the rafter system
The fillies lengthen the rafter legs
The eaves overhang is constructed to protect the walls from rain
Sheathing boards are laid perpendicular to the rafters
Requirements for reinforced belt
Regulatory requirements for such protective structures depend on the location of the ceiling .
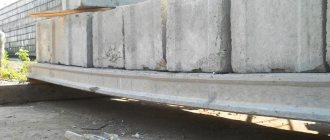
- The first reinforced belt is poured together with the strip foundation. Its width cannot exceed the permissible range of 0.7-1.2 m, and its height cannot be less than 0.4 m. It is made under all load-bearing walls, both internal and external, thereby becoming a fundamental element that forms the strength of the object under construction.
- The second protective belt is the basement one, installed on top of the foundation blocks, with a width and height of at least 0.4 m. Its task is to evenly distribute the emerging loads on the base of the house building.
If the first belt is missing in the design of the house, it is absolutely futile to implement the second one; it will not work. Only the joint functioning of two belts above and below ensures the stability of the house, even in seismic zones and with moving soils. - The third belt is installed under the ceilings, and the fourth under the roof beams to secure the roof structure using anchor bolts. Thus, it will be able to absorb the total load from the roofing system and must withstand climatic loads arising from the effects of wind and snow cover.
Under slabs
The floor slabs most often used are concrete floor panels with longitudinal round holes, with the design load :
900 kg/m2—for residential construction;- up to 2000 kg/m2 for industrial and public buildings.
To hold them, you will need a reinforced belt with the width of the wall structure or slightly less, up to 0.8 of the wall thickness, to install a heat-protective layer.
The cross-section of the reinforced frame should be rectangular with a height of 1.5 times the width.
To form the internal frame, only material that complies with GOST is used , with a minimum diameter for longitudinal elements of 12 mm and a length of 8 m, and for transverse elements - 8 mm with a pitch of 400 mm. The reinforcement structure must be continuous and installed strictly horizontally.
The frame is made of 2 rows of reinforcement, 2 rods each. Horizontal rods are laid with an overlap of at least 800 mm, which are placed as far as possible from the corners. The rods are connected with knitting wire. At a corner turn it is bent. The reinforcement frame must be filled with a concrete layer of at least 5 cm on all sides.
To prevent the reinforced structure under the floor slabs from becoming a “cold bridge” in the house, it is insulated from the outside with hard or mineral wool insulators. Otherwise, they will become sources of condensation and mold in the room.
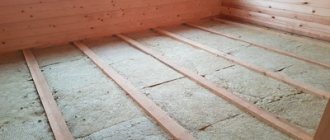
Under beams
The protective reinforcement structure along the floor beam must have parts for securing the Mauerlat. Therefore, even at the moment of creating such a belt, studs with D = 12 mm are displayed . The height of their elevation above the finished belt must be at least 40 mm. Threads are made at the ends of the rods, and holes are made in the Mauerlat with the appropriate pitch. Waterproofing is installed on top of the armored belt.
Next, securing the monolithic structure, the Mauerlat is installed along the matching holes, the protruding studs are fixed with bolts. Only after this are the rafters fixed on it, then the rest of the roof is erected.
To prevent the structure from collapsing, concrete mortar is poured with a grade of at least M200. It is allowed to independently prepare the solution in the proportion of cement/sand/crushed stone: 1/3/5.
Armomonolith under beams can be installed in smaller dimensions than for reinforced concrete slabs , since they have a lower weight.
The recommended thickness of the structure is 200 mm, and the height is from 250 mm.
Rigid mount
For a rigid connection, you will need to cut out a rafter beam or use a retaining strip. This type of fastening is used both to create a shed roof and for other types of construction.
The step-by-step execution of the cutting method is as follows:
- Cut out all the blanks according to the template. To begin, install the beam for the future rafter leg with a certain angle (laid in the project), and then mark the location of the notch. Its depth should be no more than a third of the height of the bar. After making one rafter leg, use it as a sample. You will need to make the rest identical. It is important not to make a mistake at this stage.
- Place each rafter leg with a saddle on the Mauerlat and secure with nails. First, hammer two at an angle to each other, from the sides of the rafter system. The third one must be driven vertically - it ensures the strength of the structure.
This way you will get a rigid rafter connection that can withstand any load. Remember that cutting cannot be done in the Mauerlat, as this will weaken it. Look carefully at the photo to understand how to correctly cut and assemble rigid fasteners.
There is another method of rigid fastening: when using it, meter-long bars are hemmed to the rafter legs, which rest against the mauerlat. They must be secured with metal corners.
Support amount
The amount of support of the slabs on the monolithic belt is a very important indicator for installing the ceiling on a monolithic structure. If you increase the maximum support depth, the slab will begin to function as a lever, and under significant loads, a slight rise of the wall above the slab may even occur. Despite the fact that such a process will be invisible to the observer, it will become critical for the integrity of the house box.
In addition, additional loads that arise when installing furniture, household items and interior partitions will also contribute to the formation of cracks in wall structures.
In this regard, the maximum support value for floors is strictly standardized and should not exceed for the following types of installation:
- for wooden beams - 150 mm;
- brick armored belt - 160 mm;
- belt made of U-blocks - 200 mm;
- concrete reinforced belt - 120 mm.
The minimum indicator for supporting has also been established :
- for wooden beams - 80 mm;
- brick armored belt - 80 mm;
- belt made of U-blocks - 100 mm;
- concrete reinforced belt - 65 mm.
Basement ceiling
The basement floor above the heated basement is structurally no different from the interfloor floor.
If the ceiling is installed above an unheated basement, to prevent heat loss and ensure a comfortable temperature of the floor surface, it is necessary to lay a thicker layer of thermal insulation from 200 mm. To prevent the accumulation of condensation and dampening of the thermal insulation, a vapor barrier should be laid above its surface. This arrangement of the vapor barrier is due to the fact that the diffusion of water vapor is directed from the heated room on the first floor to the cold basement.
Consumables and styling tools
Before constructing a monolithic armored belt, the developer must accurately calculate the volume of basic and auxiliary materials according to the list, which most often includes :
lumber or plywood for formwork;- insulation for thermal protection on the outside;
- M250 concrete mortar or components for its self-production;
- steel reinforcement and angle;
- knitting wire;
- waterproofing;
- high-quality mounting foam;
- fasteners.
In order for the developer to complete the entire technological process of installing the armored belt, you will need to prepare the following set of tools and equipment :
- Concrete mixer, if the concrete mixture will be prepared independently.
- Concrete pump and hoses for mechanical pouring of concrete.
- Buckets for manual concrete pouring.
- Special hook for manual assembly of reinforcement cage.
- Grinder with attachments for cutting reinforcing bars.
- Construction tools: angle, ruler, level, plumb line, for monitoring and adjusting the quality of pouring a monolithic structure.
- Profile ratchet wrench for assembling reinforced frame.
- Drill, screwdriver.
Main connecting nodes
The main components of the rafter system are:
- rafter truss - connection of a pair of rafters, braces, as well as racks and braces;
- ridge knot - combination of two opposite rafters;
- a link made of a mauerlat and a rafter resting on it;
- a module including a run, a stand and a bench;
- connection of the rafters with the strut and the stand.
The most complex element of the roof frame, according to the author, is the roof truss, which is distinguished by the fact that:
- assembled on the ground, and then transported to the roof, since this is the only way to successfully fit one wooden part to another;
The roof truss consists of at least three elements
The ridge knot also has several features:
- formed as a result of connecting two opposite rafters due to special cuts or notches;
There are many methods for creating a ridge knot.
The rafters and mauerlat become a single link, which is characterized by the following:
- the connection occurs due to cutting in each rafter leg, corresponding to the shape of the element that serves as a support for it;
The rafters are secured to the mauerlat so that they do not move to the side
A module of purlins, racks and beams is formed by driving construction brackets, steel dowels or overlays made of steel strips into the places of their connections.
An assembly of a beam, a rack and a purlin allows you to divide the load between the external and internal walls of the building
Struts, racks and rafters are assembled into a single module, creating cuttings. To prevent their connection from being weak, construction staples are used.
An assembly of struts, posts and rafters allows you to soften the pressure on the internal wall of the house
Step-by-step instructions for pouring
Before the process of pouring the reinforced belt, you will need to perform all the preparatory operations to clean the surface of the walls before, perform waterproofing, cut reinforcement for the frame and prepare lumber for the formwork.
The main stages of the technological map for the production of reinforced concrete reinforced concrete belts for floors:
- The formwork structure is assembled from lumber, with vertical and horizontal reinforcement so that the concrete solution does not squeeze out the walls.
- The width of the formwork should be equal to the width of the wall structure minus the thickness of the insulation layer, and the height should be 400 mm. Most often, class 3 boards with a thickness of 20 mm are used as building materials, fastening the elements together with self-tapping screws and further strengthening the structure after 100 cm.
- The reinforcement is cut to specified sizes and in the required quantity.
- They are then placed on clamps/backings along the length of the formwork and tied with wire to form a low layer.
- After this, transverse reinforcement is laid and the top layer is secured.
- The frame is installed in the formwork with inserts installed so that the structure does not touch its walls, with an indentation of 50 mm.
- The frame must be installed absolutely horizontal, control is carried out with a building level.
- They deliver ready-made concrete mortar or prepare it themselves at the construction site.
- They install the concrete pump and stretch the hoses.
- Fill the formwork in one go.
- Concrete is compacted and air is removed manually by piercing its thickness with reinforcement or using vibrating equipment.
- Level the outer layer of concrete to a horizontal level and cover it with polyethylene.
- The formwork is carefully removed after at least 5 days. After which the laying of floor slabs is allowed.
- Before the concrete has completely hardened, it is wetted in hot and dry weather so that the monolithic mass does not crack.
Mounting sequence ↑
After arranging the murlat, they proceed to laying and fastening the ceiling beams to the Mauerlat.
- Parameters such as the cross-section of the structural beams and the installation pitch are calculated when designing a house based on the optimal cross-section and pitch of the rafters. For example, if the rafters are supposed to be made from boards 5 by 15 cm, then the distance between these elements is chosen to be 0.6 m. This is the best option, especially since the width of the heat-insulating material is also 0.6 m.
- Most often, they have a cross-section of 200 by 100 or 150 by 100. The final length is selected taking into account the width of the future cornice. The offset is about 0.4–0.5 m. As a rule, they are installed in one direction - mainly across the room. On the fixed Mauerlat, small grooves are made (a sufficient depth of 20–300 mm) for the ceiling elements. First, the outermost ones are installed, located at opposite walls, retreating from their inner edge by 0.5–0.6 m. Next, a rope is pulled between them and the remaining beams are laid out at the calculated distance from each other according to the obtained level. By following this rule, you can ensure an even horizontal plane of the ceiling. It is imperative to check the places where the beams are attached to the Mauerlat. If necessary, they can be slightly cleaned, trimmed with murlat, or, conversely, small dies made from pieces of plywood can be placed. Then the cross beams are installed in 1 m increments.
How to lay it correctly?
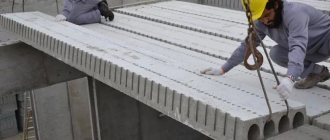
Installation of monolithic reinforced concrete floor slabs may only be carried out by trained personnel using a truck crane or other lifting equipment, subject to all safety requirements when working with heavy, bulky cargo.
The installation of beams on a monolithic protective structure can be carried out independently, but subject to the precise implementation of the technology for installing wooden structures.
Plates
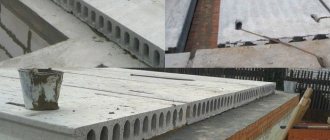
Before installing the slabs in a place determined by the design, their end voids are walled up with special armored inserts or simply concrete mortar.
This increases the strength of the structure in the most vulnerable areas with maximum loads.
The work is carried out by a team of installers consisting of at least three people using special lifting equipment.
One installer is responsible for slinging and securing the slabs to the hook. The remaining workers are at the laying site, monitoring the position of the slab and disconnecting the crane fasteners.
When performing manipulations with floors, it is contraindicated to turn them over to the opposite side, otherwise they will not withstand the weight for which they are designed.
This feature is explained by the design of the lower part, which is reinforced with reinforcement, preventing tensile forces. Therefore, violation of the installation will lead to structural fractures during the operation of the house. It is not difficult to distinguish the bottom from the top - the bottom is smooth, and the top has roughness.
When installing concrete floor slabs, proper anchoring is required. This is especially necessary for houses over one floor and objects built in seismically active areas.
There are several methods for anchoring panels to each other :
- With the use of reinforcement, when it is attached to the installation loops, and the connection with the load-bearing walls is made using L-shaped reinforcement.
- In the case where there are no mounting loops, the reinforcement is welded to a plate, which is placed in the seam between adjacent slabs, after which the joints are filled with concrete mortar.
Beams
When installing wooden floors, the wall material must be taken into account. So, for aerated concrete under a reinforced belt, a formwork 250 mm high with a simple knitted reinforced frame made of A-III, which is filled with M200 concrete mortar, is sufficient.
After the reinforced belt has hardened and the formwork has been removed, wooden beams are installed, with a thickness that will depend on the thickness of the wall, but not more than 250 mm and not less than 150 mm.
The space for laying beams is determined to be 300-400 mm, and the minimum area of support on the walls is 80 mm.
At the bottom, the beams are hemmed with boards, and vapor and moisture insulation and insulation are placed in the space between the boards. The layout of the cake, the type of insulation, its thickness and the order of protective layers are established by the project.
Mineral wool group material is used as a heat-protective material , and polystyrene foam is not allowed to be used inside a residential building, since it is flammable and emits life-threatening carcinogens. After laying the heat-protective layers, a rough wooden flooring is installed, followed by a layer of finishing, for example, with OSB boards.
This floor design is quite durable, warm, soundproof and has a long service life. It is quickly installed and does not overload the walls. It is also easy to repair, update and dismantle.
Installation ↑
To construct the murlat, wooden beams are used, which are laid in a plane parallel to the future ridge. They begin to install it during the construction of walls. For example, in the case of brickwork, you can do the following:
- closer to the top, approximately 4–6 rows below the edge, lay a thick wire at intervals of 1 m; the wire is firmly fixed inside the masonry in the center; the length of the free ends should be sufficient to subsequently wrap around and tie around the support beam without any problems; after construction is completed, visible parts of the fasteners are hidden, for example, by applying a layer of plaster.
To prevent rotting of the murlat beams, they are waterproofed by laying rolled material such as roofing felt.
When arranging the Mauerlat along the perimeter of the walls, it is necessary to check not only the reliability of the fixation, but also the horizontalness of the support beam.
Bugs and difficulties
An armored belt installed in accordance with the standard and the project guarantees a long service life of the object, since it increases its strength and performance characteristics.
The main difficulties in implementing such a protective structure arise for developers in the process of design calculations , which are quite complex and require special ones when choosing the volume of materials, dimensions and technical parameters.
It is recommended to entrust this part of the work to professionals so that all the necessary package of project documents is completed efficiently. Having a project in hand, you can build an armored belt yourself.
The main mistakes that developers make in the process of creating a protective belt for floors:
- During the installation of formwork: the lumber was chosen incorrectly, waterproofing was not carried out and the horizontal level was not maintained.
- After pouring concrete, the reinforcement is not filled with concrete and has air access to the frame elements, which is fraught with the appearance of corrosion processes.
- Concrete was poured in several stages and from different batches.
- Violation of the percentage composition of concrete components.
- Concrete was not wetted at high ambient air temperatures.
Features of the construction of the rafter system during frame construction
In the construction of light frame structures, rafters can be attached directly to the floor beams without a Mauerlat. Step-by-step instructions for carrying out this work are as follows:
- When you start working with the rafter system, you must have walls and a rough ceiling erected. Install additional supports during the work.
- Connect the ceiling beams and the top trim. Secure them.
- Install the rafters. To strengthen their block, you can use double vertical posts.
- Using racks, attach the rafter legs to the walls. After this part of the work, you can begin lathing and installing the roof.
It is best to watch a video on the construction of a rafter system on frame houses without a Mauerlat before starting construction. It will help you understand how to carry out the work so that the rafters can withstand even the heaviest loads.
When building frames, you will need a tightening. It will take on part of the load and make the structure unified. To tighten, it is not necessary to use timber; a board will do.
How to attach the Mauerlat
The main requirement when arranging a support is immobility and precise fixation of structural elements. For this purpose, studs, anchor bolts, wire method and wooden plugs are used.
Special metal studs are embedded in the masonry of the walls, then they are used to fix the mauerlat. This method is ideal for lightweight structures. The stud looks like a metal bolt in the shape of the letter “L”, and can also be welded to a square of metal. The studs are immersed in the brickwork to a depth of 45 cm. They protrude vertically from the wall by 3 cm. The studs must be inserted at the stage of laying the walls, in the final or penultimate row. The optimal distance from the outer part of the wall is 5 cm.
Fastening with anchor bolts
To enhance reliability, the Mauerlat is attached to an armored belt using anchor bolts. The manufacture of a reinforced belt is mandatory when using aerated concrete. Such blocks are soft, so it is impossible to screw bolts into them.
When the armored belt is installed in the formwork, threaded anchors are tied to it. They should be aligned exactly along the line - this will ensure a strong fixation. The fasteners themselves must be strictly vertical for the fastening process to take place accurately. There should be as many anchors as there are rafters or more. Anchors should not be located in the places where rafter legs are attached.
How to attach with wire
The classic method is to use wire fastening. To do this, follow a certain sequence of work:
- Pieces of wire are placed 4-5 rows before the end of the masonry.
- The distance between the pieces is maintained at 60 cm.
- The ends of the wire rise up 20-30 cm.
- The ends of the wire material are hidden in the solution.
- The other end of the wire is used to tie timber or boards to the wall.
Slab reinforcement
The monolith must undergo a reinforcement procedure.
- First you need to prepare the fittings. The required diameter of the rods should be selected, knowing the design loads. Typically, rods with a diameter of 12-14 millimeters are used for this.
- We lay the first reinforcing mesh at the bottom of the structure - it will become a monolithic slab in the future. This will be a kind of armored belt. First, you should lay the longitudinal rods, then the transverse ones. The best cell size for such a grid is 12-15 centimeters. If the overlap is not very large in area, then the size of the cells can be increased to 20 centimeters.
- The joints of the rods should be tied using steel wire.
- We lay the second reinforcing mesh similarly to the first. We carry out tying the meshes with wire. If there are not enough rods, then you can take an additional rod, which should be tied with an overlap equal to at least 40 times the reinforcing diameter. If rods with a diameter of just over a centimeter are used, then the overlap should be 48 centimeters. The joints of the rods should be placed in a checkerboard pattern. The ends of the reinforcement rods must be on load-bearing type beams.
Methods of fastening rafters
In the lower part, the rafters can be connected both to the Mauerlat and to the floor beams. Sometimes, for example, during frame construction, they are fixed directly to the wall. And in the upper part, the rafter legs are combined with the ridge. Each designated node can be created in several ways.
Connection with Mauerlat
Rigid fastening of the rafters to the Mauerlat ensures that there are no displacements of the assembly elements. It is performed by cutting in a certain sequence:
- To speed up the work, make a template from a piece of board or thick cardboard. A line is drawn on the workpiece, departing from the side edge at a distance equal to 1/3 of the rafter width, and then the point of contact with the mauerlat beam is marked, along which a second line is drawn, perpendicular to the first.
If the rafter width is more than 200 mm, then the cut is made at a depth of 70 mm
A triangular cut allows the rafters to rest against the mauerlat
Builders without experience can take note of the technology of attaching rafter legs to the mauerlat with a stripe of a thrust block. With this method of creating a node, as the author of the article noted, it is possible to change the position of the rafters until it becomes completely correct.
To connect the main elements of the roof frame to the Mauerlat with a stripe of a thrust bar, do the following:
- On the roof, rafters are first installed to form gables. They are fixed with metal corners for a while.
The support beam allows you to fix the rafter without cutting
The rafter and support beam are fixed to the Mauerlat with metal corners
When building a roof frame for a wooden frame, which always shrinks, they prefer to use the sliding method of attaching the rafters to the mauerlat. Thanks to it, it is possible to avoid deformation of the rafter structure and deterioration of the stability of the top row of logs, which replaces the Mauerlat.
The choice of sliding rafters is justified only when a ridge beam is provided for the main elements of the roof frame, into which they could rest with their upper part.
When the rafters are fixed to the mauerlat using the sliding method, certain steps are taken:
- The store buys clamps designed specifically for fastening sliding rafters on both sides. These are called floating metal mechanisms or sliding rafter supports.
Design
Design is an extremely important stage of construction. It is on it that drawings are made, materials are selected and fastenings of rafters to floor beams are selected. It is very important at this stage to correctly calculate the wind and snow load. The weight of the entire system will depend on the calculations performed.
At the stage of designing the roof and attaching the rafters to the floor beams, it is necessary to take into account the load-bearing capacity of the walls. If you make the roof too heavy, the entire building may collapse in one moment.
There are a number of factors that need to be taken into account when designing the roof and rafter attachments to the floor beams:
- roof shape,
- roofing material,
- layout of internal supports,
- rafter system,
- roof slope angle,
- length from one wall to another.
What you should know about this type of work
Before you begin installation, you need to familiarize yourself with several important nuances that will ensure the highest reliability:
| Properties of wood | Do not forget that this material can expand due to changes in temperature and humidity, so be sure to leave a gap in order to compensate for linear changes in size. This will avoid a lot of troubles in the future and eliminate unpleasant surprises in the form of cracks in the final finish. |
| Adequate structural protection | In order for the structures to last as long as possible, be sure to treat them before installation with a special compound that will protect the material from mold and pests, and also significantly reduce the likelihood of fire. It is better to use hard-to-wash options that penetrate deeply into the structure |
| Use of quality materials | It is not recommended to use wood with high humidity, since after installation the elements may move, which will disrupt the geometry of the structure. In addition, when dried in improper conditions, cracks may form on the surface, which reduces the reliability of structures. |
| Choosing the right mounting method | Different options for carrying out work may be suitable for different situations; there is no universal solution, so you should understand the pros and cons of one or another method. This will allow you to select the optimal fastener |
Important! Sometimes you have to proceed from the existing situation when the walls are erected, but even in such cases you can achieve an excellent result of the work. You should not skimp on fasteners for wooden structures and choose the most reliable ones.
Nowadays, beams in a wooden house are secured using special high-strength supports.