A home electrical network is a complex system of electrical installations and devices connected by electrical conductors. Wires are connected in electrical panels, junction boxes and device housings.
Let's look at how to connect wires without soldering using special clamps and terminals so that the switching is as reliable as possible and meets safety requirements. For this purpose, we provide 4 detailed instructions with the best ways to connect electrical wires.
We will also supplement our material with useful installation tips from experienced electrical installation specialists.
About the distribution box
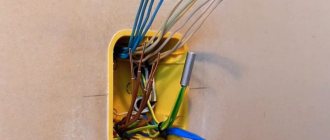
In an apartment or house, wires from the electrical panel are routed to different rooms. There are usually several connection points: switch, sockets, and so on. In order for all the wires to be collected in one place, distribution boxes were created. They carry wiring from sockets, switches and are connected in a hollow housing.
So that during repairs you do not have to look for where the wires are hidden in the walls, electrical wiring is laid on the basis of special rules prescribed in the PUE (Electrical Installation Rules).
The main recommendation is that all connections are made in the junction box.
Distribution boxes are classified according to the type of fastening. So, there are boxes for external installation and internal installation. For the second option, you need to prepare a hole in the wall into which the box will be inserted. As a result, the box lid is located flush with the wall. Often the cover is hidden with wallpaper or plastic during repairs. As a last resort, an outer box is used, which is attached directly to the wall.
There are round or rectangular junction boxes. In any case, there will be at least 4 exits. Each outlet has a fitting or thread to which a corrugated tube is attached. This is done to quickly replace the wire. The old wire is pulled out and new wiring is laid. It is not recommended to lay the cable in a groove on the wall. If the electrical wiring burns out, you will have to dig into the wall and disturb the finish in order to carry out repair work.
Welding
Connecting wires using this method is superior to other methods, as it is the most durable and of the highest quality. The essence of this method is that the ends of the wire strands are melted using a welding machine, and upon subsequent solidification, these strands become solid, ball-like, which ensures a fairly strong and durable contact. Welding can be carried out using both direct and alternating current.
- Welding machine (power at least 1 kW)
- Carbon electrode
- Flux (it protects the melt from oxygen)
- Welding mask (goggles)
- Rubber gloves
- Cord brush
- We remove the insulation and thoroughly clean the conductors to a metallic shine.
- We twist the wires and align them, cutting off the ends.
- Pour flux into the recess of the electrode, then, lowering the twist, press it firmly to the electrode.
- We turn on the welding machine and watch how the ends of the wires melt, turning into a ball.
- Using a metal brush, you need to thoroughly clean the finished ball of flux.
- We varnish and insulate the finished connection.
What are distribution boxes for?
There are many factors that speak in favor of the existence of junction boxes:
- The power system can be repaired in a matter of hours. All connections are accessible, you can easily find the area where the wires have burned out. If the cable was laid in special channels (corrugated tube, for example), then the failed cable can be replaced in an hour;
- Connections can be inspected at any time. As a rule, wiring problems occur at the connection points. If the socket or switch does not work, but there is voltage in the network, first check the quality of the connection in the junction box;
- the highest level of fire safety is created. It is believed that dangerous places are connections. Using a box will keep them in one place.
- minimal time and financial costs when repairing wiring. There is no need to look for broken wires in the walls.
Squeeze the nut
When we looked at the basic ways of connecting wires in a junction box, special attention was paid to a special nut-type clamp. The product has a fairly simple design, but despite this it allows you to make the branch reliable and durable. The compression nut consists of a carbolite body, a steel die and a plate, which actually presses the cores with four screws.
The compact size of the nut, as well as its low cost, makes it one of the most popular power line taps. In turn, the disadvantages of the product are low tightness (degree of protection IP 20), as well as the inability to branch live wire cores. It should also be noted that a very important advantage of the “nut” is the ability to qualitatively connect copper and aluminum conductors with a cross-section from 1.5 to 150 mm2.
All you need is to place the stripped contacts in a special die and carefully tighten the screws with a screwdriver, then snap the housing into place. You can learn more about nut-type compression from our article.
Connecting sockets
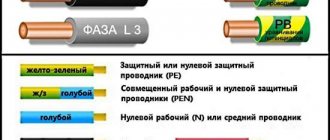
Usually a separate line is allocated to the sockets. The box contains three cables of two or three conductors. Each wire is painted a different color. As a rule, brown is the phase, blue is the neutral conductor, and the yellow-green wire is ground. One way or another, in the box all the wires are connected by color, forming groups.
Once the conductors are separated by color, they are folded, stretched, and adjusted to the same length. Don't cut too short - leave a 100mm margin so that you can re-connect if necessary. Having chosen the appropriate connection method, you need to connect the wires.
In old houses there is no grounding, which means there will be only two wires. Sometimes the wires in the cable are the same color. To determine where the phase is and where the zero is, you need to use an indicator screwdriver to determine the phase.
Connection of flexible and rigid wires
Typically, conductors of the same type are connected. But sometimes a connection between a flexible and a rigid wire is required, which is carried out in compliance with some nuances.
First, cut the cable so that its end is tapered. The rigid wire needs to be melted and a loop made at its end. A thin wire is passed through the loop made and wrapped around the rigid cable. The resulting connection must be treated with solder and reliably insulated. A similar method is suitable for aluminum conductors.
How to connect a switch with one key
If there is a switch in the room, then the connection in the box will be a little more complicated than with only sockets. There will also be three groups of conductors, but the connection is of a different type. Available:
— input cable – from another box or directly from the switchboard;
— wire for the chandelier;
- wire from the switch.
The circuit should work as follows. Power (that is, phase) is supplied to the switch key. From its output a wire is supplied to the lighting fixture. As soon as the switch contacts close, the chandelier will light up. The ground and neutral wires must be twisted together.
Connection methods
Of the permitted methods, the PUE allows you to create a contact in the following ways:
Twisted connections are prohibited. This is due to the fact that the contact will be exposed to temperature. As the temperature rises, the material expands; when cooled, it contracts. Since the contact is not secured by anything, it will quickly fail and collapse. Twisting can only be used in conjunction with another joining method, such as welding or soldering.
Squeeze method
This method includes screw and bolt connections, as well as contact using Wago clamps. Such mechanisms allow you to connect single-core and stranded copper wires. At the moment, this method is the most common and convenient. The advantages include low cost, reliability, simplicity of the process and no need to purchase additional equipment.
It is better to connect wires with a cross-section of up to 25 sq. mm in this way. Conductors with a large cross-section require a different connection or it will be necessary to take into account the nuances of contact using the compression method.
Screw connection is used for cables of small cross-section. Its essence is to install two conductors into a brass tube and clamp each section with its own screw. When connecting solid and multi-core cables, there is a risk of damaging the thin wire. For this reason, it is recommended to protect them with a special tip. There are special terminals with clamping pads that do not require the use of lugs. They provide high-quality clamping without damaging the wire over the entire cross-section of the brass tube.
Wago terminals are a variation of the squeeze method. They are reliable, but experts debate the durability of such products. Advantages: speed of work, quality of contact, simplicity.
Pressing method
Crimping of wires is carried out using a special tool - pliers. It can be manual or hydraulic. For conductors with a small cross-section, hand pliers are suitable.
Connecting a switch with two keys
Connecting a switch with two keys in a distribution box is more complex than with a single-key switch.
The scheme is characterized by the fact that a cable with three cores must be laid to the device for 2 groups of lamps (if there is no grounding). One conductor is connected to the common contact, and the other two are connected to the output to the keys. You need to remember which conductor (by color) was connected to the common contact. The phase that comes in is connected to the common wire of the switch. The neutral wires from the input, as well as from the two light bulbs, are twisted - three conductors together. There remains a phase wire from the lamps and two from the switch. They are connected in pairs - one conductor from the switch to the phase of one light bulb, and the second output to the remaining lamp.
The need for a reliable connection
First of all, you need to understand why it is so important to pay attention to the reliability of the conductor connections. Even the PUE give recommendations on the choice of connection method and strictly prohibit twisting of wires.
Consequences of incorrectly connected conductors:
- Fire. A poor-quality contact has a high contact resistance. This leads to heating, which can later lead to a fire.
- Damage to wiring. Due to high resistance, the conductor heats up faster. As a result, the insulation may melt and the contact itself may collapse. Damage to the insulating layer may result in electric shock.
- Short circuit. It also depends on the value of the contact resistance.
High contact resistance leads to negative consequences. Therefore, it is important to reduce it, for which permitted methods of connecting multi-core conductors are used.
conclusions
Thus, we have considered all the currently existing methods of connecting wires in a junction box. In order to understand which method will be better, you need to decide under what conditions the wiring will be operated and what load will be placed on it. If you calculate in detail all the parameters of the electrical network in a house or apartment, then all the work can be done with your own hands. Most connecting elements are available for sale in specialized stores or in the hypermarket in the Electricity department.
However, it is worth noting that working with electricity is a responsible task. According to regulations, only a qualified specialist can perform electrical installation work.
In addition, to perform some types of connections (for example, welding), you need to have the appropriate equipment and tools on hand.
Based on the above, it is recommended to contact specialists for help. Do not save money on the safety of your family and home. Proceed with independent electrical work only if you have certain knowledge in this area and confidence in your own abilities.
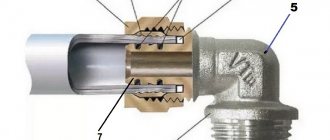
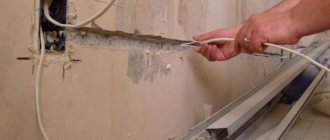
Connection of solid and stranded wires
There are times when it becomes necessary to connect single-core and stranded wires together. In this case, you immediately need to pay attention to the materials from which they are made, since copper and aluminum will inevitably enter into a chemical reaction over time, oxidation and disruption of electrical contact will occur, which will lead to heating and an emergency situation. The connection of an aluminum wire with a copper wire should be done through a bolted or terminal connection, using any of the methods of fixing a stranded wire described above and used to form a monolithic structure.
If you need to connect a single-core and stranded copper wire, this can be done in several ways:
- Twist as shown in the photo below.
- Twisting followed by soldering.
- Using a terminal block.
- Putting the ends under the bolt and pressing them.
After any connection is made, it is necessary to carefully insulate this place with insulating tape or heat shrink.
But since twisting is prohibited according to Chapter 2.1 of the PUE, clause 2.1.21, this method is suitable for a temporary connection. It is better to make rings, tin them and connect them with a bolt, or use lugs with ring terminals. You can also use WAGO type terminal blocks.
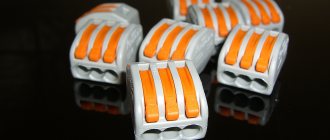
Self-clamping terminal block Wago
This method is widely used both in production and at home due to the fact that, firstly, it is simple and easy to use, and secondly, it does not take much time.
In terminal blocks of this type, the wire snaps into the socket. With its help, you can simultaneously connect up to 8 wires at once. Some terminals already have a special contact paste applied to them, which prevents oxidation of the aluminum conductors.
{SOURCE}
What to do if there are several cables?
The following methods are suitable for connecting more than two cores:
twist. The maximum number of cores is 6. They are straightened and folded parallel to each other, then twisted with pliers; PPE. The connector allows you to splice 4 wires, but only with a cross-section of 1.5 square meters. mm. With a larger cross-section - only two wires; bolted connection. You can put as many wires on the bolt as you like, as long as it is long enough; welding; soldering; crimping with sleeves. Several wires are inserted on one side of the sleeve
It is important to choose the right cross-section of the product: it should only slightly exceed the total cross-section of the cores - then the connection will be of high quality; terminal block. There are products with multiple wire connectors
Also, several wires can be secured in one terminal if they have the same cross-section.
Wires with different cross-sections cannot be connected to one terminal: the smaller one will be pressed with insufficient force.
Sleeves
The third simple way to connect conductors is crimping with sleeves.
GML sleeves are most often used for joining copper wires. Deciphered as:
- Gilsa _
- Copper _
- L narrowed
For connecting pure aluminum - GA (aluminum sleeve):
To switch from copper to aluminum, special adapters GAM:
What is the crimping method? Everything is quite simple. Take two conductors and strip them to the required distance.
After this, on each side of the sleeve, the conductors are inserted inside, and the whole thing is crimped with press pliers.
Despite its obvious simplicity, there are several rules and nuances in this procedure, if not followed, you can easily ruin a seemingly reliable contact. Read about these mistakes and rules on how to avoid them in the articles “5 Rules of Crimping” and “Crimping Insulated Tips, Sleeves and Terminals”.
To work with conductors of large sections 35mm2-240mm2, a hydraulic press is used.
Up to cross-sections of 35mm2, you can also use a mechanical one with a large span of handles.
The sleeve must be crimped two to four times, depending on the cross-section of the wire and the length of the tube.
The most important thing in this work is to choose the correct sleeve size.
For example, when connecting a monocore, the sleeve is usually taken to a smaller cross-sectional size.
And in this way you can connect several conductors at one point at the same time. In this case, only one sleeve will be used.
The main thing is to completely fill its internal space. If you are crimping three conductors at the same time, and you still have voids inside, then you need to “fill” this free space with additional pieces of the same wire, or with conductors of a smaller cross-section.
Only after this can you press.
After crimping, such a connection must be insulated. The most convenient way to do this is with a heat-shrinkable tube HERE.
There are tubes with an adhesive base. When heated, this glue flows out and ensures the tightness of the connection.
Insulation using a thermal tube is also a fairly simple process. In the absence of a gas burner or hair dryer, even a lighter is sufficient for small sections.
Sleeve crimping is one of the most versatile and reliable connections, especially when it is necessary to extend the cable, including the input cable.
In this case, the insulation turns out to be almost equivalent to the main one, when also using the outer tube HERE as a casing.
Of course, you won’t use either PPE or Wago for these purposes, but GML cartridges are just the thing! At the same time, everything comes out compact and can be easily reduced, either in a groove or in a cable channel.
Twist
Today, connecting electrical wires to each other using the twisting method is prohibited, since it is considered the most unreliable and unsafe compared to other methods. By choosing the twist option, all responsibility for possible consequences will be assigned only to you.
The connection will be very simple: you need to remove about 10-15 mm of insulation from each cable and carefully screw them onto each other. When fastening wires with a cross-section of up to 1 mm, at least 5 turns must be made, with a larger cross-section - at least 3 turns.
Video description
The video shows the design of the WAGO 222 series self-clamping connector:
It should be noted that the lever model is reusable. In principle, it has no other differences from disposable terminal blocks. The manufacturer today offers models that can operate at currents up to 32 A.
Let's add to the advantages of self-clamping and spring designs the fact that during operation the terminals heat up, and accordingly their pressure plate expands. And this increases the downforce of the element.
Spring type connector Source a.allegroimg.com
Terminal block DKS
A more outdated method of branching a wire is to use DKS terminal blocks. It is not recommended to use compact terminal blocks, because... in this case, it is impossible to do without cutting and tearing the main core. In addition, the terminal block also has such disadvantages as poor sealing and the need to periodically tighten the clamping screw, especially if the conductor is aluminum. As a result, you do not get any important advantages when splicing and at the same time you get several serious disadvantages.
Terminal Blocks Overview
Modern technologies
In many cases, the methods discussed are gradually becoming a thing of the past. They were replaced by factory wire connectors, which made installation and switching work much easier and faster:
- Terminal blocks, inside of which there are tubular brass sleeves. Stripped wire strands are inserted into these tubes and secured by tightening the screws.
- PPE caps, inside of which there are compression springs. The cores are inserted into the cap and then turned clockwise with little effort, thereby reliably compressing the connected wires inside.
- Self-clamping terminals. It is enough to place the wiring in them, and there it is automatically fixed due to the pressure plate.
- Lever-type terminal blocks. This connecting element is reusable. It is enough just to lift the lever, insert the conductor into the contact hole and lower the lever back, reliable fixation is ensured.
We do not talk in detail about all existing terminal blocks, since there is a separate article about this, where each type of wire clamp is discussed in detail.
We hope that we have clearly explained to you how to connect the wires correctly. Choose the method that suits you best. When choosing, take into account the cross-section and material of the conductors, the location of the connection (outdoors or indoors), and the amount of load current that will flow in this electrical circuit.