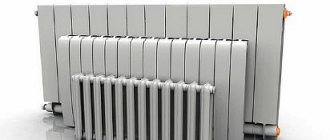
One of the most common ways to improve heating in an apartment comes down to installing additional radiators or increasing the number of registers. You just need to know the assembly diagram according to which you can connect the heating radiators to each other. The process is quite troublesome; you still need to be able to disassemble the old battery without damaging the fittings and pipes.
It is better to build sections together
Types of heating systems
Modern methods of connecting a heating radiator are extremely important nuances in matters of providing home heat. In construction practice, the two most common types of heating systems are single-pipe and two-pipe. It is precisely what type of heating you have in your home that determines the scheme by which the radiator will be integrated.
By the way, even if you do not connect the battery yourself, but with the help of professionals from a specialized company, you should still be aware of what kind of heating system was installed for you. For clarity, let's consider each of these types in more detail.
Single pipe heating
This type works on the principle of supplying water to a modern radiator, usually integrated in an apartment in a high-rise building, that is, in a high-rise building. This heating battery connection is considered the most accessible and simplest type.
But this system also has its drawbacks: taking into account such seemingly simple installation work, a single-pipe system does not imply the possibility of independently regulating the supplied heat. That is, this type of heating does not provide any additional devices that can provide the homeowner with such a service. In view of this, heat transfer in the apartment is supplied in accordance with the initially established design level.
Two-pipe heating
The operation of this system is based on the movement of hot coolant through the first pipe, while through the second pipe in the opposite direction - the already cooled liquid is removed. In this type of heat supply, there is a parallel method of connecting heating devices.
A characteristic feature of a two-pipe system is the methodical uniformity of heating of all its components. Plus, the owner of such heating has the opportunity to independently regulate the heat in the apartment using a specific valve mounted near the radiator itself.
Advice
Pay attention to the document regulating the standards for the correct connection of heating radiators. Its name: SNiP 3.05.01-85
In conclusion, we draw conclusions
Now it’s probably easier for you to decide which radiator to choose for your apartment - after all, out of the four options considered, there are only two left. As it turned out, neither steel nor aluminum radiators will withstand the test of either aggressive domestic coolant or pressure drops. So, what remains are bimetallic and cast iron appliances. What exactly to buy, look at your budget, as well as the characteristics of specific models. However, here you can give a couple of tips.
- In old houses (for example, “Khrushchev” buildings) it is quite possible to install cast iron products. If you live in a high-rise building, where the pressure of the heating system is higher, then it is still better to take bimetallic radiators.
- If the predecessors of your future new batteries are made of cast iron, then you can choose either of two options. Both bimetal and cast iron are suitable. If you are going to replace batteries made of another metal, then change them only to bimetallic ones.
Methods for connecting heating radiators
Heating radiators are mounted on the wall, or, occasionally, on the floor. There are several ways to connect them.
The methods themselves are divided according to the side of the pipe connection (side, bottom) and according to the scheme for connecting several radiators at the same time (parallel, serial, cross).
The choice of a specific option is made based on several conditions:
Let's look at connection methods in more detail.
Lateral
This option is the simplest and most common, since most radiator models have side pipe outlets. This is how it is calculated by the manufacturer.
The side connection is also convenient because unscrewing the nuts from the side is much more convenient than from below under the device body.
In addition to the bottom connection, there are wall-mounted radiators with top connection. The top side is usually clearly visible, so the connection will be visible and such a scheme is rarely used by manufacturers. The technological connection with it does not differ from the options with a bottom or side arrangement.
Lower
Bottom pipe connections are most often used when they are laid hidden under plaster. It must be taken into account that pipes with coolant, when laid even in non-combustible walls, require good thermal insulation.
Coolant temperatures up to 90 C do not pose a fire hazard. Thermal insulation is constructed so that only the radiator is heated, and not the wall from the inside. With properly designed thermal insulation, the efficiency of the heating system does not decrease.
Parallel
Powerful sections are connected in parallel. The advantage of this method is that the radiators are well separated from each other.
They can be replaced, repaired, turned off, and the operation of the entire heating network is not disrupted. The option is often used in private homes and autonomous heating systems.
Sequential
The sequential scheme is beneficial when low-power radiators are installed and there are a large number of them in one common heating system.
In a sequential circuit, maximum savings in connecting pipelines are achieved. That is why it can often be seen in centralized networks, while the two-pipe parallel circuit is practically never found there.
Cross
By cross we mean a combined connection scheme with parallel and serial connections.
This option is suitable when you need to use radiator models of different power. Many centralized heating systems are assembled using a cross pattern.
Direction of coolant circulation
The lower saddle connection of the batteries using a lower vertical collector allows you to not depend on the direction of coolant supply. This cannot be said about the lateral and diagonal leash, as well as when radiators with a bottom connection point are used: here the supply must be clearly adjusted. Otherwise, the heating of the device may stop completely, or it will heat up very weakly. A lateral or diagonal connection involves the use of a top feed (the return pipe in this case comes from below).
When installing a bimetallic radiator with a bottom connection, it is important to clarify in advance which of the inputs will be connected to the supply. Usually this information is indicated in the passport
It is important not to confuse the directions, because... The supply in such heating devices is equipped with a tube extending upward from the inlet assembly. With its help, the coolant is brought to the upper collector. After this, it spreads over the radiator.
How to add sections
After you have experimentally determined that the reason for the cool temperature in the house is not a clogged radiator, you should find a store near your home (so that you don’t have to travel far away and thereby waste your time) that sells heating equipment. You need to buy the same sections that your radiator is equipped with - made of cast iron, aluminum, or bimetallic.
It should not happen that you select inappropriate sections - because of such an error, you simply will not be able to add them, that is, the money spent will be thrown away, so be careful. The procedure for increasing sections is carried out in the same sequence of actions for all types of heating radiators.
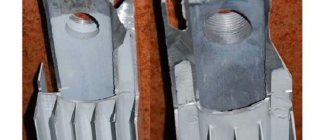
To join sections, you need a connecting nut - nipple
Let's proceed directly to increasing the number of sections. The first step is to unscrew the fitting using a radiator wrench on the side to which you plan to add one or more elements. After you have unscrewed the fitting, a nipple (connecting nut) is placed in the area where the sections join. The following important feature must be taken into account: the threads at different ends of the nipple are different, and in order to correctly install new sections you must follow the following rules:
- The right side of the nipple should be directed towards the direction where the connection to the new element will be made;
- Accordingly, the left one is towards the already present sections of the heating radiator.
In order to prevent further leakage of the battery, you should put intersection gaskets on the nipple (they can be rubber, paranitic, or gel)
At the same time, they must be put on carefully and carefully - this will guarantee that the gasket will be positioned as evenly as possible, without unwanted distortions. Next you need to tighten the thread
This action should also be carried out without sudden movements, in a leisurely rhythm, and carefully. If you want to build a high-quality heating radiator, then there can be no rush.
To prevent leakage, an intersection gasket is required
Damage to metal threads is extremely undesirable - this may result in not the most harmless problems, the solution of which will require you to additionally spend your own time and financial resources.
The enlarged radiator must be placed back on the bracket and the connection to the central heating pipe restored. To do this, you need to arm yourself with a wrench of the appropriate diameter and tow, which is necessary for wrapping the pipe threads when screwing the radiator.
It’s not difficult to add sections to a heating radiator; you don’t need to work in a team of heating installers for 10 years. But this process cannot be done without a serious approach, the availability of basic tools and the removal of your personal time. However, you can resort to the second option for solving the problem of insufficient heating of the room - becoming a client of a company providing such services, whose employees will do everything themselves, quickly and efficiently.
Required materials and tools
To expand sections, you must purchase a complete set of parts:
- Nipple - adapter to connect one section of a heating radiator, you will need at least two pieces;
- Linen tow for packing threads on the nipple;
- Silicone ring, one for each nipple;
- Mounting wrench with crank;
- Coccygeal plumbing wrench.
Approximately the same set will be needed to connect several additional cast iron sections. To expand a cast iron battery, you will definitely have to acquire a gas burner to burn out the plug plug. If in an aluminum case all tees and plugs, including the Mayevsky tap, can be easily removed, then on cast iron the tow is first burned out, only then it will be possible to remove the plug and connect the case with additional registers.
You will also need a hammer drill or impact drill, brackets and dowels, with the help of which the reinforced heating radiator will need to be mounted on a new mount.
We connect radiators to different water circulation systems
The heating fluid, which is usually ordinary water, circulates in the system in two ways - forced or natural.
Forced operation of the coolant is carried out thanks to a water pump pushing water through the pipe. Of course, such a pumping device is an element of the overall heating scheme. Installation of such a unit is either carried out directly next to the heating equipment - a boiler, for example, or is initially included in its “original” package. You will find out how to choose a heating radiator for your apartment in a separate article.
1. Single-pipe series natural circulation heating system 2. Two-pipe parallel natural circulation heating system
Another system, which has natural circulation, is very effective and efficient in places where power surges most often occur. In the indicated scheme of such circulation there is no pumping device, but there is a place for a non-volatile boiler. The movement of liquid through the system is carried out due to the displacement of a cooled coolant by a hot stream of water.
Factors to consider when implementing radiator connections:
- specifics of the laid heating main;
- its length and so on.
How to properly connect heating radiators to each other
Many homeowners are not happy with the heating efficiency of their apartment. This issue becomes especially acute during severe cold weather. Sometimes poor heating is associated with a worn-out radiator. In this case, the heating structure is replaced with more efficient and powerful equipment. Today, ceramic radiators, bimetallic and aluminum radiators are available for sale. But cast iron models remain the most reliable and durable. If the battery is in excellent condition, it is not advisable to change it. In this case, you can add sections to the radiator. This article is devoted to how to increase the heating battery.
Disabling the heating riser
Problems associated with disconnecting the riser are often the most difficult to solve. When replacing heating batteries, the riser will need to be turned off for at least half a day. According to the law, the riser belongs to joint property.
Access to public property must be provided by the appropriate utility service, which has the necessary permits and is responsible if anything goes wrong.
Basement with taps
What does this mean in practice? It is necessary to write an application to the operational office. Based on this document, utility services are required to turn off the riser at the time specified in the application. By law, this is a paid service. This pleasure costs 15 – 20 US dollars.
You can negotiate cheaper with the chief engineer, foreman or one of the foremen. Local plumbers will turn off the risers. It will cost ten dollars.
How to connect the battery
Without understanding how to connect heating batteries, without knowing the operating principle of the heating system, you will not be able to properly expand the radiator.
Preparatory work
The first step is to carry out preparatory work. This includes removing the radiator. It is necessary to remove the sections that are planned to be built up.
The battery must be cleaned, rust, dust and dirt removed.
You should inspect the threaded hole that connected the structure to the pipe. There may be growths here. They must be removed using sandpaper. Otherwise, the intersection gasket will not be installed airtight. And this can lead to the heating system leaking.
Attaching sections
Next, the sections are joined.
The connected sections are placed tightly against the battery. They make a gasket. Using a radiator wrench, measure the distance to the nipple. The nipple is inserted into the battery to the marked length. Use a pipe wrench to turn the radiator wrench. Then the nipple is wrapped into two opposite sections. Make 3 turns with the radiator wrench. Similar actions are performed with the lower part of the battery. Next, paronite gaskets and side plugs are taken and installed in the battery. In this case, a pipe wrench is used. The main thing is to tighten it very tightly to create a reliable, airtight structure. The section is attached to the radiator. The remaining sections are connected in a similar manner.
Mounting the radiator to the wall
After all additional sections are attached, the radiator is mounted to the wall. To do this, install hooks at the level of the battery location. The structure is being hung. All joints are fixed using fittings. Tighten with a wrench. All joints are treated with sealant. Recently, special adhesive tapes for pipes have appeared on sale.
Test work
The resulting structure is inserted into the pipe at one end and into the battery at the other. The connections are tightened tightly with a wrench. When installation of the fitting is completed, waterproofing is carried out.
After the assembly of the heating batteries is completed, the system is inspected for defects. If everything is in order, a test run of the coolant is carried out. The first time the water is released under reduced pressure. This allows you to detect where the connection is poor and leaking. If leaks are detected, the water is turned off and work begins to eliminate the problem. The second time the coolant is started under normal pressure.
After you have succeeded in connecting the heating battery, you need to let the radiator run for several hours. And after this time, check the condition of pipes, fittings, batteries.
What is required to expand the battery?
Before connecting the heating radiator, you need to calculate how many sections need to be installed to heat the room more efficiently. And purchase the required number of additional sections. It is better to choose cast iron.
Also, before properly connecting heating radiators, you should prepare all the necessary tools and purchase some materials:
- pipe wrench;
- radiator key;
- nipples for heating systems;
- side plugs for radiators with right and left threads;
- intersection gaskets for radiators;
- paronite gaskets;
- sandpaper.
Radiator connection diagrams
How well the radiators will heat depends on how the coolant is supplied to them. There are more and less effective options.
Radiators with bottom connection
All heating radiators have two types of connection - side and bottom. There can be no discrepancies with the bottom connection. There are only two pipes - inlet and outlet. Accordingly, coolant is supplied to the radiator on one side and removed from the other.
Bottom connection of heating radiators for single-pipe and two-pipe heating systems
Specifically, where to connect the supply and where the return is connected is written in the installation instructions, which must be available.
Heating radiators with side connection
With a lateral connection, there are many more options: here the supply and return pipelines can be connected into two pipes, respectively, there are four options.
Option #1. Diagonal connection
This connection of heating radiators is considered the most effective, it is taken as a standard and this is how manufacturers test their heating devices and the data in the thermal power passport for such a connection. All other connection types transfer heat less efficiently.
Diagonal diagram for connecting heating radiators with a two-pipe and one-pipe system
This is because when the batteries are connected diagonally, the hot coolant is supplied to the upper inlet on one side, passes through the entire radiator and exits from the opposite, lower side.
Option #2. Unilateral
As the name implies, pipelines are connected on one side - supply from above, return from below. This option is convenient when the riser runs on the side of the heating device, which often happens in apartments, because this type of connection usually predominates. When the coolant is supplied from below, this scheme is used infrequently - it is not very convenient to position the pipes.
Lateral connection for two-pipe and one-pipe systems
With this connection of radiators, the heating efficiency is only slightly lower - by 2%. But this is only if there are few sections in the radiators - no more than 10. With a longer battery, its farthest edge will not heat up well or will remain cold at all. In panel radiators, to solve the problem, flow extenders are installed - tubes that bring the coolant a little further than the middle. The same devices can be installed in aluminum or bimetallic radiators, thereby improving heat transfer.
Option #3. Bottom or saddle connection
Of all the options, saddle connections for heating radiators are the least effective. Losses are approximately 12-14%. But this option is the most inconspicuous - pipes are usually laid on the floor or under it, and this method is the most optimal from an aesthetic point of view. And so that losses do not affect the temperature in the room, you can take a radiator a little more powerful than required.
Saddle connection of heating radiators
In systems with natural circulation, this type of connection should not be made, but if there is a pump, it works well. In some cases, it’s not even worse than the side one. It’s just that at a certain speed of movement of the coolant, vortex flows arise, the entire surface heats up, and heat transfer increases. These phenomena have not yet been fully studied, therefore it is not yet possible to predict the behavior of the coolant.
Calculation of power, number of sections
Before choosing a heating radiator for an apartment, you need to calculate how many sections should be installed in each specific room and determine the power and pressure rating of this device. This is done as follows:
Selecting radiator power
In this case, the following points must be taken into account:
- Type of building (brick or panels).
- The area of the heated room.
- Number of windows.
- Presence of external walls.
- Type of glazing in the apartment (double glazing or wooden windows).
According to the standard, in a room with a ceiling height of 3 m, having one window with a wooden frame and one door, a radiator with a power of 90-125 W per 1 m2 is usually installed.
Useful information: To select a battery of optimal power for a room, for ease of calculation, you need to multiply its area by 100 W.
If there is one window and two external walls, this figure must be increased by 20%.
If there are two windows and two external walls - by 30%.
When the window is located on the north or northeast side: + 10%.
When placing the radiator in a niche: + 5%.
If there is a continuous screen on the battery: + 15%.
Deciding on the number of sections
Average power of a radiator section of various types:
There is another option for calculating how to choose the number of sections of a heating battery so that it is comfortable in a heated room, which is considered more accurate. This calculation is also made taking into account their heat transfer. In this case, the unit of space is not the area of the room, but its “cubic capacity”, that is, the volume of air mass that is to be heated. Each room is calculated separately: first, the power of the heating device is selected, and then the number of its sections is calculated.
Considering that to heat 1 m 3 of air space in a living room, 39-41 W of energy is needed, in order to heat a room of 10 m 2 with a ceiling height of 3.0 m, 1230 W are needed.
- We calculate the cubic capacity: 3 x 10 = 30 m3.
- We determine energy consumption: 41 x 30 = 1230 W.
Let's agree that each section of a modern heating battery produces approximately 200 W of energy. That is, to calculate the optimal number of sections you need 1230:200 = 6.15 sections. Round up. It turns out that in a room with a cubic capacity of 30 m 3 you need to install a radiator with 7 sections.
Useful information: When installing a battery in a corner-type room, a heat loss coefficient (1.1-1.3) is added to the formula for calculating the number of sections, the value of which must correspond to the climatic zone. The result will be: 1230·1.3:200=7.995. That is, for such a room a radiator of 8 sections is suitable.
Understanding working pressure
When purchasing heating radiators, you need to take into account their operating pressure, which should be higher than the pressure of the heating system at home
This is especially important when conducting hydraulic tests, when the load on the system is especially intense. For different types of batteries it has its own meaning:
- For cast iron - 6-12 atm.
- For aluminum ones - 16-20 atm.
- For bimetallic ones - 35 atm.
- For steel ones - 6-10 atm.
We have a separate article about the need for an expansion tank in the heating systems of private houses, as well as about its installation.
Pros and cons of connecting batteries in series
Pros of serial connection:
- low cost of consumables;
- All types of radiators can be used;
- if necessary, pipeline;
- heating devices cover the entire perimeter of the room;
- easy installation;
- small amount of consumable material.
Minuses:
- complex process design;
- high heat loss coefficient: due to the characteristic elongation of such a line, the coolant cools towards the end;
- in the absence of a circulation pump, stagnation of the liquid moving through the radiators occurs and a decrease in the efficiency of the system as a whole;
- in the absence of thermostats on batteries, there is a lack of control over the heat supply.
Instructions for adding heating radiator sections
Often, residents of houses and apartments are faced with one very serious problem - despite the systematic supply of coolant at the required temperature, there is a lack of heat in the house, and staying in it causes some discomfort. To solve this problem, you will need to increase the heating radiator. What does this kind of work involve? The essence of this procedure is to add sections to the radiator, thereby achieving a comfortable temperature in the home.
Sections before the radiator are added if you need to heat a large room
First, you will need to find a key for radiators; you must have one - if for some reason you cannot find it, then you need to borrow it from a friend or neighbor for temporary use, or go to the store to buy a new one. So, with this key you must remove the radiator, depriving it of connections to the heating system. Next, we take it to the bath and direct water into it.
Without a special key, adding sections will be impossible
There are a large number of cases where apartment residents complained about the insufficiently comfortable air temperature in their home, and the reason for this was a simple clogged radiator, which did not allow it to work “at full capacity.” But if you send water to the radiator, and it passes through its channels without obstacles and comes out clean, without having a cloudy appearance, then the matter is not that the heating device is clogged. Help in this case can only be provided by adding sections, which, by and large, is nothing complicated or difficult if you approach this task responsibly.
How to shut off a heating radiator in an apartment: educational program from experts
From the author: hello, dear friends!
The need to shut off the battery in an apartment building can arise for completely different reasons, and not only during the heating season. The purpose of this article is to sort out the question “How to turn off the heating radiator in an apartment?” Residents of private houses do not have this problem due to the autonomy of the heating system. But in an apartment where the battery is part of a multi-level system and is firmly connected to neighboring heating devices, it is important to follow certain rules. After all, shutting off the radiator yourself can lead to unpleasant consequences.
The need to disconnect
Before moving on to the diagram for disconnecting the battery from the riser in an apartment building, we suggest considering the basic reasons that can cause a malfunction of the heating system.
Here is a list of the most likely reasons for a battery disconnection:
- an emergency situation that threatens to flood your and your neighbor’s apartment with hot coolant;
- painting radiators in the cold season, when the heating is already on;
- if there is a need to change the radiator or flush it;
- In winter, the radiators are too hot and you want to lower the room temperature.
In some apartments, residents practice shutting off radiators in the summer without draining the coolant in order to protect radiators from blockages when the heating system is turned on in the fall. At this time, water often flows through the pipes with rust fragments. We will tell you how to do this correctly in one of the sections of this article.
Disconnection instructions
You should not have problems disconnecting the radiator if it is connected to the overall system correctly, using ball valves (shut-off valves). In this case, you will be able to quickly and “painlessly” shut off the flow of coolant at any convenient time, without disturbing the thermal conditions of your neighbors’ apartments.
Is it possible to shut off the battery? You can if you follow the steps below sequentially.
- Turn off the taps on the battery - first the lower one, then the upper one.
- If you are planning to paint the radiator, then the first point is quite enough for you. Just wait until the battery cools down and start painting it;
- If you shut off the battery because you need to replace it, or repair a part of the heating system in the winter, then before removing the battery, you need to release the pressure using a Mayevsky tap.
You should unscrew the bottom plug, drain the water, and after that unscrew the joints and remove the battery.
Source:
Now let's figure out how to turn on the battery correctly to avoid the formation of an air lock. Essentially, the algorithm is the same: first you need to open the lower valve, then the upper one. The last step is to release the air using the Mayevsky tap. If you first open the upper valve and then the lower one, some of the air will remain inside the radiator section.
How to properly open a stuck ball valve
It has been noticed that if ball valves are not used for their intended purpose for many years, they tend to jam due to scale formation. Do not use brute force when trying to open the tap using a gas wrench, pliers or pliers. The butterfly faucet is made of a brittle alloy, which means that it is guaranteed to crumble from excessive force.
Here's how to behave if the faucet handle doesn't budge the first time.
- Unscrew the fixing nut and remove the butterfly from the rod.
- Usually in such valves there is a nut under the “butterfly” that secures the plastic seal.
It needs to be weakened. Use the key and turn half a turn. Let's assume that there is no nut, then this point should be skipped. - You will need a tool that will allow you to firmly grasp the flats of the stem. It could be an adjustable wrench. Without excessive force, turn the rod as much as possible.
- When you feel resistance, move in the opposite direction, trying to gradually increase the amplitude by a few degrees.
- In this way, you should develop the rotation of the rod until you reach 90°. When you achieve this result, return the gland nut to its place and install the butterfly handle.
Tip: if your household has WD-40 aerosol lubricant, you can apply it to the soured rod and leave for 5-10 minutes. This will make the process of unscrewing it easier. In the case of battery maintenance, the proverb “Prepare the sleigh in summer and the cart in winter” rings true. If you try to shut off the battery with a faulty ball valve while the heating is already turned on, you may have an emergency situation!
Let's assume that you didn't want to follow our recommendations and tried to forcefully shut off the battery. As a result, not only the rod can break off, but the valve body can also burst. Hot coolant will pour out of the crack at you under pressure, and this is fraught with serious burns. While you run to the basement to shut off the riser in an apartment building, your furniture and interior may be damaged. The neighbors below may also have to make repairs. It is better to seek help from master plumbers who have the appropriate qualifications and the necessary tools.
How to turn off a radiator without shut-off valves
Let's assume that your apartment has “Stalinist” cast iron radiators or steel convectors. The design of these devices does not imply the presence of shut-off fittings. This means that it is not possible to shut off the batteries during the heating season.
Moreover, the old heating scheme involved connecting batteries in apartment buildings directly to the risers without bypasses (direct sections).
Here's what to do if an old-style battery leaks:
- you need to take care of some kind of container into which the water would flow. There are situations when the jet hits the side with strong pressure. In this case, you need to wrap a rag or rags around the place where the boiling water is gushing, so that the water can drain into a substitute basin;
- inform the company that provides heating for your home about the incident;
- do not sit idly by while the rescuers of your property arrive. Take care of access to the basement, find the keys, open the door - this will make it easier for specialists to solve your problem as soon as possible;
- try to close the riser yourself.
I would like to dwell on the last point in more detail. To turn off the heating riser, you should go down to the heating point of the entrance. Your goal is vertical pipes that are embedded in a large-diameter main; they can also be part of a common collector.
Next, you need to identify the emergency riser in an apartment building in order to properly close it.
After you have turned the valve, call your household and check if the battery has stopped leaking. If yes, you have completed the task; if not, open the riser valve (since you seem to have left your neighbors without heat) and continue your search. You need to close all available valves one by one until you find the pipe that is responsible for your home.
We recommend reading:
Source:
Important: if the basement pipes are covered with rust and do not give way, do not use force. We'll have to wait for the emergency crew to arrive. They will figure out whether it is possible to block the pipe and find a way to fix the breakdown. Otherwise, you risk breaking the main pipe valve and leaving not only your apartment, but the entire house without heat!
How to properly shut off batteries for the summer
We already mentioned at the beginning of the material that in some apartments the owners turn off the radiators for the summer. The purpose of this event is to avoid clogging the radiator with dirt and rust, which often occurs in the water during the start of the heating season in the fall.
This precaution is especially relevant for batteries with narrow channels - aluminum and bimetallic.
Here's what you need to do if you decide to turn off the batteries for the summer: turn off the taps on the radiator connections , since it is unclear whether there will be water in the batteries in the summer.
In most cases, utility services in apartment buildings drain water from the risers and the heating system as a whole, which leads to metal damage due to corrosion.
Advice: it’s great if your home has batteries made of cast iron; such an alloy is not subject to corrosion, and wide flow sections allow you to avoid blockages.
Let's consider the sequence of actions when turning off the radiator for summer time:
- It is important to choose a period when the heating is almost turned off, but there is still water in the pipes. You should turn off the taps near the battery, starting from the bottom;
- In the fall, you should wait until the heating system starts up - you will hear a characteristic murmur in the riser;
- wait a few days and make sure the pipes have warmed up. Next, you should open the valves and use the Mayevsky tap to bleed the air. By this time, water with impurities will already pass by your apartment along the riser.
Advice: if for some reason you missed the moment and did not have time to empty the heating system, you can still turn off the battery taps. When the heating season arrives, wait a few days and turn on the batteries. In conclusion, I would like to note that disconnecting radiators from the riser in an apartment building is a simple procedure if the batteries are equipped with shut-off valves. See you on the pages of our website!
Source: https://seberemont.ru/kak-perekryt-batareyu-otopleniya-v-kvartire/
General information about heating systems
It is important to initially decide how to connect heating radiators to each other. In the language of specialists, you should decide which method of piping heating devices to use
For all types of heating systems, two methods of laying pipelines are used:
Two options: double-sided and one-sided arrangement of the heating pipeline
Single-pipe scheme
Systems in which hot water is transported as a coolant through one line are less efficient for the following reasons:
A useful formula for those who are just planning to “warm up”
- They practically do not allow you to regulate the heating of a separate device;
- As you move away from the coolant source, its temperature gradually drops and the last radiator in the chain may turn out to be barely warm, or even completely cold;
- In the event of an emergency on any part of the network, the heating must be completely turned off.
For your information! The only advantage of this type of heating pipe layout compared to two-pipe is its low price.
Such single-pipe heating systems are used mainly in high-rise buildings with a centralized supply of heat to consumers.
Two-pipe scheme
In the private sector, to create autonomous (loop-circuited to one consumer) heating systems, a two-pipe radiator piping scheme is most often used:
- One of the pipes supplying coolant to the device;
- The other is for the reverse movement to the source of heating of the coolant (boiler).
A simple two-pipe system looks like this
All batteries in the system are connected in parallel, so that the two lines operate completely separately and are connected only at the end radiator.
The two-pipe radiator connection scheme provides the following advantages:
- The ability to regulate the heating of each device in the circuit, which ensures the creation of the most comfortable conditions in various rooms;
- Regardless of the distance between the boiler and the battery, each of the devices heats up equally;
- If repairs or replacement are necessary in any part of the system, it does not require a complete shutdown.
Now we’ll talk about how to properly connect a heating radiator with your own hands.
The principle of tying polypropylene pipes
Plastic pipes are popular due to their low price and ease of installation. Polypropylene does not rust and is therefore durable. The boiler is connected with such pipes by hot welding using a special soldering iron.
Antifreeze does not combine well with polypropylene, so water is used as a coolant for this type of piping.
When choosing plastic piping, the most important point is to take into account all the features of a particular building. The installation process itself is not complicated; even a beginner can handle it. The preparation of the project should be carried out by experienced professionals, since the slightest errors and shortcomings can lead, at best, to heat loss and increased fuel costs, and at worst, to serious accidents.
Preparatory actions
Before starting the process, a detailed design of the heating system for each specific room is calculated.
Then one of the serial connection options is selected: horizontal or vertical, based on the characteristics of the living space and personal preferences.
Then, focusing on the selected type of circuit, you need to decide on the coolant. For vertical connections, it is better to use antifreeze diluted in water, and for horizontal connections, use plain water.
How to connect two heating radiators, diagram
- Initially, with a series connection, the location of the heating boiler is determined. It is usually located in the basement on a special fire platform. The expansion tank is firmly fixed above it.
Attention! The height of the expansion tank relative to the boiler must be at least three meters
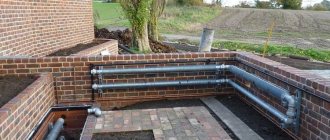
At the same time, proper adjustment of the chimney is thought out: the draft should be sufficient, and the smoke itself should go outside without remaining inside the room. Afterwards the main pipeline is connected
It is important to avoid bends when laying. There is a pipe running along the perimeter of the entire house, parallel to which all the batteries run.
Photo 2. Diagram of serial connection of batteries in a one-pipe system with a boiler and circulation pump.
- Radiators are placed under window openings.
- Such a circuit should be closed on the heating boiler.
Attention! It is recommended to place a filter in front of the boiler to clean the coolant from any impurities
- It is also necessary to provide an element through which the system will be filled with water and drained.
- In a series connection scheme, you can add taps and thermostats to each battery.
With vertical piping, a circulation pump is included in the circuit for forced circulation of the coolant, and with horizontal piping, a slope of the supply pipe is created, and a Mayevsky valve is mounted in front of each radiator to remove excess air from the system.
What taps should be installed on heating radiators?
Various designs of taps are placed in front of heating radiators. They serve to solve several problems:
- Mayevsky valve - to remove air;
- a regular tap - to adjust the amount of circulating coolant;
- The tap can be used to completely shut off the water during repairs.
The use of plastic pipe allows the installation of simple rotary taps. In an autonomous heating system made of metal pipes, it is better to use threaded valves that do not cause water hammer when closing.
In private autonomous heating systems, taps are placed at the entrances to the premises, in front of vertical sections and in other places. Their presence turns out to be very convenient when carrying out repairs of individual sections of the network.
Independent shutdown of risers
In small towns, it is quite common to turn off the heating on your own.
The riser is turned off by a valve in the basement, where it connects to the so-called sun lounger. Water valves are usually in plain sight. To find fittings to shut off heating, you must either have technical documentation or an experienced plumber who is familiar with city local communications.
As a rule, the heating system is closed with an old brass Soviet valve or valve.
Heating tap in the basement
Radiator integration location
Whether you have a serial connection of heating batteries or a more complicated parallel connection, in any case, remember that heat supply is not the only function of these units. An additional bonus of such devices is that radiators provide good protection from the “cold” intrusion of winds and drafts.
Serial and parallel connection of heating radiators
Therefore, it is not surprising that it is under the window sills that these life-saving devices find their home. Heating radiators can provide an excellent thermal curtain, especially in the localization of window openings.
Advice. Do not mount two radiators close to each other - this is fraught with loss of expensive heat: the density of the hot air flow will decrease significantly, which will entail a sharp drop in the efficiency of the heat supply itself.
Before using a specific type of connection, draw up a schematic plan on which you clearly and visually indicate the locations of the devices, and make correct calculations of the installation distance.
Radiators are positioned correctly in the following cases:
- devices are located at a distance of 100 mm from the bottom line of the window sill;
- distance to floor – 120 mm;
- distance to walls – 20 mm.
Connection steps
The operating technology depends on the selected set of fittings and pipe material. If pipes are laid along the surface of the walls in a room, then the best option is classic metal pipes.
If heating lines are laid in advance under the plaster, or in specially designed channels, then a more modern option can be used. For example, polypropylene heat-resistant pipes.
Work with steel pipes is carried out with a standard plumbing tool kit. Plastic pipes and fittings require specialized crimping tools. They are not needed for all fittings. Many systems have a threaded crimp system.
Advice from professionals
If you plan to add a significant number of sections, you need to use brackets. Without them, a new heavy radiator risks breaking existing pipes and causing an accident.
Other important points:
- Aluminum products cannot always be attached to existing radiators. Those made using extruded technology are not suitable for such work, since they have a non-separable design.
- Bimetal can be expanded without problems, since its design is sectional.
- When connecting the assembled battery, the length of the lounger is reduced by cutting off a piece of material with a grinder to the required size. As a result, there will be no thread at the end of the pipeline.
You can make the connection yourself, the main thing is to follow the rules and do not forget about the need for comprehensive testing of the system before launch.
It is important to follow the rules for connecting old and new sections
And one more thing - installation of cranes is not a mandatory procedure, it is done at your own discretion. If increasing the power of the device requires the installation of one rather than a set of sections, it is enough to follow the standard instructions.
Types of heating systems
The amount of heat that the heating radiator will emit depends not least on the type of heating system and the selected type of connection. To choose the best option, you must first understand what kind of heating systems there are and how they differ.
Monotube
A single-pipe heating system is the most economical option in terms of installation costs. Therefore, this type of wiring is preferred in multi-storey buildings, although in private buildings such a system is far from uncommon. With this scheme, the radiators are connected to the main line in series and the coolant first passes through one heating outlet, then enters the input of the second, and so on. The output of the last radiator is connected to the input of the heating boiler or to the riser in high-rise buildings.
Example of a one-pipe system
The disadvantage of this wiring method is the impossibility of adjusting the heat transfer of radiators. By installing a regulator on any of the radiators, you will regulate the rest of the system. The second significant drawback is the different coolant temperatures on different radiators. Those that are closer to the boiler heat up very well, those that are further away become increasingly colder. This is a consequence of the serial connection of heating radiators.
Two-pipe wiring
A two-pipe heating system is distinguished by the fact that it has two pipelines - supply and return. Each radiator is connected to both, that is, it turns out that all radiators are connected to the system in parallel. This is good because the coolant of the same temperature enters the input of each of them. The second positive point is that you can install a thermostat on each of the radiators and use it to change the amount of heat it emits.
The disadvantage of such a system is that the number of pipes when laying out the system is almost twice as large. But the system can be easily balanced.
Installation
The question of how to install a heating radiator is the most important after abandoning the centralized system or dismantling the old radiator.
- The radiator must be installed on a prepared surface: painted or plastered.
- Use a pencil to mark the mounting level of the new radiator. The following are considered optimal distances: from the window sill - up to 10 cm, from the wall - up to 5 cm, from the floor - up to 12 cm.
- After this, the radiator can be mounted. It must be remembered that during installation the radiator must remain in its original packaging. Cuts are made on the packaging where necessary.
- Couplings are installed at the inlet and outlet; a Mayevsky valve is required for air release. Next, you can install the tap and valve. It would be useful to use a sealant.
- After installing the heating radiator, it is necessary to carry out pressure testing.
Let us remind you that all work on the assembly and installation of radiators must be performed by craftsmen who have professional tools and experience in this field. Only thanks to this, you can avoid the cost of expensive repairs in the future.
Calculation
So, we have made our choice. How to calculate bimetallic heating radiators according to the parameters of your apartment?
With standard (2.5 - 2.7 meters) ceiling heights, you can use the simplest calculation scheme:
- For 1 square meter of room, 100 watts of heat is taken;
- Depending on the climatic zone, a coefficient from 0.7 (Crimea) to 2.0 (Yakutia) is used;
Low winter temperatures increase the need for heat.
The heat output of the section is estimated on average at 180 watts.
Fastening
How to hang a bimetallic radiator on the wall?
- Standardly, pin brackets are used for fastening, which are screwed into plastic dowels;
- Instead, you can use pieces of smooth steel reinforcement with a diameter of 10-12 mm, driven into pre-drilled holes of a slightly smaller diameter.
Harness
What components for bimetallic radiators will be needed when installing them yourself?
- Set of radiator plugs (4 pieces, external thread DN25). The diameter of the internal thread of the passage plugs is determined by the number of sections of the device: if there are fewer than 10 of them, a liner with a nominal diameter of DN15 is sufficient, if more, it is better to take plugs with an internal thread of DN20;
- Throttle or thermal head and ball valve with American connectors for connecting to plugs. The throttle will allow you to regulate the heat transfer of the device manually, the thermal head – automatically, depending on the air temperature in the room;
- In the apartment at the top of the riser, the radiator will have to be equipped with a Mayevsky valve to bleed air.
Radiator connection kit.
What pipes should I use for connection? Preferably corrugated stainless steel.
We invite you to familiarize yourself with an overview of Purmo heating radiators and their technical characteristics
What is this instruction related to?
They have high tensile strength;
- They bend with a minimum radius and do not require precise sizing;
- They are mounted with compression fittings using a pair of adjustable wrenches.
The radiator in the photo is connected with a corrugated stainless pipe.
Assembly Tips
Radiator plugs are sealed with paronite or silicone gaskets - the same ones that are used to build up a bimetallic radiator with additional sections.
Other connections are wound with Tangit Unilok sealant thread or flax with paint.
A diagonal connection will allow you to heat the maximum number of sections.
Spider radiator connection diagram
Let’s figuratively imagine a boiler from which we take a pipeline and bring it somewhere to the center of the house. Usually such a system is called a spider. We lower the risers and collect them, sending it all to the return line. We connect radiators to the pipes. The coolant rises up according to its natural physical laws. That is, the hot coolant goes up, and on the second pipe in the middle it leaves and falls down. It passes through the radiator, cools and enters the return line.
Please note that the lower pipes are sloped. This is the only problem, that you need to do slopes
But it is precisely in today’s time that many are again switching to these old systems, as problems with energy resources begin. For example, the electricity is often turned off, and the pump will not work. The system will just stop. But such a system works for you all the time. The boiler can be any: gas, coal, diesel and even electric. This whole system will work.
This system is very cumbersome. It must be practically brought out onto the roof and into the attic. Therefore, not everyone can master it.