A person who dares to make furniture on his own will receive a high-quality and exclusive item made to suit individual tastes and needs.
Not all designers or factories are ready to provide what you need.
Preparation
Plywood is a versatile wood material. Before the advent of plastics, plywood was used to make everything from airplane wings to children's toys.
Advantages of plywood:
- resistance to warping;
- low fracturing;
- Smooth surface;
- environmental friendliness;
- durability;
- ease of processing.
The first thing you need to determine when designing is what the cabinet will be made from.
Advice . It's worth going shopping and seeing if they have what we need in stock.
Kinds
Different tasks require different thicknesses. The weight of the finished product depends on it
- thin _
Consists of 3 - 7 layers of veneer, with a total thickness of 3 - 8 mm. This type of plywood is lightweight and is good for making panels for frame construction of furniture or for facades. It is convenient to use such plywood as the back wall of a cabinet. - average thickness - 10 - 16 mm. The most popular type, combining load-bearing strength and the ability to withstand end fasteners.
- thick - over 18 mm. It is used for load-bearing critical structures, floors, and weight distribution. From it you can cut out support bars and openwork strong structures for walls.
Types of wood
Plywood consists of veneer sheets glued together. The wood used is spruce, pine, oak, but the most popular is birch. It peels perfectly and has an excellent appearance.
The strength of the wood and its appearance depend on the type of wood used.
There are 5 grades based on the quality of wood used. The first one is the “cleanest”, without knots or visible defects. Fifth - allows for veneer shortages, unevenness, and fallen knots. For a cabinet that will be painted with opaque paints, you can use grade 2-3 ; if you want to preserve the appearance of the wood, you should use grade 1-2.
Advice . Most often, combined plywood is found - outer sheets are made of birch, and inner sheets are made of alder or pine. This will not affect the quality of the furniture, and such material costs much less than high-quality varieties.
Moisture resistance
It depends on the glue used and manufacturing technology.
- FC . Has average moisture resistance. It can delaminate if exposed to water, so it is better not to use it for bathroom furniture.
- FSF . It has excellent properties and can be used in any furniture. When purchasing, you should pay attention to the formaldehyde emission class. It should not be lower than E1; this is an acceptable parameter for use inside buildings.
- FOF . Rarely used for furniture, as it is impregnated with phenol-formaldehyde resins and has a high level of formaldehyde emissions. It has excellent weather resistance - it is not afraid of moisture and cold, so it is mainly used outdoors. There are practically no alternatives for outdoor furniture; fortunately, there is no need to worry about formaldehyde concentrations in the fresh air.
Materials and tools
A well-equipped workshop provides the opportunity to realize any ideas.
Of course, you can use inexpensive hand tools, but in this case the quality will be lower and the labor intensity will significantly increase.
To assemble the cabinet we will need:
- drill _ The end joints of plywood should not be loaded with spacers - it may delaminate. To tighten screws or drive nails, you will have to drill filler holes. You can purchase a frame or a template for your drill yourself - all holes must be perpendicular. A cordless screwdriver of sufficient power can act as a drill;
- sawing tools - machine, jigsaw, circular saw. It is better to cut thick sheets when purchasing - many stores provide sawing services on format-cutting machines. A jigsaw produces a crooked cut; if you have to make a cabinet for a workshop, it will do. For more precise cuts, you will need a circular saw with a guide bar. It makes it possible to cut sheets with an accuracy of tenths of a millimeter;
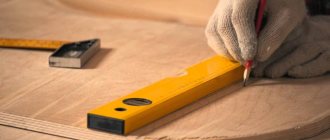
- measuring and auxiliary tool. Parts of high-quality furniture must be precisely sawn. To measure and mark the sheet, you will need a tape measure, a 50 cm long metal ruler, and a small and large square. Angle clamps and clamping clamps will help hold the parts during drilling and assembly. It is better to have several of them - they will be useful for further work;
- if the work is carried out in a residential area, it will be useful to purchase a construction vacuum cleaner - it connects to a power tool and makes the work cleaner. With the help of a simple homemade cyclone, you can use a household vacuum cleaner in this role;
- fasteners _ The peculiarity of plywood is that not every fastener can be used. When expanding, there is a high risk of splitting, so it is worth using adhesive and corner fasteners as much as possible;
- glue - any carpenter's glue. The most convenient are polyurethane compounds;
- corners - galvanized furniture;
- for hidden fasteners with thick plywood, you can use tightening screws ;
- for unloaded areas, you can use self-tapping screws, confirmats or nails . For such spacer fasteners, you need to drill a guide hole with a diameter of 1 mm less. This will not reduce the strength of the product, but will avoid internal stresses.
To fasten the fronts and drawers, you will need hinges and other fittings. It can be purchased online or at your local specialty store.
Scheme and drawing
Cabinet drawing
Before purchasing materials, you should carefully draw the future product and calculate the dimensions. This can be done either manually or on a computer - graphic editors Sketcsh Up or 3Dmax will make the task easier. The contoured large parts are designed first, which are “clogged” with small partitions and compartments.
There are two main technologies for plywood cabinets:
- With a load-bearing wooden frame . The cabinet is a structure made of planed wooden blocks, and the walls are made of plywood or veneer. The design is lightweight and durable.
- With plywood frame . The use of thick plywood will completely replace a wooden frame; the design technologies are the same as in the popular chipboard.
Advice . Before designing, it’s worth browsing through furniture makers’ forums - standard designs are posted there for free access, which you can customize to your liking.
When drawing, do not forget about the thickness of the materials, the location of the fittings, and the location. Opening doors should not interfere with passage; access to all compartments should be easy.
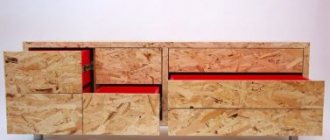
In general, a cabinet is a box with two supporting side walls, a lid, a bottom, “stuffing” of shelves and drawers. A flat lightweight sheet is attached to the back side, giving shear strength, and doors are attached to the front side if desired.
The result of this stage will be the following materials: a general drawing of the cabinet, an assembly drawing with dimensions and notes on fasteners, a list of parts indicating thickness, dimensions, and method of fastening.
Design and size of the structure
When choosing this or that model, you need to remember that even beautiful and unusual chairs should, first of all, be comfortable and safe. Therefore, you should start with the selection of suitable materials and design dimensions. Basic rules to follow:
- For the manufacture of load-bearing elements, plywood with a thickness of 18-24 mm is used; for backs or seats, 12-16 mm is sufficient. Only in this case will the structure withstand the weight of an adult; for children's models, the thickness can be reduced by 1-3 mm.
- The standard height of plywood chairs for adults varies from 42 to 48 cm; for children, the value decreases to 25-35 cm, depending on age. The main selection criterion is that the legs should be positioned at right angles and reach the support.
- If you plan to use the chair outdoors or in damp rooms, it is better to use moisture-resistant or laminated plywood.
- To obtain an aesthetically pleasing appearance of the product, it is necessary to use only grade 1 or grade 2 material; others will be extremely difficult to sand and paint with high quality.
- For use at home, stool chairs or designer models are more suitable, while for a garage or pantry it is better to give preference to folding or transformable products.
- The design of the manufactured interior item must correspond to the style of the living space. Simpler models with minimal decor are suitable for outbuildings and garages.
When choosing the design of future furniture, you should realistically evaluate your skills in working with wood and the availability of tools, since parts that are complex in shape, and especially curved ones, are not as easy to make as they seem.
Use plywood with a thickness of 18-24 mm for load-bearing elements, for backs or seats - 12-16 mm
Standard chair height
For an aesthetically pleasing appearance of the product, use grade 1 or 2 material
The design of the chair should match the style of the living space
How to do it?
Material cutting
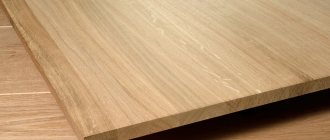
The main advantage of this material is its easy workability. Smooth sheets are easy to saw, sand, and join. There are a number of recommendations that will allow you to get a much better result:
- Before cutting with household saws, you can stick thick masking tape or screw thin plywood onto the cutting line. The saw teeth are capable of chipping wood fibers, and the cut will be “ragged.” If the fibers are pressed, the cut will be clear, the fibers will not chip;
- Marking lines should be as thin as possible. You can use a marking cord or a finely sharpened pencil. The cut is made so that the line remains visible from the side of the finished part;
- If you have a ready-made project, it is better to cut the plywood on a sawing machine in a specialized company. When designing, you can think about how the parts will be cut out - this will save the usable area of the sheets, and will also allow you to avoid troubles when purchasing, when you have to buy a whole sheet for the sake of a small shelf;
- Tenon or miter joints can be sawed either manually or using CNC machines. Inquire about the presence of enterprises with such equipment; cutting on such a machine will improve the accuracy of the part and make any curved cuts;
- the ends after cutting can be sanded, rounding the edges, or processed with a manual milling machine if desired;
- in places of future fasteners on thick parts, you can make “plugs” from wood or anchor compounds. A place in the end is drilled out, a soft dowel lubricated with glue is hammered in, or liquid polyurethane anchor compound is poured. The hole should not exceed 1/3 of the thickness of the plywood. This technique will increase the strength of the perpendicular joint; it will be possible to put a larger load on the shelf.
Assembly
Having a detailed drawing will make this stage much easier - you can only keep simple dimensions and parameters in your head .
Before assembly, you should lay out the parts on the floor and sign them with self-adhesive paper and a felt-tip pen.
As a rule, assembly begins from the main perimeter - load-bearing walls, ceiling and bottom. If there are several walls, be sure to assemble them at once. The help of a partner, clamps, and a jig for adding holes will help make assembly easier.
After assembling the perimeter, be sure to check the perpendicularity of the surfaces; if it is rectangular, you can check the diagonals. We secure it with temporary bevels on the back side.
We “clog” the structure with shelves and nests for cupboards. After this, we attach the back wall - it will give shear rigidity.
We put the cabinet in place, assemble the cabinets, shelves, hang the fronts and other planned fittings - mirrors, hooks, handles, legs, plugs.
Important . The cabinet should stand level, not swing on its legs, and the doors should open and close easily.
Finishing
To finish the cabinet, you will have to disassemble it again - remove drawers, fronts, hooks, mirrors and shelves.
Surfaces are sanded manually with sandpaper or sanding machines. It is better to do this in several stages, reducing the abrasive grain by 50%: No. 180 - No. 240 - No. 320. The movements of the sandpaper when sanding by hand should follow the grain of the wood - this way, scratches from accidentally trapped grains of sand and coarse abrasive are less noticeable.
Plywood with thick face veneer can be fired or wire brushed. This will add a vintage feel, making the coating “older” and more prominent. This treatment is suitable for finishing hardwood veneer - oak, ash, hornbeam, birch.
The smooth surface of plywood can be coated with various coloring compounds:
- oil-wax .
Gives a natural look and withstands tinting. Not suitable for saturated colors, used in designs that preserve the appearance of wood. The oil impregnates the top layer of wood, protects it from moisture, but the wood itself will absorb mechanical loads (scratches, abrasions). It is practically odorless and can be used when working “on the balcony” or in an apartment. Easy to apply and rub in with a rag. It is important to know that it is better to burn rags after oil, otherwise they can spontaneously ignite at any moment; - tinting + varnish . Suitable for “glazing” wood while maintaining its natural appearance. It is better to use tinting based on solvents with a high dry residue - nitrobes. They give a uniform, rich color, do not raise the pile, and are easy to apply. Minus - pungent odor during application, if there is no workshop;
- opaque enamels for wood .
They create a protective film that completely covers the grain of the wood. There are different types of materials that differ in properties and application technology. Oil-based pentaphthalic paints are popular, but they are short-lived. For furniture, it is better to use nitro enamels or acrylic varnishes - they are absorbed into the upper layers of wood and do not “snap off” over time. Impregnation will help reduce paint consumption - impregnation of plywood with inexpensive compatible bases (primer, drying oil, oily solvents); - combined options . Using masking tape, you can finish unpresentable ends with opaque paint, and treat beautiful veneer surfaces, for example, with oil or clear varnish. The “game” of imagination when using different colors adds uniqueness to the product.
Types and features of models
The strength characteristics of the material make it possible to make chairs from plywood for adults and children, to develop a lightweight and comfortable design for the garden, kitchen, garage, and fishing. The projects and drawings of the following models are in greatest demand:
- Traditional chairs-stools that have a place in any apartment or country house. A small number of parts, smooth straight lines of individual elements allow you to make such a chair with a minimum set of hand or power tools.
- A folding chair made of plywood can always be taken to the dacha or when going outdoors, because it will not take up much space in the trunk, or even when stored in the pantry. Compared to a stool, the design is more complex, but it can easily be implemented even by a novice craftsman.
- Transformable chairs are multifunctional and replace several household items, for example, a high chair for feeding a child and a full-fledged high chair with a separate table. They can have a folding or prefabricated design.
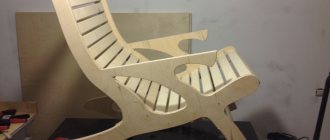
- A special direction is designer chairs and plywood armchairs. They are distinguished by the presence of parts with complex shapes and curves, more advanced and expensive methods of finishing and decoration. It is recommended to take on such projects only if you have experience; it is better to give preference to simpler options as your first job.
This is not a complete list of models, especially since many craftsmen prefer to make furniture themselves. It is worth noting that this exciting activity has a number of advantages:
- the ability to make a unique piece of furniture that meets all the parameters of the user’s needs;
- cost savings, since the cost of necessary materials is much lower than the cost of finished furniture;
- an invaluable experience that will definitely come in handy in life.
An original hand-made plywood chair can be an excellent gift for family members or friends.
Stool
Folding chair
Transformer
Designer chair
Armchair
Decoration
After painting, the furniture is assembled and installed in place. The use of decors - patina, overlay elements, panels, metal corners - will help to give a complete appearance.
Most often, the appearance is spoiled by multilayer ends ; they can be sealed using U-shaped profiles made of plastic or aluminum, self-adhesive melamine tape with a wood pattern, or paint.
If you are considering making cabinets from other materials, we recommend considering furniture board, chipboard, plasterboard and cardboard.
General information
Making plywood furniture is not as difficult as many might think. Of course, certain skills in working with tools are needed, but they can be acquired in the process of making wooden furniture with your own hands. The only thing is to start with simple designs, so the chair is an excellent option for a beginner.
It must be said that a beautiful plywood chair, made independently, will perform not only a practical function, but also a decorative one. And if you also make a table in the same style, you will get a set of furniture that can decorate the interior of a country house or even an apartment.
Another argument in favor of making plywood furniture yourself is that this work does not require a workshop with a large number of woodworking machines. You can get by with household tools such as a jigsaw and an electric drill. In addition, it is advisable to have a router and a grinder.
Even if you have to buy these tools, they will quickly pay for themselves, since the price of good furniture is very high these days.
Advice! To give plywood products a more attractive look, they can be decorated with saw-cut carvings made with a hand jigsaw.
Children's plywood high chair project
Photo
Perhaps the following photos will give you a couple more ideas for designing the final result
Buying a stool
On the other hand, there are quite a lot of interesting solutions on the market, some of which are designer ones. At some stores like IKEA, you can look for collapsible versions of plywood stools.
Moreover, many retail chains offer a choice not only of stools, but also of chairs that were made with an unusual design, thanks to which even plywood furniture is very durable and reliable.
Some stools are sold in sets, which is important for people who assemble interiors in the same style.
Small fishing chair
A chair for fishing or for picnics is the simplest product with which it is recommended for a person without experience to start making homemade furniture. It is necessary to cut two supports in accordance with the diagram. Connect them together using the existing grooves. Attach strong fabric to the top edges of the supports.
The chair is ready, and due to the special shape of the grooves it will fold, so when delivered to the river bank it will not take up much space.
Decorative finishing
- Take the smooth profile molding and cut it into 10 pieces so that each piece fits the sides of the cabinet. That is, you should get 4 planks 152 cm long, and 6 planks 48 cm long.
- Attach the molding to the cabinet along the perimeter of the sides using glue or liquid nails.
Decorative moldings on the side - Use the same method to attach the molding to the top and bottom of the face.
- To securely fix the parts, use clamps.
- Strengthen the grip with screws.
- Take decorative molding, cut it to size, and attach it to the outside around the perimeter of the cabinet lid using glue and screws.
- If desired, you can also decorate the bottom of the cabinet.
Bottom design is not necessary
Decorative molding is an optional element that you can do without or choose a different design.
Preparatory stage
Making a stool from plywood is not at all difficult, especially if there are a large number of examples and drawings on the Internet. But for everything to go smoothly and fairly quickly, before starting work you need to prepare tools and materials:
- plywood (one sheet will be enough);
Preparation of tools and materials
- carpentry corner;
- a simple pencil or marker for making marks;
- jigsaw or hand saw;
- a set of sandpaper with different degrees of grain;
- screwdriver and set of screws;
- wood glue;
- foam rubber and upholstery fabric (if the seat of the stool is soft);
- special construction stapler;
- wood varnish and brush.
Plywood
On a note! It is not necessary to use foam rubber and upholstery fabric, because the seat of the stool can be hard. First of all, a hard surface is required for furniture that is intended for household purposes.
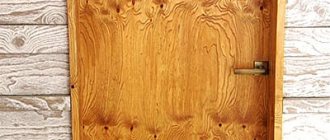
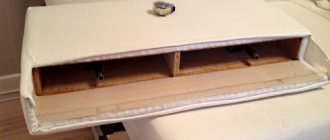
Back wall
Take a sheet of thin plywood (12 mm), cut it to fit the back of your workpiece. Attach it to the frame.
Fastening the back wall with a stapler
Check the perpendicularity of the surfaces - the frame should be rectangular, without bevels or shifts. It is better to do this during installation, measuring the diagonals: they should be equal.
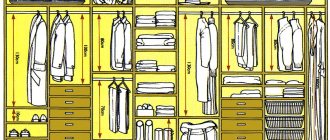
Sliding wardrobe from toly23
Forum member toly23 decided to get a wardrobe instead of a formal cabinet. After monitoring the market, my wife and I came to the conclusion that it was better to make the cabinet ourselves. The sketch was drawn by my wife, the design is complicated: not only shelves and a hanger for outerwear, but also several drawers of different sizes. To avoid having to redo it, toly23 calculated all the dimensions and selected the fittings taking into account the gap under the door system.
toly23 FORUMHOUSE Member
I specifically looked for handles (measured by height) that were low and didn’t even catch when closing the mirrored door. The drawer in the right section is a pull-out drawer for bedding, it pulls out perfectly and doesn’t get caught in the doors. I found a calculation of doors for cabinets on the Internet, and I managed to make everything myself.
The cabinet is full - with a base, sides and top, with three doors, the middle one is mirrored, the side one slides in, as the child loves to frolic with the ball. Unlike the previous case, the parts were cut out independently, and improvised tools, clamps and a glass cutter were used for direct cutting.
The forum member ordered the doors from a furniture company, with an aluminum frame. The total cost was around 18 thousand. If you look at catalogs of ready-made models with similar functionality, the savings become obvious.
toly23 began the step-by-step assembly with the frame - first the frame and the top shelf, then the vertical racks and shelves in the compartments, installation of the hanging rod, assembly of the drawers. The final stage was the installation of a door system with a middle mirror door, which was carried out after the installation of the cabinet in the nursery.
Petrovich 32 also made itself a sliding wardrobe of a similar design. It further complicated the task - it also has a mezzanine compartment that can be closed separately from the main compartment. The product has successfully passed the strength test for the sixth year without any complaints.
Decor options
The final finishing, which gives the product a complete look, is carried out before the furniture is assembled into a single structure. However, this should be done only after adjusting all the elements, because having remade them, the master will be faced with the need to re-decorate. Particular attention must be paid to sanding the edge parts remaining from the jigsaw. The main fabric is brought to P600 grit.
To apply varnish, you must first coat the plywood with stain or a special impregnation that adds moisture resistance and prevents the material from drying out. Paint is rarely used, mainly for children's furniture. Products for adults are coated with wear-resistant varnish as standard.
An additional decoration for a plywood chair can be a designer pattern that matches the interior of the room. If you have stencils (or talent), you can draw a cartoon character, an ornament, or landscapes on a stool. An optional, but stylish and functional element will be the piping along the edge of the soft seat, giving the product a finished look.
Making home furniture yourself requires at least basic skills and abilities. But making a chair from plywood with your own hands is not difficult, you just need to familiarize yourself with the production technology and the requirements for materials. Such a responsible approach will give the highest quality results.
What you will need
- 3 sheets of plywood 19 mm thick;
- 1 sheet of plywood 12 mm thick;
- 5 boards measuring 2.5x7.5x20.3 cm;
- 6 moldings with a smooth profile, 1 with an ornament, 20 cm wide;
- 4 decorative legs;
- 4 bars measuring 5x15 cm (for legs);
- 6 door hinges;
- 2 magnetic closers;
- 2 door handles;
- a circular saw;
- drill;
- jig for corner structures and hidden fasteners;
- fasteners;
- wood glue;
- furniture corners;
- tape measure, long metal ruler, squares.
Not every type of fastener is suitable for plywood. It is recommended to use glue or corners more often. For lightly loaded areas, screws and nails are suitable.